|
||||||||||||||||||||||||||||
|
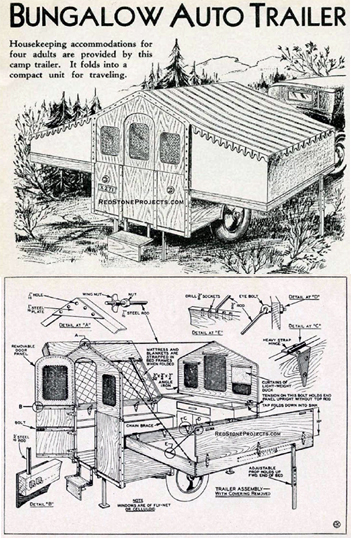
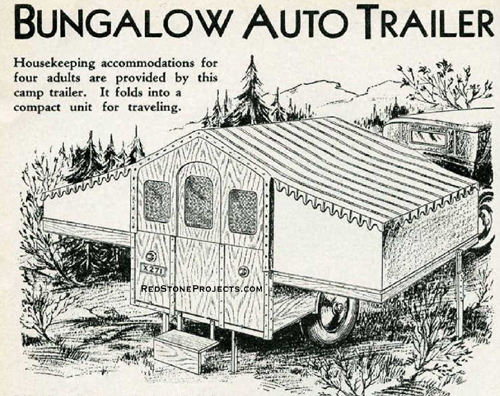
All Orders Processed on a Secure Server Build a Vintage Folding Tent Trailer Lightweight Pop Up Camping Trailer Plans
UNDOUBTEDLY the neatest and most convenient way to "autocamp" is with a self-contained, built-in trailer. A number of excellent camp trailers are offered on the market, and are commended for the consideration of anyone planning an extended camping trip. But there are those whose pocketbook will not stand even the nominal cost of a readymade trailer; and there are legions of amateur builders who find keener joy in putting to practical use creations of their own handicraft. To these, this article on how to build a bungalow trailer will be of particular interest. The cost of building this pop up trailer is not excessive; no more than the cost of a complete, reasonably priced camping outfit with tent, etc. Its advantages over the running board camping outfit are manifold. Tent Trailer Folds Up for Travel
First, the members of the camping party are not packed in like sardines with the camping paraphernalia. No ungainly parcels are lashed to the car to chafe the paint work. The beds are always off the ground; one does not have ticks and crawly things for bedfellows. When passing through cities with points of special interest, the trailer can be checked at a parking station, leaving the car free for side trips. And, above all, the bungalow trailer offers home like conveniences that cannot be had by tent camping. It is a mistaken idea to assume that a trailer materially impedes traveling. It is a fundamental engineering law that more weight can be hauled than can be carried by a tractive machine. No doubt an automobile is put to more undue strain carrying a 500-pound camping outfit, than by hauling a 1,000-pound trailer. And, too, if the camper trailer is low built, and is hooked up close to the towing car, the official speed limit of any state can be maintained without undue effort. The only time this light weight trailer will make its presence felt is on steep grades, when a change to lower gear will have to be made a little sooner. But makers put gears in the gearbox for just that purpose. The cost of building this bungalow trailer will depend somewhat upon the builder's shopping acumen at secondhand shops. The primary unit that enters into the construction is the front axle assembly and part of the frame from the chassis of a junked car. Scores of these are available for a song at any automobile graveyard. Various sizes of angle iron are used. Often this can be picked up cheaply at places dealing in second hand building material. Plywood is used extensively. Water stained or slightly damaged plywood can often be had at lumber yards at greatly reduced price, but even if all new material is used, except the axle, wheels, etc., the cost will not exceed $40.00. The biggest item that enters into the construction is one's time. Bungalow Camping Trailer
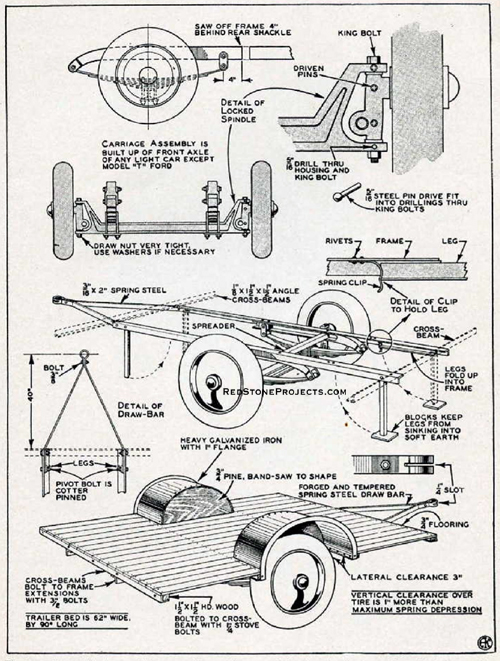
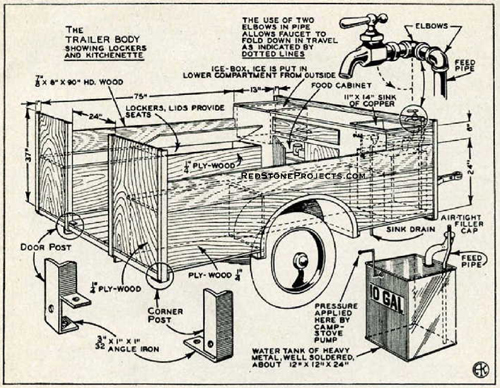
The first consideration of the DIY trailer builder is the selection of the front axle assembly. The style shown has semi-elliptical springs. Axles fitted with transverse springs, as the Model T Ford, are not suitable. Axles with cantilever type springs, as old model Chevrolets, are not desirable. Many light cars have the semi-elliptical. Points to consider in the selection are: Low hung frame, reasonably well-fitting shackle bolts, good wheel bearings and wheels fitted with a common size small tire. It is highly desirable to have the same size tires on the trailer as on one's car. The car spares will then do for the trailer in case of a puncture. Sloppy king bolts and bushings are not objectionable; the axle will be made rigid at this point. After one has found the axle he wants, and made a dicker with the junk man, the frame is cut through with a hacksaw 4 in. back of the shackle bolt, and the assembly hauled home. The next operation is to lock the wheel axles rigidly to the axle proper. One of the drawings shows how this is done. Invariably the king bolts are too hard to drill and the temper must be drawn first. So the bolts are withdrawn and heated to cherry red in a fire. They are then covered with ashes and permitted to cool down slowly. After replacing, the bottom nut is drawn up as tightly as possible. Then 5/16 in. holes are drilled through the stub axle and the axle yokes, and tight-fitting steel pins are driven in. Of course, the wheels should have been lined up first. A 1/4-in. toe in is permissible. After the axle has been made rigid, all steering arms and rods can be removed. Construction work now begins in earnest. Two lengths of 1/8" x 2" x 2"x 90" angle iron are bolted to the short section of the original car frame. Three flathead machine screws are used on each side. The heads are counter-sunk, and the nuts should be riveted over after drawing tightly. 3/32" x 1 1/2" x 1 1/2" angle iron is used for the legs, which fold up into the frame and are held with spring clips. Several laminations of old phonograph motor spring will make these clips. The drawbar is now made: 3/16" x 2" spring steel stock is used here. It is best, perhaps to have a blacksmith, or a shop specializing in auto springs, shape this drawbar. Note that the bar terminates in a slotted loop, which will permit quick attachment to the bar of the towing car. One of the leg bolt holes can be used for the drawbar. A second bolt, however, is necessary. The nuts of these bolts too, should be riveted over. Now turn to the drawing showing the flooring in place. The cross stretchers are four lengths of 1/8" x 1 1/2" x 1 1/2" x 62" angle iron with a square strip of hardwood bolted into the angle. The purpose of the wood is to provide stock to which to nail the floor boards. The cross members are bolted to the main stretchers and the nuts riveted over; 3/4" pine will serve as flooring. Afterward this can be covered with battleship linoleum if desired. The construction of the mud guards is quite obvious. Heavy galvanized iron is shaped over semicircular pieces of wood and screwed to it at close intervals. The galvanized iron should overlap the side about 1" This 1" overlap is then peened back to form a flare. Later this is screwed to the sidewall of the trailer. The clearance between the top of the tire and the mudguard should be about 1/2" more than the maximum depression of the car spring; 3" is ample for the lateral clearance. The width between the mudguards should be as great as possible. A 2" clearance between the sidewalls of the tires and the semicircular boards is sufficient under normal conditions, since tire chains will never be necessary on the trailer wheels. Plumbing System Occupies
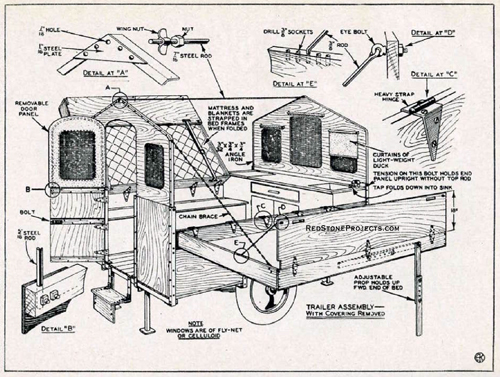
Another drawing shows some of the stages of the cabinet work. The perspective drawing shows the general layout and gives the salient dimensions. The insert drawings show hidden detail construction, so a long-winded discussion of all the detail work would be superfluous. The kitchenette at the rear is one of the main features. Incorporated in the space, 13" x 30" x 60" is an ice box; a drawer for kitchen utensils, cutlery, etc.; a cupboard for pots, pans, and foodstuffs; a 5" x 11" x 14" sink; and a ten-gallon water tank. The location of these are designated on the drawing. The ice box compartment should be lined with a heat insulating material; balsa wood, cork, asbestos, magnesium. The ice is put in through a door on the outside of the trailer. While the cooling effect is not as good with the ice below the foodstuffs, it will serve satisfactorily. The foodstuffs are accessible through a hinged lid on the top of the cabinet. The water tank, and its operation, is a rather unique feature. The tank fits in the lower, right-hand corner of the cabinet. The tank can be approximately 12" x 12" x 24". An auto junk yard will provide the gooseneck filler, which will permit the tank being filled from outside. The water pipe is fittedwith two elbows at the top so that the faucet can be turned down into the sink when the trailer is folded. Air pressure is applied to the tank by leading a copper tube to a convenient point on the front of the cabinet. A tire valve is soldered to the end of the pipe. The ordinary camp stove pump will contribute the pressure. Note that the corners and the door opening are reinforced with angle iron. And note particularly the 7/8" x 8" x 90" hardwood stretchers which give solidity to the body. Lockers with hinged lids are built over the wheel housings. These serve for storage space and for seats. The seats can be upholstered with thick felt and leather. Again, the junk yard will provide the leather. Look at the drawing showing how the folding beds are built in, and the erection of the front and back walls. Note how the beds are hinged to the hardwood stretcher. They are not symmetrical. To design the beds so that they will fold one on top of the other, it is necessary that one be higher than the other when opened. This means that they must be hinged differently. Detailed Arrangement of
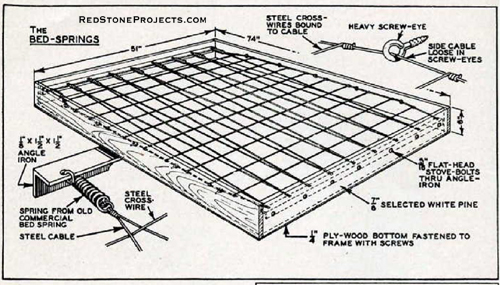
The upper section of the end walls is 5/16" plywood and is hinged to the lower, permanent section so as to fold inward. The edge of the plywood is faced with 3/32" x 3/4" x 3/4" angle iron. A 94" length of 7/16" galvanized iron round rod is stretched between the tops of the end walls, and later serves as a support for the canvas roof. Windows can be cut in the end walls and celluloid or fly netting with roll curtains used here. It is not well to use celluloid for the middle, rear window, as the camp stove will be located at this point and there is a fire hazard. Note that a chain supports the beds at one end. However, chain cannot be used satisfactorily at the other end, as the cabinet forms an offset, and the chain would not offer a direct support. A folding leg on the outside provides a solid support. Note that leg is adjustable to uneven ground. The construction of the folding side wall panels is obvious. The oblong holes in these panels are for straps. Now for the detail construction of the beds. A wooden frame is built of 7/8" x 6" pine. The overall dimensions of the frame are 6" x 51" x 74". 1/8" x 1 1/2" x 1 1/2" angle iron is bolted to the inside of each end piece, and light, steel cable is laced between the two. Stiff springs at one end provide the necessary tension. The extreme side lacings pass through screw eyes, and the lateral lacings are bound to the cable, not to the screw-eyes. A cotton, or kapok mattress is used on the spring mattress. Diagram Showing How
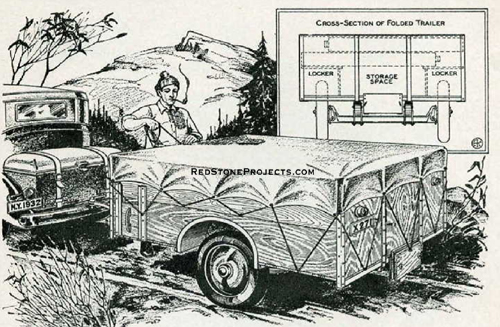
Study the drawing which shows the bungalow trailer partly folded, and illustrates particularly how the mattress and blankets are strapped in the bed frame before folding. The sketch shows, too, how roller curtains are used at the windows; the removable, canvas panel at the door; and the folding steps. One of the illustrations at the opening of this article shows the trailer completely folded. After the beds have been strapped and folded in place, the end walls fold down over them. A water-proof tarpaulin is lashed over the whole. The end elevation drawing shows the ample space beneath the beds in which to stow additional duffle, suitcases, and the like. Canvas Tarpaulin Covers
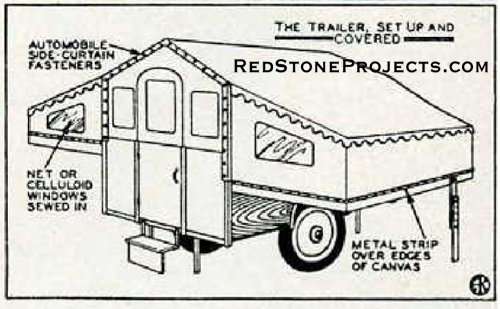
beds opened and ready for night's stop. One more drawing finishes the job. The canvas work is quite obvious. The pattern can readily be determined, and the sections basted together. Then a tent and awning shop can do the machine sewing. The cost of this is trivial. Note that the canvas is attached permanently to the bed frames, but is fastened to the end walls with patent fasteners. When folding up the trailer, the canvas is detached from the end walls and folds up with the beds. A scalloped, awningborder around the edges of the trailer enhances its appearance. There! Now we've got a "rolling home." Regarding the drawbar attachment. The design of automobiles is so variable that no fixed design can be offered. But if one will drive one's car to a shop specializing on spring bumpers, the mechanics there can quickly dope out a suitable means of attaching the drawbar. Maybe one can pick up the fittings at the old junkyard. Many old-time cars were not factory equipped with rear bumpers; these were attached as an accessory. The usual fitting consisted of an expanding wedge within the channel of the car frame. If these fittings can be obtained, it will be a simple job to hook up the drawbar to them. Completed, this trailer affords comfortable accommodation for four adults. At night, a curtain can be stretched down the middle of the bungalow to offer more privacy.
|