Free Shipping on All U.S. Orders
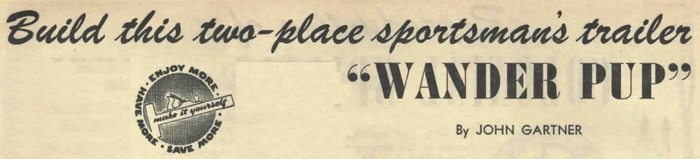
All Orders Processed on a Secure Server
Build a Lightweight Trailer for Two
Vintage 1950's Do It Yourself Plans

Restored PDF copy of vintage 1951 Wander Pup Trailer for Two Plans with enhanced and enlarged figures and illustrations and searchable text.
1951 Wander Pup Trailer Plans
Build a Sportsman's
Trailer for Two
Get these vintage trailer plans PDF Format
All Orders Processed
On a Secure Server
Price $12.95
Get a restored copy of these vintage Wander Pup Trailer Plans with 13 Pages of Enhanced and Enlarged Figures and Illustrations and Searchable Text.
We will email these plans, to the address provided with your payment, within 48 hours following receipt of your order.
|More Vintage Trailer Plans|
Popular Home Craft February 1951 cover, complete plans for a two-place sportman's trailer Wander Pup.
Build this two-place sportman's trailer
"Wander Pup"
Build this two-place sportman's trailer Wander Pup by John Gartner
WANDER PUP licks the one big bugaboo of trailers - excess weight. Completely equipped with beds, stove, water tank, and refrigerator it has a certified weight of only 700 lbs. Yet it has full headroom for a 6'2" man and excellent beds for two. It has an ample galley, cozy dinette, big clothes closet, plenty of drawers and storage space, lots of windows. Another good feature of these micro trailer plans is its high road clearance. There is a minimum of 10" below the drop floor because the wheels are individually sprung. 
Picture of the 10 foot travel trailer called Wander Pup.
A look at Photo 1 will show the details, as will Fig. 1 in the drawing. WANDER PUP is built on a small wheel setup built by the Knapp Manufacturing Co. of Newport Beach, California. Most of the plywood and hardware can be obtained locally but you will do well to buy the windows, vent, moulding, etc. from a trailer supply house. If none is available in your district the Trailer Coach Equipment Co. of 2140 American Ave, Long Beach 6, California, will fill mail orders.

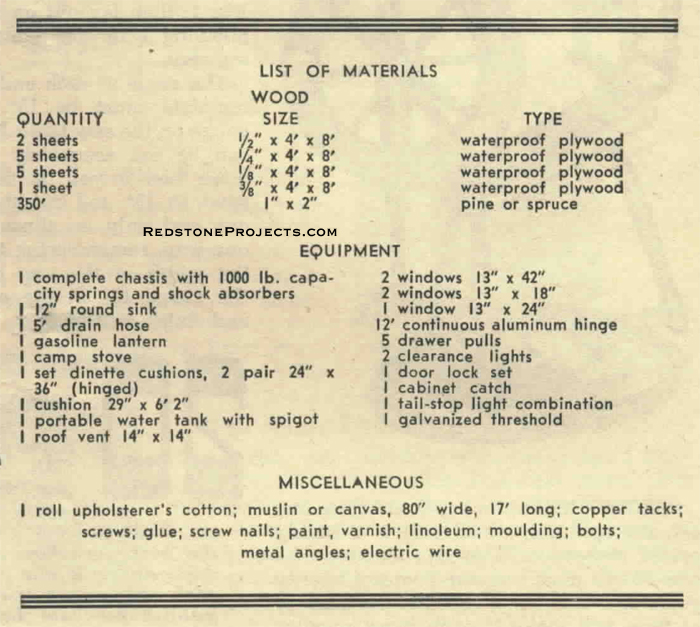
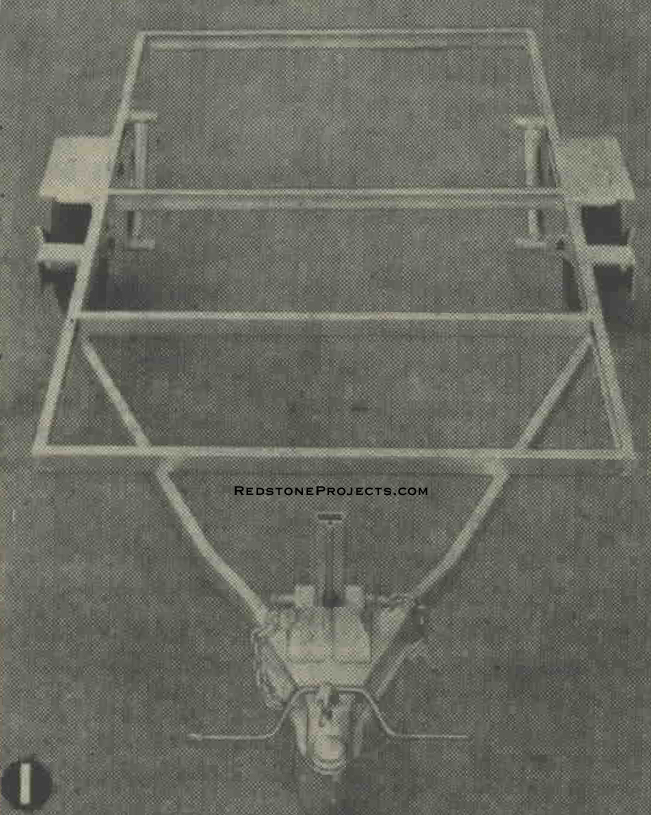
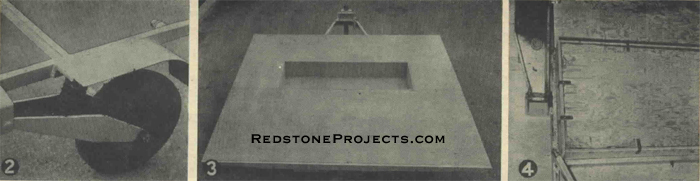
Begin by flooring the chassis. Take two pieces of 4' x 8' half-inch waterproof plywood and cut them to 6'4" in length.

Wander Pup bill of materials.
If you are using the Knapp chassis cut one 3'10" wide, the other 3'6" wide. Fit together as in Fig. 1 and saw out the drop floor section alongside the frame members. Bolt these pieces to the chassis with 1/4" stove bolts in a half dozen places (see Photo 3).
Underneath shot of the lower portion of the floor box.
Photo 4 is an underneath shot of the lower portion of the floor box. This drop floor is made of the end pieces cut from the 1/2" plywood floor ends. Use plenty of waterproof glue in building this recessed section. Bolt 1/2" x 2" angle iron braces at intervals of 12" or so to strengthen the floor.
Trailer drop floor is made of the end pieces cut from the 1/2 plywood floor ends.
When the floor is complete, take two pieces of  1" x 2" stock and glue and screw along each side under the floor. These stringers make the bases for fastening the sides.
Wander Pup trailer floor plan, right and left elevation, profile layout and roof and molding details with dimensions.
Next come the sides. Take two pieces of 4' x 8' quarter-inch waterproof plywood and place them on the garage floor edge to edge. Take a long straight edge and mark the pieces off into 12" squares. Refer to Fig. 2 for the pattern of the side. It can be varied somewhat but be sure and allow the greatest headroom in the section directly over the drop floor.

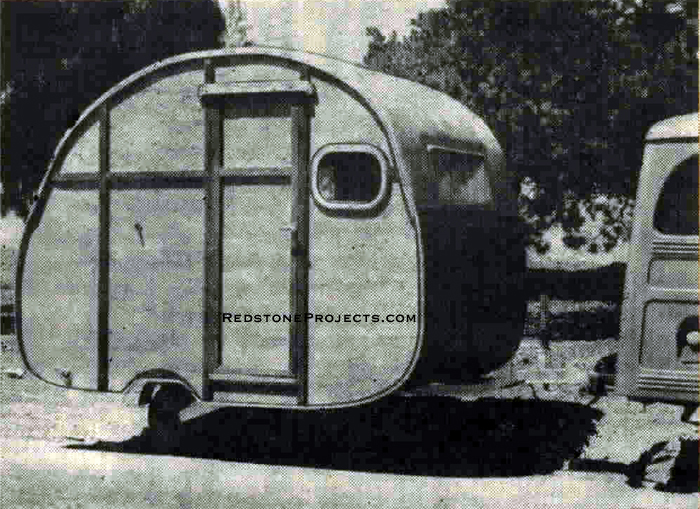
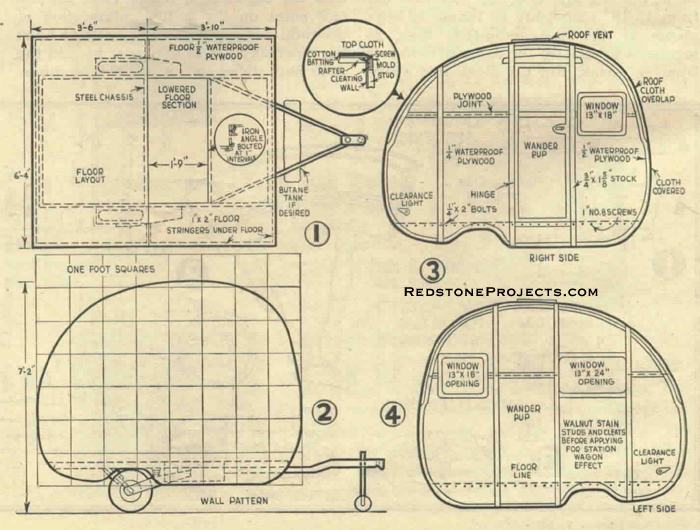
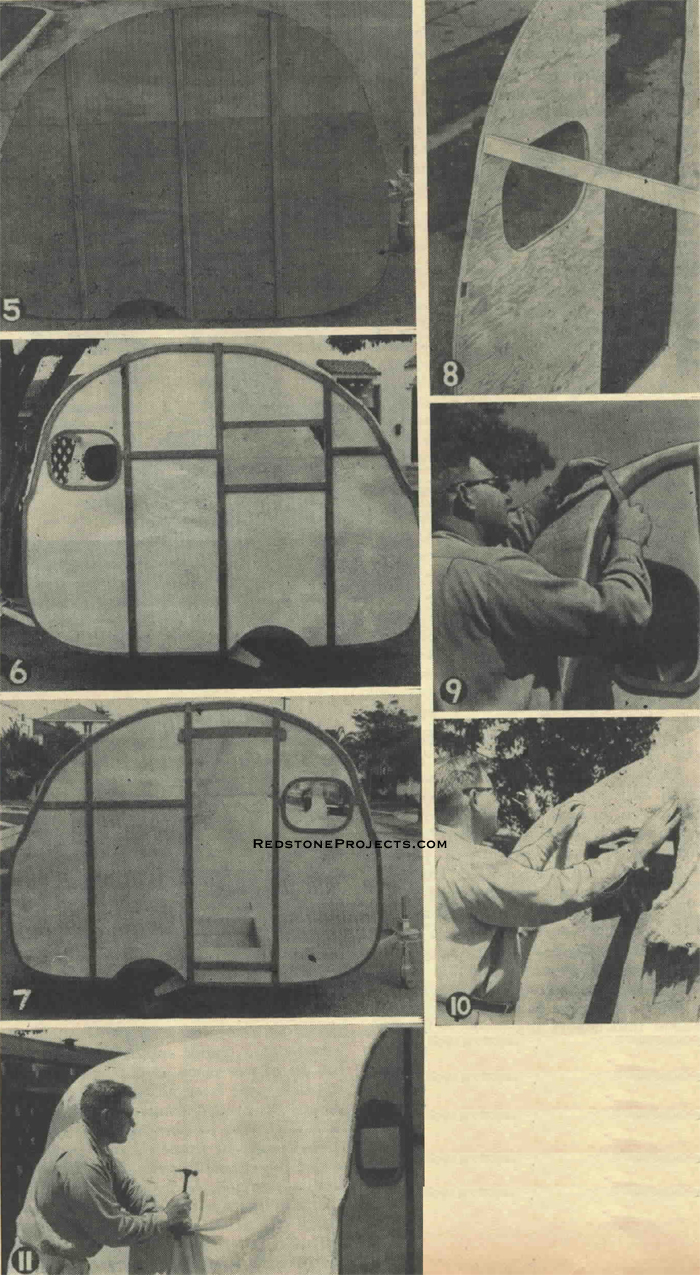
Sawout on this outline with a jig or band saw. Before doing anything else take this side as a pattern and mark out a duplicate on two more pieces of the 1/4" plywood. 

Before putting on the outside studs and cleating, decide whether you want the station wagon effect shown in the finished WANDER PUP photo. If you do, it is a lot easier if you stain either the studs and the cleats or the plywood before building up the side. The studs are made of more of the 1" x 2" stock. I used a standard material carried by most lumber yards which actually measures 3/4" x 1 5/8". Allow for the window openings as in Figs. 3 and 4. The edging is made of scrap pieces of the 1/2" plywood from the floor and is jigsawed out as shown in Figs. 3 and 4 and Photos 6 and 7. The top and bottom of each stud has to be tapered to match the 1/2" edging. 

Apply the canvas covering to the Wander Pup travel trailer.
After putting on the studs cut notches in the plywood sides as shown in Photo 5 to take the ends of the rafters made of the same stock as the studs. Check the number and position of the rafters by scaling Figs. 6 and 7. Be sure that the rafters carrying the roof vent and the fore and aft windows are in the right places. Also the bed risers and the crosspiece on which the table is hinged. Glue and screw the studs and the edging to the sides. Use No. 7 flat head screws 1" long in the studs and 3/4" long in the edging. Save the pieces cut from the doorway to make the door.
Plan and elevation view of the Wander Pup trailer showing the position of the door, windows, cabinets and living area.
A discrepancy will be noted in the front side windows in the drawings and in the photos. I used some windows I had on hand which no longer are available. The window shown in the drawings is better because it opens. 

Next mark the floor line on the inside face of the sides and temporarily affix two cleats to each side to hold it in position. Erect the sides in the right place in regard to the floor. Put plenty of waterproof glue on the frame stringers , and set up the sides again. Drill a 1/4" hole thru each stud and floor stringer and bolt with x 2" round head brass bolts. Use No. 8 1" round head brass screws between studs into the floor stringers. Now we're ready for the rafters. Cut eleven of them 6' 4 1/2" long out of the 1" x 2" stock. Check Photo 8 and the inset of Fig. 3 for the details of how these are fastened. Put glue in the notch, fit the rafter closely, and run a No. 7 1 1/2" flat head screw at an angle thru the rafter and into the edging. Countersink it in the rafter.

After placing the rafters fix some cross pieces of rafter stock to frame the fore and aft window and roof vent openings. A 3" screw thru the rafter and into the ends of the crosspieces will hold them securely.

Take a piece of 4' x 8' 1/8" plywood and glue and screw it to the cross stringer at the floor line. Its upper edge will come about half way up to the window opening. Place another short rafter between the side and window edge for fastening this piece. Place it so that the 1/2" plywood covers only the bottom half. The upper half is for fastening the next roof section. Glue and screw this piece to the side edges and the rafters with No. 5 5/8" flat head screws. Keep the screw heads in as far as possible from the outside edge to allow for rounding off the corners later.

When this piece is fitted saw out the section that covers the lower half of the window opening. Then fit another piece of the 1/8" plywood above the one already placed. This will have to be trimmed to the middle line of the rafter bordering the roof vent. Now fit the two similar pieces at the other end. On top fill in on each side of the vent with a piece of the 1/8" plywood and the roof is finished.

Next take a drawshave and a coarse wood rasp and round off the edges of the upper portion (Photo 9) . This doesn't have to be done, but it makes a neater job.

Get a small roll of upholsterer's cotton from an upholstery shop for padding and insulating the top. This feature isn't actually necessary either, but when the trailer is parked in the hot sun you'll be glad it's there.

Spread the top section with slow-drying glue and cover it with the cotton as shown in Photo 10. The muslin roofing covers not only the top section but the entire ends as well. The builder has found that 'exposed plywood when bent will check and deteriorate long before straight sections. Stretch and tack the cloth over the entire roof and ends using small copper tacks. This material is known in the trailer trade as cast iron muslin and can be bought at a trailer supply store. It need not be in one piece as the waterproofing solution used later will take care of any seams. On the front and rear sections the material must be cemented with water-proof canvas or linoleum cement. Do the whole job carefully so that a smooth surface is obtained. At the window and vent openings place most of the tacks on the inside face of the framing (see Photo 11). 

The door comes next. Take the two pieces cut when making the sides and frame them on the outside with more of the 1" x 2" stock. Trim the door so there is a 1/2" margin on all four sides. Hinge with a piece of continuous hinge. For door stops take some more of the 1" x 2" stock and some 1" wide strips of 1/4" plywood. Tack the plywood on first around the inside of the door opening. A standard trailer supply door lock completes this operation.

Aluminum windows obtained from a trailer house are used in WANDER PUP because of their all around quality and lightness. Use a waterproof sealer and screw them securely every two inches with 3/4" round head brass screws.

The top is waterproofed with a material called Topbrite. It is a heavy asphalt base aluminum paint and is obtainable from trailer supply stores. There are other brands of the same stuff which probably will work as well. This finish makes the top absolutely waterproof. 

The cloth covering each end is enameled whatever color you choose. The sides are finished with one coat of synthetic resin sealer, such as Firzite, and then coated with two or more coats of the best quality outside spar varnish.

After painting, mouldings make a complete job. I used two strips of bending oak 1/2" x 3/4" screwed over the cloth edge around the top section. The ends and lower edges are covered with an aluminum moulding 3/4" x 3/4" set in a waterproof sealer and fastened with oval head drive screws 1" long. A piece of 3/8" x 1" wood moulding is screwed over the joint between the aluminum painted top and the enameled ends extending from the lower edge of the fore and aft windows to each side. Small pieces of sheet aluminum can be cut out and trimmed to make a neat joint where the three mouldings meet about half way up on the ends of each side. 

Details of the Wander Pup's interior construction.
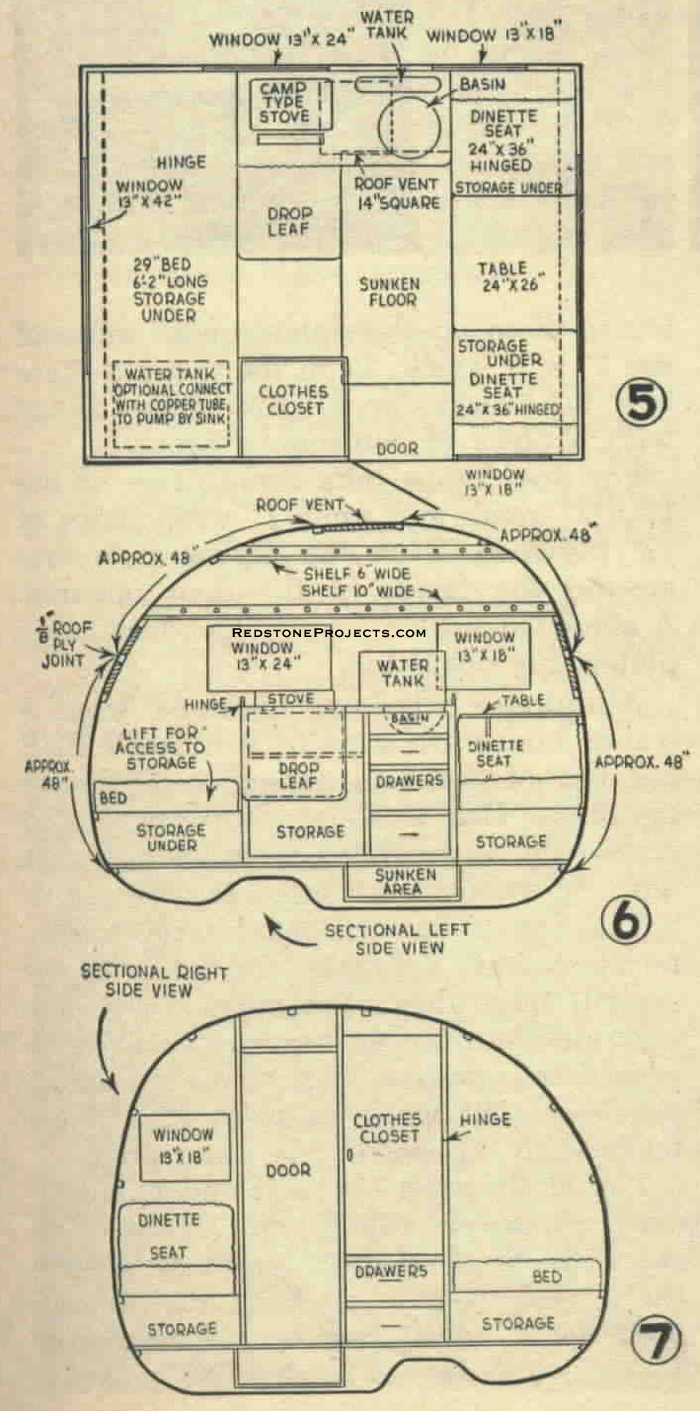
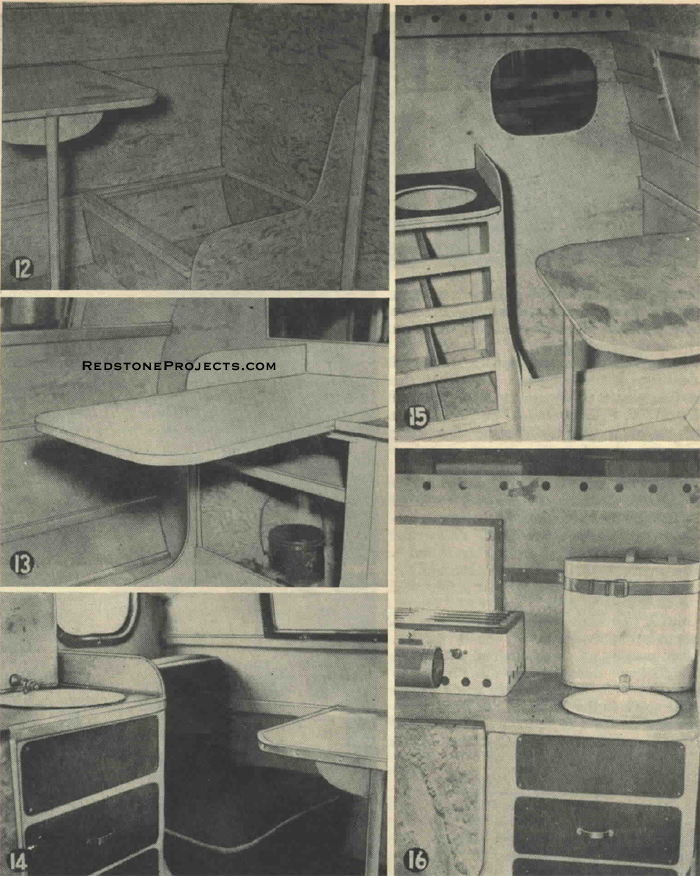
A study of Photos 13, 14, 15 and 16 will show the details of the interior construction. Quarter inch plywood and 1" x 2" framing is used.

Purchase a dinette cushion set and a rear bed cushion from a trailer supply house, rather than try to make your own; it is much more satisfactory. The dinette cushions are hinged and slide down quickly to make up into a good bed. Cushion dimensions are shown in Fig 5. The table is hinged on an end rafter so that it will swing up to the ceiling at night. The table leg also is hinged and is made as shown in Photo 12. The drop leaf pictured in the galley is necessary as kitchen work space is too limited without it.

Two drawers are shown below the clothes closet (Fig. 7) and three below the galley sink (Photos 14, 15 and 16). They are made of 1/2" plywood for the sides and bottom with 3/8" plywood for the front and back. Outside faces for the drawers that overlap for a good joint are of 1/4" plywood.

The sink is drained with a hose bent back against the wall and extending thru a hole in the floor.

The shelves over the galley are of 1/4" plywood. A gasoline hot plate makes a satisfactory stove. The water tank and round basin sink are standard trailer supply items. Interior finish used was a stain wax in a silver gray color. It is easy to apply, requires only one coat, and looks very nice. 

Save with Vintage Plan Deals
|See All Vintage Trailer Plans|
Any 2 Vintage Trailer Plans
$19.95 FREE Shipping
Select 2 Vintage Travel Trailer Plans


Any 3 Vintage Trailer Plans
$24.95 FREE Shipping
Select 3 Vintage Travel Trailer Plans
 
 
3

 
Any 4 Vintage Trailer Plans
$29.95 FREE Shipping
Select 4 Vintage Travel Trailer Plans


4
Any 6 Vintage Trailer Plans
$36.95 FREE Shipping
Select 6 Vintage Travel Trailer Plans


This modern chassis makes an excellent base for your teardrop trailer project, lightweight camping trailer, or vintage travel trailer build.
Teardrop Chassis Plans
Build a Teardrop Chassis
without Welding
eBook
PDF Format
Price $12.95
Learn more about these plans >>
Utility Chassis Plans
Build a Utility Trailer
without Welding
eBook PDF Format
Price $12.95
Lean more about these plans >>

Buy  Both
Build a Teardrop Trailer Chassis
and
Build a Utility Trailer
Together and Save 20% !
eBook
PDF Format
Price $19.95

RedStoneProjects.com Home
SAVE With Multi-Plans Deals!
Project Plans
Concealment End Table Plans
Quilt Rack Plans
Crossbow Plans
Catapult Plans
Craftsman Style Plans
Water Screw Plans
Tobacco Pipe Rack Plans
Shooting Sports Plans
Reloading Bench Plans
Closet Reloading Bench Plans
Brass Cleaning Bench Plans
Small Reloading Bench Plans
Corner Reloading Bench Plans
Two Sided Shooting Bench Plans
Nativity Stable Plans
Trailer Plans
No Weld Teardrop Trailer Chassis
No Weld Utility Trailer
Vintage Trailer Plans
Vintage Travel Trailer Plans Collection
16 Foot Canned Ham Vacation Trailer
Craftsman Hardside Folding Camper Trailer Plans
1947 Thousand Addresses Travel Trailer Plans
Bungalow Folding Tent Camper Trailer Plans
1937 Runlite Lightweight Travel Trailer Plans
1947 Treadrop Trailer for Two Plans
1935 Pullman Trailer Plans
1940 14 Foot Cabin Trailer Plans
1951 Lightweight Sportsman's Trailer
1956 18 Foot Family Vacation Trailer
1934 17 Foot House Trailer
DIY Pop Up Camper Trailer Plans
1960 Fold Up Trailer with Slide Out Plans
1953 Wild Goose Kamp Master Trailer Plans
1935 Jim Dandy Cabin Cruiser Trailer Plans
Vintage How To Build Trailers eBook
Hardside Pop-Up Camper Plans
Wanderbug Lightweight Vacation Trailer Plans
Streamline Family Vacation Trailer Plans
Tent On Wheels Folding Trailer Plans
Lil Guy Micro Camper Trailer Plans
Traveler Wood Framed Travel Trailer Plans
Vintage Roadside Chuck Wagon Trailer Plans
Pickup Truck Pop Up Camper Plans
Hardside Roof Top Pop Up Sleeper Plans
Low Profile Pickup Truck Camper Plans
Vintage Streamline Teardrop Trailer Plans
Vintage 1956 Camp Trailer Plans
Modern Conestoga Trailer Plans
1947 Trail Scout Camper Plans
Vintage Bolt Together Tent Trailer Plans
Vintage 1947 Wanderer Canned Ham Trailer Plans
Vintage Boat Plans
Sea Craft 25 Foot Cabin Cruiser Plans
21 Foot "Luxury" Shanty Boat Plans
20 Foot Budget Houseboat Plans
DIY Project Books
Build Three Working Model Catapults
Build Five Craftsman Style Tobacco Pipe Racks
Build a Reloading Bench and a Reloading Brass Cleaning and Sorting Bench
Vintage Trailer Mugs
Trailer Articles
Pulling a Motorcycle Trailer
Building a Motorcycle Trailer
DIY Tent Trailer
Build a Budget Tent Trailer
The Trailer Grows Up
Motorcycle Rallies
Americade Motorcycle Rally

 
Contact Us Privacy Policy Plans License