Free Shipping on All U.S. Orders
All Orders Processed on a Secure Server
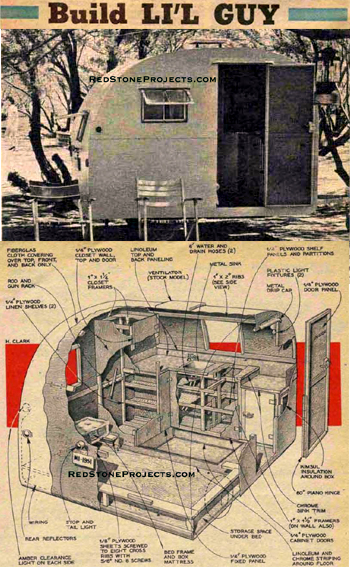
Lil Guy Micro Camper Trailer Plans
Build This Vintage Compact Travel Trailer
|
Lil Guy Micro Camper Trailer Plans
Build a Vintage Compact
Travel Trailer
 |
PDF Format |
|
|
All Orders Processed
On a Secure Server
|
Price $12.95
|
|
Get a restored copy of these vintage Lil Guy Micro
Camper Trailer Plans with 18 Pages of Enhanced and Enlarged Figures
and Illustrations and Searchable Text.
|
We will email these plans, to the address provided
with your payment, within 48 hours following receipt of your order.
|
|
|More
Vintage Trailer Plans|
|
|

|
|
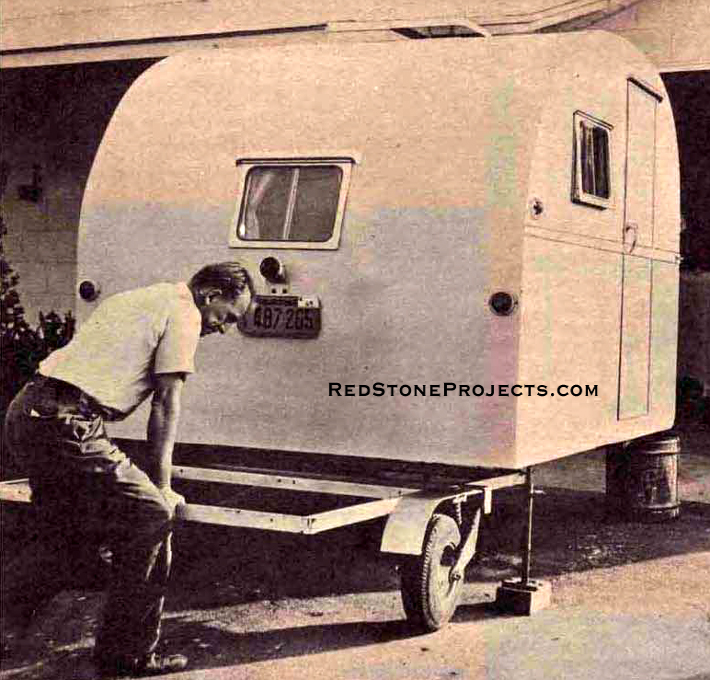
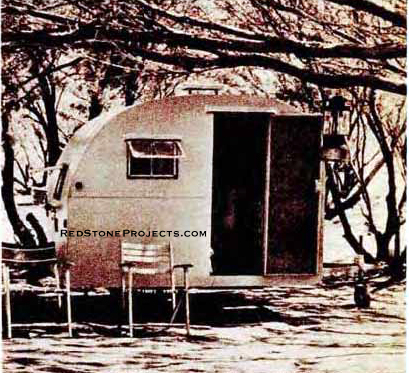
Hit the road this summer with Li'l Guy, an 8-ft micro
house trailer with everything - including a kitchen sink! Weight 780 lbs.
By Clinton R. Hull
|
| Li'l Guy was made because I could find no factory job
light enough, or one that would enter the average garage. Built with tools
that are in any handyman's shop, this trailer can really take a lot of
wear.
After 7,000 miles and exposure to desert sun and coastal
rain, Li'l Guy's Fiberglas plastic finish and plywood body show absolutely
no signs of deterioration. Every joint is fastened with Weldwood glue and
galvanized screws or bolts, except the cupboard frame, where glue and finishing
nails were used. Clearance and pilot holes were drilled for every screw
to prevent splitting.
Ample sleeping quarters are provided by a 46-in. box spring,
with extra pad. The base lifts easily for access to the storage space beneath.
A pair of folding "beach-back" rests convert the bed into a divan when
necessary. Our on-the-road table is a pair of large trays which I found
more practical than the originally planned dropleaf table hinged to the
wardrobe door.
Divided plastic plates, egg and food containers, aluminum
utensils, card table, folding camp stools and beach chairs comprise our
furniture. |
|
|
Bed frame runs width of trailer. The wardrobe
will occupy part of the space along the wall.
|
| Actually, the interior arrangement is one of personal
preference. The bed can be replaced by bed-dinette seats and drop table.
Two 27 or 30-in. bunks work well if an L-shaped sink-cupboard is built
in the center at one side, the wardrobe relocated and the ice box replaced
by a portable. |
|
|
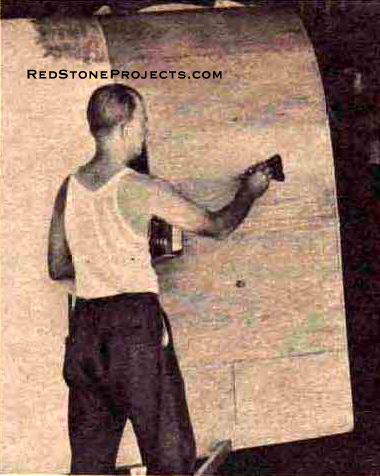
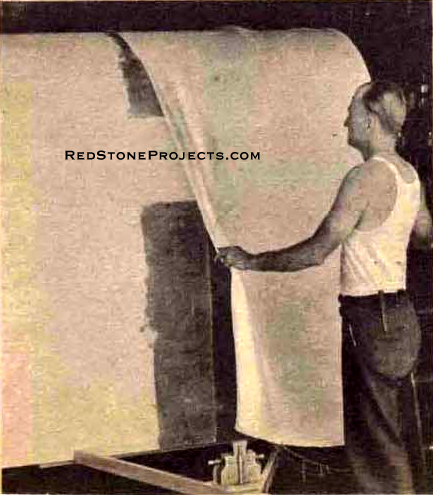
After applying coat of plastic to half of the
top, lay on Fiberglass cloth. pull out all the wrinkles.
|
| Waterproof casein glue is used in all joints of the underframe.
Now with this assembly set up and bolted together, be sure, before the
glue sets, to check the frame at each corner with a square. If necessary,
put clamps on the frame to hold it in the square position until the glue
is dry. |
 |
|
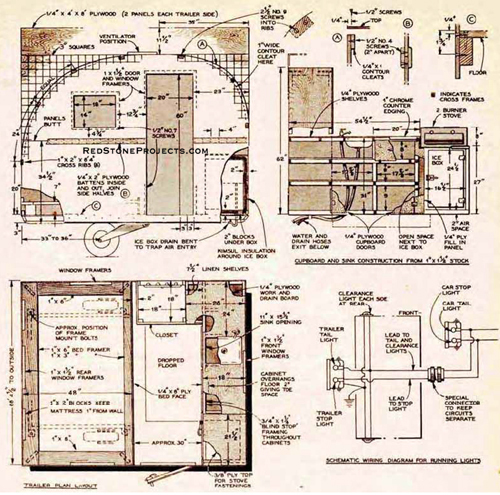
Figures 1, 2, 3, and 4 (Page 107)
|
Get a restored copy of these vintage Lil Guy Micro
Camper Trailer Plans with 18 Pages of Enhanced and Enlarged Figures
and Illustrations and Searchable Text.
All Orders Processed On a Secure Server
|
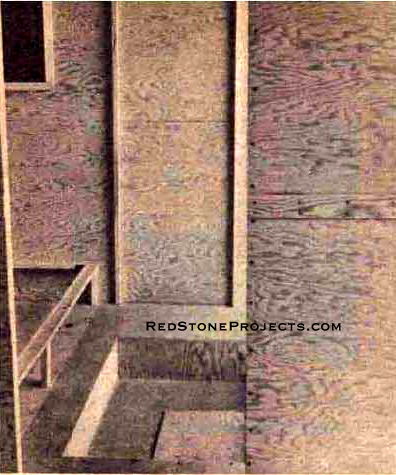
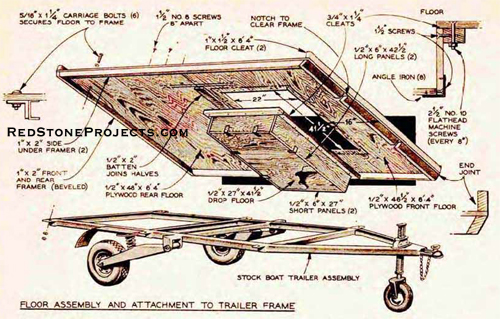
| Begin with the floor. Cut two 6 ft. 4 in. pieces from
the sheets of 1/2-in. plywood and cut 1 1/2 in. from the side of one. Place
side by side and attach them with the 1x2-in. side frames and 1 1/2-in.
No. 8 screws spaced about 8 in. apart. Bevel and fasten the end frames.
Be sure to pre-bore all screw holes.
Set the floor in place and with a pencil outline the trailer
frame and locate the six holes for fastening the floor to the trailer.
For proper balance the wheel axles should be approximately 33 to 36 in.
from the back end of the house body. If your trailer frame is too long,
shorten it to fit. Turn the floor over and glue a 2-in, batten under the
floor joint. Note that this piece rests between the cross members of the
trailer frame.
Lay out the dropped floor area. Bore 5/8-in. holes at
diagonal corners, and cut out the section with a keyhole saw. Smooth edges
with plane or sanding block. Cut 6-in. strips for the sides and ends from
the 1/2-in. scrap. These go around underneath the floor opening to form
a box.
Attach 3/4 x 1 1/4-in. strips all around the top of the
box with 1 1/2-in. screws and bolt to the floor with 2 1/2-in. No. 10 flathead
machine screws. Use 1/4-in. drill. Turn floor over and bolt to trailer.
Lay out and cut the curves of the body sides from 1/4-in.
plywood as indicated in the sketch on page 107. Use the first side as a
template for the second.
Scribe an inch-wide strip around the curve of the scrap
pieces. Move the pieces down onto the sides so the scribed line is just
at the edge of the curve. Fasten with a few screws then cut around the
line, using the curve of the side as a guide. These 1-in. strips reinforce
the edges and facilitate attachment of the ribs.
From one 1/4-in piece of scrap siding cut four 2-in. x
8-ft. battens. Clamp them together and bore two rows of 1/8-in. holes 4
in. apart and 1/2 in. each side of center. Round the edges on one side
of each with a sanding block, and put two aside. Lay the left-side sections
together and join them with one batten along the outside and 1/2-in. No.
4 screws. |
|
|
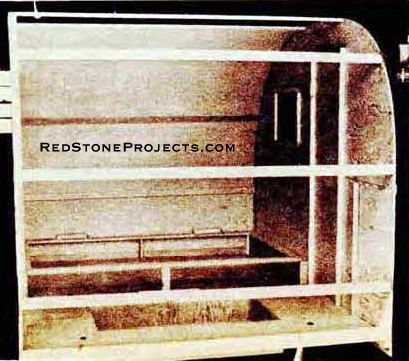
After floor assembly is complete, the 1/4-in.
plywood sides and all the ribs are put in place.
|
| Glue liberally, and repeat with the right-side sections.
Fasten temporary cleats 4 in. up from the inside lower edges of both side
panels. On the exterior surfaces draw two light pencil lines along the
length of the sides. Now bore two rows of 5/32-in. holes, one row 1/4 in.
below the pencil line, the other 1 3/4 in. below. Alternate holes so they
are 3 in. apart along the sides. (Diagram on page 107, detail C.)
With some assistance glue and set one side in place, resting
it on the blocks. Bore pilot holes into the under-frame through those in
the side. With a few 1-in. No. 7 screws the side will stand alone. Be sure
it is true and finish fastening it. Repeat with the other side. |
|
|
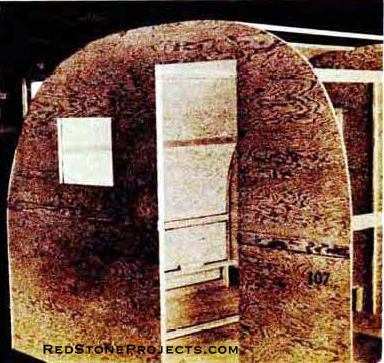
Door and window apertures are now cut and framed.
Note outside batten that joins side panels.
|
| Cut eight 6 ft. 4 in. top ribs from the 1x2-in. stock.
Beginning at the rear of the trailer and measuring around the contour of
the sides, locate the center of the first rib 20 in. above the floor surface.
Space the others 24 in apart, center to center.
As the top ribs are located glue the ends and drive an
8-penny finishing nail into the center of each end. At each rib, bore a
hole through the side and a 3/16-in. pilot hole into the rib 1/8 in. each
side of the nail and drive in two 2 1/2-in. No. 9 screws.
Fit the 1/4 x 1-in. curved reinforcing strips along the
edges of the sides between ribs. Bore 1/8-in. holes through them and fasten
with 1/2-in. No. 4 screws. |
 |
| Plane lightly around the curves of both sides to assure
smooth surfaces for the roof sections.
Now for the top. Cut four 6 ft. 4 1/2 in. pieces from
4-ft. x 8-ft. sheets. Bore 1/8-holes 1/4 in. from the ends of all four
pieces. On one piece place temporary cleats 4 in. from one edge, draw a
line and bore for No. 7 screws as you did the sides. Bore two rows of 1/8-in.
holes every 4 in. along the upper edge, one row 1/4 in., the other 1/2
in. from the edge, alternated so they are 2 in. apart to prevent splitting
the ribs. Sides of the other pieces are bored the same way.
Set the first sheet in place at the rear of the trailer.
Be sure the edges are flush with those of both sides. Apply some glue and
set the No. 7 screws in the under-frame. Glue the ribs and side edges also. |
|
Repeat the procedure with the other half.
The sides do not require cloth, but are covered with
enamel.
|
| Bend the sheet over and tack it to the second rib temporarily.
Be sure edges still match. These top sections square the trailer sides
and the edges must be true at all times.
Bore 1/16-in. pilot holes for all edge and rib screws
and use 5/8-in. No. 4 screws. Insert them every 6 in. along intermediate
ribs. Draw the edges down tight along sides and ribs. Work forward to complete
the roof. There will be a space left below the No. 8 rib. Fill with 1/8-in.
scrap plywood. Put the inside battens over the joints in the side sections.
Install the door frame and rear wardrobe uprights. Use
one of the windows and the ventilator as patterns and make frames for them
from 1x2-in. stock. Use 8-penny finishing nails and glue on corners. Locate
the frames on the inside walls, scribe the perimeters and cut the openings. |
|
The lifted mattress reveals ample storage room
beneath.
Panel protrudes 1 in. above mattress.
|
| Secure side window frames in place with No. 7 screws,
and the front and rear-window and ventilator frames with 5/8-in. No. 4
screws. Some ventilators require both inner and outer frames.
The bed frame is next. Fasten it to sides and rear with
No. 7 screws and glue. Cut an 8-in. x 6-ft. 4-in. piece of 3/4-in. plywood
and enclose the front of the bed frame, using No. 7 screws. The protruding
1 in. holds mattress in place. |
 |
|
Floor Assembly and Attachment to Trailer Frame
|
Get a restored copy of these vintage Lil Guy Micro
Camper Trailer Plans with 18 Pages of Enhanced and Enlarged Figures
and Illustrations and Searchable Text.
All Orders Processed On a Secure Server
|
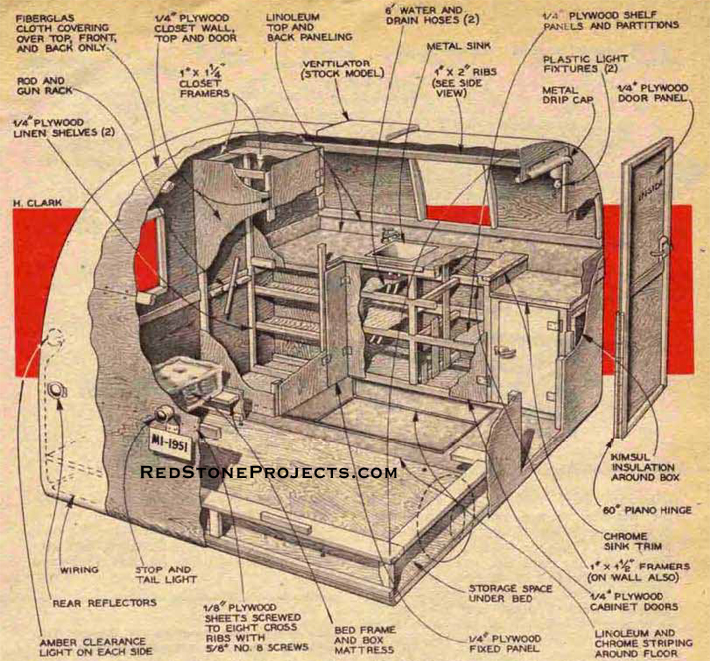
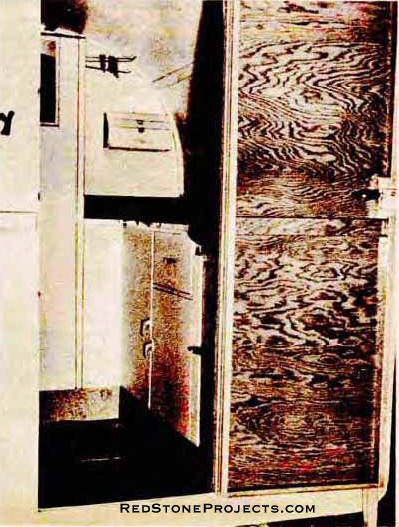
| Build cupboard framework from 3/4 x 1 1/4-in. blind stop.
Secure front and side ribs to sides and front as with the bed frame. Side
ribs (end of the cupboard) are cut 3/4 in. short so that the cupboard front
frames are attached to their ends. With partitions, shelves and ice box
placed, enclose the front of the 18-in. wardrobe at the left side with
1/8-in. scrap. |
|
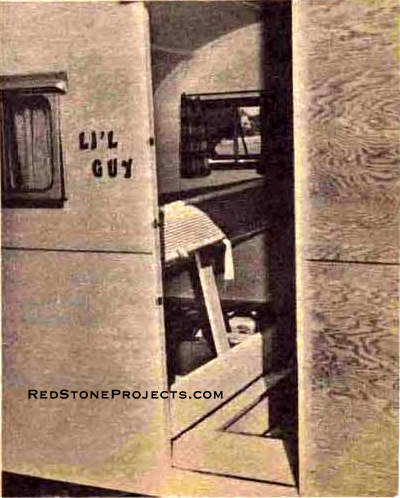
|
View through doors show ice box, dropped floor,
cupboard detail, sink and sufficient work space.
|
| Complete the wardrobe and linen shelves and install the
doors. The wardrobe and outer doors require frames to prevent warping.
Use a continuous piano hinge on the trailer door itself and hang temporarily
with three or four screws before cutting the T-bar aluminum weather strip
to fit. |
|
|
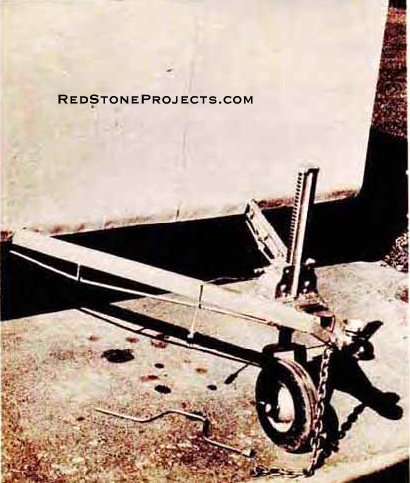
Front under-frame is notched to accept trailer
tongue. Note safety chain and connector plug.
|
| With the trailer in the shade, apply a coat of plastic
from the center of the top to the rear edge over a space slightly wider
than the Fiberglas cloth. Get some help and lay the cloth in place, center
to center. Pull wrinkles out, working both ways. Pull 1/2 in. over the
edges of the top in a straight line and tack to the sides every 2 in. Note
that no cloth is used on the sides |
|
|
After a day on the road Li'l Guy rests up - more
than 1,000 miles from the place it was constructed.
|
| Repeat with the rest of the cloth, one half of each side
at a time. Soak the over-lap areas until all air bubbles disappear before
applying the second cloth. Apply plastic to the end under-frames, tack
cloth ends and cut surplus.
Thin two quarts of plastic with a pint of acetone, and
work it into the cloth thoroughly. Apply a coat to the sides and door.
Roll the trailer into the hot sun. Turn it about as each area hardens.
Apply two more unthinned coats to the top, three to the sides and door.
Sand the final coat, apply a coat of flat primer and two coats of auto
enamel. |
|
|
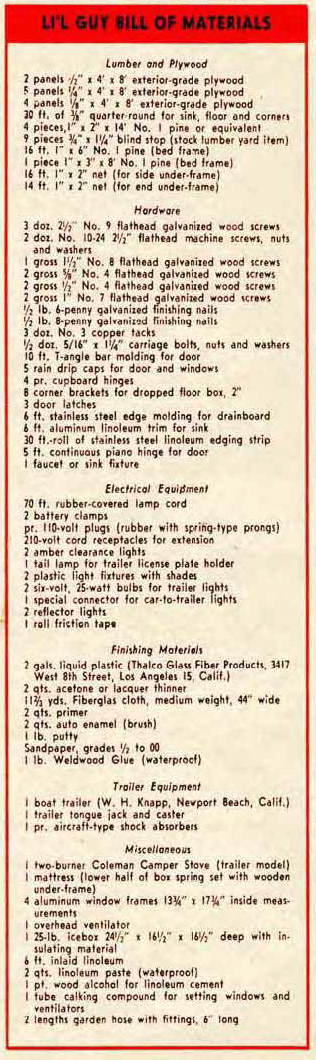
Li'l Guy Micro Canned Ham Trailer Bill of Materials
|
| Install windows, door, ventilator and rain drip caps.
Locate the lock so that the latch passes and engages the door frame. Strip
brass or Monet prevents chafing the wood. Cover cupboard with 1/4-in. plywood
and linoleum. Cover the floor and a few inches along walls and under stove
with linoleum.
Wire the trailer with rubber-covered lamp cord, using
insulated staples and special trailer lighting fixtures. Solder and tape
all joints. Instead of the usual entrance receptacle I use a regular plug,
hanging beneath the trailer. A canvas bag keeps it clean. I carry a 25-ft.
extension cord for camps where 115-volt current is available. For camping
I have 6-volt 25-watt lamps and a 10-ft. cord. Small battery clips on the
cord engage a direct wire from the battery and the car frame, completing
the circuit.
When the trailer body is to be removed occasionally keep
all wiring in the clear except the ground. Do not ground the 115-volt circuit.
The trailer tongue may be shortened If desired, but where a large boat
is carried the long tongue is best. |
Any 2 Vintage Trailer Plans
$19.95 FREE Shipping |
|
Select 2 Vintage Travel Trailer Plans
|
|
|