Free Shipping on All U.S. Orders
All Orders Processed on a Secure Server
Build a Vintage Canned Ham Trailer
16 Foot Vacation Camping Trailer
|
16 Foot Canned Ham Travel Trailer Plans
Build this Vintage 16 Foot Travel Camper Trailer
 |
PDF Format |
|
|
All Orders Processed
On a Secure Server
|
Price $12.95
|
|
Get a restored copy of these vintage Canned Ham Trailer
Plans with 18 Pages of Enhanced and Enlarged Figures and Illustrations and Searchable
Text.
|
We will email these plans, to the address provided
with your payment, within 48 hours following receipt of your order.
|
|
|More
Vintage Trailer Plans|
|
|

|
|
|
You can cut down on vacation costs
by building this sixteen-foot trailer.
It sleeps four, has a sink, gas range and refrigerator.
By a. Hamel and H. Sibley
|

|
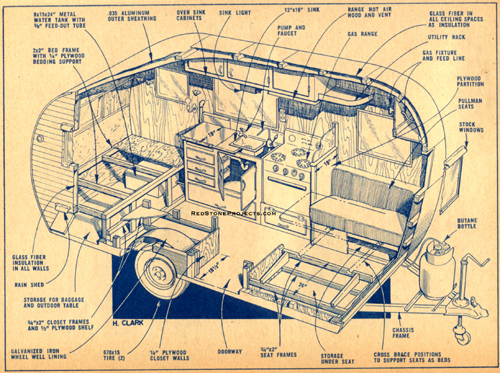
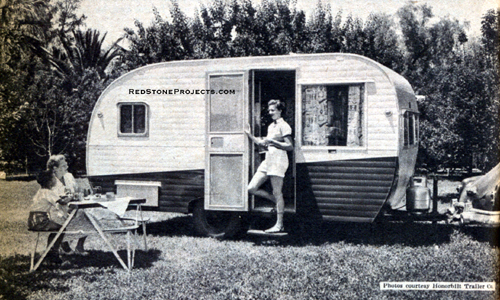
THIS "Canned Ham" trailer, designed and built by A. Hamel
of the Honorbilt Trailer Co., Lakeview, Calif., has made exceptionally
good use of space, sleeping four in a Pullman berth and a bed, with an
additional take down cot above the rear bed. Equipment includes an apartment
size butane gas range, combination ice-and-electric refrigerator, water
storage tank and hand pump, water and electric utility connections, Formica
sink top, clothes closet and three cabinets, with luggage space under the
bed. Many identical units have been tested for thousands of miles over
a long period, proving them easy to tow without sway.
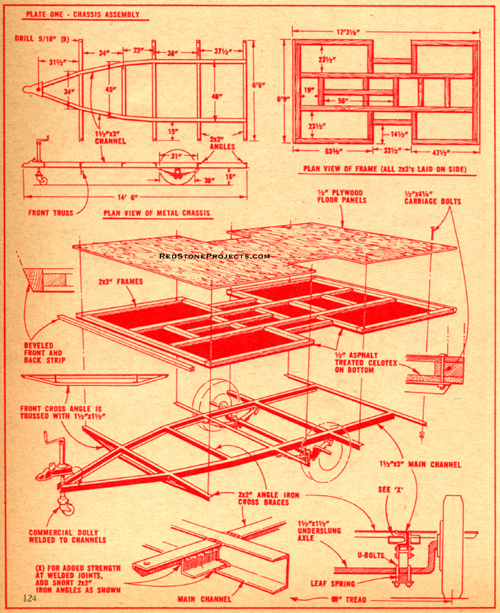
With an aluminum-sheathed body on the channel steel chassis
the center of gravity is kept low and a unique construction of the plywood
and pine framing makes for light weight without sacrifice of strength.
If you camp where utilities are not available light is provided from the
butane supply and water pumped to the sink by hand. Hinged windows plus
the large roof vent insure ample ventilation in addition to the screen
inner door.
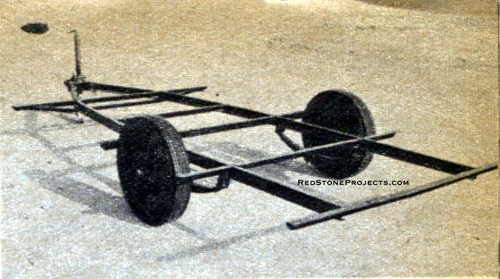
The three-inch channel steel chassis shown can be purchased
from Zeman Mfg. Co., El Monte, Calif. It is fitted with Goodrich 6.70x15
tubeless tires and electric brakes, as well as an adjustable front wheel,
making it very easy for one man to couple it to the towing car. The drop
axle hung under the springs is 1 1/2x1 1/2 in. solid square-section.
|
|
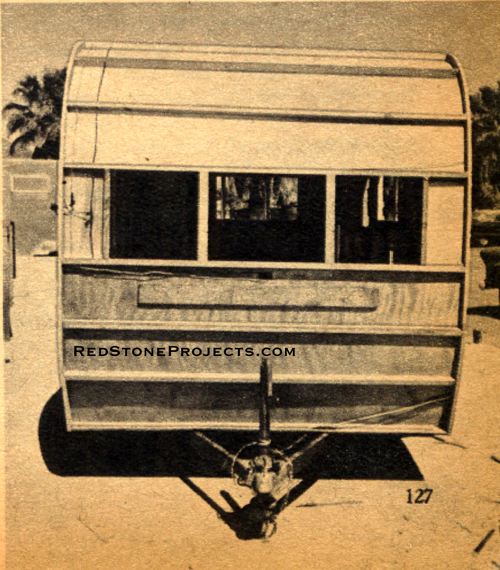
TRAILER rests on an all-steel chassis. Tires are
6.70x15. Front wheel is adjustable.
|
Note the neat welding assembly, bringing the angle bar
cross members flush with the channel frame. The front cross member is trussed
with an angle bar.

|
UNDERSIDE of the floor frame is shown above
with its covering of tar-treated Celotex.
|
The floor unit, which consists of a "sandwich" of 2x3 in.
framing between tar-treated insulation board on the bottom and 1/4-in.
plywood on top is bolted to the chassis.
It is mounted even with the forward cross member of the
chassis and extends beyond the rear cross member. The drawings and cross
section show how the wood frame is covered on the bottom with Celotex,
on the top with plywood. This "sandwich" is then bolted to the chassis
with eight 1/4-in. carriage bolts. The floor bolts and the bolts for the
side walls are offset so as not to interfere with each other. Tile-type
flooring is cemented to the plywood before the walls are installed. This,
of course, need not cover space under bed or cabinets if you wish to economize
on the material.
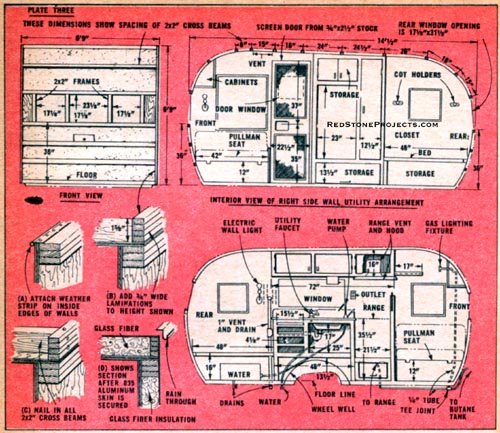
The side walls are made of 3/16-in. birch plywood reinforced
with laminated framing on the curved edges and solid members on the straight
portions. Profile of the sides with radii of the curves is shown in the
drawing.
The profile is laid out on a flat surface with a rough wooden
form of fixed blocks to hold the laminated and straight members in place
until the plywood is nailed on.
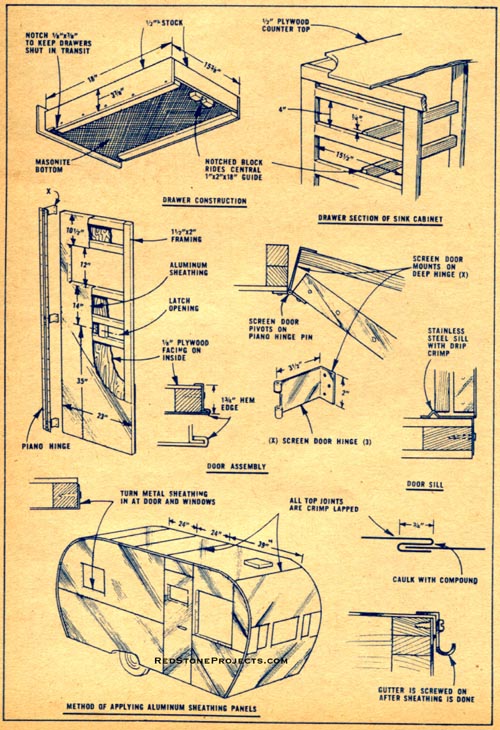
|
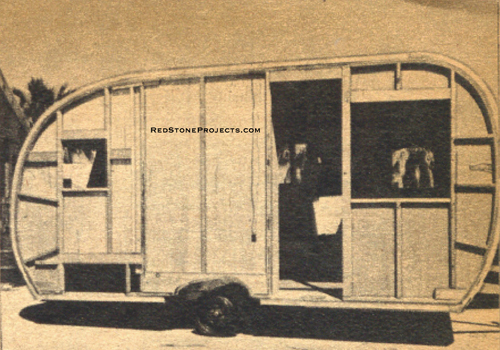
FRAMING for the right side has openings
for the door, window and luggage compartments
|
The curved members consist of three pieces of 3/8 x1 5/8-in.
pine or spruce which have been thoroughly soaked (or steamed) to soften
the fibers, then nailed together after being bent in position.
|
LEFT SIDE framing. Most of the wiring
is installed here and is carried over the roof.
|
Lap joints are made where curved members meet a straight
one. Right and left side walls are illustrated with studs and bracing,
the studs being 2x2's where indicated.
|
PHOTO shows installation of wheel housing.
Sides are temporarily braced with diagonals.
|
Glue is applied to all contacting surfaces. Window openings
are dimensioned to receive stock sash and frames, which are better and
more economical in the long run than homemade units. (Those in photos were
made by Woodland Metal Products Co., Marshall, Mich.) Plywood is available
in various widths and lengths up to 96 inches and is laid out for minimum
waste in cutting. Incidentally, window openings are not
cut in the plywood until it is assembled with the framing. Note that the
plywood will be on the inside of the framing when walls are mounted on
the floor; the outside receives the aluminum skin.
|
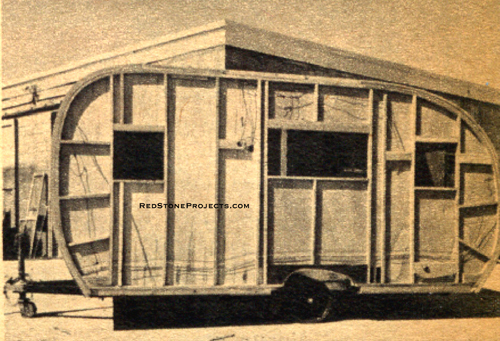
FRONT END framing is ready to receive
the Fiberglass insulation and aluminum skin.
|
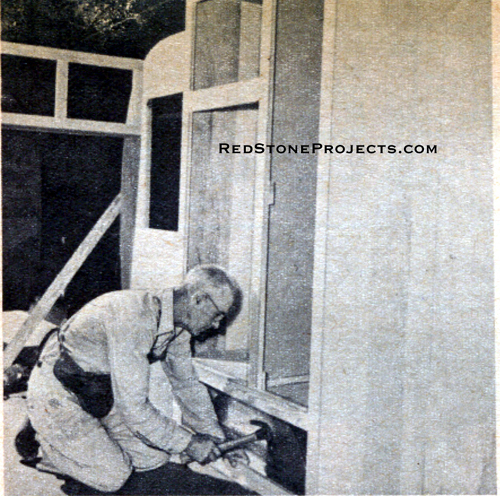
Side walls are bolted and nailed to the floor as shown and
temporarily braced. Next, the framing for the forward cabinet is installed,
further reinforcing the structure. Wheel housings are nailed in place,
followed by the sink cabinet, refrigerator, and closet units. End walls
are now installed, beginning at the bottom and proceeding toward the roof.
If you find that you are unable to bend the plywood to follow the contour
of the frame, cut it to fit from one cross beam to the next.
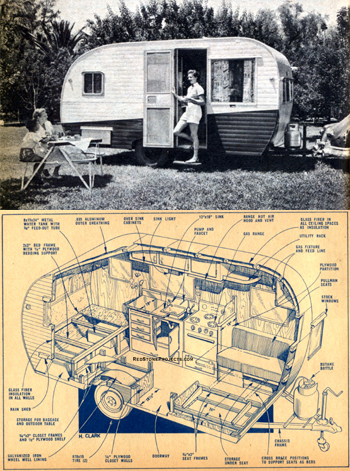
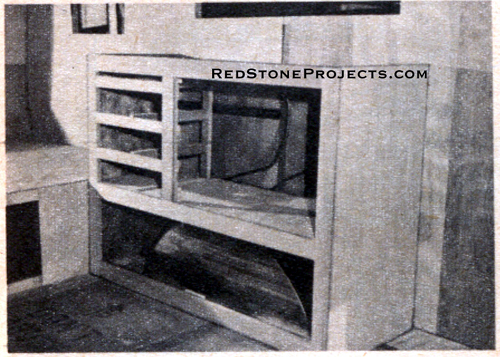
Our cutaway drawing shows the arrangement of the various
furnishings. Pullman seats forward, stove and sink on left side, refrigerator
and clothes closet on the right. The full-size bed is at the rear with
the water tank and luggage space underneath.
There is a hooded electric light over the sink and another
over the bed. On the forward cabinet is a gas light for use when utilities
are not available. Gas is supplied to the stove from a Butane bottle through
a tee with 3/8 and 1/4-in. copper tubing. Above the sink is an outlet for
110-V current for toaster or other equipment.
Note the handy shelf with curved plywood rim at the right
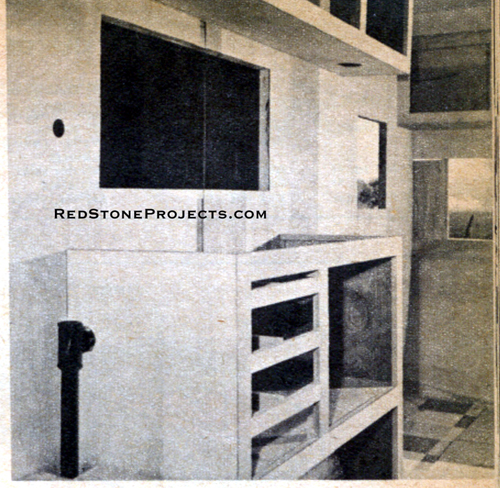
of cabinet over the stove. The refrigerator compartment is tailored to
fit a combination ice-and-electric unit (made by Marvel Refrigerator Co.,
Sturgis, Mich.). The framework for this, including the clothes closet and
the sink unit on the opposite side of the trailer, is made of 3/4x3-in.
pine, with sides of plywood.
Doors are 3/4-in. plywood rabbeted for a lip of 1/4- inch.Cabinet
doors are 3/4-in. plywood rabbeted for an overlap of 1/4 in. and hung on
offset hinges. The sink top is of 1/4-in. plywood with Formica cemented
to it and bound with stainless steel molding.
|
THE REFRIDGERATOR and clothes closet
unit is built outside and installed when finished.
|
A generous size sink (Federal Enamel & Stamping Co.,
Pittsburgh, Pa.) sits in a 1/2-in. plywood board with Formica top (Pionite,
Pioneer Plastics Co., Salem, Mass.) and is equipped with a hand pump which
supplies water from the tank under the bed and with a tap for utility connection.
|
|
FRAMEWORK for sink. Note the drain pipe at left
which is carried up to the vent hole.
|
Directly over the stove is an enameled hood attached under
the upper cabinet, having a vent into the side wall. The sink drain pipe
is also vented into the side wall. Three drawers and a bread board are
provided, as well as storage space under them and under the stove.
|
COPPER tubes are installed to lead from the
water tank to the sink and outside connection.
|
The .032 ga. aluminum skin can be put on before completion
of the inside cabinets. It is cut to convenient size to join over the front
and rear cross beams for a 1-inch lap and is secured with binding head
screws. The edges are first bent 1/2 inch in a brake and nailed to the
curved sides. This portion will buckle in places somewhat but is flattened
with a hammer, later to be covered with a rain gutter. On the roof the
joints are crimped and calked with Kool Seal mastic, as are the edges of
the roof vent, a stock item.
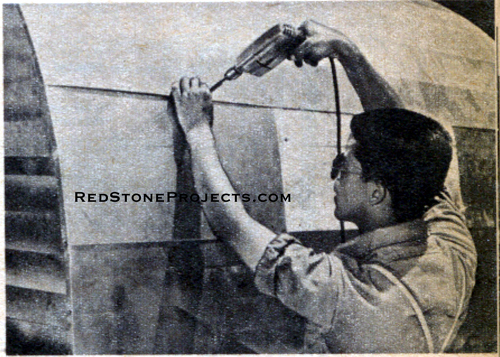
|
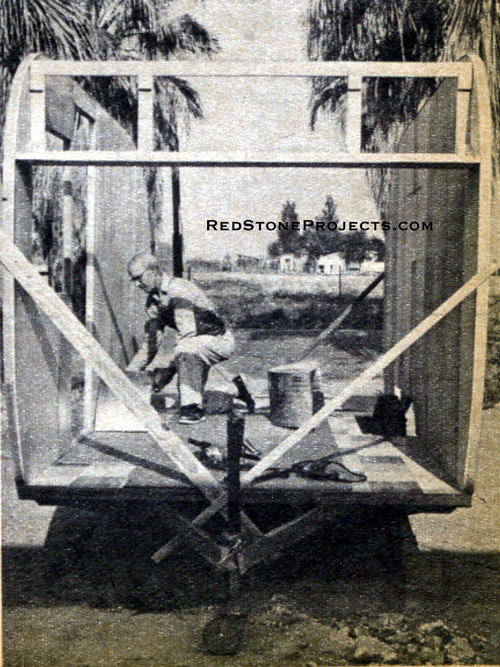
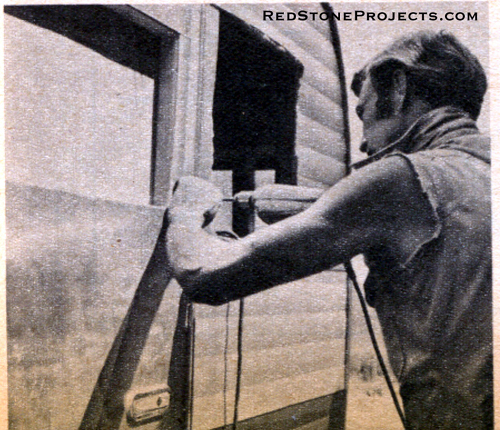
INSTALLING skin at rear end.
Note Fiberglass is not yet cut from the rear window.
|
Sheets of aluminum siding are cut for the sides, here secured
with round-head screw nails. However, flat sheets of aluminum as on both
ends can also be used. Fiberglas insulation had of course been laid over
the wood framing before the skin is finally installed.
|
|
Round Head screw nails are used to attach the
.032-gauge aluminum to both trailer sides.
|
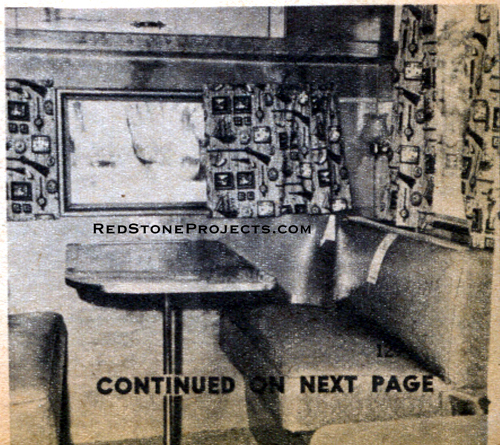
The Pullman seats (by Newhouse Upholstery Co., El Monte,
Calif.) rest on tapered beams. For night use two straight beams are set
in the notches located at the front of the seat frame; the seats are then
placed over these, making a comfortable bed, with space underneath for
bedding stowage.A plastic shield protects the occupants of the Pullman
seat from spattering off the stove, which is a compact, apartment size
range with three burners and oven.
|
FOLD AWAY table and Pullman seats.
Backs lay flat to form a roomy bed.
|
The main door is plywood on the inside, aluminum on the outside,
over a wood frame and is hung on a full-length piano hinge, with the screen
door on offset hinges assembled on the same piano hinge. A sliding panel
in the screen door gives access to the main door handle when both doors
are closed. Half-round molding goes over the joints of the interior paneling.
A fine varnish finish is applied to all exposed wood parts if they are
left natural.
Any 2 Vintage Trailer Plans
$19.95 FREE Shipping |
|
Select 2 Vintage Travel Trailer Plans
|
|
|