Free Shipping on All U.S. Orders
All Orders Processed on a Secure Server
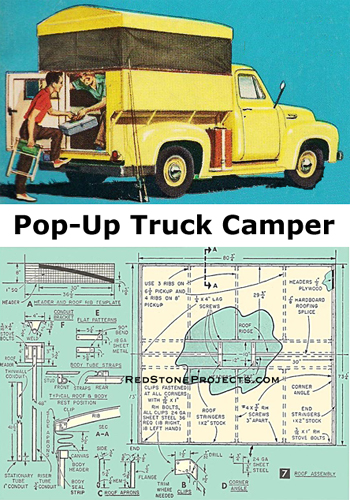
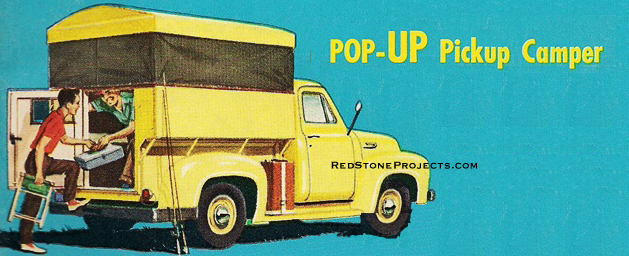
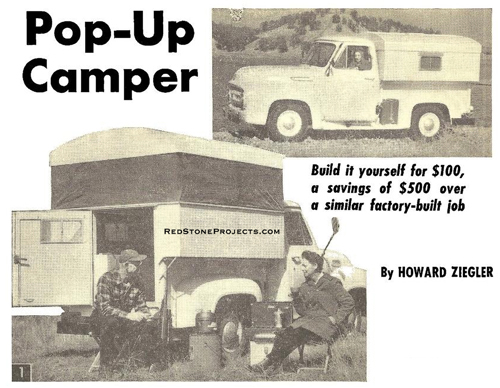
Build a Pickup Truck Pop Up Camper
Truck Bed Mounted Pop Up Camper Plans

Illustration and sheet of plans for a vintage pickup truck popup camper as shown on the cover of DIY plans and instructions.
Pickup Truck Pop Up Camper Plans
Build this Truck Bed Mounted Pop Up Camper
Get these vintage trailer plans PDF Format
All Orders Processed
On a Secure Server
Price $12.95
Get a restored copy of these vintage Truck Bed Mounted Pop Up Camper Plans with 13 Pages of Enhanced and Enlarged Figures and Illustrations and Searchable Text.
We will email these plans, to the address provided with your payment, within 48 hours following receipt of your order.
|More Vintage Trailer Plans|
IIlustration of a pop up camper mounted in the bed of a pickup truck.
Open and closed views of a DIY pickup truck pop up camper.
BUILT with a roof that can be quickly raised and lowered, this pickup camper will give you the stand-up headroom of a large, heavy camper. Yet it still retains the driving advantages of the small camper which folds down for traveling.

Because of its light weight and sturdy construction, you can take to the rough off-beat roads without special overload springs, heavy-duty tires or a pickup truck with a big engine. The collapsible roof feature reduces gas-wasting wind resistance, and sway bracing isn't needed for cornering or bucking a strong wind.

This being the third pickup camper body I have built and used in the past 15 years, I tried to incorporate all of the good and none of the bad features of the too large or too small pickup campers. For example, we have two good-size bunks (Fig. 4) with ample stand-up dressing room; a galley with ice box, stove and food storage cabinet (Fig. 5); a knock-down table which allows us to eat a meal indoors during cool or rainy weather; a cabinet to keep our clothes clean when traveling and a large bedding storage chest that serves as a seat.

If you care to line the storage chest with sheet metal and provide a drain through the camper floor as we did, you'll have a private bathtub which is a luxury when roughing it far from civilization.

Although we built this camper body for our 1953 Ford pickup truck, you can alter the size of the parts to suit the make and model pickup truck you have. Follow the general assembly procedure but measure and cut each part as you assemble it, taking the dimensions from your pickup truck body.

Figures 2 and 3 illustrating the structure of the pick up truck pop up camper with dimensions.
Making the Camper Body

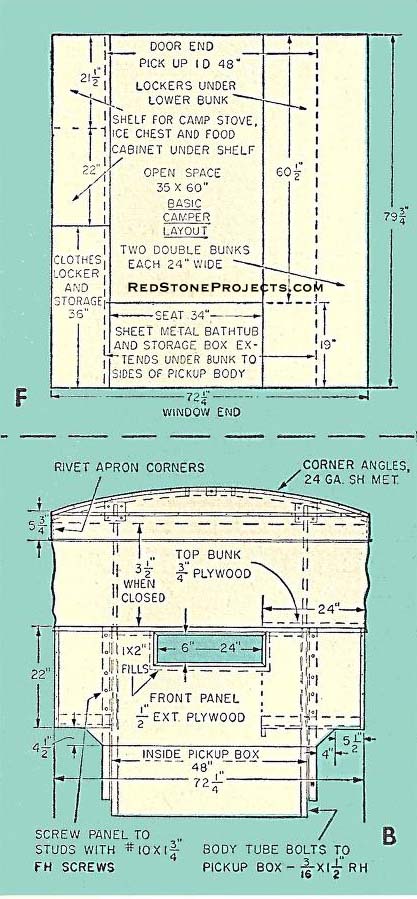
Start by checking the basic dimensions of the framework (Fig. 2). Note that the whole structure is built around four studs (Fig. 2A) which fit in the pickup body post sockets. First, make the studs from 2 x 4-in. stock (actually 1 5/8 x 3 5/8 in.), notching the lower 12 in. to fit the body socket and to place the face of the stud flush with the outside surface of the truck body ends. The lower ends of the studs should make a snug fit in the sockets. Don't make them so tight that you have to drive them in. Notch the upper ends of the studs to receive the 1 5/8 x 1 5/8-in. plates.

Next cut the front panel to size as in Fig. 2C. Location of the window opening will depend on location of the window in the pickup cab, so don't cut the opening until the panel has been temporarily clamped on the studs. Use a level to get the studs plumb and mark the stud locations on the panel. Then remove the panel and studs from the body and fasten panel to studs with #10 1 3/4-in. fh screws spaced 4 in. apart. Saw the window opening before you return the panel to the pickup.

Make the window frame as in Fig. 2D and bolt it to the front panel. If the height of the window in your cab won't permit use of the upper window frame member, let the upper plate act as the top window frame member. Be sure to wrap the edges of the glass with friction tape before installing and use a generous seam of caulking between the glass and the retaining moldings (Sec. A-A in Fig. 2D). If you prefer, you can hold off on window installations until the whole job is done. This might save some broken glass.

If you plan to cover the truck floor with 1/2-in. plywood, this should be installed now. Since pickup floors vary, you'll have to choose a type of fastener for the job. If the pickup floor has wooden slides, you can use flat head wood screws. Otherwise, you'll probably have to bolt it down.

Install the two rear studs in the body sockets and notch the tops of them for the plate as you did the front studs. Notice that both the front and rear plates (Fig. 2E) are notched at each end to half-lap with the side plates. The rear plate is also dadoed to receive the left-hand door jamb. When installing the door jambs, fasten the left hand one with the top screw and bottom lag screw, and the right hand one directly to the stud. If necessary, use a shim between right jamb and stud when fastening them together above the truck box.
 

Figure 2F and 3B of plans for a truck mounted pop up camper showing details and dimensions of the front and rear construction.
Next, install the lower bunk on the left side and the shelf on the right side (Fig. 2). Use temporary cleats to keep these in position while you drill and install the bolts that fasten them to the pickup body. Use ten 3/16 x 2 1/4-in. fh bolts, equally spaced, on each along the centerline of the rolled top edge of the pickup body (Fig. 3C).

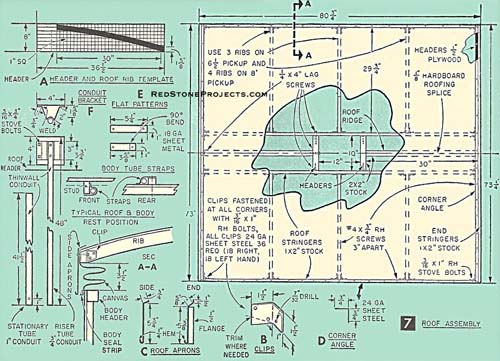
At this point you have enough of the parts installed to provide a means of checking following parts for fit. Cut and fit the side plates next. Remember, these are notched at each end to form the half-lap joint with the front and rear plates. Cut corner and side risers to fit. Notch the bottom end of the side risers only to fit over the 1 x 2-in. fills that run along the outside edge of the lower bunk and shelf (Fig. 2). Then install the fills. Attach these to shelf and bunk with glue and nails driven up from the bottom. You can clamp these pieces in place while you nail them. Toe-nail where a fill meets a vertical member. Use glue and #14 x 2 3/4-in fh screws to secure plates to top ends of risers.

Now you can install the 1/8-in. hardboard side panels. Set them up temporarily by tack nailing. Then drill and countersink for #4 x 3/4-in. fh screws, locating them 5 in apart. You can cover the left- and right-hand side at the rear now or leave it until later. In any event, panels are butted at the corners. The butt is covered with sealer and then a bead of sealer is put down on each flange of the corner covers.

These sheet-metal covers (Fig. 2) can be bent over the edge of a workbench. Be sure, when you take up on the screws that hold them in place, that you have installed enough sealer so excess is squeezed out. The 3/4-in. plywood top bunk merely rests on the framework and is screwed to it and to the stiffener that runs along its inside edge.

Now is a good time to make and install the body braces (Fig. 3D). Hacksaw these to length and bend in a vise. Heating the bend area with a blow torch will make the job easier. Best bet is to cut to length, make bend at one end, check on pick-up body, make second bend, then drill attachment holes. Use the bent-up braces (held in place) as template to drill holes through pickup body and underside of bottom bunk and shelf.

Roof Assembly

This is a separate assembly that you can fabricate on a bench or floor of the shop. Before you do anything else, be sure to measure and mark down the length and width dimensions of the camper body you have just built so you can make the roof assembly to fit your particular job.

As we've designed it, inside clearance is 72 in. from the floor to the stringers. If you need more, just increase the vertical dimensions of the top headers and side stringers. Of course you will also have to compensate for other parts such as the side and end aprons. The central area of the roof is designed flat which makes the skylight installation a simple matter.

Start by making full-size cardboard templates of the header and roof rib as in Fig. 7A. Use the cardboard templates to draw around when laying out the pieces on 1/2-in. plywood. One way to cut these ribs so all will be alike in shape and size is to nail the stock together one on top the other and cut them all simultaneously by stack-sawing on a band saw. If you want to economize on material, however, carefully lay out each rib close together on a single sheet of plywood and cut them out one at a time.

Knockdown table provides indoor eating accommodations on cold and rainy days. Cabinet doors cover storage space under the bunks at left side. Padded lid on large storage chest serves as a seat and  to upper bunk.
Knockdown table provides indoor eating accommodations on cold and rainy days. Cabinet doors cover storage space under the bunks at left side. Padded lid on large storage chest serves as a seat and step up to upper bunk.
The best way to determine the true length of the roof stringers is to mock up the headers flush with the front panel on the camper body and the outside surface of the rear wall. Add 1/8 in. to the distance between headers and allow for a 3/8 in. overhang at the sides. Cut the roof stringers to length and bevel the two edge ones to match the contour of the header.

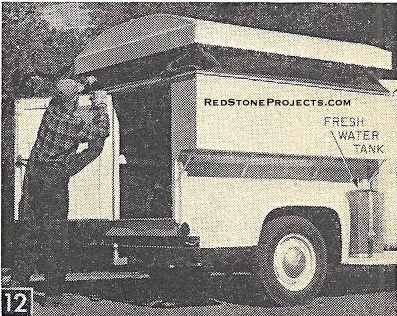
When assembling, start with the roof stringers, ridge and headers, attaching these to each other and to the end ribs. This will establish the flat area and also the curve which the ribs must meet.

Assemble the ribs to the stringers with clips (Figs. 7 and 11, Sec. A-A). Make the clips as in Fig. 7B and fasten with 3/16 x 1-in. rh bolts. When installing the ribs, use a straight board placed across the roof ends to assemble the top edges of the ribs flush with each other.
 

Galley and clothes locker is a shelf on right side of camper body. Fresh water tank is strapped on right running board (Fig 14) where it is easily refilled while traveling.
Covering the Top

Set the roof assembly on saw horses or on a flat surface and cut the 1/8-in. hardboard cover slightly oversize. Worry about the skylight cut-out later. Apply sealer on roof ends, outer stringers and ridge. Start fastening along the splice line with #4 x 3/4-in. fh screws spaced 3 in. apart, and work from that point toward the outer edges. To bend the hardboard to fit the contour, use a 2 by 4 and clamps across the sheet, clamping it down just ahead of each set of screws. This will produce a well-shaped, tight-fitting cover. Make the ventilator cut out with a saber saw or a key hole saw. Coat the splice itself with sealer and then cover with 1 x 1-in. roof splice covers.

Figure 6 showing the door assembly and dimensions for the pickup truck popup camper.
Since the roof aprons (Fig. 7C) are difficult to make neatly without a bending brake, try having them made at your local sheet-metal shop. Take the apron length dimensions directly from your assembled roof. Delay installation of the aprons until the roof riser system is in place.

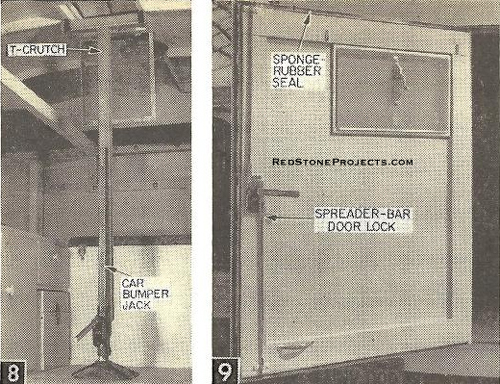
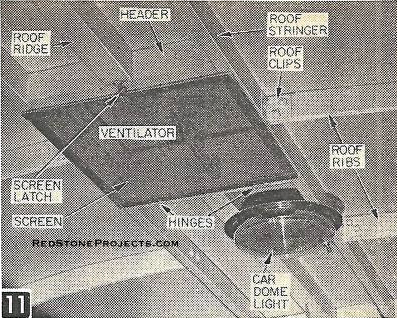
Details of the bracket parts and riser tubes are given in Fig. 7F, and the actual set-up is shown in Fig. 10. First cut the stationary tubes to length. These are not difficult to locate since they about the body studs; the straps which hold them in place can be shaped on the job. Cut the material as in Fig. 7E, secure one end to the stud (Fig. 10) and then bend the remainder to fit.

Place the riser tubes in the stationary tubes and put the roof in place temporarily. Be sure the roof is accurately positioned and blocked up to be 3 1/2 in. above the body. Remember to allow for the thickness of the upper bunk on that side. Each of the riser tubes should be centered in the stationary tubes. You can do this with small pieces of wood acting as shims. The riser tube bracket parts can be made around a scrap piece of riser tube. The semi-circular seat for the riser tube can be made by slicing a short length of 1-in. tube in half lengthwise, and welding this to bent up sides. Again, it might be more convenient to have this part made for you, especially since welding is required.

Clamp the bracket back in position and then place the riser tube bracket in place against the riser tube. Mark the location of the tube seat on the bracket back and have it welded accordingly. Follow this same procedure with each riser tube and bracket assembly. When this is done you can attach riser tubes to brackets and brackets to headers. Then remove the blocks which were holding the roof up.

Lay out 4 3/4 in. from the top of the stationary tube and drill a 3/16 in. hole through both tube and stud. Do this on all four tubes. Use some scrap lumber to raise and support the roof until inside clearance is 6 ft. (or whatever height you require). Check distance from body top to roof in all four corners. All measurements should be equal. Now, using the holes already drilled in the stationary tube as a guide, drill through again to make the matching hole in the riser tube. These holes are for holding the roof in the raised position with the retainer pins (Fig. 10), which are 8 in. lengths of 3/16-in. welding rod bent at a right angle at the center.

Figure 7 of the pickup truck pop up camper plans detailing the construction of the roof with dimensions.
Installing The Canvas

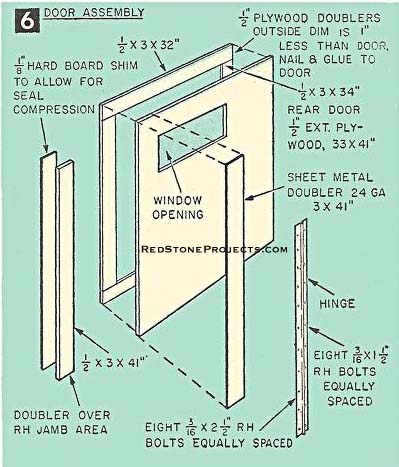
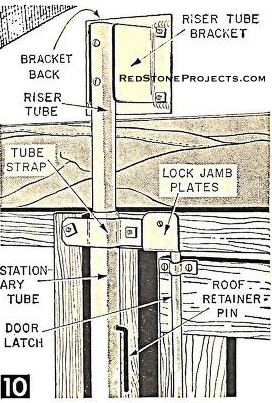
Sew the canvas in the form of a large loop and when installing, be very careful to distribute excess evenly around the camper and allow for a vertical looseness of 1 1/2 in. (Fig. 3A and 7, Sec. A-A). This is what we did and after two years of use, the canvas is now just snug and no more. Tack the top of the canvas to the perimeter of the roof. Fasten the bottom of the canvas to the top of the body with the body seal strips as in Sec. A-A, Fig. 7. Tack the canvas down first, then attach strips with finishing nails. Remember to attach the door drip cap (Fig. 3E) over the door opening, before fastening down the canvas at this point.

Now lower the roof to closed position. Set the aprons in position and check for clearance on all sides. Install the end aprons first. Apply sealer generously under all flanges and bend the ends around the corners so that the side aprons will cover the end aprons. Install the side aprons next. Fasten the corners of the aprons together with aluminum rivets. Next install the corner angles along the ends of the roof (Fig. 7D). This will be easier if you cut a slit at each screw hole to facilitate bending the angle to fit the contour of the roof. Start at the center and work out toward each edge.

Make the Door

Make the door as in Fig. 6. Be sure to check the size of the door opening on your camper body so the door will be a good fit. The sheet metal doubler at the hinge is a precaution against bolt pull-out. The hardboard shim under the jamb doubler will force the rubber to seal to half its original thickness and assures a weather-proof closure.

Fig. 8. To raise or lower the roof, car bumper jack with wooden T-crutch extension bolted to it is placed at center of romper gear. Roof is then locked in raised position as in Fig. 11 and car  jack removed. Fig. 9. Interior view of door showing purchased house trailer window and door lock. Spreader bars of lock engage holes in jamb plates as in Fig. 11.
Fig. 8. To raise or lower the roof, car bumper jack with wooden T-crutch extension bolted to it is placed at center of romper gear. Roof is then locked in raised position as in Fig. 11 and car jack removed. Fig. 9. Interior view of door showing purchased house trailer window and door lock. Spreader bars of lock engage holes in jamb plates as in Fig. 11.
The spreader-bar door lock (Fig. 9) is standard item sold for camper boxes. But we installed ours vertically instead of horizontally. You may have to resize the bars be-cause of this but that is a simple hacksaw job. When this is fitted, install the lock jamb plates (Fig. 10) so the door will have to be pulled tight to lock. These jamb plates should be mortised into upper plates and floor. When installing door window, apply caulking sealer and fasten to door with screws supplied with trailer window. Install the side panel window and roof ventilator similarly with the exception of reinforcing the 1/8-in. hardboard side panel with a 3/4 x 1 in. window frame on the inside (Fig. 3E).
Riser tubes fastened to movable roof slide within stationary tubes fastened lower camper body. Retainer pins inserted through holes in both tubes lock roof in closed position shown.
To raise and lower the roof, use a standard car bumper jack with a T-crutch made from 1 5/8 x 1 5/8-in lumber bolted to it as in Fig. 8. It is important when lowering the roof to check and be sure the canvas ring is folded inside the camper body as in Fig. 12.

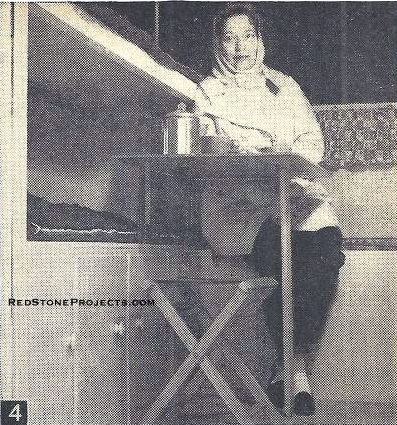
Knockdown Table and Bathtub

Arrangement of storage cabinets, shelves and table can be varied to suit your individual needs. We equipped ours with a little knockdown table (Fig. 4) so we could eat indoors during rainy weather. A fold-up card table would serve as well.
 

Hinged screen is installed over ventilation opening keep out insects.Dome light is wired to truck storage battery.
Hinged screen is installed over ventilation opening keep out insects. Dome light is wired to truck storage battery.
The large storage box extending across the pickup truck body at the window end of the camper body (Fig. 2F) has a padded cover and is used as a seat. This is the storage box we lined with sheet metal for the bathtub. 

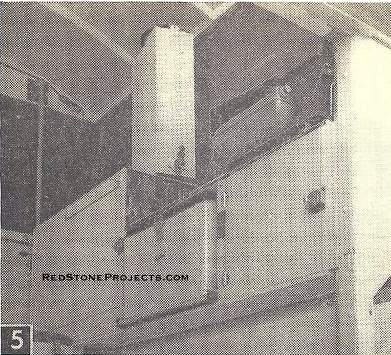
We fitted the area under the lower bunk with doors of 1/2-in. plywood as in Fig. 4 and use the space for storage. You may want to substitute one large lift-off door to cover this area so that long items such as fishing rods or rifles can be stored under the bunks.

The clothes locker, food cabinet and shelf for the camp stove, located at the right side of the camper (Figs. 2F and 5), are made of 1/2-in. plywood joined at the corners with 1 x 2-in. cleats. We mounted the ice box on 1/2-in. plywood which is fastened to metal drawer slides of the type used for pull-out phono turntables.

When lowering the roof canvas must be folded and tucked inward so it will not become caught and pinched between aprons and sealing strips. Fresh water tank is strapped to running board.
We finished both the interior and exterior with one coat of Firzite followed by one coat of enamel undercoater and one coat of exterior enamel. All galvanized sheet metal was washed with vinegar to etch the surface and given a coat of metal primer before enameling.
DIY Pickup Truck Pop Up Camper list of materials.
Save with Vintage Plan Deals
|See All Vintage Trailer Plans|
Any 2 Vintage Trailer Plans
$19.95 FREE Shipping
Select 2 Vintage Travel Trailer Plans


Any 3 Vintage Trailer Plans
$24.95 FREE Shipping
Select 3 Vintage Travel Trailer Plans
 
 
3

 
Any 4 Vintage Trailer Plans
$29.95 FREE Shipping
Select 4 Vintage Travel Trailer Plans


4
Any 6 Vintage Trailer Plans
$36.95 FREE Shipping
Select 6 Vintage Travel Trailer Plans


This modern chassis makes an excellent base for your teardrop trailer project, lightweight camping trailer, or vintage travel trailer build.
Teardrop Chassis Plans
Build a Teardrop Chassis
without Welding
eBook
PDF Format
Price $12.95
Learn more about these plans >>
Utility Chassis Plans
Build a Utility Trailer
without Welding
eBook PDF Format
Price $12.95
Lean more about these plans >>

Buy  Both
Build a Teardrop Trailer Chassis
and
Build a Utility Trailer
Together and Save 20% !
eBook
PDF Format
Price $19.95

RedStoneProjects.com Home
SAVE With Multi-Plans Deals!
Project Plans
Concealment End Table Plans
Quilt Rack Plans
Crossbow Plans
Catapult Plans
Craftsman Style Plans
Water Screw Plans
Tobacco Pipe Rack Plans
Shooting Sports Plans
Reloading Bench Plans
Closet Reloading Bench Plans
Brass Cleaning Bench Plans
Small Reloading Bench Plans
Corner Reloading Bench Plans
Two Sided Shooting Bench Plans
Nativity Stable Plans
Trailer Plans
No Weld Teardrop Trailer Chassis
No Weld Utility Trailer
Vintage Trailer Plans
Vintage Travel Trailer Plans Collection
16 Foot Canned Ham Vacation Trailer
Craftsman Hardside Folding Camper Trailer Plans
1947 Thousand Addresses Travel Trailer Plans
Bungalow Folding Tent Camper Trailer Plans
1937 Runlite Lightweight Travel Trailer Plans
1947 Treadrop Trailer for Two Plans
1935 Pullman Trailer Plans
1940 14 Foot Cabin Trailer Plans
1951 Lightweight Sportsman's Trailer
1956 18 Foot Family Vacation Trailer
1934 17 Foot House Trailer
DIY Pop Up Camper Trailer Plans
1960 Fold Up Trailer with Slide Out Plans
1953 Wild Goose Kamp Master Trailer Plans
1935 Jim Dandy Cabin Cruiser Trailer Plans
Vintage How To Build Trailers eBook
Hardside Pop-Up Camper Plans
Wanderbug Lightweight Vacation Trailer Plans
Streamline Family Vacation Trailer Plans
Tent On Wheels Folding Trailer Plans
Lil Guy Micro Camper Trailer Plans
Traveler Wood Framed Travel Trailer Plans
Vintage Roadside Chuck Wagon Trailer Plans
Pickup Truck Pop Up Camper Plans
Hardside Roof Top Pop Up Sleeper Plans
Low Profile Pickup Truck Camper Plans
Vintage Streamline Teardrop Trailer Plans
Vintage 1956 Camp Trailer Plans
Modern Conestoga Trailer Plans
1947 Trail Scout Camper Plans
Vintage Bolt Together Tent Trailer Plans
Vintage 1947 Wanderer Canned Ham Trailer Plans
Mobile Vacation Home Plans
Lightweight Expanding Trailer Plans
Simple and Rugged Truck Camper Plans
Sleeps 4 Expanding Truck Camper Plans
Vintage Boat Plans
Sea Craft 25 Foot Cabin Cruiser Plans
21 Foot "Luxury" Shanty Boat Plans
20 Foot Budget Houseboat Plans
DIY Project Books
Build Three Working Model Catapults
Build Five Craftsman Style Tobacco Pipe Racks
Build a Reloading Bench and a Reloading Brass Cleaning and Sorting Bench
Vintage Trailer Mugs
Trailer Articles
Pulling a Motorcycle Trailer
Building a Motorcycle Trailer
DIY Tent Trailer
Build a Budget Tent Trailer
The Trailer Grows Up
Motorcycle Rallies
Americade Motorcycle Rally

 
Contact Us Privacy Policy Plans License