Free Shipping
Build a Boat for Camping and Fishing
Vintage Two-In-One Camper Boat Plans

|
Camper Boat Plans
Build a Vintage 2-in-1 Boat for Camping and Fishing
 |
PDF Format |
|
|
All Orders Processed
On a Secure Server
|
Price $12.95
|
|
Get a restored copy of these vintage Camper Boat
Plans with 10 Pages of Enhanced and Enlarged Figures and Illustrations
and Searchable Text.
|
We will email these plans, to the address provided
with your payment, within 48 hours following receipt of your order.
|
|
| More Vintage
Boat Plans |
|
|

|
|
|
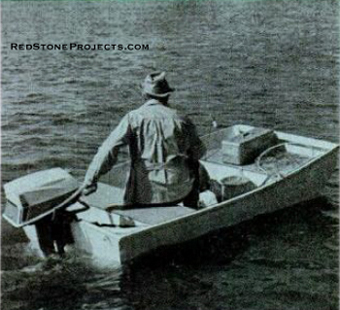
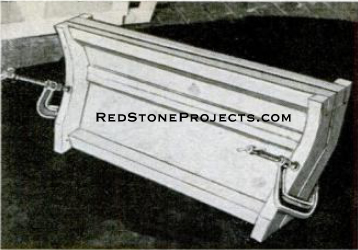
Designed with camping in mind, this sturdy John
boat is actually a small fishing pram with a roomy, removable camp chest
integrated into the bow.
|

|
|
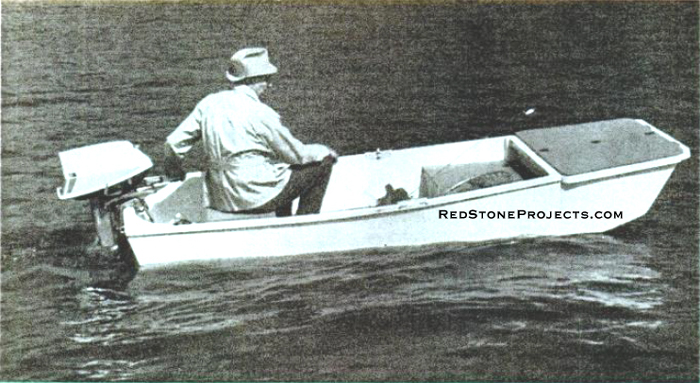
Stow gear in the locker
ASHORE
|
Use the 8-ft. pram for
FISHING
|
| WHY THE SPLIT PERSONALITY? Well, that bolt-on bow locker
is actually a sturdy camp chest which can be packed at home, attached to
the pram at the launch site, then removed again when you reach camp.
Double-galvanized, annular-ring boat nails are used throughout.
These cost much less than comparable screws and also make the fabricating
job easier without sacrificing strength.
Assuming that you plan to fiberglass the boat, all joints
are both glued and nailed. If not, use calking compound at all through-hull
fastenings and planking joints. In any case, be sure to use calking when
mounting the bottom battens since these would be attached after fiberglassing
the hull. |
|
Camping Boat with integral bow locker attached.
|
|
| Begin by assembling the transom. Cut and mount the inside
framing on the plywood, glue coating all contacting surfaces and spacing
the 11/4-in. nails 3 in. apart. (The 1 x 4 framing on the aft surface of
the transom should be mounted after you have planked the bottom.) Once
the glue has cured, bevel the bottom edge 15 deg. |
 |
|
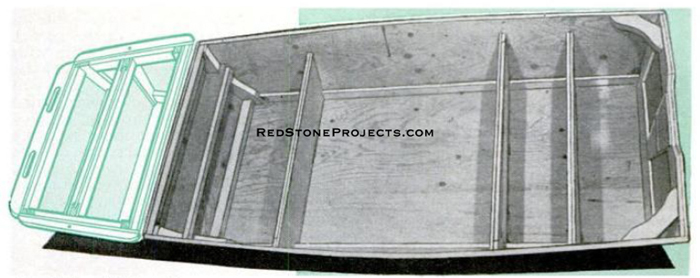
Completed Camping Boat Plan View
with removable Bow Locker highlighted.
|
| Next, make up the temporary building frame and the bulkhead
frame which forms the bow of the pram. Since the latter must mate snugly
with the rear bulk-head of the bow locker, we recommend that you build
the two together. When completed, clamp them together, check the fit and
then drill holes through the side frames for the two connecting plates. |
 |
|
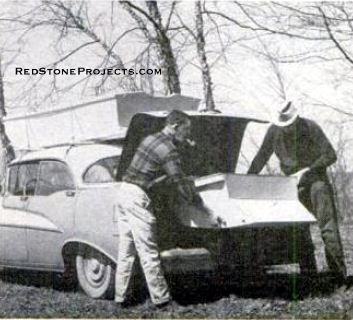
TWO-MAN PRAM is light and easy to car-top.
You can carry the bow-locker/camp-chest in the car trunk.
|

|
|
HEAVY BOTTOM BATTENS on the outside
protect plywood planking, act as exterior framing for the pram.
|
| The fairing operation is a little unusual since this
boat isn't framed in the normal way. To determine the proper bevels for
the transom and forward bulkhead, you'll have to assemble the hull temporarily,
then take it apart and cut these bevels so that frames fit flush against
planking.
Tack the two pieces of side planking to the transom and
secure the temporary building frame 50 in. forward of this with two screws
through each side. (After the seats have been installed, this frame will
be removed and the screw holes sealed with wood putty backed by 1-in.-sq.
plywood plates glued to the inner surface.) Bend the two side panels around
the building frame and tack them in place. |

|
|
BUILDING FRAME is a single mold temporarily
mounted amidships. To avoid stooping, support hull at working height on
saw horses topped with 2 x 4's.
|
| Once you have marked the transom bevels, remove the transom
and cut them slightly oversize. Then replace the transom, check the fit
and sand the bevels until you have a perfect joint. Finally, coat all contacting
surfaces with glue and attach the plywood with 1 1/4-in. nails.
The chine and sheer curves should run smoothly from the
transom to the fore end of the bow locker, so before you fair the pram's
bow bulkhead, you'll have to frame the locker and clamp this framing to
the pram. When you have marked the proper bevels, remove the clamps and
fair the bow bulkhead and locker frame. After fairing, secure the side
planking.
Since the locker forms a separate part of the boat, you
might take time out here to finish it up before going ahead with the rest
of the hull. In spite of its odd shape, the locker is simply a box with
a center-hinged lift-off top. Make the hand-rails by cutting a 2 x 4 lengthwise;
mount them by driving nails from inside. |
|
Figure
1. Temporary Building Frame, Seat Bulk Heads, Stern Knees, Shear Moldings,
Locker Chines, Transom and an Oblique View of the hull assembly.
|
Get a restored copy of these vintage Camper Boat
Plans with 10 Pages of Enhanced and Enlarged Figures and Illustrations
and Searchable Text.
All Orders Processed
On a Secure Server
|
|
| Next, mount the chine battens with their edges extending
slightly below the bottom edge of the side planking so that they may be
faired to fit flush against the bottom planking. After fairing these battens,
mount the bottom planking.
To complete the hull, make up the three seat frames and
install them by driving nails from the outside through the planking. Once
the stern knees have been installed, the hull will be adequately braced
and you can remove the building frame. |
|
Figure
2. Bulkhead Side Frames, Connecting Bolts, Connecting Plates, Locker
Divider, Divider Slide, and Hull Assembly Plan and Elevation Views.
|
Get a restored copy of these vintage Camper Boat
Plans with 10 Pages of Enhanced and Enlarged Figures and Illustrations
and Searchable Text.
All Orders Processed
On a Secure Server
|
|
| Install the 1/2-in. plywood seat tops with galvanized
hinges - any type will work, but piano hinges give the best appearance
- then shape the sheer moldings and mount them using 1-in. nails.
Before painting or fiberglassing the hull, extend the
connecting-plate holes in the bulkhead side frame through the side planking
and seal the bolts with epoxy.
Finally, mount the bottom battens by driving nails through
the planking into the framing. |
|
|
|
CRITICAL JOINT between bow bulkhead of
pram and rear bulkhead of locker must be a perfect fit. To avoid error,
fabricate both bulkheads in one operation.
|
|
 |
|
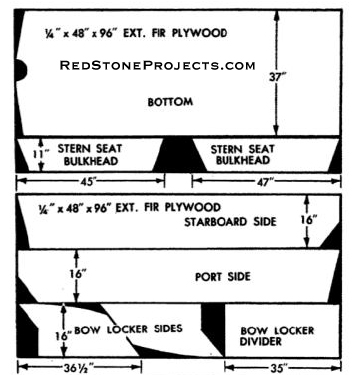
CUT PLAN 1. Camping Boat Bottom, Stern
Seat Bulkhead, Starboard Side, Port Side, Bow Locker Sides and Bow Locker
Divider.
|
 |
|
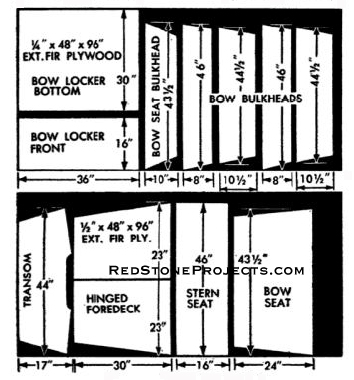
CUT PLAN 2. Camping Boat Bow Locker Bottom,
Bow Locker Front, Bow Seat Bulkhead, Bow Bulkheads, Transom, Hinged Foredeck,
Stern Seat and Bow Seat.
|
 |
|
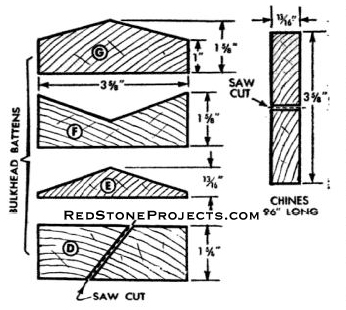
CUT PLAN 3. Camping Boat Bulkhead Battens
and Chines.
|

|
|
Camping Boat List of Materials
|
|

