Free Shipping on All U.S. Orders
All Orders Processed on a Secure Server
Build a Hardtop Popup Camper
Plans for a Vintage Post War Camping Trailer
|
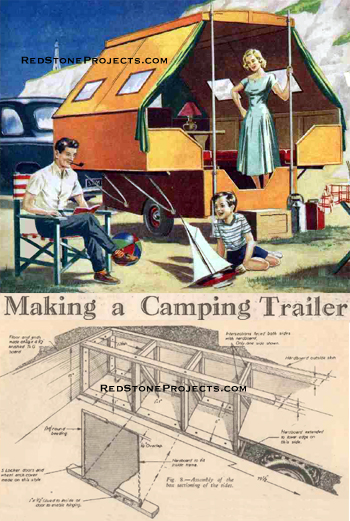
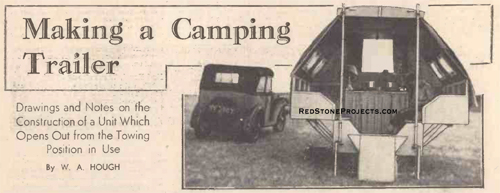
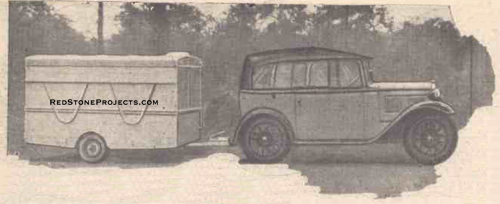
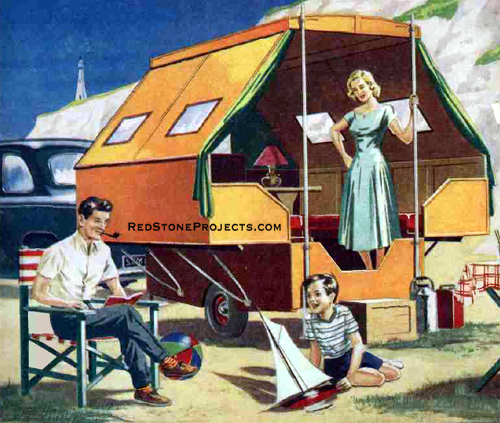
| Weighing 650 lbs., unladen, the trailer's measurements
are 7 ft. x 4 ft. x 58 in. high from the ground when closed, and 7 ft.
x 8 ft. x 6 ft. headroom when in use. This area comprises locker space
on each side of the 6ft. x 3ft. floor area, curtained wardrobe and storage
recesses, also a fold-away sink. It is made mainly of hardboard and the
emphasis is on simplicity of construction. The interior of the trailer
in the open position is shown in Fig. 6.
The cost of making would have been $60 to $65, but this
figure was greatly reduced by looking around for cheap materials, various
sections being made and stored as the material for the job was obtained. |
Get a restored copy of these vintage Hardtop Popup
Camper Plans with 16 Pages of Enhanced and Enlarged Figures and
Illustrations and Searchable Text.
All Orders Processed
On a Secure Server
|
Figure
1. Layout of chassis and floor battening (shown dotted).
|
|
| Chassis, Wheels and Springs
The chassis is made of 27 ft. of 1 1/2 in. x 1 1/2 in.
x 3/16 in. angle iron, which can be bought at steel shops, buildersâ€â„¢
merchants and sometimes from scrap yards. The sketches given at Fig. 1
show its layout. Bolting the seven members together, as shown, before arc
welding, makes the welding job easier, quicker and, therefore, cheaper,
also greatly assists in keeping it flat. Two pieces of angle iron illustrated
in Fig. 2 are also welded into position on the underneath side of the hitch
plate, one each side of the parking-brake lever slot. |
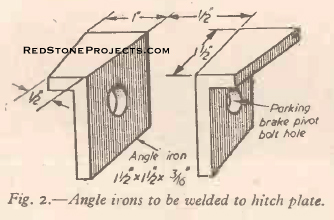
Figure 2. Angle irons to be welded to
the hitch plate.
|
|
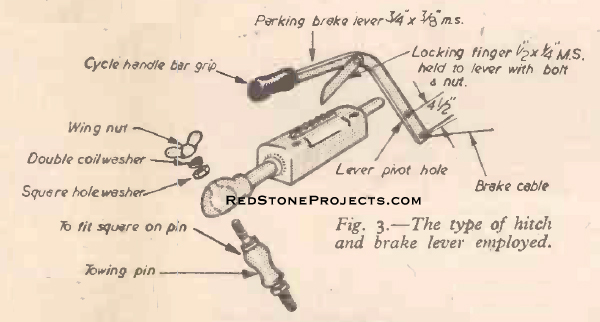
| The towing hitch used is of the type shown in Fig. 3
and costs approximately $5. These can be purchased from caravan equipment
specialists.
The wheels used are the type used on builders' barrows;
these have 4 P.R. (ply rating) tires, which are suitable for road use.
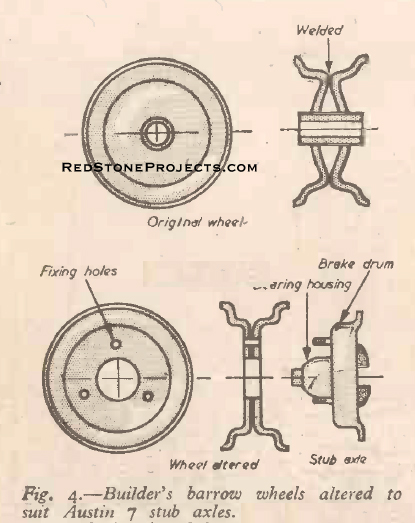
Air pressure required was found to be 23 psi. The wheels were altered,
as shown in Fig. 4, to enable them to be mounted on Austin 7 stub axles,
so giving the wheels the bearings and braking system which are required
on trailers of over 200 lbs. These wheels can be obtained new from caravan
suppliers. |
|
Figure 3. The type of hitch and brake lever employed.
|
|
| For the axle a length of 1 1/4 in. x 1 1/4 in. steel
bar bought at a scrap yard proved suitable, the weight helping to keep
the small wheels on the ground. The pair of Austin 7 stub axles bought
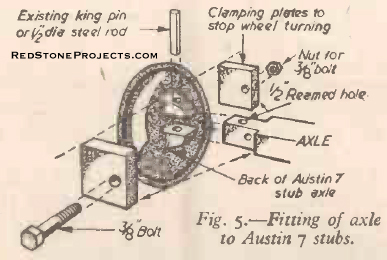
at the same time make up the wheel unit. Fitting of the axle to stubs can
be seen in Fig. 5. The clamping plates are finally arc welded to the stubs.
Springing is affected by a pair of 1938 Morris 8 springs
purchased from a Morris spares agent. Having seven leaves, these springs
are sturdy, which is a necessary attribute for use with small wheels. This
sturdiness, coupled with the correct tire pressure, gives very steady towing.
The springs cost $3 each. |
|
Figure 4. Builder's barrow wheels altered to suit
Austin 7 stub axles.
|
|
| In the chassis sketch (Fig. 1) it will be seen that the
wheel center line is behind the trailer center line. Putting the wheels
farther back in this manner gives more weight to the towing end, lessens
snaking and helps to keep the back of the towing vehicle down. The weight
of the front half (wheels to towing hitch) is 100 lbs. more than the back
half. |
|
Figure 5. Fitting of axle to Austin 7 stubs.
|
|
| Floor, Ends and Sides
The dotted lining in Fig. 1 shows the layout of floor
battening, this being screwed into position with 24 1 1/4 in. No. 10 wood
screws, screwing from underneath and side of the angle iron, so locking
the battening into position. On to this is made the floor, made up of 75
ft. of 7/8 in. x 5 in. prepared tongued and grooved boards. The ends of
this lower part of the trailer are also made from the same size boarding,
the boards being glued together with Scotch glue. A few wriggly nails assist
in keeping them together while the lengths of 2 in. x 1 in. on each side
of the ends (see Fig. 8) are glued and screwed into position. A central
section of one end is now cut out, this piece forming part of the hinged
opening for entry into the trailer when in its closed state. |
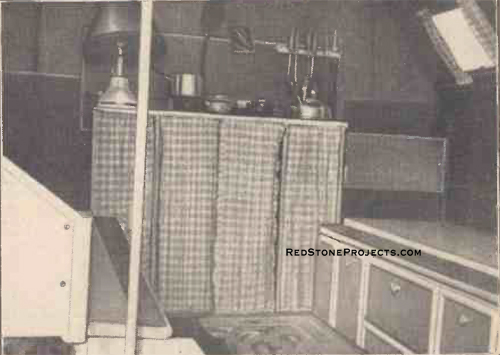
Figure 6. The interior of the author's
camping trailer.
|
|
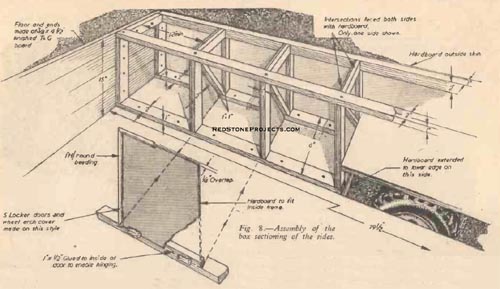
Box sectioning the sides as in Fig. 8 serves a three-fold
purpose: first, it provides strength to take the leverage of the beds when
being slept on, second, it creates useful locker space and, third, owing
to wheels being inset, gives a flush finish to the inside. The main strength
is created by the intersections, using the strength of hardboard and glue,
coupled with a leverage stop which is the diagonal member of these sections.
In turn, these are glued and screwed to the outer corner lengths of 2 in.
x 1 in. battening.
|
Figure 7. Details and positioning of the jacks.
|
|
| The completed units are screwed to the floor and end
pieces, keeping the whole outside flush to facilitate easy covering with
hardboard. The 2 in. x 1 in. battening used on this section is prepared
Perana pine, this type of pine is hard and will hold screws well.
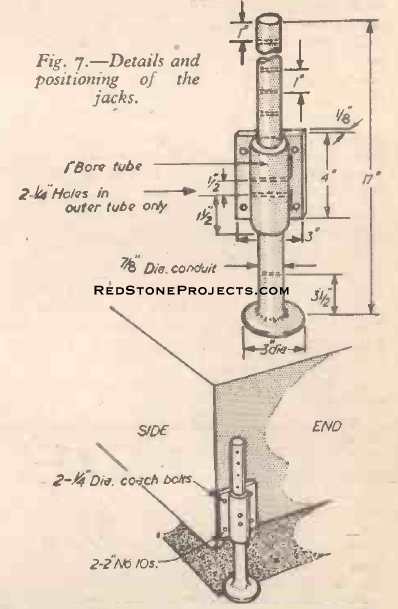
The jacks were fitted next so that they came into use
for further building up and can be seen in Fig. 7. The source of material
was a scrap yard, where 28 in. of 1/8 in. x 3 in., 16 in. of 1 in. inside
diameter tube and 6ft. of 7/8 in. diameter conduit was obtained for under
a dollar. All the material had to be steel as welding was necessary. The
two holes in the outer tube allow for finer adjustment than would one hole. |
|
Figure 8. Assembly of the box sectioning of the
sides.
|
|
| Beds, Roof and Sides
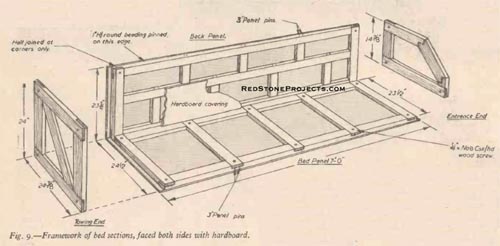
Apart from the roof the trailer is made up of panels faced
both sides with hardboard. A layout and assembly of the beds are shown
in Fig. 9. These are placed on to the lower pan of the trailer in their
closed position and are hinged on the outside. To keep out draught when
in use, and rain when towing, a strip of canvas 7 ft. x 1 1/2 in. is then
tacked over the hinges. Four 7 ft. lengths of 1 in. half-round beading
are then marked off and recessed for each hinge, then screwed over the
canvas (Fig. 11) after applying a good weather-sealing compound such as
Seelastik. |
|
Figure 9. Framework of bed sections, faced both
sides with hardboard.
|
|
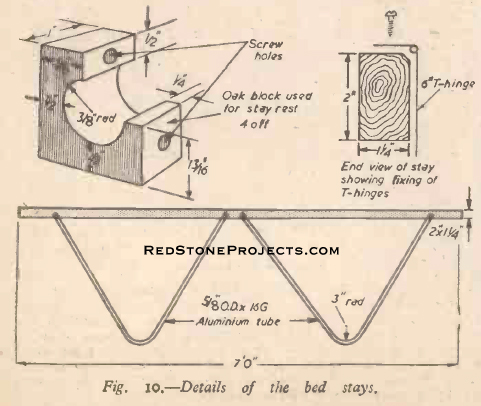
| The beds are held in the open position by means of two
aluminum tubular stays to each side. These are inserted into a 7 ft. length
of 2 in. x 1 1/4 in. Perana pine so forming one complete stay, see Fig.
10. The stays are held to the beds by five 6 in. T-hinges. A recessed oak
block is screwed at the lowest possible position on the trailer side and
central with each aluminum stay, so forming a resting point to hold the
beds in position. |
|
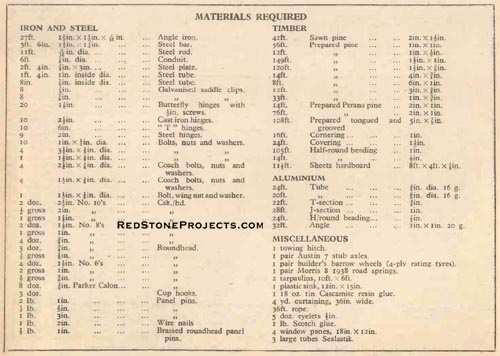
Camping Trailer Bill of Materials
|
|
| The roof and fittings to hold it up were dealt with next.
With the trailer closed, the roof was made to measure, making it a flush
fit with the sides and ends of the beds. Fitting aluminum T-section all
around its lower outer edge, so that one side of the T overlapped the beds,
stopped any rain getting into the trailer when towing. Seelastik was used
to seal the T-section to the roof. Four clips were fitted, one at each
corner, to hold the roof on; these were of the type used on ammunition
boxes. |
|
Figure 10. Details of bed stays.
|
|
| In making the roof, consideration had to be given to
allow enough room between the beds and roof ribs, to house the side panels
as shown in Fig. 11. |
Get a restored copy of these vintage Hardtop Popup
Camper Plans with 16 Pages of Enhanced and Enlarged Figures and
Illustrations and Searchable Text.
All Orders Processed
On a Secure Server
|
Figure
11. The Entrance end in open and closed positions.
|
|
Owing to the sheet of hardboard covering the roof being
only 4ft. wide, it was necessary to build up the sides of the roof on a
double side basis (Fig. 11). It will be appreciated that when curving a
sheet of hardboard over a 2 in. rise as in this case, its covering width
is under 4ft. The whole roof frame is screwed and glued, and the hardboard
sheet is glued and panel pinned. A good waterproof glue is necessary, and
"Cascamite" was used which is a powdered resin glue used with water. This
can be bought at most good class iron suppliers or woodwork hobby shops.
| To hold the roof up four 6ft. X 3/4 in. diameter 16 ga.
aluminum tubes are used, held in position on the lower part of the trailer
by two saddle clips to each tube. The clips are placed about 10 in. apart,
and a hole drilled through one clip and the tube, facilitated holding the
tube in position by means of a 3/16 in. diameter pin. On the roof four
2 in. lengths of 7/8 in. inside diameter tubes are used, held to the roof
with two saddle clips to each one, and again drilling through to enable
pinning of the roof at the required height (see Fig.11). |
|
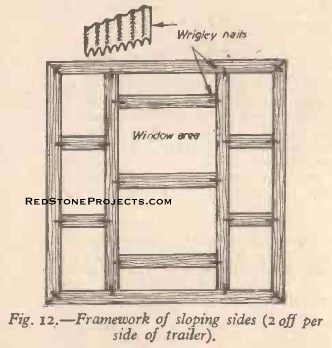
Figure 12. Framework of sloping sides (2 off per
side of trailer).
|
|
| The sloping sides consist of two panels to each side,
each panel made of 3o ft. of 5/8 in. x 1 1/2 in. prepared pine and faced
both sides with hardboard which is glued and pinned, the same glue being
used as on the roof. Fig. 12 shows the framework of these panels and how
they are held together. The panels are held to the roof by means of aluminum
"J" section, positioned one length on the roof and one on the panel, so
as to allow one to hook into the other. |
|
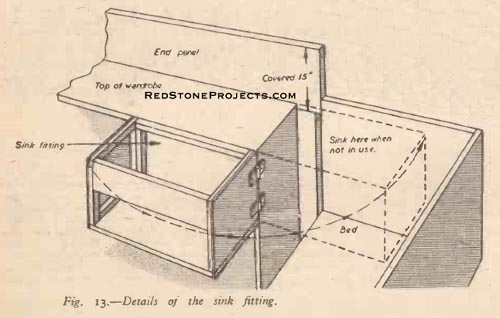
Figure 13. Details of the sink fitting.
|
|
| Canvas Ends
Canvas for the ends was cheapened by buying two 10 ft.
x 6 ft. new green tarpaulins. Leaving one canvas out in the rain, proved
that it shrunk when wet, so care was taken to make the ends on the large
side. The canvas is tacked to the sloping sides, and hooked to the inside
of the roof. They are overlapped 6 in. down the center, roped and eyed
to enable them to be laced up. |
|
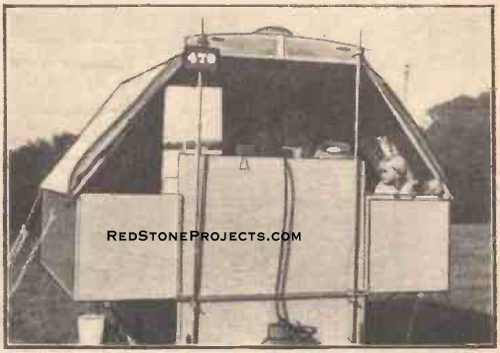
Figure 14. A rear view showing the end panel.
|
|
| End Panel, Wardrobe and Sink
When the trailer is opened up for use a gap is made between
the beds at the towing end behind the wardrobe. This gap is closed by a
panel made of a framework of 1 in. x 1 in. and fully faced on the outside
only, inside is faced on the top 15 in. only, to give a flush finish above
and behind the wardrobe (Figs. 13 and 14). Extending this panel above the
wardrobe has many uses, but the main reason is to keep flames away from
the canvas when cooking.
The final panel for fitting is the flap entrance at the
rear of trailer, this being made to measure to fit in the opening when
the trailer is closed. This flap is hinged to the piece previously mentioned,
which is hinged to the trailer. To seal against weather when closed, all
meeting points of panels are covered with 1 1/2 in. covering, this being
treated with Seelastik before screwing to the beds and entrance flap. |
|
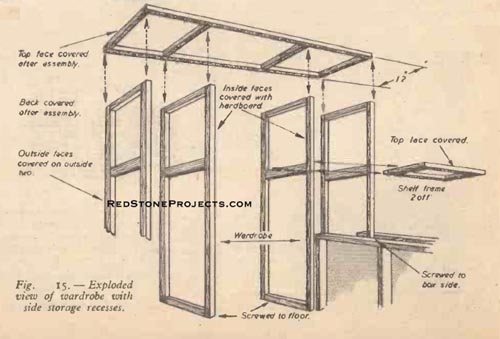
Figure 15. Exploded view of wardrobe with side
storage recesses.
|
|
| The wardrobe (exploded view, Fig. 15), is made as shown
in seven separate pieces, each on a framework of 1 in. x 3/4 in. and faced
one side only. After assembly the whole front is edged with 1/2 in. half-round
beading. A cutlery drawer is fitted under one shelf.
The curtains covering the wardrobe are mounted on wire
frames, which are hinged to the wardrobe side, so forming double doors,
giving easy access. The side curtains covering the storage recesses are
hung from curtain wires, and are weighted at the bottom to keep them in
position.
The sink unit is simply a box made on the same style as
the wardrobe, i.e., in separate sides and base. The front is only half
covered to give access to toilet requisites. A small plastic sink bought
at any caravan equipment supplier fits into the top. For drainage a flexible
plastic tube passes through a hole in the base of the sink unit, and then
put through a hole in the floor when required. Hinging the sink makes it
a firm enough fixture, and enables it to be swung away over the bed when
not in use. |
|
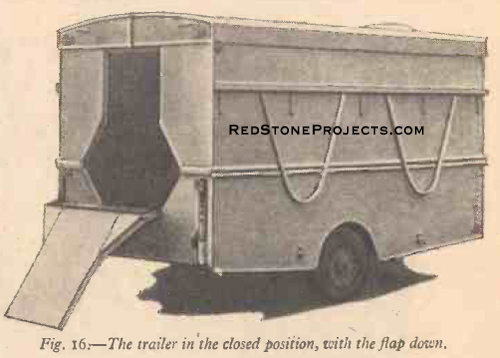
Figure 16. The trailer in the closed position.
|
|
| Finishing
All outer corners are covered with 20 ga. aluminum angle,
using a good measure of Seelastik before pinning with 1 in. brassed roundhead
pins. A 1 ft. 4 in. x 4 ft. sheet of 20 ga. aluminum was cut into 2 in.
strips along its 4 ft. length and bent to make 1 in. angle. Aluminum sheet
can be bought at builder's supply shops or Half-inch half-round aluminum
molding, also obtained from a builder's supply, is screwed with "Parker
Calon" screws to the side of the lower section of the trailer, following
the edge. |
Any 2 Vintage Trailer Plans
$19.95 FREE Shipping |
|
Select 2 Vintage Travel Trailer Plans
|
|
|

