Free Shipping
Pickup Camper with Full Kitchen
Plans to Build a Sleeps 4 Expanding Truck Camper
|
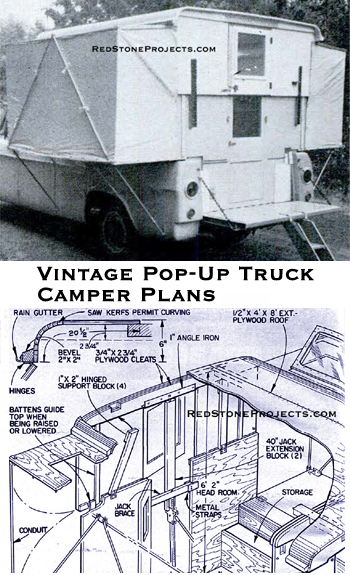
Build an Expandable Camper
|
Two plywood boxes, sliding one
over the other, open up to make a
truck camper that sleeps four.
By A.S. Ryan |
|
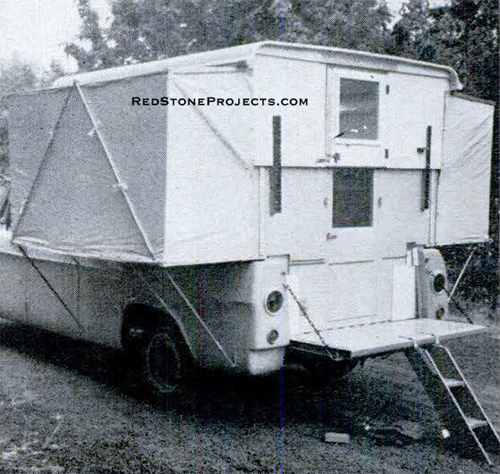
With the roof raised, facilities in the camper
are readily available. Mom gets lunch.
|
|
| If you've been figuring that the cost of a truck plus
a camper is a bit steep, or you're already a pickup truck owner but the
budget won't stretch to a camper, here's a collapsible plywood unit you
can build yourself. Just follow the blueprint on the following pages.
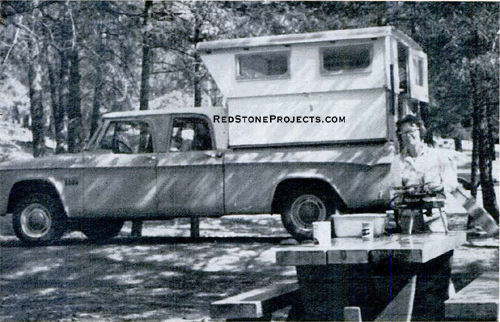
Opened up, this camper has over six feet of head room,
lots of living space, and sleeping places for four. Closed, and lowered
for minimum wind resistance, it's easy to drive, yet has enough head room
to seat passengers while traveling. Removing the rear cab window makes
easy access.
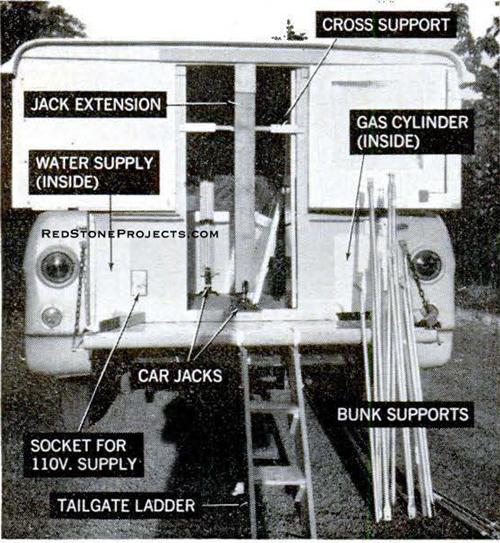
Two bumper jacks raise or lower the upper section, and
hinged sides unfold to give two full-length bunks. Plastic side curtains
button around the bunks to enclose the entire camper. |
|
Raise the roof, using bumper jacks and extension
supports at each end. Top door opens out, bottom door inward, to let you
exit over tailgate if necessary.
|
|
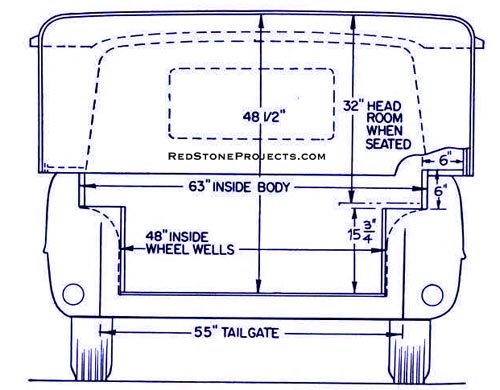
| How to plan yours. Make careful measurements of
your truck box to determine the size of the unit you'll build. Some of
the dimensions given apply only to my truck (a 1965 Dodge six passenger
pickup).
Find the minimum inside height by seating the tallest
in the family on a board across the wheel wells. Most truck beds have at
least four feet between wheel wells. This lets you use a full sheet of
plywood as the floor. Test position all the main structural pieces after
cutting. Be sure there's room to raise the tailgate. |
Support raised roof inside with flip-up braces,
outside with bolted on safety brackets. Stairs
and bunk supports store inside camper when not in use.
|
|

|
Set up for the night by opening out the side
bunk and roof panels and bracing them with conduit. Lower braces rest on
hooks that are bolted to the truck.
|
|
| How to build it. First, lay out and cut the lower
ends and side pieces, using B-B, concrete form grade fir plywood. Use the
flattest panels you can find. Don't cut the door openings yet. To the end
pieces, attach the guide strips (battens) that align the upper section
for raising.
Assemble the ends and the lengthwise structural pieces
of 1/2" and 3/4" plywood. This is easier to do with the section turned
up side down. Use 6d finish nails and a good waterproof glue, and make
sure all corners are square. Glue-nail the floor in place.
Cut out a door in the lower section. Put a temporary brace
across the opening (save the cutout for a door).
Cut out the truck cab access window. Attach doublers to
lower sides, as shown in blueprint. Attach the fold-down sides to the lower
section with five 3" hinges or a piano hinge. |
|
Enclose the camper by attaching plastic, or
canvas curtains around the side bunks. Snap buttons hold them securely.
Windows open to provide ventilation.
|
|
| Put foam gaskets between the camper body and bunk sections
to limit vibration, and use spring-loaded hooks to hold the sides up.
Raising the roof tree. Assemble the roof by supporting
the upper end pieces in vertical position (braces nailed temporarily do
it), and glue-nailing two-by-four roof beams in place. Cover with 1/2"
exterior plywood, using one full panel at center and a smaller curving
panel on each side. To bend these, cut lengthwise grooves every 3/8" beginning
about 1" from the edge. Make test cuts and bends on scrap. Glue-nail the
panels to the end pieces and the beams.
Attach the two-by-two molding at roof sides, beveled as
shown in the drawing. Cut the wind deflector crosspiece at front to fit
the curve of the cab, leaving about an inch between them. |
|
Sheets
1 and 2 of truck camper construction details including front, rear
and side templates.
|
Get a restored copy of these vintage Sleeps 4 Expanding
Truck Camper Plans with 17 Pages of Enhanced and Enlarged Figures
and Illustrations and Searchable Text.
All Orders Processed
On a Secure Server
|
|
|
To determine the size of your camper, measure
your truck's dimensions as shown above. The Standard pickup can sleep four,
plus one in the cab (below). In Part II, plans for the kitchen facilities
will show how to build a table that lowers to make a cross bunk.
|
|
Cut out the upper rear opening (saving the cutout for the
door), and screw an angle iron across the top of the door frame to stiffen
it for jacking. Drill a hole in the center of the iron to receive a stud
screwed into the top of the jack extension to keep it from slipping off.
(A hole in one of the cleats on the front panel does the same job.)
A cross brace bolted to the jack extension keeps it
vertical while it's being jacked up. The jack extension
is sized to provide enough height to raise the top in position to receive
the roof supports.
|
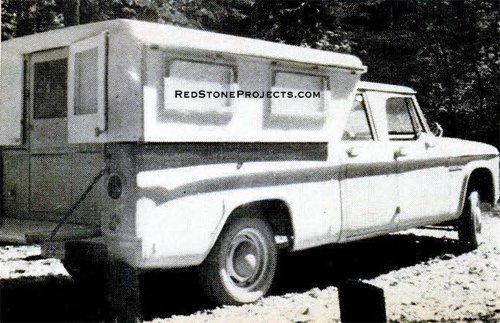
With top lowered for travel, there's enough
headroom to sit inside the camper. Six passenger truck (below) sleeps two
in its cab.
|
|
| Hinge the 1/2"-plywood upper sides to the roof molding.
These open up to form a roof for each side bunk. Add weatherproofing to
the inside edges of the end panels and the folding roof sections. Put two
windows in each of the open-out roof sections. Be sure the windows open
outward.
Finishing it off. Paint the upper and lower sections
before you put them together. Sand all rough edges, and countersink and
putty all nails and screws. Coat the camper inside and out with an oil-base,
sandable primer, and finish all surfaces with high quality enamel. Cover
the top with canvas, or fiberglass and plastic resin. |
|
Expandable Truck Camper in the lowered position
for travel.
|
|
| Up she goes! Telescope together the upper and
lower sections, and test raise them several times. Adjust the batten guides
until they're nonbonding. Sand them glass smooth to aid sliding action.
Hinge four one-by-two uprights (two at front, two at back)
to the lower section of the camper to support the upper one in the raised
position. Put catches on them to hold them in the up position. Also, fit
two angle iron and block assemblies (as shown in the blueprint) to each
end of the raised top. These are placed on the outside and bolted through
the end walls. They provide extra bracing and act as a safety support when
the top is up.
When raising the top, unhook the folding sides so that
the side curtain snaps don't catch on the lower section.
Before placing the camper in the truck, remove the truck's
rear window. Then, with a neighbor's help, lift each section onto the truck.
Run four bolts through the floor and truck bed to hold it in place. Make
the conduit supports to lengths that keep the foldout bunks level, and
the bunk roofs sloped slightly outward (for rain runoff).
Cut and sew plastic or canvas curtains to fit around the
bunks, and attach them with canvas snaps. Fix up the interior to suit your
needs, or follow the plans in Part II for outfitting the camper with storage
cabinets, gas stove, sink, and icebox. |
Part II
How to Add a Kitchen to Your Camper
|
|
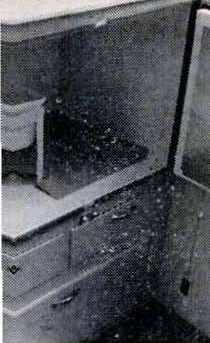
Construction
of the icebox cabinet.
|
Get a restored copy of these vintage Sleeps 4 Expanding
Truck Camper Plans with 17 Pages of Enhanced and Enlarged Figures
and Illustrations and Searchable Text.
All Orders Processed
On a Secure Server
|
Before you start building, measure your truck or trailer
carefully, and change the dimensions on the plans to suit. Test fit the
parts before putting them together. Assemble the cabinets with 6d nails
and a good waterproof glue.
The big pieces. First, cut out and put together
the plywood panels for the top, back, sides, and partitions of the two
counter units. If the kitchen goes into a camper where the rear panels
of the camper can be the ends of the two cabinets, you don't have to fit
the cabinets with plywood ends. Make sure the panels are put together square.
Add the drawer runners and the shelves before attaching
the front trim. Saw up the front trim from 3/4" pine stock. An easy way
to assemble these trim pieces is to lay them out on the floor and put glue
on all the butt joints. Put bar clamps across the assembly. Make sure it's
square; then drive corrugated fasteners into all the joints. Drive them
into the side that goes to the inside of the cabinet so they won't show.
When the glue is dry, glue-nail the trim to the front of the cabinets.
|
| Build the drawers and doors as shown in the drawings,
sizing them to fit the various openings. Put on bullet catches to keep
them from opening while traveling.
Install the seats, hinging the lids and attaching one-by-two
cleats to the front edge of the storage area. These hold the table in the
lowered position to make a bunk.
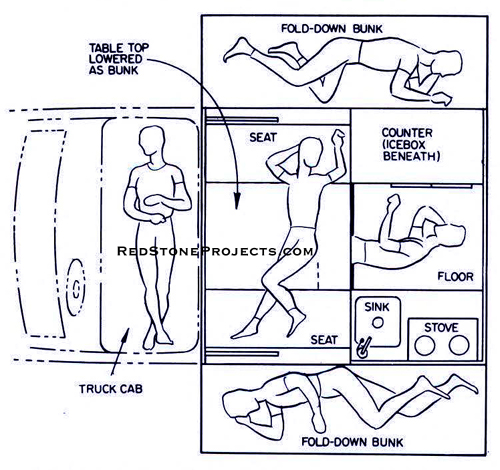
Make the dining table of 3/4" plywood, hinging a short
section to fold up so you can get in and out of the seats on each side.
The table seats four to five if one person sits on a camp stool in the
aisle. The table attaches to the cab end of the camper with two swing-up
brackets, and is supported on the other end with a fold-down leg. |
|
| The icebox. Make the icebox lining from 18-gauge
galvanized steel. Coat it with epoxy enamel and assemble it with sheet
metal screws. Caulk the seams with silicone and insulate it with 2"-thick
urethane foam sheets. Insert the icebox unit through the cabinet rear before
attaching the plywood back.
Mount a plastic dishpan big enough to hold a 50 pound
chunk of ice inside the icebox on an angle iron frame. Attach a hose connector
in the bottom of the dishpan, and run a drain hose through a hole in the
floor.
The sink is the boat galley kind with a hand pump. Water
is stored in a five gallon plastic tank belted in the storage area beneath
the sink. Store a length of plastic garden hose there, too, for filling
the tank.
The stove. A standard two-burner stove fits in
the opening in the counter top beside the sink. The gas line runs from
two one gallon propane cylinders mounted under the rear of the icebox.
It runs through a hole in the camper rear panel, along the bottom edge
of the panel, and in again on the stove side. Bolt a wood brace to the
plywood walls to hold the cylinders in place. And be sure to keep the gas
turned off at the cylinders while traveling.
See that the propane tanks and the water tank are installed
back out of the way, yet easily accessible through doors in the bottom
of the cabinets, or through small doors in the end of the camper, whichever
is easier. |
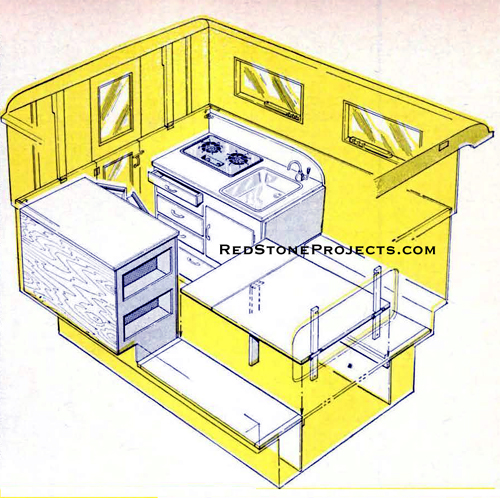
|
Cutaway showing truck camper interior layout.
|
|
| You can wire the camper so you can have lights and run
appliances or tools when you stop over at campgrounds where electric hookups
are available. Just mount an outdoor receptacle on the end panel of the
camper. Run Romex cable from it to a couple of receptacles (one in front
and one in back) mounted on the camper wall.
Light sockets on extension cords can be run to hang from
the camper roof.
To finish your kitchen, set and putty over the
nails, sand rough edges, and coat with a sandable
primer. Paint all the outside surfaces with enamel. |
|
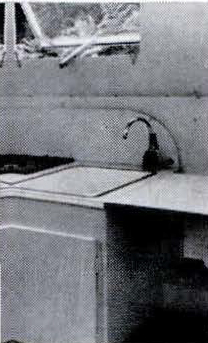
Construction
of sink and stove cabinet with drawers and storage.
|
Get a restored copy of these vintage Sleeps 4 Expanding
Truck Camper Plans with 17 Pages of Enhanced and Enlarged Figures
and Illustrations and Searchable Text.
All Orders Processed
On a Secure Server
|
|
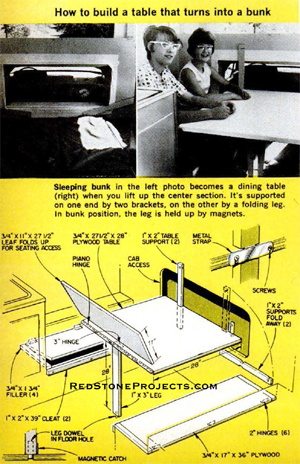
Sleeping bunk in the left photo becomes
a dining table (right) when you lift up the center section. It's supported
on one end by two brackets, on the other by a folding leg. In the bunk
position, the leg is held up by magnets.
|
|
Any 2 Vintage Trailer Plans
$19.95 FREE Shipping |
|
Select 2 Vintage Travel Trailer Plans
|
|
|