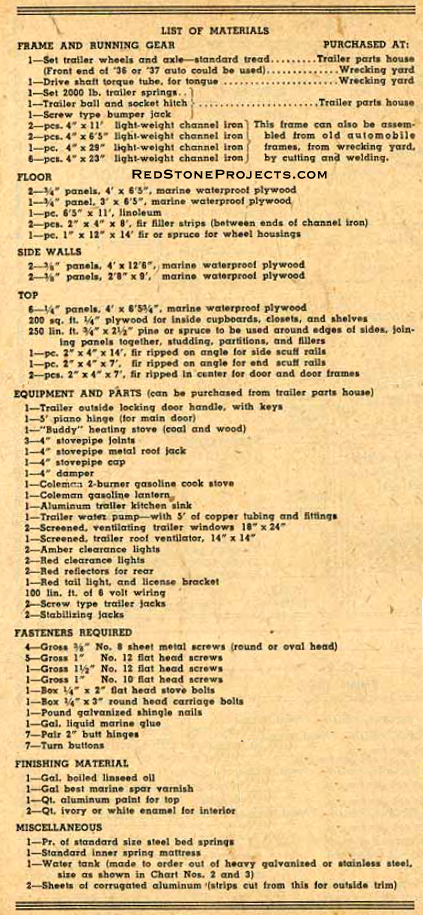
Free Shipping
1947 Trail Scout Camper Plans
Vintage Post War Travel Trailer Building Plans
|
1947 Trail Scout
Camper Plans
Build a Vintage Post War
Travel Trailer
 |
PDF Format |
|
|
All Orders Processed
On a Secure Server
|
Price $12.95
|
|
Get a restored copy of these vintage post war 1947
Trail Scout Camping Trailer Plans with 21 Pages of Enhanced and
Enlarged Figures and Illustrations and Searchable Text.
|
We will email these plans, to the address provided
with your payment, within 48 hours following receipt of your order.
|
|
|More
Vintage Trailer Plans|
|
|

|
|
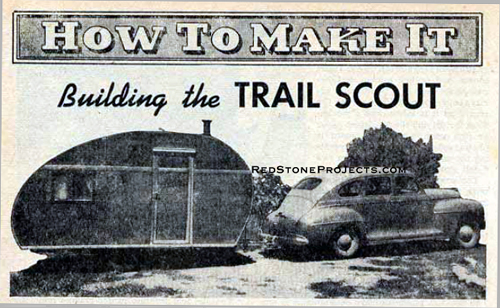
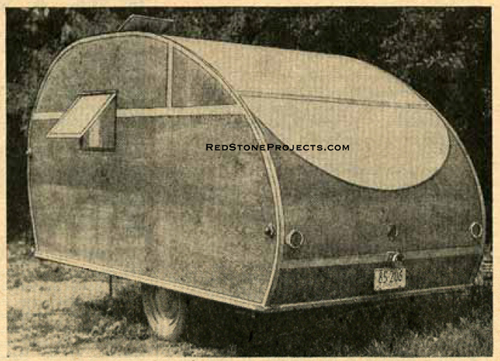
| HERE is a hunting and fishing trailer that embodies features
that have proved themselves over 10,000 miles of travel on every kind of
road, and in all climatic conditions - spring fishing, fall hunting, or
even a full winter spent in the South. |
Part 1. You can stow your grub and gear in this
land cruiser and start traveling in comfort.
By Dale Vincent
|
| Wheels are spaced the same width apart as your car, enabling
you to travel and explore far from the regular beaten track.
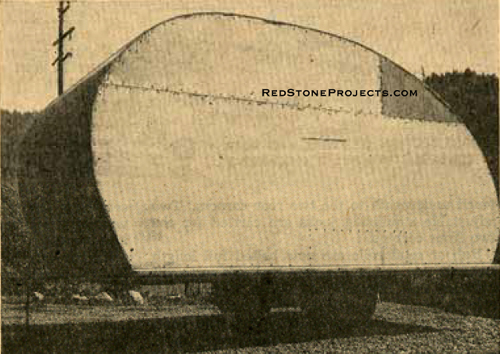
Weighing only 1,100 pounds, it is light enough to be taken
into the mountains with ease. Its stream-lined shape utilizes waste space
and lets you roll at your customary driving speed over the highways. |
|
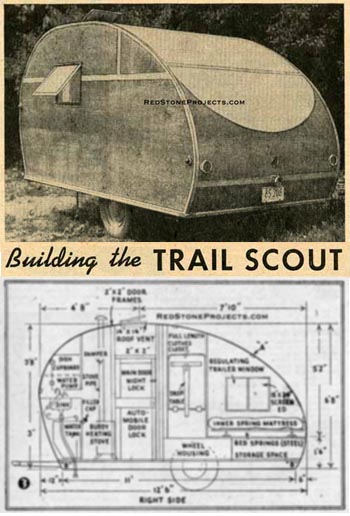
| Built of waterproof, marine plywood, she is as water
tight and sound as a boat. Trailer itself is 12 1/2 feet long (overall),
6 feet 5 inches wide, and six feet in height. The cost of material will
run approximately $300.00, including running gear, and a full-size inner
spring mattress. Trailer wheels and axle purchased at a trailer parts house
are best, but if expense has to be watched, purchase the front end of a
late model car at some wrecking yard.
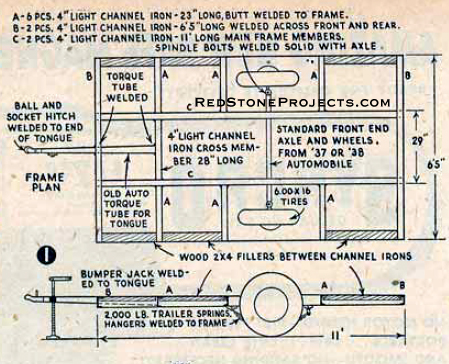
After checking the wheels for alignment, the spindle bolts
should be welded solid, making wheels and axle one unit. When 2000-pound
springs are U-bolted to the axle, they may have to be underslung - this
you will have to check, as axles differ. Angle iron or old automobile frames
are cut and assembled, Fig. 1. |
|
|
| Acquire a good torque tube drive shaft housing at a wrecking
yard. A hole is now cut with a cutting torch in the center of the front
cross channel iron large enough for the torque tube to slip through. Slide
this torque tube through the hole until it butts against the next cross
bar, and weld it solid (Fig. 1). Then weld the torque tube in the front
channel iron cross bar. Weld the trailer hitch socket on the end of the
torque tube. This hitch should be of malleable steel and not made of casting.
A screw type bumper jack is needed to raise and lower
your trailer tongue. This jack can be any one of a number of bumper jacks
that are sold at the parts houses. The body of jack is welded on the side
of the torque tube tongue 29 inches out from the trailer frame. |
|
Photo 1. Showing rear end segments glued
and screwed to sidewall. Also notice
splice batten and wheel house box.
|
| |
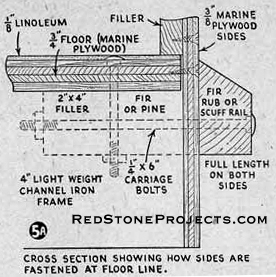
| The 3/4-inch marine plywood floor is laid on top this
frame. Do not bolt it down until it has been cut to fit. A space will have
to be cut out of the floor at each wheel for the wheel housings (Fig. 2).
Now the floor is laid, and two-by-fours are cut to fit between the ends
of the channel iron under the floor along both sides, except the space
where the wheels are. Now insert these fillers between frame ends and clamp |
|
| with C-clamps. Drill 1/4-inch hole down through each
end of filler strip. Be sure to catch the frame wherever possible. These
are then bolted with 1/4 x 3-inch carriage bolts all around both sides.
Take light batten strips and screw underneath floor, crossways over the
floor panel cracks, to keep out dust.
Wheel-housing boxes are made of 1 x 12 pine or spruce
according to Figs. 2 and 3, and are covered by gluing and screwing a 3/8-inch
veneer panel on top. Be sure you have at least four inches for tires to
work up and down. |
|
Photo 2. Showing front end curved segments
and batten splices on roof and sides.
|
The outside edges of wheel-housing, floor, and filler
strips are all flush, as your sidewall goes flat against all these. Linoleum
is now glued and laid over the floor,
flush to the edges. The 3/16-inch marine plywood sides
are laid out in 6-inch squares according to Fig. 4. The curve is then marked
with a pencil and sawed out with a key-hole or hand saw. Next, 3/16-inch
holes are drilled three inches apart and 3/4 inch back from the edge completely
around these side panels: holes counter-sunk for flat head one inch No.
12 screws. |
|
Photo 3. Door jams and frame are glued and
screwed into place first on solid wall.
|
| A soft pine board 1 x 3 inches and 12 feet long is now
laid on the workshop floor or out in the yard. On this board is painted
with a brush a medium coat of waterproof liquid marine glue. If your wife
has a used cotton blanket, trade her out of it and rip up 3-inch-wide strips
to go the full length of this batten. Push this stripping down onto the
glue and put another medium coat of glue on top of the blanket strip. This
pine batten makes a solid side, after gluing and screwing the top and bottom
halves to it. |
|
|
Get a restored copy of these vintage post war 1947
Trail Scout Camping Trailer Plans with 21 Pages of Enhanced and
Enlarged Figures and Illustrations and Searchable Text.
All Orders Processed On a Secure Server
|
| These blanket strips are laid between all splices and
joints throughout the trailer. Saturated with liquid marine glue and screwed
up tight, they make a permanent, flexible, waterproof joint. Filler strip
segments are sawed out of pine or spruce and screwed to curved edge of
side as per photos No.1 and 2 (do not forget the marine glue-soaked blanket
strips).
Marine glued blanket strips are now run full length of
both outside edges of floor and around wheel-housing box. Sides are lifted
up and clamped in position with C-clamps. Sides are now screwed to the
filler strips at floor line and around wheel-housing the full length of
the trailer. |
|
|
PART 2. We can't let our work trail behind, so
let's put the finishing touches on the Scout.
|
| IN PART 1 the building of the shell of the Trail Scout
was described. In this issue we will tell you how to complete the interior
and finish the exterior.
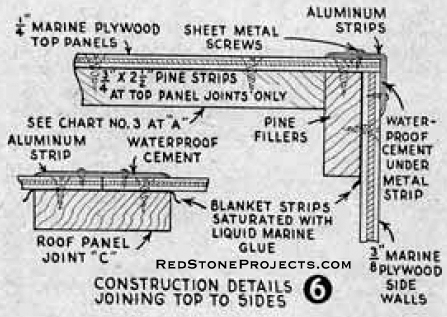
The 1/4-inch marine plywood roof panels are now drilled
and countersunk for 1-inch No. 12 flathead screws around all four edges,
3 inches apart and 3/4 inch back from edge. Starting at the bottom front,
these roof panels are screwed tight. With the grain running crosswise,
the roof panels automatically take the curve of the sides. A splice is
made between each roof panel as per "A" Fig 3. (Detail of this roof-splice
joint can be studied at "C" on Fig. 6.) Be sure to put glue and blanket
stripping at all joints. All roof panels are put on except the last one.
This panel is left off until the main door is cut out. |
|
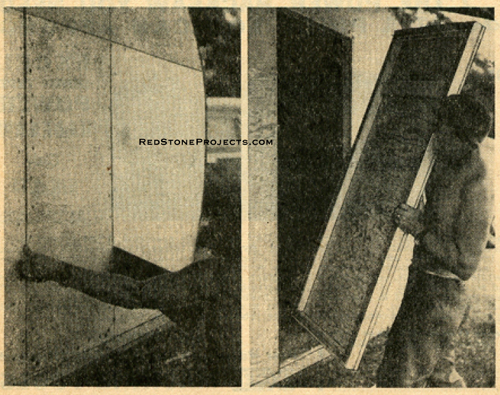
Photo 4 shows the door being sawed out of the
sidewall. The door is then lifted out and the edges trimmed. Be sure to
leave plenty of play for the metal edge strip, hinges and locks as
shown in Photo 5.
|
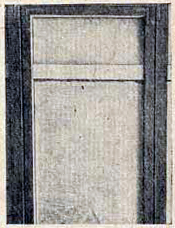
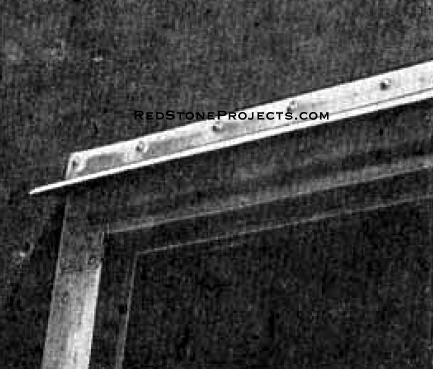
| The main door, posts, jambs, and header are glued and
screwed into position as per "D" in Fig. 3, Fig. 7, and photo No. 3. This
door is then sawed out as in photos No. 4 and 5. Now the last roof panel
at the rear is put on, leaving your job looking as in photo No. 7.
Two permanent, screw-type, leveling jacks are fastened
underneath to the two rear corners. Two adjustable stabilizing jacks are
carried for the two front corners.
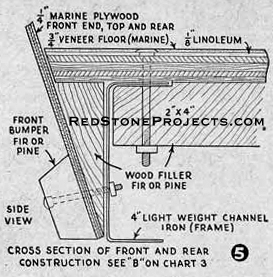
Rub or scuff rails are now bolted full length on each
side as per Fig. 5A. End rub and scuff rails are now clamped and bolted
to front and rear as per Fig. 5. The 3-inch aluminum strips are now cut
from corrugated sheets, and bent, clamped, and screwed into place with
sheet metal screws over all outside joints and splices, as shown in Fig.
6. For the next step in construction waterproof cement or dum-dum is putty-knifed
over all edges before the 3-inch aluminum strips are screwed into place. |
|
| Fig. 7 shows detail construction of hinges and metal
weather stripping around door and door casings. Openings for windows, roof
ventilator and stovepipe jack are reinforced on the inside by gluing and
screwing 3/4 x 2 1/2-inch pine strips around the openings. Dum-dum or waterproof
cement is then placed under edges of windows, ventilator, and stovepipe
jack and then screwed into place.
If your wife helps you on this job, be careful that the
marine glue, and the waterproof cement do not drip into her hair. If they
do, build yourself a doghouse instead of a trailer. |
| Next the wiring system is put in. All states do not have
the same regulations. so, inquiry should be made from the state police,
and clearance lights, tail lights, and reflectors installed according to
your local laws. A simple electric light wiring diagram is installed as
shown in Fig. 4. |
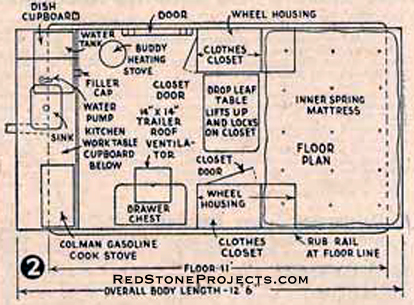
You are now ready for your interior furnishings. Bedsprings
are installed first as per Figs. 2 and 3. Notice that you can lift front
of bed to get at storage space underneath. Figs. 2 and 3 also show detailed
construction of full-length clothes closets. Both these closets have a
hat shelf at the top and a broom-stick rod
underneath the shelf for coat hangers. These closets
are made from 1/4-inch veneer, or the scraps left from top and sides. |
|
|
Photo 6. Aluminum strips are screwed around all
raw edges of door, frame, and body. Drip molding is bent and fastened above
as shown.
|
| A butane cookstove and heater may be used by those who
prefer them. We have found that a Buddy heating stove, as shown in Fig.
3, is preferable because it will burn coal, pine cones, cow chips, or sage
brush - things you are most likely to find around camp. The cookstove is
a two-burner Coleman, using the same white gas we use in our lamp and the
outboard motor. One five gallon can of white gas supplies fuel for all. |
|
|
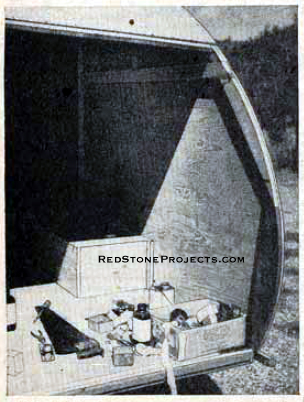
Photo 7. Body before trim is put on.
|
| A large-size water tank, as shown in Fig. 3, is absolutely
essential for off-the-highway travel. It guarantees pure drinking water
for at least a week. If an icebox is wanted it can be placed in the space
marked "dish cupboard" on Figs. 2 and 3. But experience has proved an icebox
useless in hunting and fishing camps because of the lack of ice. The chest
of three drawers was purchased unpainted at a local furniture house. |
Cupboards may be made as suggested in sketches - or according
to your wife's specifications. The interior is painted with two coats of
white or ivory fast-drying
enamel. Curtains are hung and mirror installed. Fire
extinguisher is optional, but highly recommended (Photo No. 9.) |
|
|
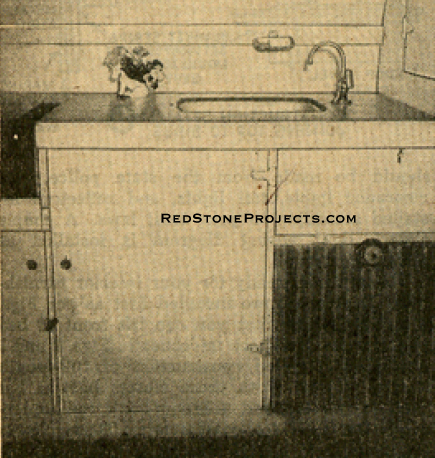
View of front end, showing part of the kitchen
table, sink, water pump and water tank.
|
| With mattress installed, and the bed made, she is now
starting to look like home. The outside should be painted with two coats
of boiled oil. A little stain may be added to this, if wanted. The roof
is now painted silver to reflect the heat, and the outside is given at
least three coats of the best marine spar varnish. The trailer may also
be painted with enamel to match the paint job on your car. |
|
|
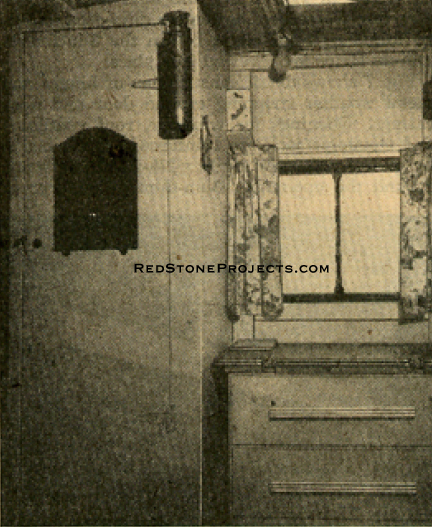
Photo 9. View of left side of interior.
|
| You will need a ball type hitch mounted on the rear of
your car. You hook your trailer to this ball. Next have a garage mechanic
hook a plug on to the tail light wiring that matches outlet plug to your
trailer cord. This lets your clearance lights on the trailer work on and
off from your own light switch on the dash. |
|
Photo 10 above shows the ball-type hitch
mounted on the rear of the car.
|
| You are now ready to roll to your favorite hunting or
camping spot, or this little trailer will leave you independent of hotels
on business trips - or will serve as a guest bedroom at home - and if you
happen to have a flat tire, remember you have chosen your wheels to match
the ones on your private car, and the spare in your trunk is also a spare
for the trailer. |
|
Photo 11 above shows the car being
unhitched from the trailer.
|
| If a flat does happen on the trailer, don't worry because
it looks like the wheel is boarded up solid, just take your bumper jack,
hook it under the scuff rail, and lift the body of the trailer. The springs
force the wheel down as the body goes up, and as the tire clears the ground
you will find it easy to remove.*** |
Any 2 Vintage Trailer Plans
$19.95 FREE Shipping |
|
Select 2 Vintage Travel Trailer Plans
|
|
|