Free Shipping
1970 Truck Camper Plans
Build a Vintage Wood Frame Cabover Pickup Camper
|
1970 Truck Camper Plans
Build a Vintage Wood Frame Cabover Pickup Camper
 |
PDF Format |
|
|
All Orders Processed
On a Secure Server
|
Price $12.95
|
|
Get a restored copy of these Vintage 1970 Truck Camper
Plans with 11 Pages of Enhanced and Enlarged Figures and Illustrations
and Searchable Text.
|
We will email these plans, to the address provided
with your payment, within 48 hours following receipt of your order.
|
|
|More
Vintage Trailer Plans|
|
|

|
|
|
| IF YOU can't buy it, build it. This was my decision
when I couldn't find a camper body that would meet my particular needs
and pickup. If you have a similar problem, you might do as I did and follow
this procedure to suit your own pickup. Though the dimensions of your truck
will be different, the method is relatively universal.
My first step was to visit dealers in stock campers to
decide on the equipment I could use. Next, I measured and laid out on paper
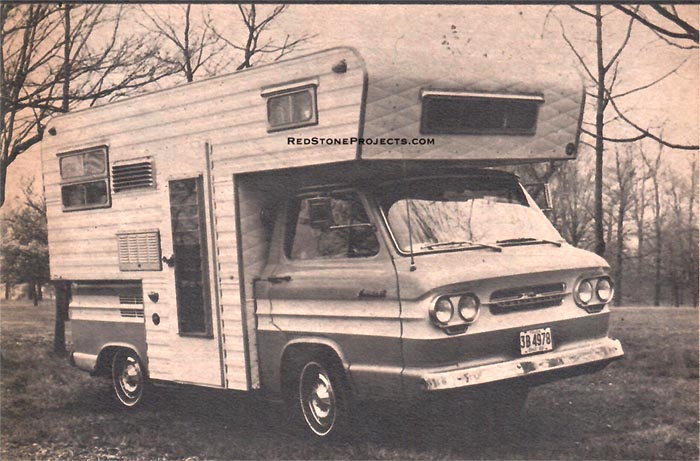
the dimensions of the pickup box. My truck is a Corvair 95 Rampside (since
discontinued) which made possible an interesting side entrance door. Your
pickup no doubt will require a rear entry but the general building approach
is the same, no matter the pickup. I drew a set of plans for building the
camper with a scale of 1/8 in. to the foot. I decided on this scale because
it would best show the details of framing members - vertical and horizontal
stringers - that make up the wall and roof sections. The drawings showed
windows and door locations and the best placement of such interior appointments
as stove and refrigerator, kitchen and dining areas. At the outset, I wanted
to cut the weight of the camper and so I carefully selected appointments,
appliances and construction materials to keep the finished weight of the
camper as low as possible.
I selected redwood for the framing material of
the sides and top. On the floor and forward portion of the camper I used
3/4-in. fir plywood because of its strength and rigidity. I assembled the
floor sections to the front wall of the camper, also using 3/4-in. plywood.
This involved tailor-fitting the various cuts to the exact area size of
the pickup box. |

|
|
CAMPER rear view showing position of propane
tank on tailgate to comply with laws. Windows are fitted with screens.
|
| After completing the floor assembly, I turned to the
sides next. For this I selected l x 8 x 10-in. redwood boards. I had these
boards milled to an exact 3/4-in. thickness at a lumber mill. This was
an important operation because I wanted to use a 3/4-in. router blade to
cut the half-lap joints. Therefore, it was imperative that the material
thickness be an exact 3/4 in. to assure a tight-fitting lap joint. These
boards then were rip-sawed to 1 1/2 in. width on a table saw for use as
the vertical studs and horizontal stringers for the sides and top of the
body. I referred to my plans to find the exact locations where these members
would cross one another. At these marked locations the router was used
to cut 3/4 x 3/4-in. rabbets. This made a perfect fitting lap joint.
Next, the verticals were attached to the assembled
floor section and the horizontal stringers were glued and clamped to the
verticals. At points where I believed there would be stress, I further
secured the lap joints with a counter-sunk 1 1/2-in. flathead wood screw.
Consideration and attention were given to the location of windows and doors
when fabricating these side members so lap joints would not fall in a position
that might interfere with the installation of the windows, doors and vents. |
|
|
|
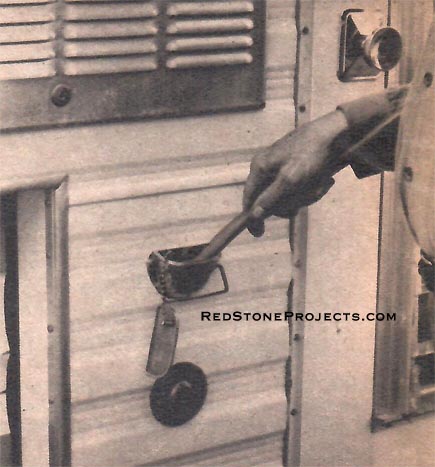
WATER STORAGE tanks are filled from outside
the camper. Fittings for the camper were purchased from a local mobile
home dealer.
|
| This type of construction results in a honeycomb or cellular
configuration which makes it easy to place the 1 1/2-in. fiberglass insulation
in each of the cells. The top of the camper was assembled in exactly the
same manner as the sides and the two were attached. The front and rear
of the top were rounded where they met the front and back. |
|
|
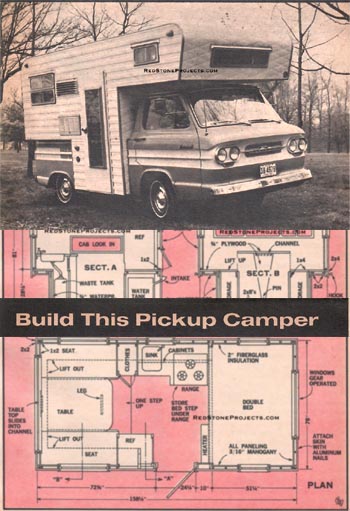
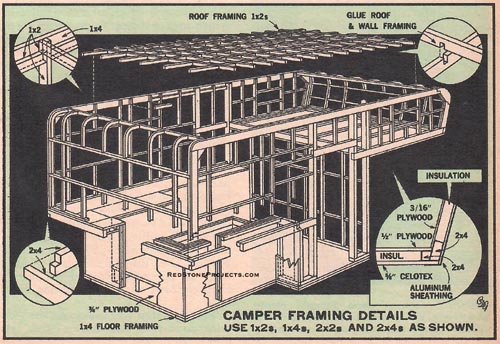
Figure 1. Truck Camper Framing Details
|
| The superstructure of the camper now was complete
and ready for the interior plywood. The interior was paneled with 1/4-in.
mahogany panel board. This was secured to the interior skeleton with contact
cement applied between the stringers and the back face of the panels. In
areas where I thought there would be greater stress, I fastened the panels
to the frame with 3/4-in. flathead brass screws countersunk into the panels.
After the paneling was in place I set all the windows and the door. I finished
these off with aluminum moldings. |
|
|
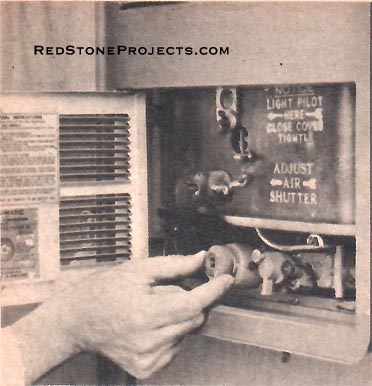
HEATER is a compact model which provides
comfort in subzero weather. It vents behind the truck cab protected from
the weather.
|
| The next step was to lay out the electrical circuits
for the interior lights, taillights, stop and clearance lights. At the
same time, I installed the wiring cable for the intercom system for communication
between body and truck cab. After the wiring, I installed the fiberglass
insulation in the cells formed by the stringers. The fiberglass is best
cut to size with a sharp knife. Any other means of cutting and handling
this material can be hazardous. (Broken glass fibers can penetrate the
skin and cause irritation.) With the insulation in place, the following
step was to install the exterior aluminum skin to finish the body.
The aluminum covering which I used for the camper
was the regular grade and weight of prefinished white trailer siding. This
was provided in exact lengths and widths to meet my specifications. |
|
|
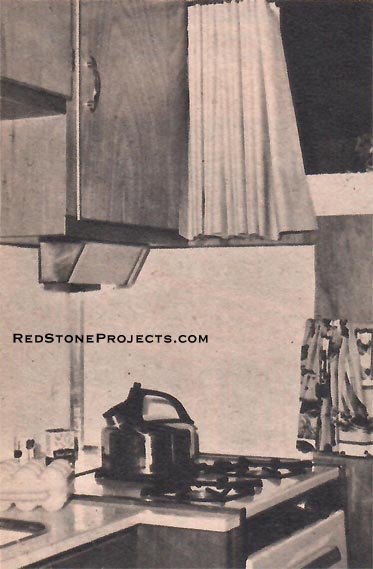
CABINETS above range provide plenty of
storage. Every inch of interior space is utilized for efficient living
and most comfort.
|
| The aluminum was fastened to the skeleton framework with
3/4-in. hex-head aluminum screws. After the skin on the sides and top there
remained only the roof rail, outside window garnish and drip caps for the
windows and door.
This is a good place to mention the source for the appliances
and building materials that were used in this project. An excellent supplier
can be found at practically any mobile-home sales and service center. Most
of these are affiliated with some large trailer supply dealer. Throughout
the planning and building of this custom camper an attempt was made to
keep everything light as possible but at the same time functional. |
|
Figure
2. 1970 truck camper plan and elevation views with dimensions.
|
Get a restored copy of these Vintage 1970 Truck Camper
Plans with 11 Pages of Enhanced and Enlarged Figures and Illustrations
and Searchable Text.
All Orders Processed
On a Secure Server
|
|
| Modern appliances and materials that would require minimum
maintenance were chosen. These appliances can be repaired by most mobile
home dealers and parts are readily available.
With the interior of the camper coach completed there
remained only the placement and fastening of the gas stove, refrigerator,
space heater and kitchen sink. The cabinet doors and drawers were made
of 3/4-in. birch plywood sanded and varnished to match the interior paneling.
The floor was covered with 9-in. square vinyl tile, except for the dinette
area, which was covered with nylon carpeting. |
|
|
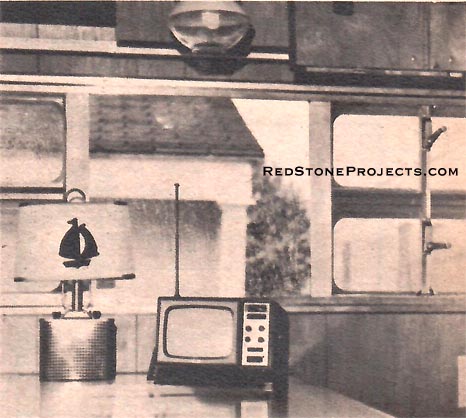
HOMESTYLE conveniences are to be found
throughout this handsome Camper. All appliances operate on both 12 and
117 volts.
|
| The cost of all materials, including appliances, was
about $850 and the project required about 200 spare-time hours in building.
The resulting camper fitted perfectly into the pickup box. The completed
weight of the coach is 1,030 lbs., well within the weight limit I had estimated
and set.
In use this camper has turned out to be a good performer.
It handles well and the weight is evenly distributed for cornering and
roadability. When the pickup must be used without the camper, a sling can
be attached to four eyebolts at the corners of the camper and the whole
thing can be hoisted out.
For living in, she lives up to our expectations also.
There is plenty of storage space, the body is cool in summer and warm in
chill nights. Interior appointments are both functional and comfortable
with all conveniences. |

|
|
VENTILATOR FAN is motor-driven and placed
to exhaust interior air most efficiently. The fan has approved weatherproof
wiring.
|
| I was proud of the finished job and had lived up to my
promise that if I couldn't buy it, I'd build it. |
Any 2 Vintage Trailer Plans
$19.95 FREE Shipping |
|
Select 2 Vintage Travel Trailer Plans
|
|
|

