Free Shipping on All U.S. Orders
All Orders Processed on a Secure Server
Ideal Outdoorsman's Trailer Plans
Build It Yourself Compact Camping Trailer

|
Ideal Outdoorsman's
Trailer Plans
Build It Yourself Compact Camping Trailer
 |
PDF Format |
|
|
All Orders Processed
On a Secure Server
|
Price $12.95
|
|
Get a restored copy of these vintage Ideal Outdoorsman's
Trailer Plans with 31 Pages of Enhanced and Enlarged Figures
and Illustrations and Searchable Text.
|
We will email these plans, to the address provided
with your payment, within 48 hours following receipt of your order.
|
|
|More
Vintage Trailer Plans|
|
|

|
|
YOU ASKED FOR
An Ideal Outdoorsman's Trailer
TO BUILD YOURSELF... HERE IT IS
By HI SIBLEY
|
|
|
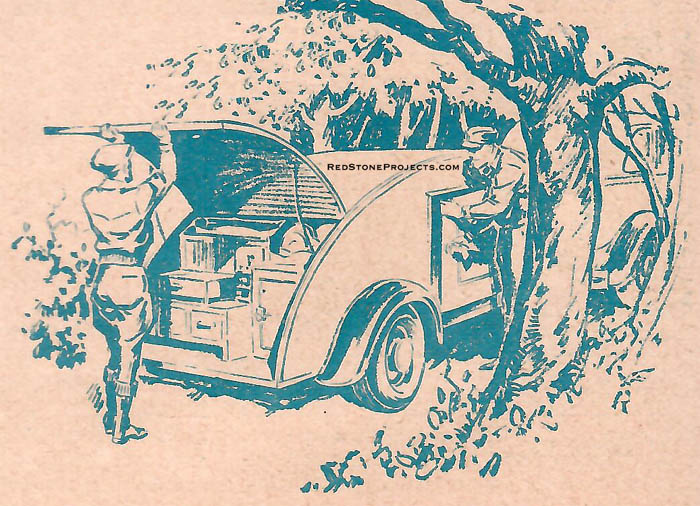
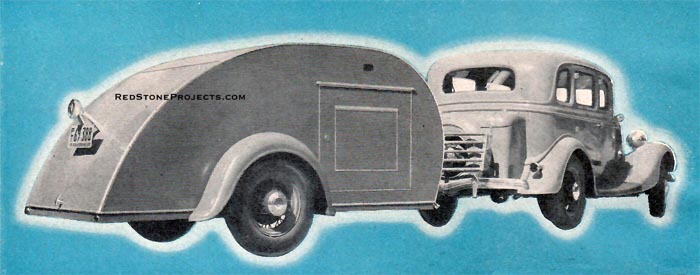
Though compact, the snug quarters provided be
this lightweight trailer, named the Kaycraft Kampster,
have every
needed convenience.
|
THIS compact, streamline trailer is especially adapted
to the demands of the outdoorsman because of its unusually generous road
clearance and light weight, making it possible to follow wagon trails through
brush and to climb steep, rutty roads. Although it weighs only 650 pounds,
its construction is exceptionally sturdy, as the detailed drawings indicate.
The unique design is
by Walter Hille and J. S. Mc-Beth, of Los Angeles, who
have named it the Kaycraft Kampster.
A snug, comfortable sleeping compartment is located amidships,
an inner-spring mattress being laid directly on the floor. Forward is a
compartment for clothes, and, over the sleepers' feet, a large shelf for
bedding, duffel, and miscellaneous equipment. It has ample space for hunting
and fishing gear.
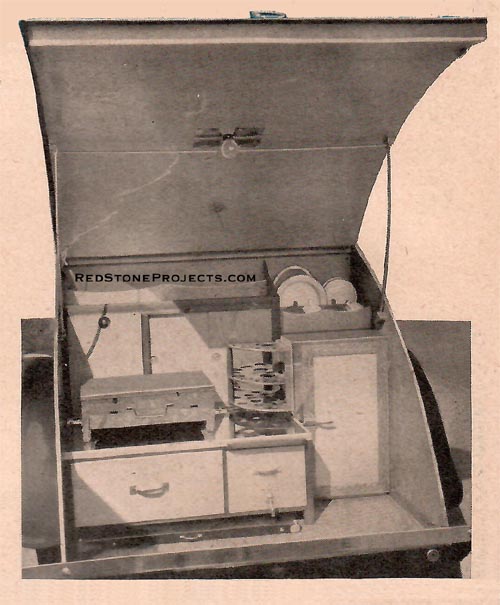
In the rear, a lid lifts to give access to a complete
kitchenette, including stove, refrigerator, water tank, shelves, a drawer
for food, and racks for dishes. Even a swinging beverage rack can be built
in if desired.
Electric bulbs and switches are provided in both the sleeping
compartment and kitchenette, the wiring for which can be arranged to plug
in on a six-volt car battery, or a 110-volt circuit in an automobile camp. |
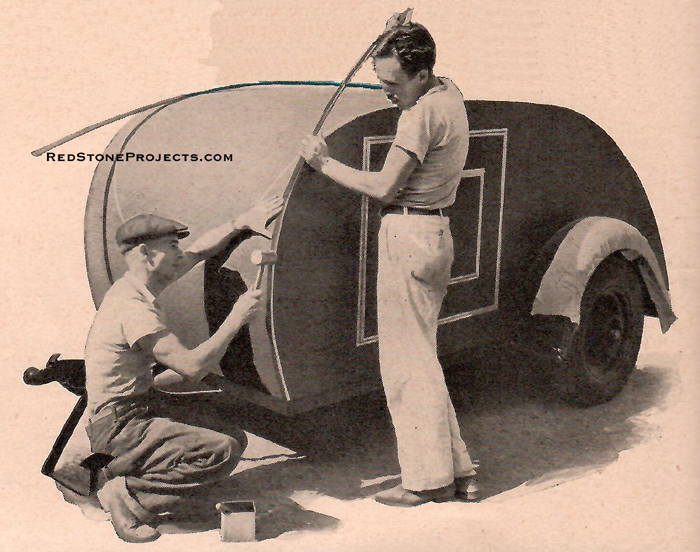
Aluminum molding being tacked over the trailer's corners
to give the finished job an attractive appearance.
|
Materials to build the trailer cost about $100 east of the
Rockies, and somewhat more on the Pacific Coast. A man who lacks the equipment
to make the chassis himself, or would rather not go to the trouble, can
buy the chassis complete with wheels, tires, and hitch. This will increase
his cost about $50.
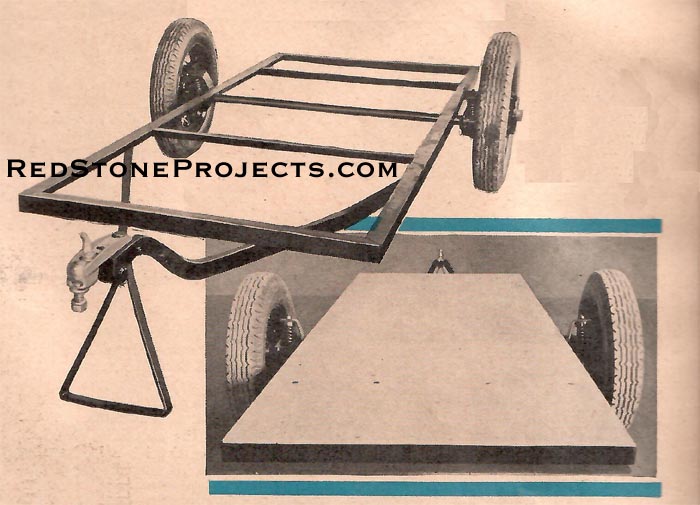
The chassis frame is a flat rectangle 48 x 115 1/2 inches,
made of steel angle irons as in Figure 1. Side and end members are 2 1/4
x 2 1/4 x 1/4 inches, mitered and welded at the corners.
| |
Ideal Outdoorsman's Trailer Plans Figures 1 through
5.
|
Get a restored copy of these vintage Ideal Outdoorsman's
Trailer Plans with 31 Pages of Enhanced and Enlarged Figures
and Illustrations and Searchable Text.
All Orders Processed
On a Secure Server
|
|
There are two cross members of 1 1/2 x 1 1/2 x 1/4-inch section,
cut as shown Figure 2, and welded to the side members. The axle, welded
to the frame, also serves to reenforce the structure. To make sure no warp
creeps into the finished frame, the various members should be
laid upside down on a flat surface when welding. When
completed, the top is level all over.
For the hitch bars, 2-inch channel steel is used, being
bent in the form of an A, and welded on the underside of the frame, making
an exceptionally sturdy job. A triangular parking stand is bolted between
the ends of the channels. This swings up under the trailer when not in
use. The upsweep of the hitch bars is illustrated in Figure 3, together
with the parking-stand dimensions.
A standard hitch, made by Zagelmeyer, Bay City, Mich.,
and shown in the photos, is well suited to this trailer, but it is possible
to use other makes.
| |
Ideal Outdoorsman's Trailer Plans Figures 6 through
8.
|
Get a restored copy of these vintage Ideal Outdoorsman's
Trailer Plans with 31 Pages of Enhanced and Enlarged Figures
and Illustrations and Searchable Text.
All Orders Processed
On a Secure Server
|
|
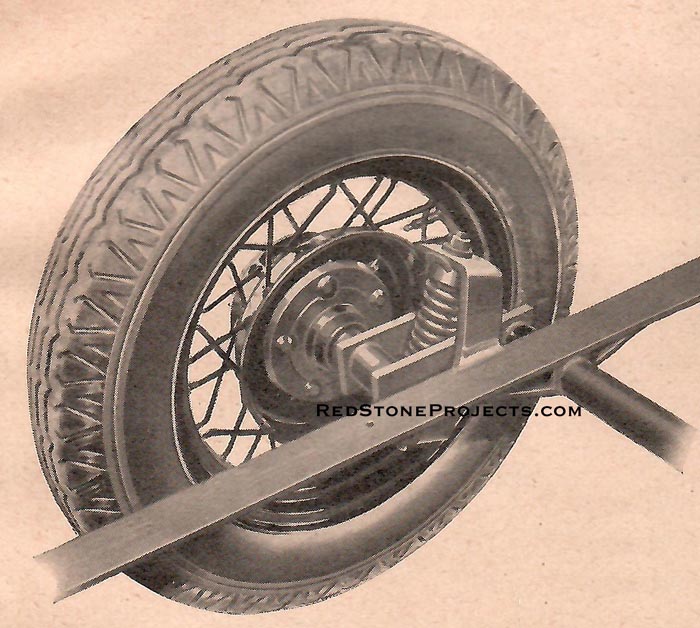
| An ingenious axle, with independent springs, or knee-action,
was designed especially for this trailer, making possible the exceptional
clearance of 11 inches. Heavy, coil springs, set between the chassis frame
and a yoke carrying the wheel spindle, form a very compact unit, and not
only provide easy riding but keep the wheels up close to the chassis, and
eliminate long springs, shackles, bolts, clips, and so on. In Figure 4
is shown the method of securing this type of axle to the frame.
In case you prefer to use a conventional leaf spring,
one may be mounted, as shown in Figure 5. This, however, entails some expense
in the way of a pattern and castings.
The cast-steel knee, for the patterns of which dimensions
are given, will give a 5-inch drop (or greater if you wish), and brings
the wheel up close to the chassis. It is welded to the tubularsteel axle,
and has a seat for the spring. The chassis frame should have a plate, welded
to the side member, to carry the spring-hanger rivets at the forward end,
and the shackle bolt at the rear. Select a light spring, or remove some
of the leaves from any standard spring, bearing in mind that the moving
load will be only 650 pounds, plus equipment. This type of axle naturally
will not have so much clearance as the model shown in the photos. |
|
|
Above. View of the chassis frame, constructed
of steel angle bars, welded together. At forward end are the tow bar and
stand. Below. Floor in place on the chassis frame only along the two ends.
|
| The knee is used with a leaf spring because a one-piece
forged axle of sufficient weight cannot be bent at a right angle, and,
unless this were done, the wheels would be too far below the chassis, making
the trailer look top-heavy.
The first step in building the body is laying the floor
of 3/4-inch plywood. This is cut to the exact size of the chassis frame,
and secured with 1/4-inch carriage bolts through end and cross members,
but not along the sides. Later, bolts will be put through the sills at
the base of the walls as well as through floor and frame.
For the side walls, also, 3/4-inch ply-wood is used. On
wrapping paper, glued together in a rectangle 3 feet 8 inches x 10 feet,
lay out 4-inch squares, and trace the outline shown in Figure 6. Both walls
of the body are identical. Notches for the intermediate ceiling beams are
5/8 inch deep, those at the ends 2 inches, as in Figure 7. This drawing
also gives the locations of the forward and rear bulkheads, or partitions.
Spruce sills, 13/16 x 1 inch, are screwed and glued along the bottom edge
inside each side wall. |
|
|
One of the trailer wheels, showing the specially
designed knee-action spring. Leaf springs may be used, if you wish.
|
| The body can be erected directly upon the chassis if
the wheels are removed and the frame raised on blocks about 3 or 4 inches
from the floor. With the wheels in place, the top is rather awkward to
work on.
The floor plan, shown in Figure 7, gives an idea of the
general arrangement of the built-in conveniences, and shows how the two
doors in the forward partition open into the clothes closet and shelves.
This compartment, as well as the entire body, is shown in the cutaway perspective,
Figure 8.
Plywood cleats serve as door stops. Shelves also are of
plywood, with a 1/2 x 1/2-inch strip under the forward edge of each. On
the forward side of the rear bulkhead is a large shelf, or bin, for bedding,
duffel, and other equipment, well out of the way over the sleepers' feet.
A spruce beam, 3/4 x 2 in., runs across the top of each bulkhead, with
the beams between them being 3/4 x 1 1/4 inch. The bulkheads are further
reenforced with vertical cleats in the corners. |
|
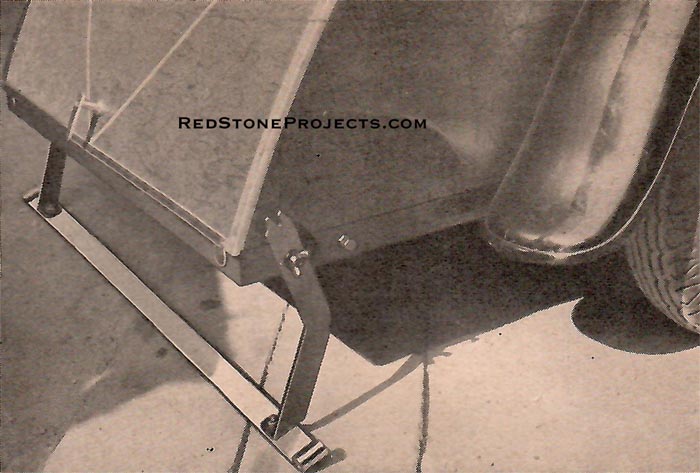
|
The special bumper of the trailer, which can be
let down when you reach camp to furnish support at rear. It is held in
position by wing nuts.
|
| Brass or galvanized screws and nails and casein waterproof
glue should be used throughout. Flathead screws should, of course, be countersunk.
Before the glue sets, check corners with a square.
With beams and bulkheads installed, the roof is laid.
Plywood 1/8 inch thick is used, and, over the sleeping compartment, it
is installed with the visible grain lengthwise. This piece reaches only
to the middle of the beams along the top of each bulkhead. Over the nose
or forward compartment, another sheet of 1/8-inch plywood is put on with
the grain crosswise. It is so
placed because of the more abrupt curve here.
Casein glue and brads are used to secure the plywood to
sides and beams. The covering over the kitchenette is a separate unit and
will be described later. |

|
|
Ideal Outdoorsman's Trailer List of Materials
|
For a first-class job, the whole inside of the body should
be given a coat or two of clear shellac before the roof is laid, and the
underside of the roof panels should be similarly treated. Spar varnish
can be used instead of the shellac.
|
|
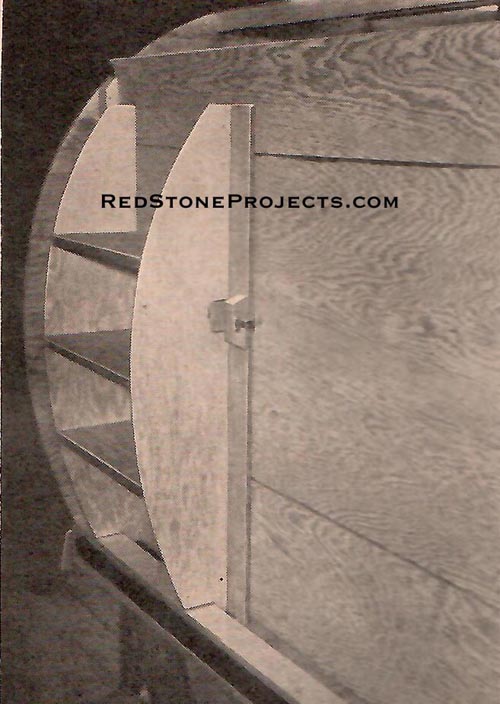
Shelves in compartment at forward end of trailer,
reached through door in bulkhead.
|
| The model in the photo is covered with durable imitation
leather, laid in rubber cement, and aluminum corner strips over the edges
covering the joints as well as the tacks. If desired, canvas can be used
for covering, if stretched tightly after thinned casein waterproof glue
is applied to the walls and top. After the first coat of paint is thoroughly
dry, smooth with a coarse sandpaper, paint, and sandpaper again with increasingly
finer grades until the surface is smooth enough to suit you.
Half-round metal molding is placed over the joint between
body and chassis frame. |
FINISHING AND EQUIPPING YOUR
Ideal Outdoorsman's Trailer
Simple Instructions on Putting the Final
Touches to a Mobile Camp That Will Enable
You to Cover More Ground in Greater Ease
|
|
|
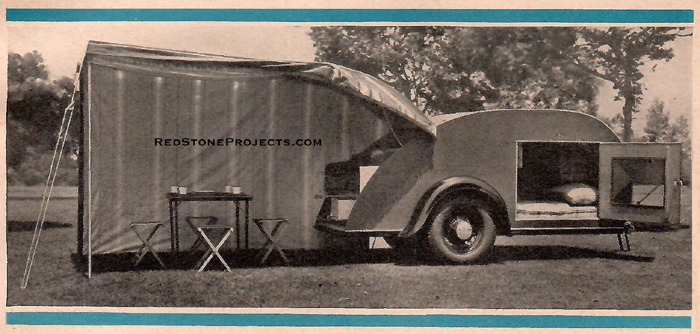
Ready for the road. The trailer's light weight
makes it easy to tow, and the ample clearance permits it to be taken over
the roughest trail.
|
| WITH the chassis and sleeping compartment built according
to the instructions and drawings, we are now ready to start on the kitchenette
of our lightweight trailer. The general dimensions of the extremely compact
and convenient kitchenette are given in Figure 9. |
|
|
The lid raised to give access to the kitchenette.
A folding table is stored beneath the drawer.
|
| It is constructed of 1/4-inch plywood, and, where framing
is visible in front, of Philippine mahogany. Drawer rails and cleats may
be of pine.
The built-in conveniences include a cupboard with sliding
panels, a bin or dish rack, large drawer, and a chromium-plated workbench
top, a galvanized water tank, bread board, and refrigerator. A pair of
rails, fixed to the cupboard next to the workbench, permit the gasoline
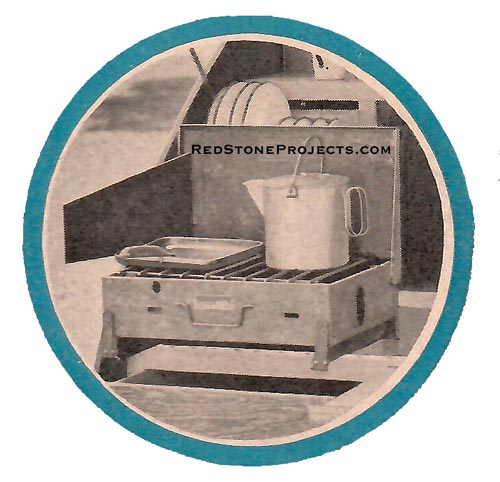
camp stove to be pulled forward for greater convenience in cooking. |
| Since building the cupboard is more or less of a cabinet
job, all joints should be true, square, and neat as possible, especially
in front. Plywood is used for sides, top, and shelves, as well as for the
large drawer, which has a 10-inch-thick front, with rabbeted ends. It is
important that this drawer be made to slide freely. This holds true, also,
for the panels in the upper part of the cupboard. The track for the panels
is simply a 1-inch-wide piece of Philippine mahogany, with two rabbeted
grooves in the top edge. Brads and casein glue are used throughout the
cupboard. The finished job is given two or more coats of shellac.
The water tank holds ten gallons, and, like the drawer,
extends nearly to the rear wall of the cabinet. The front of the tank is
painted aluminum, and has a nickeled drawer pull and tap. A standard filler
cap is set into the top.
It is possible to purchase a small ice box ready-made,
but the box for which details are shown in Figure 10 is quite satisfactory,
having a capacity of about 45 pounds of ice. First, a frame is built of
3/4 by 1 1/8-inch pine, and a galvanized box set inside it. The turned-up
front edges of this galvanized lining are tacked to the front frame. Inside
the metal box are a substantial ice shelf and a drain. A 1-inch space is
left in front and back of the shelf to permit circulation of air when the
box is closed. The edges of the shelf are bent up about one half inch to
keep melted ice from dripping upon the food below. |

|
|
Sanding the plywood panel that covers the top
of kitchenette lid. The underside is covered with a similar panel, and
the lid attached to the sleeping compartment by means of a continuous,
piano-type hinge.
|
| This much done, place a section of 1-inch insulating
board over the galvanized lining of the sides, top, bottom, and backs.
On the side next to the wall, the insulation should stop
two inches from floor to let bottom frame member fit over side sill. Now
cover the other side, the back, and the bottom of ice-box with plywood.
The top is covered with l/8-inch composition wood, and a neat frame of
the same material covers the front, except, of course, for the opening
for the door. |
Ideal Outdoorsman's Trailer Plans Figures 9 through
14.
|
Get a restored copy of these vintage Ideal Outdoorsman's
Trailer Plans with 31 Pages of Enhanced and Enlarged Figures
and Illustrations and Searchable Text.
All Orders Processed
On a Secure Server
|
| The door consists of a 1/4-inch plywood panel, with a
rectangle of 1-inch insulating board on the back, and covered with galvanized
iron, as shown in the sectional drawing, in Figure 10. Rubber weather strip,
fitted to the inside edges of the door, make it air-tight. A mahogany frame,
with mitered corners, is nailed around the outside edges. The door is attached
with nickeled refrigerator hinges, and held shut with a refrigerator latch.
As the door must be fitted very snugly, it is well to make sure the frame
is carefully squared up at the start. |
|
|
This close-up shows how a dish rack may be built
into the bin above stove instead of over ice box.
|
| A swinging beverage rack can be made to fit alongside
the ice box. Details are shown in Figure 11. The shelves are of 1/4-inch
plywood, with three 1-inch mahogany corner posts. The shelves are cut to
accommodate a dozen glasses and a bottle. The unit, being hinged, can be
swung forward out of the way when meals are being prepared on the workbench.
Dish racks are not shown in the drawings, as the owner
will prefer to install them to accommodate individual outfit. The racks
can be built into the compartment which, in the drawings, is given over
to a bin, or it can be built as a separate unit in the space above the
icebox.
The large, hinged cover over the kitchenette compartment
forms a shelter while cooking is being done, and, properly made, should
fit closely when down. The frame consists of four curved beams of 1/2-inch
plywood 1 5/8 inches wide, and the 3/4 x 1 5/8 -inch end pieces and spacers
shown in Figure 12. The curve of the beam will, of course, be the same
as that of the side wall of the kitchenette compartment. Ends of the two
middle curved beams are rabbeted one quarter inch into the end members.
The spacers are separate blocks. |
|
|
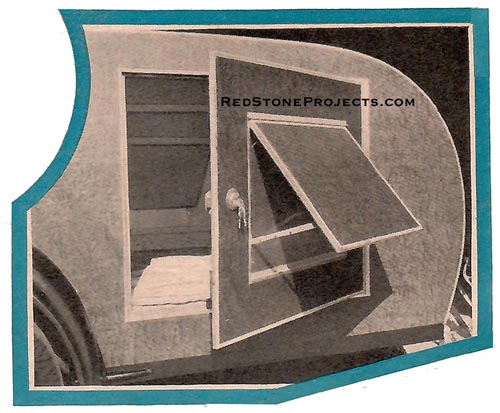
A door of sleeping compartment with screen cover
raised to ventilate interior.
|
| Between the middle beams a well is formed with spacers,
to accommodate the light socket and switch. A beam, one filler block, and
the top end piece are bored for the armored light-cable. Assemble the frame
with screws and casein glue, install the armored cable, and then lay on
the 1/8-inch plywood panels top and bottom, first applying casein glue
to the beams and end members. The plywood is laid with the visible grain
crosswise, and extends about 9/16 inch beyond the frame on sides and bottom,
so there will be ample clearance for the side in closing it. Aluminum molding
is screwed to the side and bottom edges as shown, and fitted with weather
strip to make a dust-proof job. |
|
|
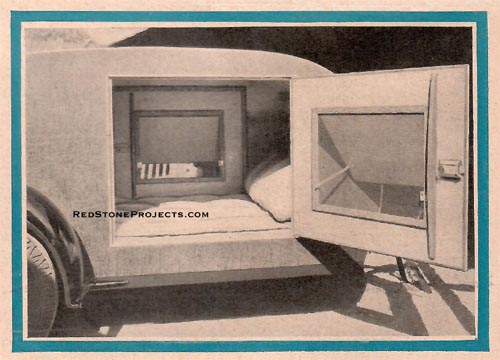
The wide door makes it easy to climb into the
comfortable sleeping compartment in which the mattress is laid directly
on the floor. The screen covers can be adjusted to suit the weather.
|
| Two brackets are screwed on the underside at each edge
to carry the braces which hold the top open. The cross member of the chromium-plated
brace, between the small brackets, serves as a towel rack. Sockets attached
to the sides of the kitchenette take the lower ends of the bracket, and
clips, screwed to the underside of the roof, hold it firmly when top is
closed. The top is attached by means of a continuous hinge that extends
the entire width. The handle and lock are the standard type used in automobile
door handles.
Both doors of the sleeping compartment are alike except
for the fact that only the one on the curb side has an outside lock, the
other being secured by a bolt on the inside. They are cut from 1/2-inch
plywood. The ventilating window is hung on a continuous hinge at the top,
and has a notched arm to hold it open, as shown in Figure 13. The ample
width of the doors makes access to the sleeping compartment quite easy.
Copper screen is secured to the door openings by a molding frame around
the inside. Either aluminum corner strip or molding is placed around door,
and the window opening. Around the inside edge of the door, sponge weather
strip is cemented. This fits against a doorstop frame, rendering the sleeping
compartment dust-proof.
Between the window and the swinging end of the door, a
wood brace is screwed on the inside to keep the door from twisting or splitting.
The lock is a sturdy night latch.
The lighting layout will be determined by the owner's
special requirements. In Figure 14, the wiring shown is a circuit that
can be plugged into an outside 110-volt current, only the tail light drawing
current from the car battery. One bulb is located on the forward bulkhead
and serves as a dressing and reading light. The other is located on the
underside of the hinged kitchenette lid. The regulation tail and stop light
is mounted on a bracket at the left rear side. Ruby reflectors should be
set in the chassis frame, one on each side. These are required by law in
some states, and, even in those in which their use is not compulsory, they
will be found a valuable safeguard in night driving.
Because at some time you may camp where 110-volt current
is not available, it would be wise to install a second circuit, which can
be plugged into the car battery. The same wiring can be used if a two-way
switch and the proper sockets and bulbs for a six-volt circuit are provided.
This trailer, as illustrated, has been thoroughly tested
under all possible conditions, and will tow at high speeds without sway.
Its sturdy construction is assurance of a long life on the road, and a
pleasant, carefree life outdoors for the builder. |
|