Free Shipping on All U.S. Orders
All Orders Processed on a Secure Server
Build This Streamline Family Vacation Trailer
Detailed Vintage Camping Trailer Plans
|
15 Foot Family Vacation Trailer Plans
DIY Vintage Camping Trailer Build
 |
PDF Format |
|
|
All Orders Processed
On a Secure Server
|
Price $12.95
|
|
Get a restored copy of these vintage 15 Foot Family
Vacation Trailer Plans with 40 Pages of Enhanced and Enlarged
Figures and Illustrations and Searchable Text.
|
We will email these plans, to the address provided
with your payment, within 48 hours following receipt of your order.
|
|
|More
Vintage Trailer Plans|
|
|

|
|
|
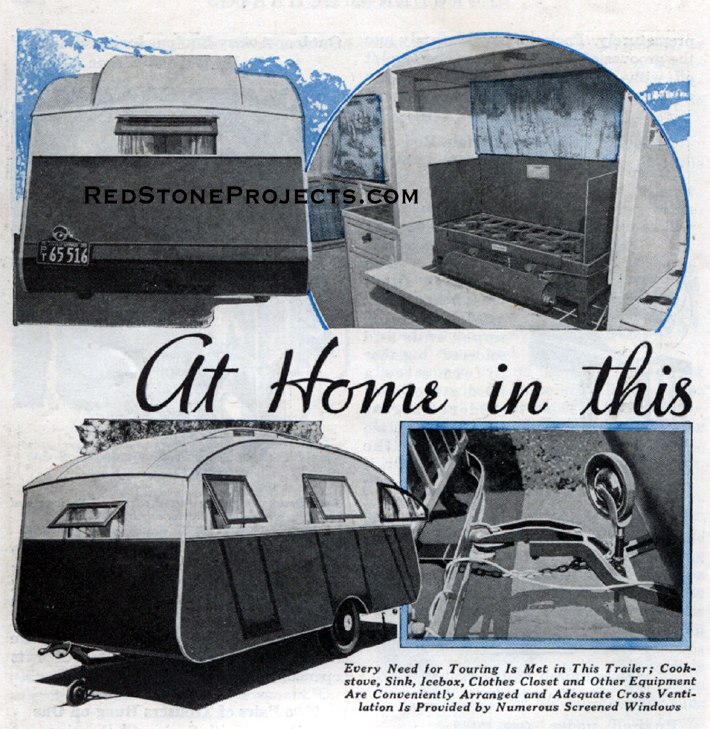
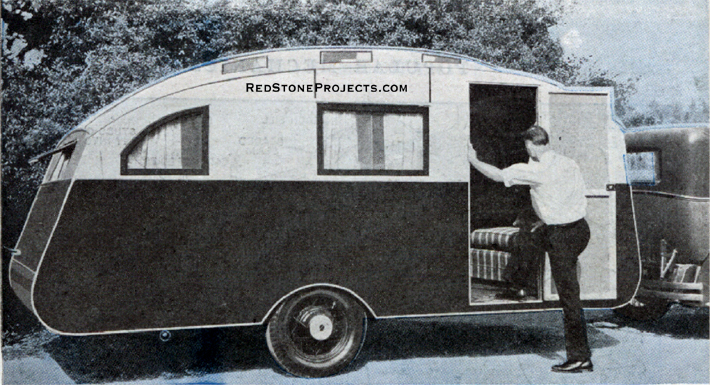
Every Need for Touring Is Met in This Trailer;
Cookstove, Sink, Icebox, Clothes Closet and Other Equipment Are Conveniently
Arranged and Adequate Cross Ventilation Is Provided by Numerous Screened
Windows.
|
|
PART 1: BUILDING THE CHASSIS
STYLED in the latest streamline, roomy, yet light and
sturdy, this trailer affords you all the comforts of home. "Roadability"
is assured by a clever arrangement of interior fittings to give an equal
distribution of weight. An underslung axle of unique and original design
maintains a low center of gravity and at the same time provides a spring
seat as close to the wheel as possible. The tubular construction of the
axle reduces the unsprung weight to the minimum.
Construction begins with the sills. Fig. 1 gives you a
perspective view of the under-frame assembled, and over in Figs. 4 and
5 you will find the essential dimensions. The sills, A in Fig. 1, are of
selected hard maple, 2 1/4 by 4 in. in cross section, and are joined by
spruce cross members, B, 1 1/2 by 2 1/2 in. in section. All joints are
mortised and secured with 3/16-in. carriage bolts. |
|

|
| Before you begin work, notice from Fig. 4 that all the
cross members, except the ends, are spaced on centers. A section of each
sill between the third and fifth cross members is rabbeted to take the
fender as shown in Fig. 1 and the detail at the left in Fig. 5. With this
rabbet cut at the bench you can mortise the sills and cross members.
The care you use in mortising determines to a great extent
the rigidity and strength of the frame. Accuracy in laying out the spacing
and depth of the cuts and the use of a miter box in sawing down the shoulders
of the mortises will assure a close fit. Scoring the depth of each mortise
with a marking gauge will aid in chipping out the waste with a chisel,
as the last few chips will break off at the scored line. Now you level
two sawhorses on the floor and place the sills on these. Then with the
cross members in place you can check the fit of all the joints and bore
the 5/16-in. holes for the bolts. When you bore these holes, it will help
to clamp the parts tightly together so that the bit goes through the two
members as though they were one piece. |
|
|
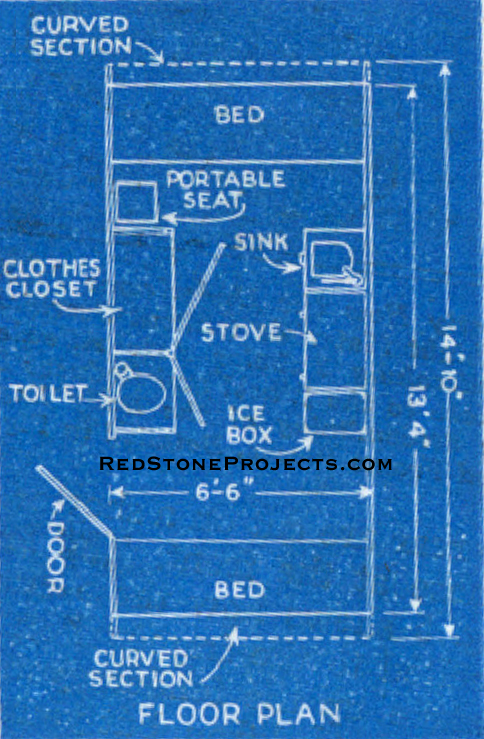
DIY Family Vacation Trailer Floor Plan
|
| Waterproof casein glue is used in all joints of the underframe.
Now with this assembly set up and bolted together, be sure, before the
glue sets, to check the frame at each corner with a square. If necessary,
put clamps on the frame to hold it in the square position until the glue
is dry. |
|
|
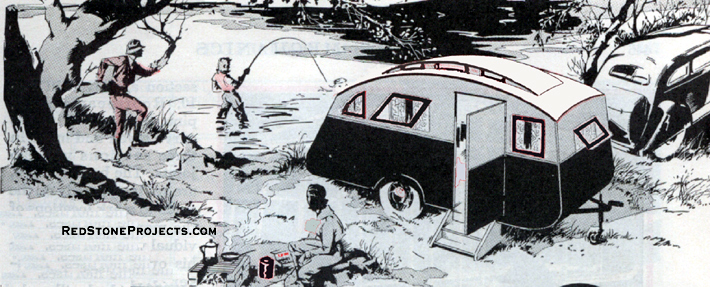
For Sleeping Quarters That Will Accommodate Four
Persons, a Luxurious Studio Couch Is Placed at Each End; the Aluminum-Painted
Top Reflects Heat, Keeping the Interior Cool; for Added Insulation, the
Walls and Top May Be Made Double.
|
| Now you're ready for the lower rails, fenders, springs,
and the curved end members. The cross members are halved at, the ends to
take the lower hardwood rails, which are 1 1/4 by 1 1/4 in. in section.
These rails, part D in Fig. 1, are bolted to the cross members with bolts.
There are two longitudinal pieces halved into the cross members directly
over the axle. These form an opening for the water tank. Fig. 3 shows what
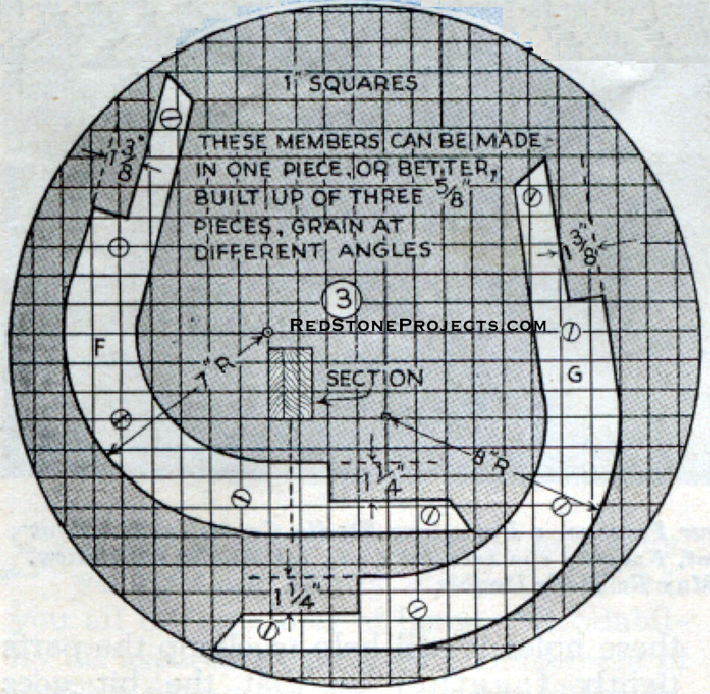
you will want to know about the curved end members, F and G. |
Get a restored copy of these vintage 15 Foot Family
Vacation Trailer Plans with 40 Pages of Enhanced and Enlarged
Figures and Illustrations and Searchable Text.
All Orders Processed
On a Secure Server
|
|
|
Figures 1 and 2.
This Shows Exactly Now the Underframe Is Assembled,
Using Light Materials without Sacrificing Rigidity; an Underslung Tubular
Axle Affords a Spring Mount Close to the Wheel and Reduces Unsprung Weight;
Streamlining of the Body Begins with the Curved Frame Pieces, Detailed
in Fig. 3.
|
|
| Those at the rear are cut on a shorter radius than those
at the front. The lower detail in Fig. 5 shows how these curved pieces
are bolted to the frame. You can, of course, make up the fenders yourself
from heavy galvanized iron, but your tinsmith, with the equipment he will
have at hand, can do a neater job in far less time and at a nominal cost.
The fenders are cut on a 16-in. radius but not to a full semicircle, as
they are only 14 in. deep and 10 in. wide. Chevrolet front springs are
mounted on the sills as in Fig. 1, the shackle brackets being bolted to
the sill as in the detail at the right. The bolts holding the shackle brackets
should be a snug fit in the holes bored through the wood. It's a good idea
to use lock washers on all bolts in the underframe.
Now that you've progressed to this stage, you're ready
to start with the axle. As shown in Fig. 2, this is a simple affair consisting
of two wheel-spindle brackets of electric steel joined with a chrome-molybdenum
tube. You can buy the tube but it will probably be necessary to make the
spindle brackets. The additional cost of this work will be money well spent,
as this type of axle is so far superior to anything that can be improvised
from standard auto parts. After you get your axle made up as suggested
in Fig. 2, you make a trial fit on the springs, but do not attach the axle
permanently to the frame as the latter must remain on the sawhorses until
the upper structure is set up. |
 |
|
Figure 3. Curved Frame Pieces Streamline the Trailer
Body.
|
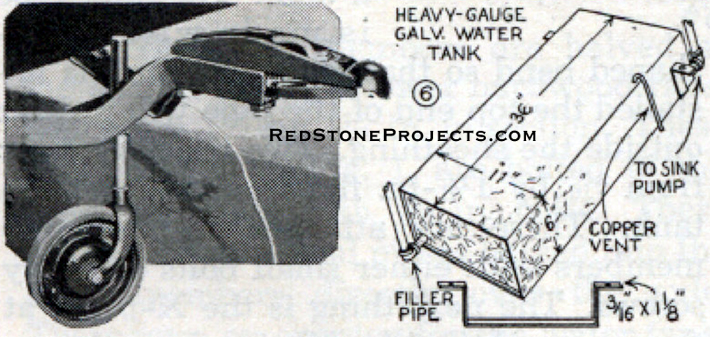
| Two jobs remain to be done before you have the underframe
complete. The first is making and installing the 14-gal. water tank, which
is dimensioned in Fig. 6 and shown in position in Fig. 4. Once again, a
tinsmith can save you a lot of time and bother in building such a tank.
The filler pipe is made with an S-shaped bend so that when the tank is
installed the top end of the pipe will project outside the sheathing. Two
brackets, bent from 3/16 by 1 1/8-in. flat iron, support the tank. These
are attached to the cross members with either small bolts or heavy screws.
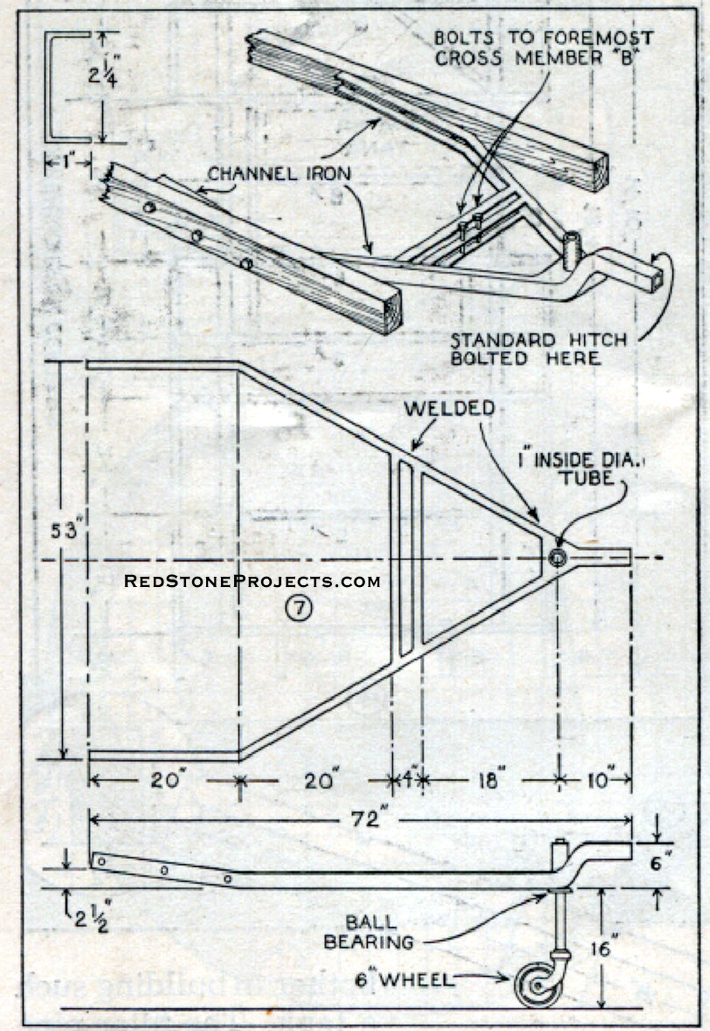
The next thing is the X-brace at the rear, and the 1 by 2 1/4-in. channel-iron
A-frame, which carries the coupler and the caster wheel at the front. Details
on the construction of the A-frame are given in Fig. 7, and the X-brace
is shown installed in Figs. 1 and 4. The A-frame calls for a simple welding
job and the fitting of a bushing to take the spindle of the caster wheel.
The bushing can be made from a short length of tubing. The A-frame is not
installed permanently at this time as it would interfere with the body
sheathing.
You will need two folding jacks to support the rear end
of the trailer when it is parked. These are attached to the sills with
a bracket as in Fig. 1; they serve to prevent tipping and ease the weight
resting on the tires. Provide a reliable catch or hook so that the jacks
will not drop down when you're on the road. You can also get out the filler
pieces, C in Fig. 1. |
Get a restored copy of these vintage 15 Foot Family
Vacation Trailer Plans with 40 Pages of Enhanced and Enlarged
Figures and Illustrations and Searchable Text.
All Orders Processed
On a Secure Server
|
|
|
Figure 4.
Fig. 4 Gives You a Dimensioned Plan of the Underframe
Shown Assembled in Fig. 1.
|
|
| The position of these is shown in the enlarged detail
at the left. These pieces are cut to fit but are not installed permanently
until the studs, E, are erected. In connection with the fitting of these
pieces, see the lower detail in Fig. 5, which shows the curved end member,
G, bolted both to the cross member and the filler piece, C. This assembly
is not completed until the studs are glued and screwed to the cross members
before the filler piece is put in place. |
| When you cut these filler pieces be sure of the length.
Properly cut and fitted, with the studs in place, they contribute greatly
to the strength and rigidity of the whole structure. |
Get a restored copy of these vintage 15 Foot Family
Vacation Trailer Plans with 40 Pages of Enhanced and Enlarged
Figures and Illustrations and Searchable Text.
All Orders Processed
On a Secure Server
|
|
|
|
Figure 5. Details of the Sills and Lower Rails.
|
|
| Just now is also a good time to check the frame over
for slight inequalities which might cause trouble when laying the floor.
A straightedge will show up any high spots on the cross members. If necessary,
level up with a plane. |
| To ensure close fit of the studs, scrape away any excess
glue where the cross members join the outer rails. For wheels you can use
any of the standard wire auto wheels fitted with a 5:50 by 17-in. tire.
Suitable bearings should be purchased to fit the wheel spindles. |
 |
|
Figure 6. Galvanized Tank Supplies Water to a
Marine-Type Pump.
|
| Now to finish up, you can give all the parts of the underframe
two coats of black paint, a primer first, then follow with a body coat.
It is well, in painting, not to cover those sections of the lower rail
where the studs join the rail and the end of the cross member, as glue
is to be used in these joints. |
 |
|
Figure 7. An A-Shaped Frame of Channel iron Carries
the Trailer Hitch and Caster Wheel.
|
 |
 |
|
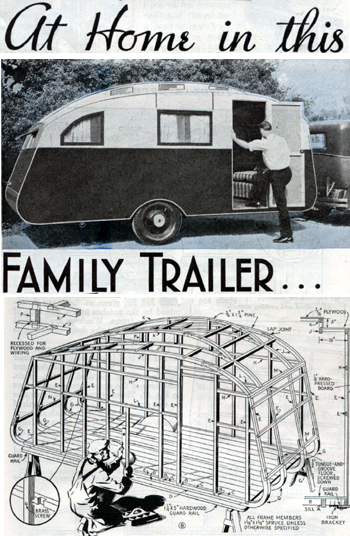
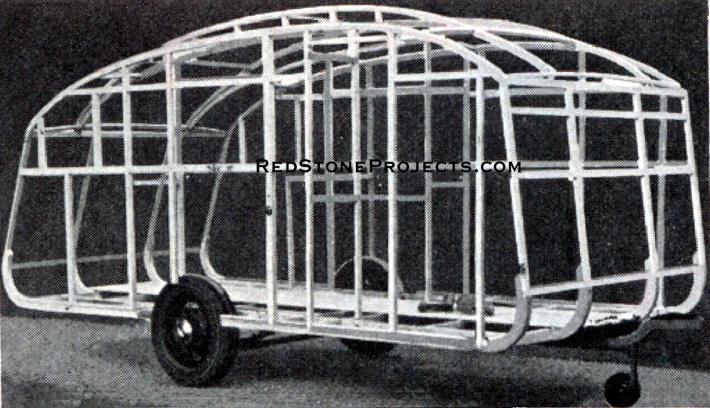
PART 2: BUILDING THE TRAILER FRAME
NOW that you have completed the trailer chassis, Fig.
8 shows what's next. Notice first, from Figs. 11 and 14, that the position
of the vertical and horizontal members differs on the two sides of the
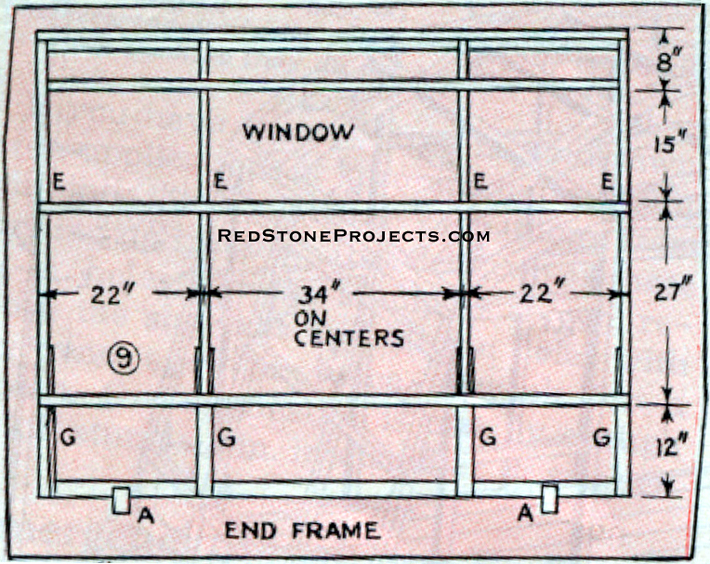
frame. The end frames, Fig. 9, are identical with exception of the top
cross member, which is 1 in. lower on the rear frame. To start the framing,
set up the corner studs, E in Fig. 8, then follow with the top rails, H,
and those across the ends, M, which are double. At the lower ends the studs
are halved and screwed to the cross members, B. Then the filler blocks,
C in Fig. 8, are screwed to the lower rail, D, to complete the joint. All
joints in the entire frame are set in waterproof casein glue and wherever
vertical and horizontal members join, the two parts are halved to make
a flush joint which is held, with a 1-in. screw. Some care is necessary
in mortising, as a tight joint adds greatly to the strength of the structure. |
Get a restored copy of these vintage 15 Foot Family
Vacation Trailer Plans with 40 Pages of Enhanced and Enlarged
Figures and Illustrations and Searchable Text.
All Orders Processed
On a Secure Server
|
|
|
Figure 8.
Trailer Body Framing Details
|
|
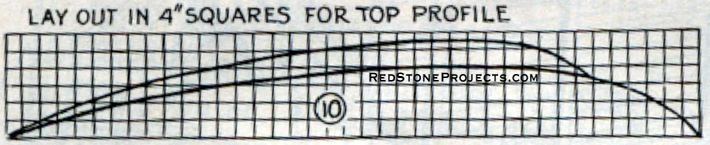
| Profiles of the roof and raised center section are given
in Fig. 10. Roof beams are of pine, band-sawed to the curve given and made
in three sections with lap joints. The beams, Fig. 8, are set temporarily
on the studs to mark locations of the mortises. Each individual will probably
have his own method of assembly, and whichever method achieves the purpose
with the least complication, should, of course, be chosen. Note, from Fig.
11, that dimensions between the studs are not given as these are determined
by the notches in the side rails of the chassis frame. Windows are identical
on both sides, but the door, of course, is only on the right side. |
 |
|
Provision is made in the framing for building
in a sink and a compartment for a gas stove, also storage cabinets for
clothing, food and cooking utensils.
|
| The framing for the raised center section of the roof
is erected upon the inner beams, J in Fig. 8, and cross members are installed,
being mortised at the joints. Locations of the cross members are given
in Fig. 12. These pieces are the same size as the studs and rails, and
are mortised into the curved members of both roof and raised center section.
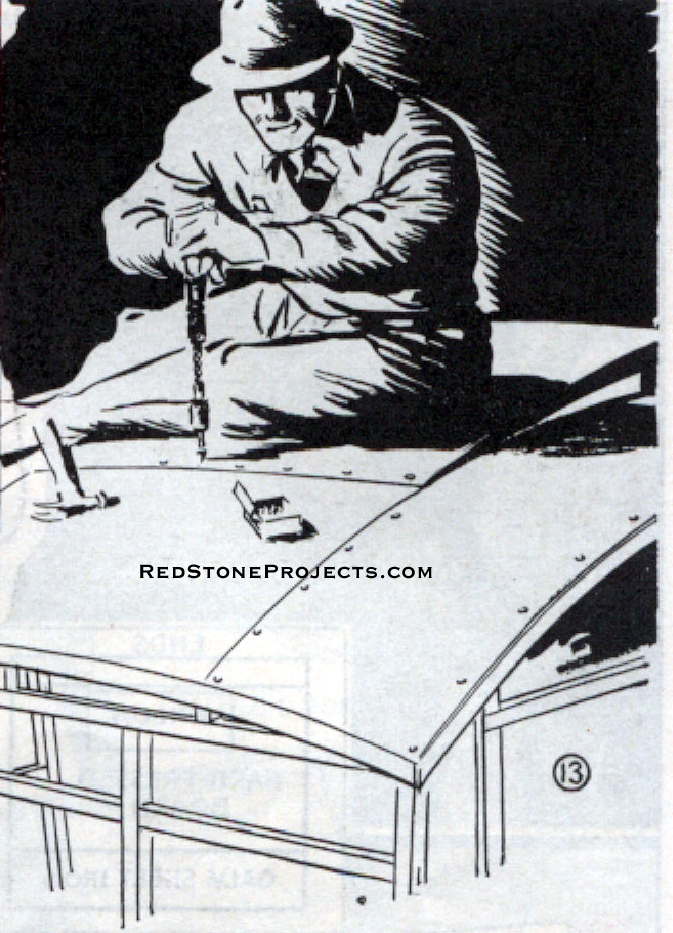
In order to leave space for the plywood roof, Fig. 13, on top of the curved
inner members, J, the short studs or uprights, P, Fig. 8, are notched at
the bottom. This construction assures a rain-tight joint. |
 |
|
Figure 9. Trailer End Frames
|
| A cross section of the completed body is given in Fig.
8. This also illustrates the installation of a hardwood guardrail along
the bottom, secured to cross members with bolts and angle brackets. This
guard will prevent possible damage to the side of the trailer in parking
lots and on the highway. An automobile bumper, attached to the sills by
means of extension bars, will be a wise precaution for protecting the rear
of the trailer. |
 |
|
Figure 10. Trailer Top Profile Layout and Dimensions
|
| When the upper structure is all complete, the floor can
be laid. This is 1/2-in. pine, tongued and grooved. Screws are used to
fasten it in place. In this way it will add greatly to the rigidity of
the structure. This done, the entire frame is given a priming coat of paint.
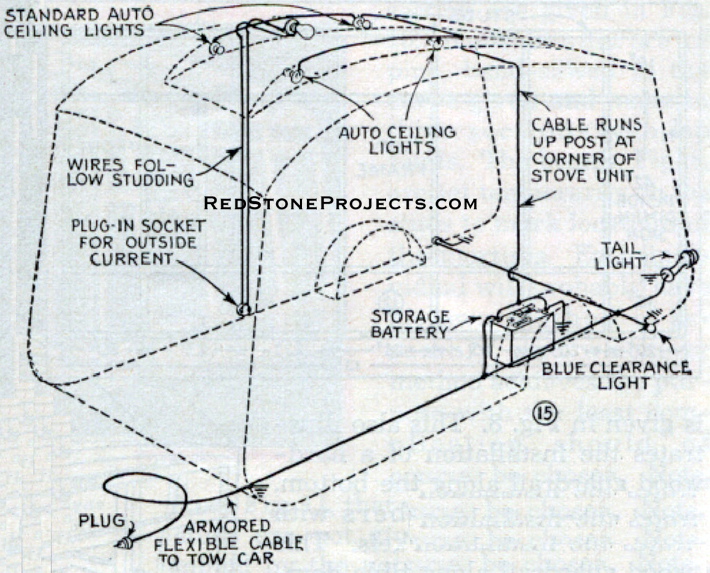
A wiring diagram, shown in Fig. 15, provides for a single
110-volt bulb supplied by outside current where this is available. The
outside current is led in through a plug-in socket mounted on the right
side of the trailer, on the underside of the guardrail. |
|
Get a restored copy of these vintage 15 Foot Family
Vacation Trailer Plans with 40 Pages of Enhanced and Enlarged
Figures and Illustrations and Searchable Text.
All Orders Processed
On a Secure Server
|
|
|
Figure 11.
Right Side Trailer Body Frame Detail
|
|
| Tail and clearance lights are connected to the towing
car through the usual plug and armored cable, and a storage battery placed
on the left side back of the fender takes care of four ceiling lights.
These are the standard automobile type with individual switches. The wires
from the storage battery are run up a post at a corner of the stove compartment,
and along a cross member of the roof to the lights on the other side. |
Get a restored copy of these vintage 15 Foot Family
Vacation Trailer Plans with 40 Pages of Enhanced and Enlarged
Figures
and Illustrations and Searchable Text.
All Orders Processed
On a Secure Server
|
|
|
Figure 12.
Trailer Roof Cross Members
|
|
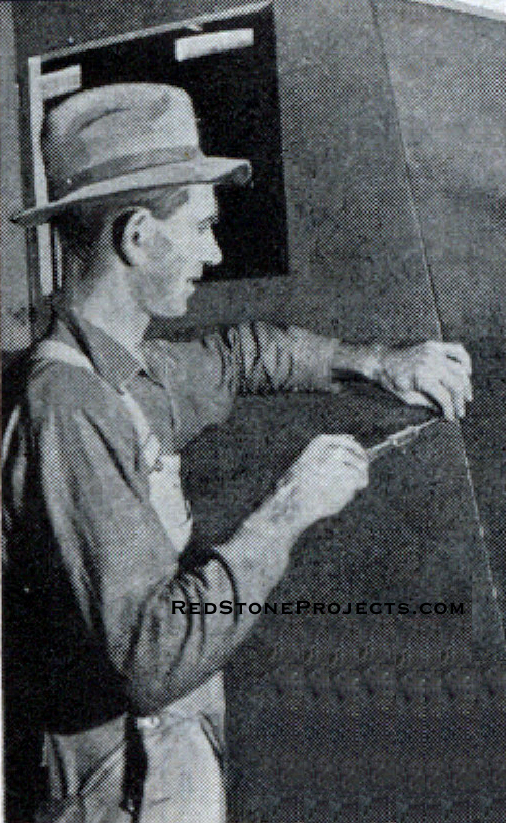
| For outside sheathing, 1/8-in. hard pressed board is
excellent material, having a very smooth finish and rigid structure. It
is obtainable in 4-ft. widths, and should be accurately marked by tacking
to the frame temporarily and outlining with a sharp pencil. Cut with a
sharp, fine-tooth saw and smooth the edges with No. 00 sandpaper.
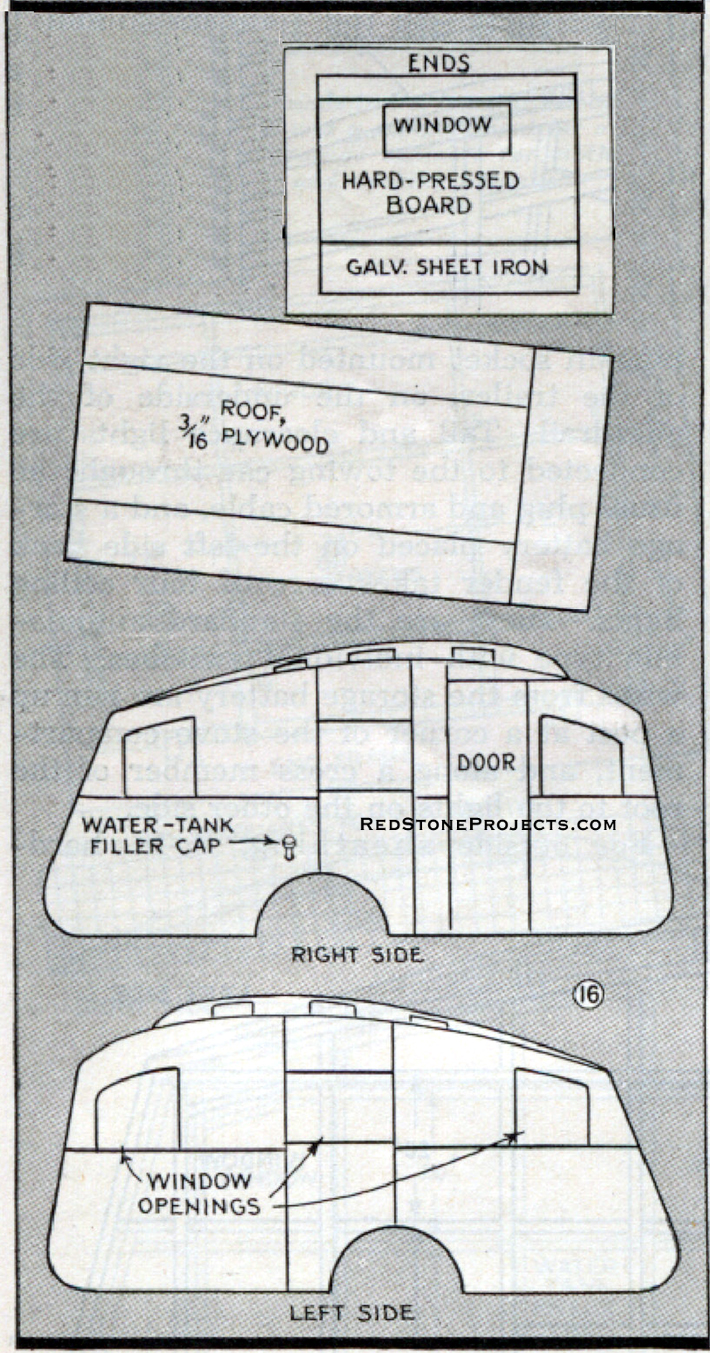
Fig. 16 shows when to join the sheathing. It is all installed
with flat-head, 3/4- in. brass screws, neatly countersunk. The joints of
the panels meet in the center of studs or other frame members, but around
windows and door frames the edges should come flush with the inside of
the frames. On the right side, before the panel is screwed on, the filler
cap and pipe for the water tank should be installed. If you wish to make
double walls, you can use the same material on the interior walls. Some
minor changes in the interior, such as position of cabinets and wiring,
will be necessary if you decide on double walls. |
|
|
Figure 13. Attaching the Trailer's Plywood Roof
|
| On the curved ends of the body, heavy galvanized-iron
sheets are installed, using flat-head brass screws. Hard pressed board
is used for the sides of the raised center section of the roof, but the
roof proper is entirely covered with 3/16-in. plywood, as in Figs. 13 and
16. This is later covered with a suitable roofing material. The plywood
is cut in four pieces, as in Fig. 16. |
Get a restored copy of these vintage 15 Foot Family
Vacation Trailer Plans with 40 Pages of Enhanced and Enlarged
Figures and Illustrations and Searchable Text.
All Orders Processed
On a Secure Server
|
|
|
Figure 14.
Left Side Trailer Body Frame Detail
|
|
| There are two ways of finishing the exterior. One is
to cover with Fabrikoid and the other to fill seams with plastic wood to
make an invisible joint, and spray the body with automobile lacquer or
enamel. Both finishes are very effective, especially when the lower half
is in a dark color to match the car and the upper portion, above the window
sills, in aluminum, with window sash to match the lower part of the body.
For that matter, any color that matches your car will give a pleasing contrast
with the aluminum-painted top. |
|
|
Figure 15. The electrical system adds materially
to your comfort. A storage battery supplies current for the auto-type ceiling
lights.
|
| Before the sheathing is put on, it is well to decide
on the interior finish. If you prefer all one tone, the painting can be
done anytime, on the interior. If, however, you like a light framing contrasted
with dark panels, paint the wood before the sheathing is set on. |
|
|
Attaching Trailer Sheathing
|
 |
|
Figure 16. Trailer Body Sheathing
|
 |
|
Selected as being representative of the type trailer
many of our readers have desired to see published in Popular Mechanics,
this trailer, of which this article is the third and last installment,
was designed and built by Mr. C. Hart Collins. We are indebted to him for
his kind cooperation in going through the entire construction in detail
so that complete information, based on the actual work, could be supplied
to our readers.
|
|
|
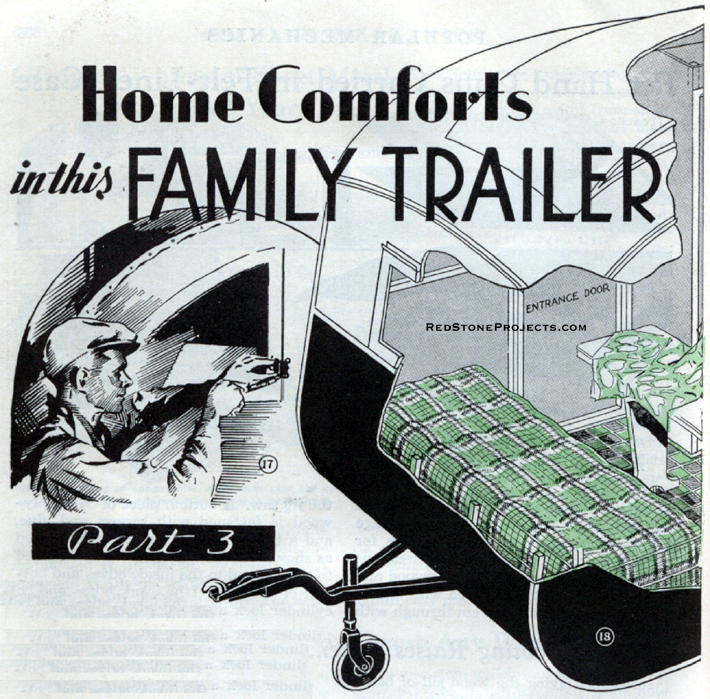
PART 3: TRAILER INTERIOR FURNISHINGS AND PAINTING
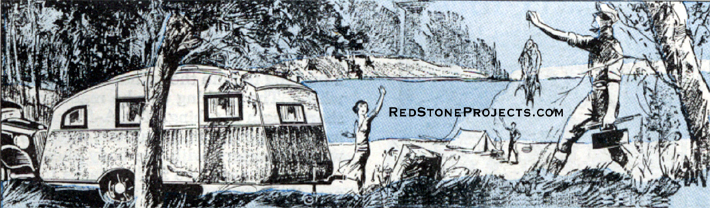
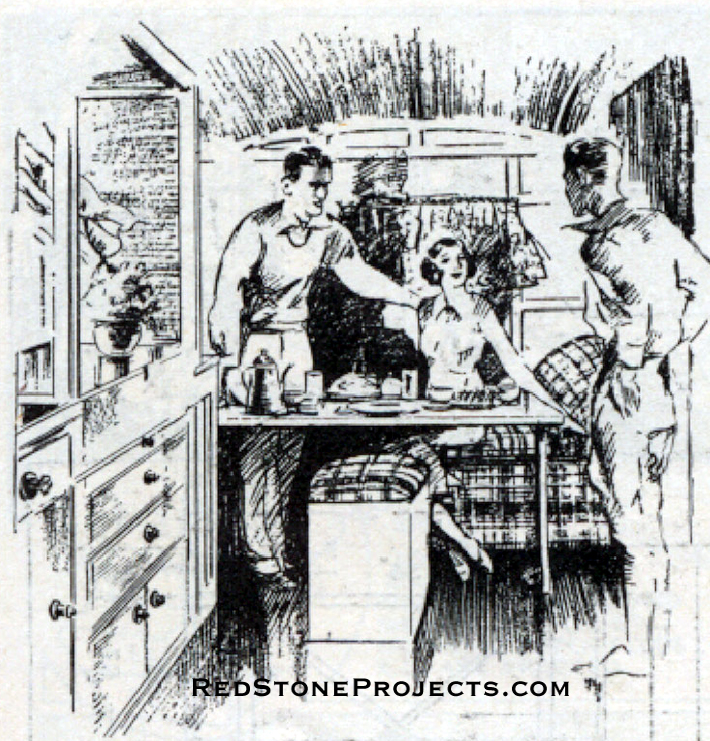
ONE glance at the cutaway view above and you have the
whole story of the interior furnishings. There's your kitchen, dining and
living room, and two bedrooms with clothes closet space. When you stop
along the road for the night, there's nothing to unpack, no ropes or awnings
to bother with. Simply uncouple the trailer from the car and park it in
any convenient place. One person handles it easily, even when fully loaded.
Now to finish the job. Remaining exterior details are
application of the roof of auto-top canvas and, if you have so decided,
a fabric covering of the body. In putting on the latter, you apply the
lower half of the wall covering first, then lap the upper half over it,
using copper tacks. A strip of auto-fabric binding is tacked over the seam.
Fig. 24 gives you the distribution of the material, and the sectional views,
Figs. 19 and 20, and the detail in Fig. 21 show what to do when finishing
up the top at the outer edge and around the ventilator openings in the
sides of the raised center section. Bindings of light aluminum angle are
used to finish all corners of the body as in Fig. 18. Where the top canvas
overlaps the sides it's a good idea to apply a light coating of marine
glue under the seam. Aluminum gutters around the edges of the top finish
this part of the job.
Window sash are made of white pine, rabbeted as illustrated
in Fig. 23, the corners joined with casein glue, dowels and corrugated
fasteners. The same figure shows how the copper screen is tacked to the
inside of the window frame. All windows swing outward on offset hinges
as in Figs. 17 and 18. Jointed brackets hold the windows in any position.
After you finish the exterior of the body you can permanently install the
A-frame and coupling and also the tail and clearance lights.
When you go inside, the first job is painting. An undercoating
and two applications of eggshell enamel in ivory or cream should take care
of this. Remember that you can easily make a double-walled job by sheathing
the interior walls and ceiling with pressed board or plywood. Now's the
time to do this if you desire. The interior walls and ceiling painted;
the next job is the floor. A linoleum covering, cemented down, adds to
the attractiveness of the interior and is easier to clean.
Now over to Figs. 25, 27 and 28 for the views and plan
of the stove, cupboard and sink. Fig. 25 shows a space-saving arrangement
of the drainboard. The latter slides down over the sink when not in use,
and the swinging arm which supports it when open folds back against the
cabinet.
The drain pipe from the sink is led down through the fender,
the end being bent so that the water does not strike the road wheel. The
cabinet which houses the cook stove is fitted with two drawers, a sliding
shelf, and a cupboard which houses the storage battery with additional
room for large utensils. There is more cupboard space above the stove.
A 3-in. vent, made as in Fig. 27, passes through this cupboard and the
roof to carry off cooking fumes.
In the main the framing for this cabinet can be the same
material as the body frame, 1 1/4 by 1 1/4-in. spruce. For panels you can
use pressed board or plywood. Doors, drawer fronts, and the sliding shelf
are best cut from 3/4-in. fir plywood. Fig. 28, with a plan and elevation,
shows you where to place the cabinet on the wall. Doors should have positive
catches so that. they do not swing open on the road. |
Figures
19, 20 and 21.
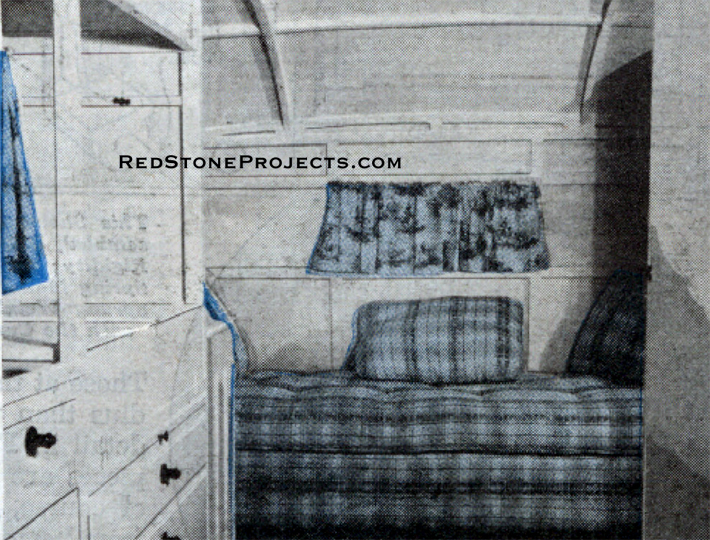
Here's what you have when the job is finished -a kitchen,
dining and living room, and two bedrooms with clothes closet space. Folding
studio couches make up into double beds. A three-burner stove, a sink with
running water and an icebox provides everything right at hand for getting
a meal. There's nothing to unpack when you stop.
|
Get a restored copy of these vintage 15 Foot Family
Vacation Trailer Plans with 40 Pages of Enhanced and Enlarged
Figures and Illustrations and Searchable Text.
All Orders Processed On a Secure Server
|
| Drawers should have spring locks for the same reason.
You can buy a 25-lb. icebox which will fit in the position shown in Fig.
27, or one can be built in at about the same cost. The table, Figs. 22
and 27, is a simple folding affair made of either plywood or pressed board,
painted, of course, and is shown open in Fig. 22 and folded against the
wall in Fig. 27. Ordinary sliding door bolts are used to hold the table
in either position.
Installation of the clothes closet and the chemical toilet
as in Figs. 29 and 30 just about completes the job. The elevation, Fig.
29, will give you the size and position of these closets. For material
you can use either plywood or pressed board. It will save time to cut the
doors from 3/4-in. fir plywood for then there is no frame to make.
Notice that there is a flap hinged to the clothes closet
door. This flap hooks to the corner of the stove cabinet, the arrangement
forming a partition. All doors should have spring catches to hold them
closed. The chemical toilet is vented to the roof through the clothes closet
as in Fig. 29. There is a folding writing desk hinged to the back of the
clothes closet under a mirror. |
Figures
22, 23 and 24.
With the lower half of the body covered with waterproof
fabric, it is only necessary to paint the upper half in aluminum enamel.
If you omit the covering, then the sheathing is painted in the same color.
|
Get a restored copy of these vintage 15 Foot Family
Vacation Trailer Plans with 40 Pages of Enhanced and Enlarged
Figures and Illustrations and Searchable Text.
All Orders Processed On a Secure Server
|
| A stool, which is really a box with a hinged top, does
duty both as a chair and added storage space. The top may be upholstered
as indicated. The beds are two studio couches, the end dimensions being
approximately those shown in Fig. 26.
Both can be made up into double beds. When folded there
is space in a lower compartment for the bedding. You will save time by
buying these readymade, as they are inexpensive. Fasten each to the floor
with bolts or screws.
Now you come to painting the cabinets, and, if you want
a first-class job, give the walls one more coat. If the doors have been
cut from 3/4- in. plywood, as is recommended, it will be necessary to fill
the edges of the plywood. |
Figures
25, 26,27 and 28.
Above you have the "kitchen" equipment, a stove, sink,
icebox and cabinet and also the dining table. At the right is a plan and
elevation showing where to build in the cabinet. The lower cupboard houses
the storage battery which furnishes current for the lights.
|
Get a restored copy of these vintage 15 Foot Family
Vacation Trailer Plans with 40 Pages of Enhanced and Enlarged
Figures and Illustrations and Searchable Text.
All Orders Processed On a Secure Server
|
| A paste wood filler worked into the end grain on all
the exposed parts will build up a smooth surface for the paint. Work it
into the open grain with a cloth or your fingers, rub off the excess and
allow the filler to dry. Then sand the edges lightly with fine sandpaper
to level the filler and smooth up sharp corners. The trick in painting
cabinets of this sort is in covering all corners, edges, and the smaller
surfaces first, then finish off with the large areas. In this way you can
brush out the paint to a uniform coating much more effectively. To produce
a smooth, even final coat, it is necessary to be just as particular with
the primer as you are with succeeding applications. Another trick is keeping
the paint thinned to an easy brushing consistency to avoid a too heavy
application which cannot be brushed out to a thin film. This applies also
to the exterior paint job. |
Figures
29 and 30.
Generous clothes closet space and a compartment for
hats are provided for in the arrangement shown above. There's also a mirror
and a folding writing table. A flap on the clothes closet door hooks to
the stove cabinet and partitions the interior into two rooms.
|
Get a restored copy of these vintage 15 Foot Family
Vacation Trailer Plans with 40 Pages of Enhanced and Enlarged
Figures and Illustrations and Searchable Text.
All Orders Processed On a Secure Server
|
| You should be particular with such details as the sliding
ventilator panels and the windows. The panels, Figs. 20 and 21, are best
removed while you are painting the slides, and the sash should be left
open until the paint is thoroughly dry. In this way you will avoid sticking
and possible breakage. The same thing is true of the closet and cupboard
doors and also the drawers. Now with the painting done, all that remains
is to fit and hinge the entrance door and provide a spring lock, and there
you are. |
Any 2 Vintage Trailer Plans
$19.95 FREE Shipping |
|
Select 2 Vintage Travel Trailer Plans
|
|
|