Free Shipping on All U.S. Orders
All Orders Processed on a Secure Server
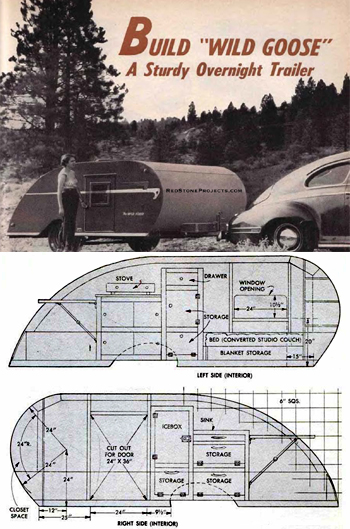
Build The Wild Goose
A Sturdy Overnight Trailer
Vintage 1953 Camping Trailer Plans Based On The King
Kamp Master Trailer
Complete Illustrated Plans and Instructions Free
|
Wild Goose Overnight Trailer Plans
Build this Vintage
Kamp Master Camping Trailer
 |
PDF Format |
|
|
All Orders Processed
On a Secure Server
|
Price $12.95
|
|
Get a restored copy of these vintage Wild Goose Trailer
Plans with 13 Pages of Enhanced and Enlarged Figures and Illustrations
and Searchable Text.
|
We will email these plans, to the address provided
with your payment, within 48 hours following receipt of your order.
|
|
|More
Vintage Trailer Plans|
|
|

|
|
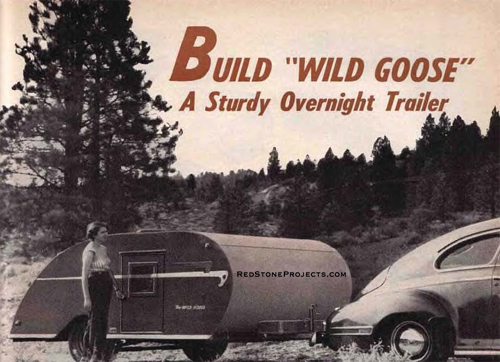
| OVERNIGHT CAMPERS, hunters, fishermen and vacationers
with limited time can appreciate the convenience, comfort and ready roadability
of "Wild Goose". Hung low to the ground, yet with ample road clearance
for the back trails, it tows anywhere your car will go. Keep it packed
with the necessary bedding, also canned and dried foods and you can get
away for a week-end trip in only a few minutes time. When you arrive at
the destination, Wild Goose is up into a neat outdoor "kitchenette" in
less time than it takes to put up a tent.
Looking over the details on the following pages you will
note that the construction of this streamlined job differs somewhat from
ordinary trailer construction. Where adaptations must be made only a few
general dimensions have been given. Because the unit has been designed
for road speeds up to 60 mph, care must be taken when assembling the welded
chassis frame. When notching the channel steel side frames to form the
first bend, cut the notches accurately so the meeting edges fit snugly
before welding. The gusset plates should be at least 12 in. long, and at
the forward end of the drawbar where the reverse bends open the cuts made
in the channel webs is a good idea to weld in triangular filler pieces
for maximum strength. Note also the position of the truss rods which pass
under the forward cross member. The ends of the rods are welded to the
frame members and are bent over king posts to form individual trusses.
This construction carries the load at the forward end without any tendency
to springing or vibrating, which would cause the trailer to weave at high
speeds.
Note in the chassis details at the left how a 2 x 4-in.
subframe is bolted to the steel chassis frame. If you use an auto front
axle it must be cut and a filler piece welded in to obtain a 68-in. wheel
tread. A standard trailer axle is recommended. Mount the axle to center
approximately 47 in. from the rear frame member, attach the wheels and
fit a parking jack with small caster wheel on the draw-bar so the chassis
frame can be leveled. Cover the wooden members of the chassis framing with
a 3/4-in. waterproof plywood floor and plane the edges smooth |
|
| and square. Added strength and rigidity will be gained
if the plywood floor is glued to the wooden frame members with a waterproof
glue and fastened with 1 1/2-in. F.H. screws spaced about 4 in. apart.
Next assemble the sides as in the detail drawings on pages
188 and 189. These are assembled separately and then attached to the floor
with heavy shelf brackets. Cross ribs, or "rafters" are put in after the
sides are attached and braced temporarily in the vertical position. Now
note in the center detail on the preceding page, showing the right side,
that the crosshatched portion of the side measures 66 in. from the rear
end. This establishes the hinge point of the curved deck. The latter raises
and is supported on the folding screen-door frame as in the photos above
and below. This gives standing room at the sink and stove. The area is
enclosed with fabric walls made from heavy awning material as shown.
Probably the best method of making the sides is to lay
out the profiles full-size on a single sheet of heavy wrapping paper made
by taping together several widths to get the required size. Then cut the
side panels from 1/8-in. hardboard. Assemble the frame members on the panel
as detailed, cut them to fit, then glue and screw each piece to the panel.
Note that the joints are strengthened with plywood gussets attached with
glue and screws. Locate the openings for the door and window and cut away
the panel. Add the top and bottom frame members for the window and the
top member over the door opening. Then attach with shelf brackets to the
plywood floor and brace temporarily in the upright position. Be sure that
the sides are braced perpendicular to the bottom.
Locate and mark the hinge point of the curved deck on
both sides. Some builders may wish to place the hinge point farther forward
to gain more headroom at the refrigerator and sink. If you purchase the
sink, refrigerator
|
Get a restored copy of these vintage Wild Goose Trailer
Plans with 13 Pages of Enhanced and Enlarged Figures and Illustrations
and Searchable Text.
All Orders Processed
On a Secure Server
|
Assembly
Figures
|
and cabinets ready-made this may be advisable. In any
case the center rib is located with its back face at the hinge point. Openings
for the wheel housings can be cut into the side panels and the metal housings
fitted in place. The housings are raised into position and the lips screwed
to the floor. It's a good idea to coat edges of the plywood with a water-proof
mastic before placing the housings. At this point cut four 3/4-in. plywood
ribs for the deck. Cut the ribs 2 in. wide and about 2 in. longer than
the measurement and to the same contour as the curved rear half of the
sides. Some handwork will be necessary to assure a true fit at the front
and rear where the sides join the floor. Keep in mind that waterproof glue
is used in all joints in addition to screws. |
|
Left
and Right Side Assembly Figures with Dimensions.
|
Get a restored copy of these vintage Wild Goose Trailer
Plans with 13 Pages of Enhanced and Enlarged Figures and Illustrations
and Searchable Text.
All Orders Processed
On a Secure Server
|
The first forward rib is located approximately 15-in.
from the floor. Now. before you go further, measure and cut the two covering
pieces from 1/8-in. tempered hardboard, using 4 x 8-ft. panels. After cutting
to the required width, allowing a 1 1/8-in. overhang on both sides and
a 2-in. overlap at the joint, place the parts in position and locate the
rib under the overlap. Glue and screw the rib in position. Two other ribs
are installed equidistant between the three already in place. Now install
the covering pieces, beginning with the front piece. Pre-fit this piece
at the front edge. notching over the drawbar members and trimming the edge
flush. Then spread glue, clamp in place and drive screws at the lower edge
first. An exceptionally neat job of attaching the covering can be had by
using oval headed screws turned in over finishing washers. Otherwise use
round headed screws spaced about 2 in. apart. |
Get a restored copy of these vintage Wild Goose Trailer
Plans with 13 Pages of Enhanced and Enlarged Figures and Illustrations
and Searchable Text.
All Orders Processed
On a Secure Server
|
Chassis
Details with Dimensions
|
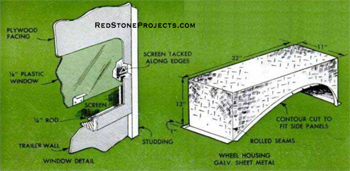
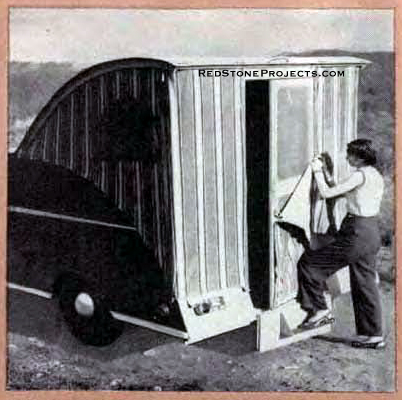
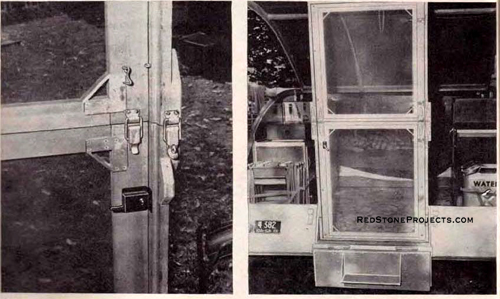
| Now note in the upper and lower righthand photos on page
190 the folding step and the fixed panels on each side. The side panels
arc approximately 11 1/2 in. high and are screwed and glued to 2 x 4-in.
posts band sawed to the contour of the trailer sides and screwed and glued
to the bottom with the outer edges 7/8 in. from the trailing edge of the
floor. Space between the inner posts should be 29 5/8 in., which is the
width of the |
|
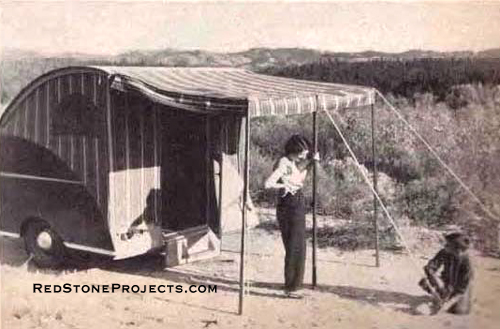
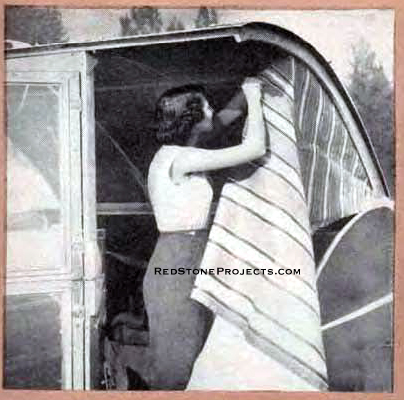
| Fabric walls enclosing kitchen area are attached with
grommets and turn buttons. Use heavy awning cloth. Page 190. |
 |
|
All set up at vacation, hunting, or fishing camp,
with cooking and sleeping accommodations for two persons. Page 190.
|
 |
|
Folding Screen Door Frame.
|
| doorframe. Fit 3/4 x 12-in. plywood panels over the posts
and attach with screws and glue. Cover the wooden panel with 1/8-in. hardboard
panels cut to extend down over the rear edge of the floor and floor supports.
The step panel is cut from 3/4-in. plywood to fit between the posts and
is hinged to the rear chassis member. The outer face of the hinged panel
is covered with 1/8-in. hardboard extending 1/2 in. at the top and ends.
The original step was made by cutting, bending and welding 1/8-in. steel
to form the unit pictured. It is attached to the hinged panel with screws. |
 |
|
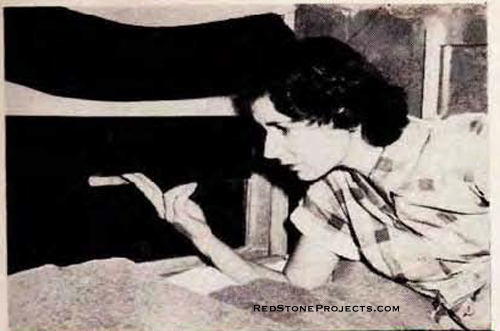
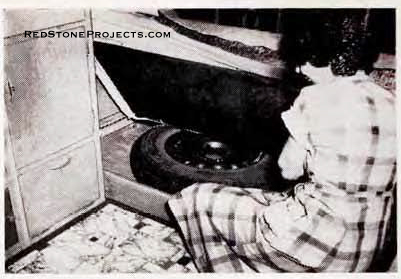
Space under studio couch provides for storage
of a spare tire and also clothing and sporting equipment.
|
| At this stage the curved deck can be made and fitted
in place. The ribs, which have already been cut, can now be fitted individually.
Cross ribs are butt-joined to the outer curved ribs but are half-lapped
over the center ribs. Join all ribs to a 2 x 2-in. cross member at the
ends. Before covering with 1/8-in. hardboard, check the fit of the deck
frame in the opening. It should fit snugly without binding at any point.
Now attach the covering pieces, beginning at the forward end of the frame,
in the same manner as those on the front of the trailer. Slide the edge
of the second piece under the edge of the first one to form an overlap
directly over the center cross rib. When driving the screws make sure that
the hardboard does not buckle and that the overhang on each side is the
same. Hinge the completed deck in place, using four butt hinges equally
spaced across the width. Cover the joint with two thicknesses of waterproof
canvas cut into 4-in. strips and tacked or screwed over the joint. Spread
calking compound under the first strip and fold the edges of both strips
as they are tacked. Do not use glue as it may be necessary to renew the
canvas covering after several seasons of service. |
 |
|
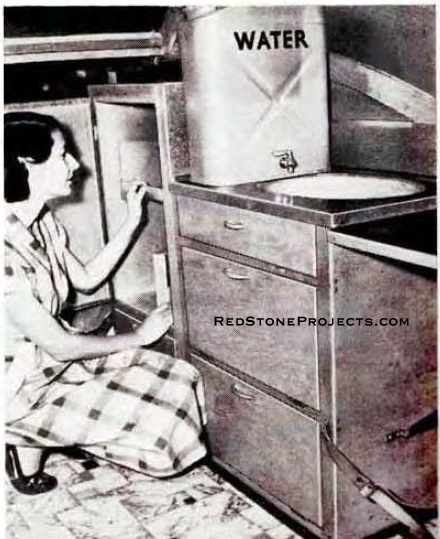
Above, there's ample space on the metal-topped
cabinet for a camp stove. Below, refrigerator and sink cabinet with drop
leaf occupy right wall of trailer.
|
| Details on page 188 show the clothes closet built into
the forward end of the trailer body, also the storage cabinets on the right
and left walls. The closet is of simple construction and there can be some
variation in the position of the parts. Sections A-A and B-B show how the
sliding doors are fitted. Dimension and position the parts according to
the space occupied by the studio couch you use for a bed. Cabinets are
made from plywood with facing strips of solid stock. The design of the
cabinets can be altered to suit the builder's requirements. Only a portion
of the lower compartments can be used for storage. as the cabinets are
built over the wheel housings. Ready-made unpainted cabinets can be adapted
by removing the lower drawer, cutting away a portion of the back and fitting
a hinged door over the drawer opening. Small iceboxes also are available. |
| Although a method of constructing a window with a plastic
pane is detailed on the opposite page, it is recommended that a ready-made
unit be purchased. The door in the right side of the trailer is framed
with 1 x 2-in. stock and covered with hardboard. The door is weather-stripped
with felt and is made watertight with an aluminum T-molding and metal drip
trough. |
The two-piece screen door, detailed on the opposite page,
supports the deck when in the upright position and is hinged to fold inward
as the deck is lowered. When in the raised, or open, position the door
opens as a single unit. The upper doorframe hinges, shown in the side view,
are made from 1/16-in. flat steel plates riveted together loosely for free
movement and drilled for screws. Considerable hand fitting of the assembly
will be required in order to assure free movement of the door and its folding
frame. The door swings outward on four butt hinges as shown in the detail.
|
Get a restored copy of these vintage Wild Goose Trailer
Plans with 13 Pages of Enhanced and Enlarged Figures and Illustrations
and Searchable Text.
All Orders Processed
On a Secure Server
|
Folding
Screen Door Dimensions
|
The fabric walls enclosing the kitchen area when the
deck is raised are cut to fit and are provided with equally spaced grommets
for attachment to the deck and body as in the upper photos on page 190.
If desired, an awning also can be provided as in one of the photos. |
| To finish, apply an under coat and two coats of outdoor
enamel. Joints in the body covering are concealed with aluminum moldings
applied after finishing. Wire the trailer for a 110-volt lighting circuit
for convenience in trailer courts. Use 6-volt screw-based bulbs for car-battery
operation of lights. Provide clearance reflectors, taillight and license
plate holder. * * * |
Any 2 Vintage Trailer Plans
$19.95 FREE Shipping |
|
Select 2 Vintage Travel Trailer Plans
|
|
|