Free Shipping
Build a Craftsman Folding Trailer
DIY Vintage Hardside Pop Up Camper Trailer
|
Craftsman Folding Camping Trailer Plans
Build this Vintage Pop Up Camper Trailer
 |
PDF Format |
|
|
All Orders Processed
On a Secure Server
|
Price $12.95
|
|
Get a restored copy of these vintage Folding Trailer
Plans with 13 Pages of Enhanced and Enlarged Figures and Illustrations
and Searchable Text.
|
We will email these plans, to the address provided
with your payment, within 48 hours following receipt of your order.
|
|
|More
Vintage Trailer Plans|
|
|

|
|

|
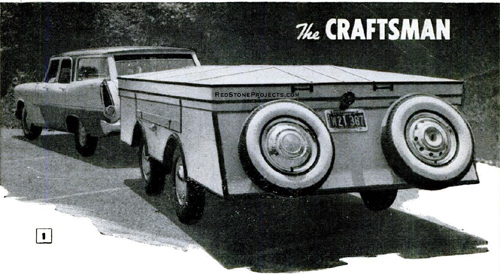
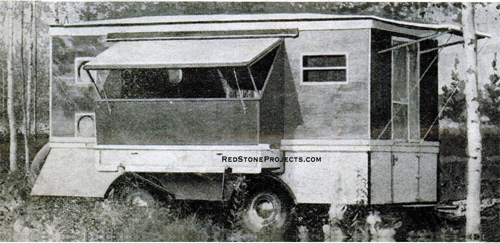
| Designed and Built especially for
a trip to Alaska, this fold-down camping trailer was thoroughly road-tested
on the rugged Alcan Highway. Economical, high-speed towing is the main
consideration in its construction, combined with generous living space
for four persons.
When folded for towing, the trailer is lower than a modern
car, Fig. 1, thus offering a minimum of wind resistance. Utilizing airplane-type,
stressed-skin construction for the upper portion of the trailer body reduces
over-all weight by hundreds of pounds.
Because the trailer is supported on four wheels, its weight
seldom bears on the trailer hitch. This occurs only on very rough roads,
as the tow bar has a pivoting action, Fig. 9, that accommodates considerable
vertical motion. About 30 min. is required to set up the trailer completely
when a campsite is reached. |
|
|
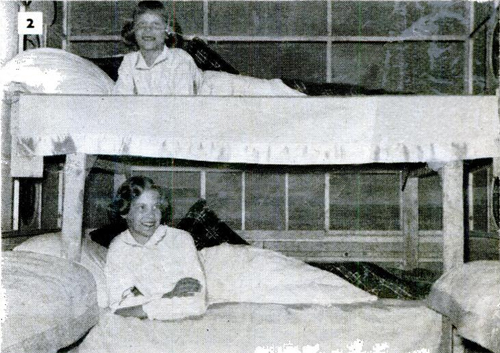
Author's two daughters enjoying a trip to Alaska,
each night sleeping most comfortably in bunk beds at the end of the trailer.
|
The setup is shown in Figs. 3 through 8. When the roof is
raised, the rear wall, which is hinged to it. is swung down and fitted
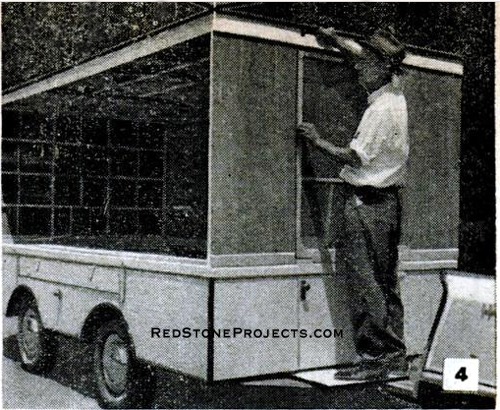
on the lower body, Fig. 3. The front wall is next, being fitted in the
same manner, Fig. 4.
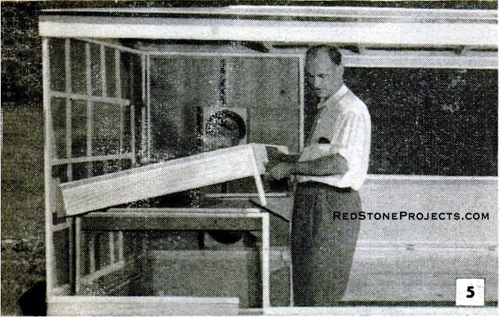
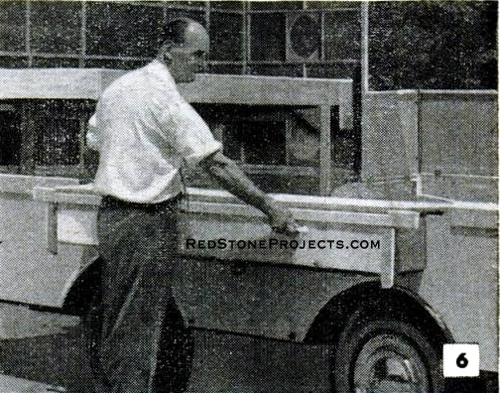
Then one side wall is put up, and the bunk beds in the
end of the trailer are fitted one above the other, Figs. 2 and 5. The drawer-type
side bunks now are pulled out, Fig. 6, and their side walls swung up in
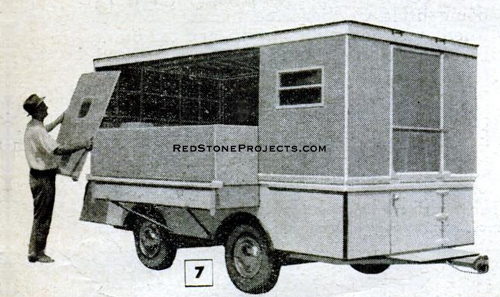
place. The completed trailer is shown in Fig. 8. Note in Fig. 7 that the
bunk end walls are square.
|
|
First step in setting up the trailer is to raise
one end of the roof and swing down one end wall that is hinged to roof.
Lower end wall is screwed to trailer body.
|
|
|
Second step is repeat of preceding operation on
wall at opposite end of trailer. Setting up trailer can be a one-man job
but go quicker with two.
|
|
|
In this photo, one side wall has been left off
to demonstrate headroom inside the trailer for 6-ft man and to show how
bunkbeds are set up on brackets.
|
|
|
Drawer pulls attached to the pull-out bunks permit
handling them like bureau drawers. Hinged side walls of bunks then are
raised and tubing brackets installed.
|
|
|
Final step in setup is installation of side wall
panel. Square end panels on man job pull-out bunks were modified with triangular
extensions as below.
|
|
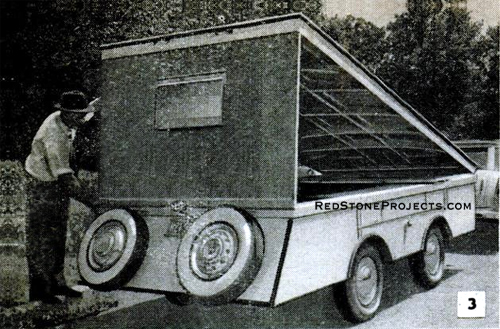
Below, spectators often express amazement a full-sized
house trailer popping out of the shallow trailer originally towed into
the camping area.
|
|
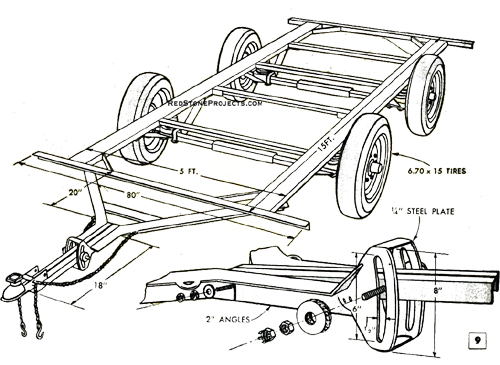
Construction of the trailer starts with the welded, platform-type
frame, Fig. 9. Side members are 3/16 x 6-in. steel channels. The end crosspieces
are ¼ x 2 -in. steel angles. Four other crosspieces, spaced equidistant
the length of the frame, are ¼ x 1 ½ -in. steel angles. Axles
for the original trailer are the drop type that can be purchased at trailer
supply houses. Automobile front wheel hubs are used with the axles. Because
some wheels have roller bearings and others ball bearings, it is best
|
|
Dimensions and layout for the the trailer chassis.
|
to purchase car wheels and hubs from an auto graveyard first,
and then buy the axles with spindles that will accept those bearings. To
get the required tread on the original trailer, it was necessary to shorten
a long axle. Conversely, a shorter axle may be lengthened to suit.
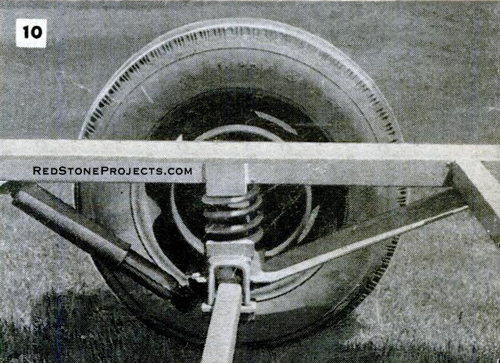
Two coil springs from the front axle of a car are cut
in half to provide four springs for the trailer. In Fig. 10 is shown a
suspension unit. The upper end of each spring is welded to the frame, and
four short pieces of flat are welded equidistant around it to help position
it. The lower end of the spring fits in a ring shaped from 3/16 x 2-in.
steel flat. The ring is welded to a 24-to. length of 1/8 x 6-in. steel
plate bent in a modified Z-shape. The lower horizontal portion of the Z-shape
measures 5 in., the upper is 4 in. and is welded to the frame channel.
Two U-bolts are welded to the ring around the lower end of each spring
providing a means of clamping the assembly to the axle.
|
|
Axle, wheel and suspension for the trailer chassis.
|
A shock absorber from a light car is fitted behind each spring.
Note in Fig. 10 that the end of the angle cross member is "boxed" with
a short piece of angle to provide a surface for welding the bolt to which
the upper end of the shock absorber is attached.
Details of the frame extension, made of 2-in. angles,
and the tow bar, assembled from two 2-in. angles welded together, are shown
in Fig. 9. Fig. 12 shows the main, or lower, body. The floor consists of
4 x 8-ft. sheets of 1/2-in. exterior-grade plywood bolted to the frame
and trimmed to fit, allowing 2 in. extra all around, to accommodate the
2 x 2 strips bolted to the lower surface of the floor along the outside
edges.
Strips of plywood now are nailed across the joints between
the plywood, on the lower surface, and positioned to butt against the frame
members. These plywood strips, held by clinched nails, aid in keeping the
body positioned on the frame.
Cutouts also are made for the wheel wells. These are made
by fitting trailer fenders into the cutouts and attaching a plywood semicircle
to the inner edges of the fenders. If desired, the floor assembly now can
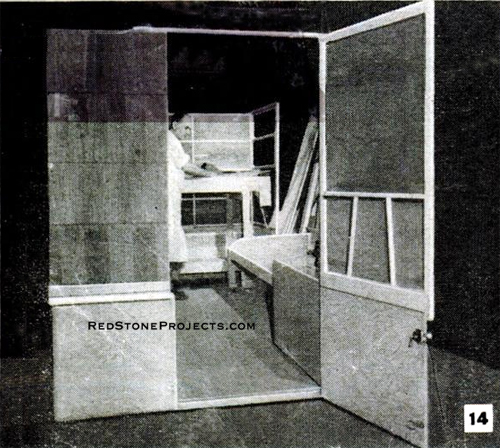
be removed from the frame and the body finished separately Fig. 14.
Get a restored copy of these vintage Folding Trailer
Plans with 13 Pages of Enhanced and Enlarged Figures and Illustrations
and Searchable Text.
All Orders Processed
On a Secure Server
|
Dimensions
and construction details for the wall panels.
|
|
| |
Get a restored copy of these vintage Folding Trailer
Plans with 13 Pages of Enhanced and Enlarged Figures and Illustrations
and Searchable Text.
All Orders Processed
On a Secure Server
|
Plans
with dimensions for the trailer body and interior.
|
|
This is handy where overhead clearance is restricted. The
sides of the lower body are 1/4-in. plywood on which are fitted strips
of 1 x 3, rabbeted 1/4 x 2-in. to produce a finish wall height of 30 in.
Note that the 1 x 3 strips on the pull-out bunks project
3 in. beyond the ends, requiring the strips on the fixed portion of the
body to be shortened by that much, Figs. 6 and 12. Dimensions and details
of the pull-out bunks are shown in Figs. 12, 15 and 16. These dimensions
can be changed to suit, but remember that corresponding changes will have
to be made in the side members of the body.
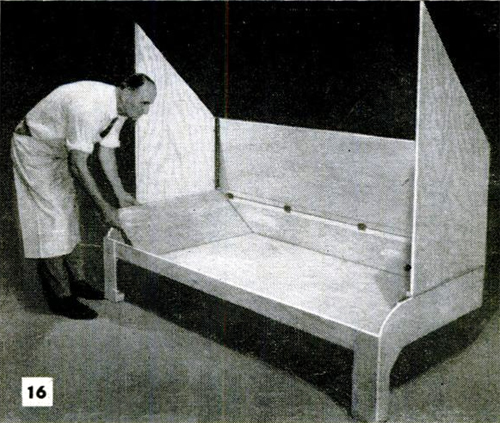
A small sheet of plywood fitted at the head of a bunk
will provide a "pillow effect" under an inflatable or other type camp mattress,
Fig. 16. Located inside the trailer door are two cabinets. The top of one
contains a small sink of the type used in trailers and boats. Under the
sink can be installed a small, portable refrigerator or icebox.
The other counter top is used for a three burner gas range,
for cooking. Beneath the counter is stored a tank of butane gas that supplies
fuel for the range. Supports for the upper bunk at the rear of the trailer,
Figs. 2 and 12. are U-shaped members assembled from 1 x 4 stock. Plywood
gussets at the upper corners reinforce them.
The lower ends of the supports fit in "pockets" formed
from lengths of 1 x 2 stock and plywood. Dimensions and details of the
method used to construct the upper side walls, end walls and roof are shown
in Figs. 11 and 13.
Each wall section consists of a framework of 1 x 1 stock,
assembled with glue and nails, over which is glued and nailed to a sheet
of 1/16-in. plywood, light sheet aluminum or plastic coated canvas.
|
|
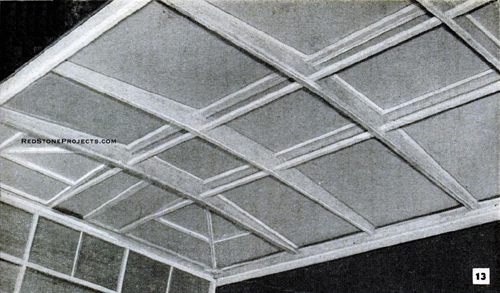
Ribs of roof are 1/8 or 1/4-in plywood edged with
1 x 1 stock. Curves lower edges allow more headroom.
|
Felt weather stripping is tacked to all four edges of each
side panel, and bottom and top of end panels. Adjacent panels are held
together by thumbscrews and nuts of the type shown in Fig. 11. The same
screws and nuts are used to hold the panels to the main body of the trailer,
being fitted through holes drilled in a strip of 1/4-in. plywood on the
lower edges of the panels. that overlaps the trailer body.
The number, size and shape of the clear plastic windows
is optional. The upper half of the trailer door, Fig. 14 is a screen. But
an optional cover of light canvas is suggested for chilly weather. Plastic
coated canvas is used to cover the trailer roof, Figs. 11 and 13. Battens
are nailed over the canvas to the longitudinal members, and to alternate
ribs, as indicated. The canvas is painted silver to minimize heat buildup
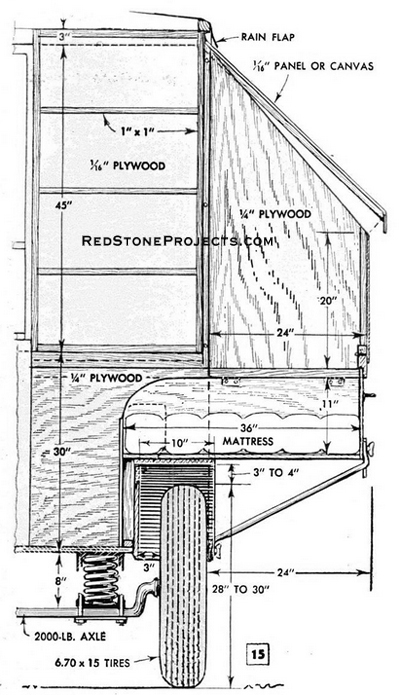
under it caused by the sun. As indicated in Fig. 15, a strip of 1/4-in.
plywood is fastened to the edges of the roof so that it projects down 3
in.
A cutout can be made in the strip for each of the lean-to
roofs over the pull-out bunks, and a rain flap used at these points. This
will permit the roofs to be raised slightly. Two spare wheels, including
hubs and bearings are carried on the back of the trailer. They can be held
by long bolts, as indicated in Fig. 12, or regular trailer-type wheel mounts
can be used as on the original trailer.
|
|
The trailer's two piece folding door.
|
|
|
Elevation view, with dimensions, of the trailer
slideout.
|
|
|
Demonstrating the vintage trailer bunk setup.
|
Any 2 Vintage Trailer Plans
$19.95 FREE Shipping |
|
Select 2 Vintage Travel Trailer Plans
|
|
|