Free Shipping
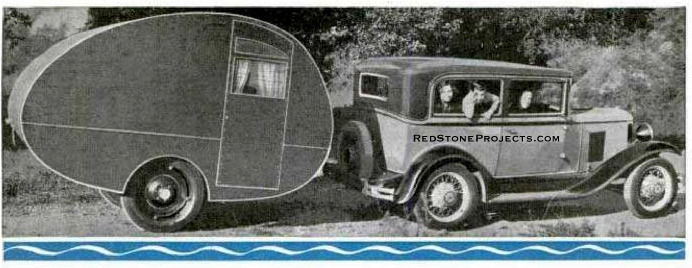
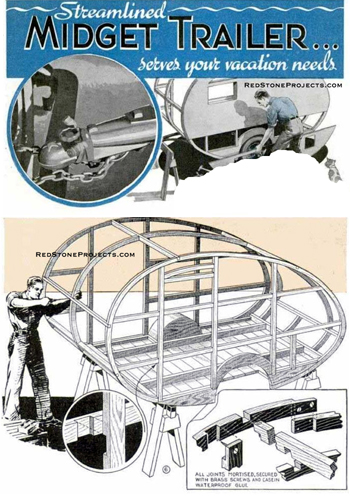
Build a Streamlined Midget Trailer
Compact Vintage Teardrop Camping Trailer Plans
|
Compact Vintage Teardrop Trailer Plans
Build this Streamline Lightweight Camper Trailer
 |
PDF Format |
|
|
All Orders Processed
On a Secure Server
|
Price $12.95
|
|
Get a restored copy of these vintage Compact Vintage
Teardrop Trailer Plans with 23 Pages of Enhanced and Enlarged
Figures and Illustrations and Searchable Text.
|
We will email these plans, to the address provided
with your payment, within 48 hours following receipt of your order.
|
|
|More
Vintage Trailer Plans|
|
|

|
|
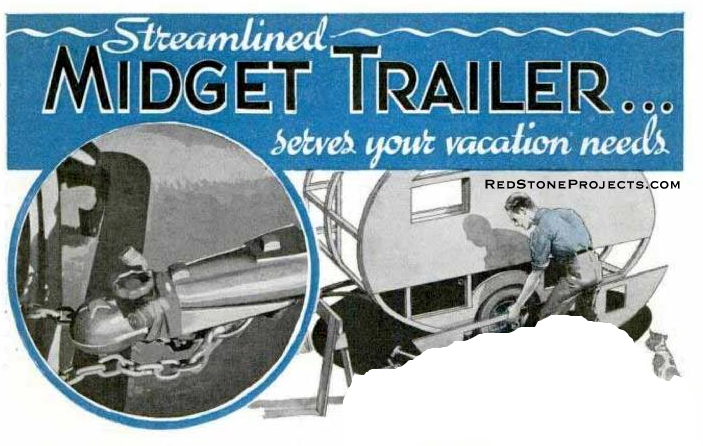
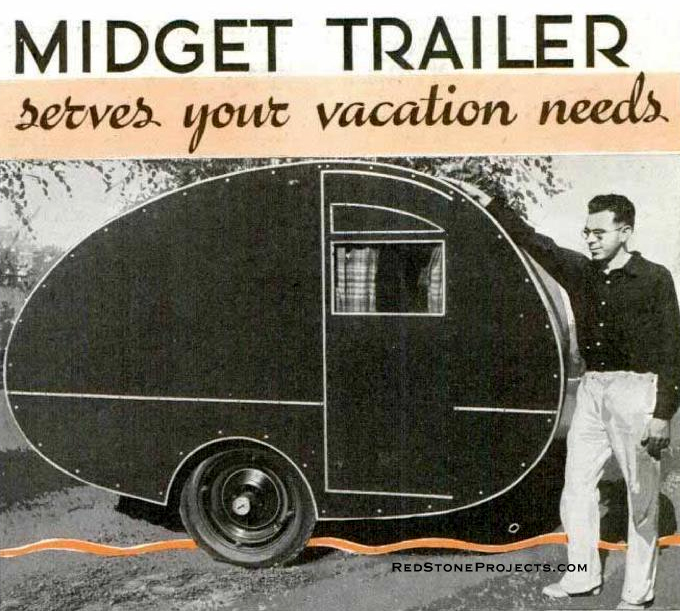
Streamlined Midget Trailer
Serves your vacation needs
|
|
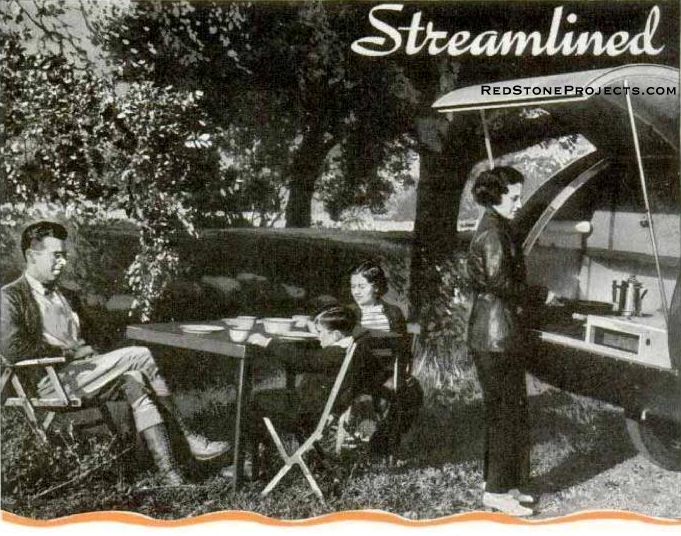
"Teardrop" body provides sleeping quarters for two
adults on a full-size bed, besides storage room for six or eight cots or
sleeping bags to accommodate as many persons on a week-end trip. There
is a large cabinet for food supplies, a sink with running water, stove,
worktable, and a cork-insulated icebox with a water-sealed drain. The trailer
body is only 9 ft. long, 5 ft. 9 1/2 in. wide and the weight complete ready
for the road is approximately 960 lbs. The trailer is balanced so nicely
that one man can move it about easily when detached from the car. Although
material costs will vary, $125 will be a fair average.
|
|
|
|
Part 1 - By CHARLES W. BRENTNER
GLANCING casually at this little job gives you the impression
how much can be done in a small space, how smart it appears in modern streamline
design, and how easy such a small trailer should be on your car. Going
through the photos, constructional drawings and details as given in this
article, you will agree that it is surprisingly complete in its accommodations
and provides all the comforts on the road that the average person demands.
While it is classed as a midget in comparison with the size of most house
trailers, it is just the thing so many people want for greater enjoyment
of weekend or vacation trips.
Being light in weight, you will have no cause to worry
about undue clutch and rear-axle troubles due to excessive wear. Also,
there's no sidesway which is often responsible for uneven tread wear on
the rear tires of the towing car. This elimination of sidesway is due to
the manner of springing the trailer body to the axle.
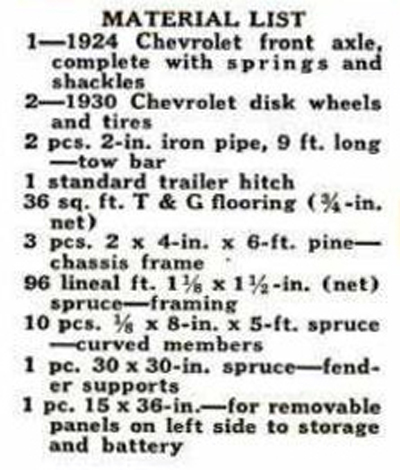
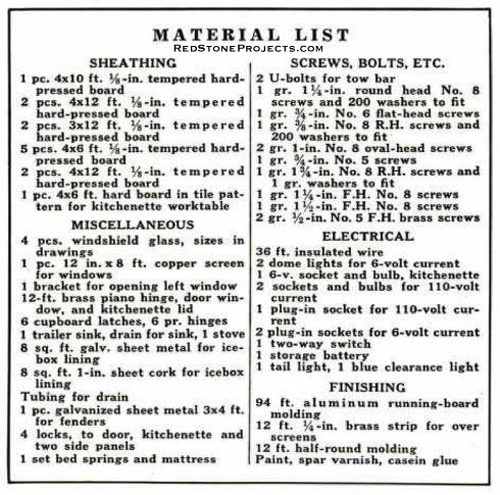
The material list gives the general sizes and the quantities
of stock and incidentals required for the construction of the chassis and
body frame. Of course, allowances are made on the various items for cutting
and fitting. In the matter of woods designated in the list, substitutions
can be made, if desired, but it should be kept in mind that the body has
been designed for maximum capacity in the minimum of space. For this reason,
the stock sizes of the chassis and body framing have been worked out carefully
to
give the greatest strength possible with the fewest number of parts and
still keep the weight under a given figure. If it happens that you can't
get spruce for the parts as specified, pine is a substitute, but in equivalent
sizes lacks the strength of the former wood. Oak gives a sectional strength
equal to spruce but adds to the weight. In this latter instance, a good
compromise would be the use of oak for the chassis frame and pine for the
body framing. Adding metal corner plates and iron angles attached with
screws will greatly strengthen those parts that are made of pine. |
|
|
Get a restored copy of these vintage Compact Vintage
Teardrop Trailer Plans with 23 Pages of Enhanced and Enlarged
Figures and Illustrations and Searchable Text.
All Orders Processed
On a Secure Server
|
|
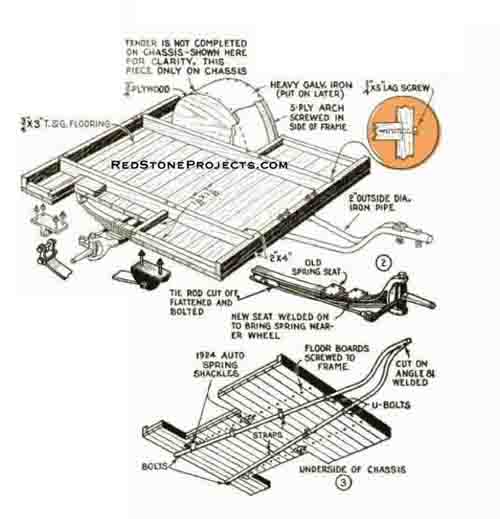
| Chassis: General dimensions of the chassis are
given in Fig. 1. You will note that the floor area is relatively small,
in fact, passengers stand only on a small portion inside the door when
getting in or out or putting on shoes while sitting on the bed. The remainder
of the floor supports baggage, water tank and battery. Assembly details
are shown in Figs. 2 and 3. First buy from a wrecking yard a standard 1924
Chevrolet front axle, springs and shackles, and a pair of 1930 disk wheels
of the same make. Make sure that the axle you get has not been sprung or
otherwise damaged. Cut the tie rod, flatten the ends and bolt to the axle,
after aligning the wheels. Usually this is best done after installing on
the chassis and aligning with the towing car. The flat ends of the tie
rods, after aligning the wheels, are clamped to the axle and then drilled
to insure true register of the holes. A new spring-seat is welded near
the wheel on each end, Fig. 2, to bring the point of suspension nearer
the wheel, thus preventing sidesway on the road.
The tow bar, Fig. 3, is in the form of a vee, made of
a pair of 2-in. iron pipes bent to an upswing at the forward end, the ends
beveled and welded at the tip, as shown; then two holes are drilled for
bolts through the trailer hitch. The latter should be of a standard make
having a ball-and-socket fitting. At this point provision should be made
for running the lighting and taillight wires through the left-hand pipe. |
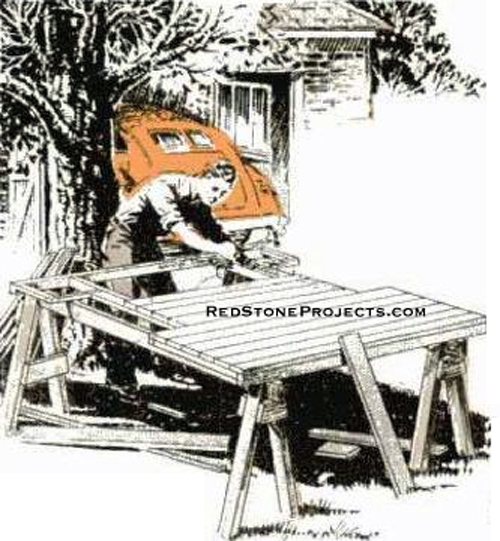
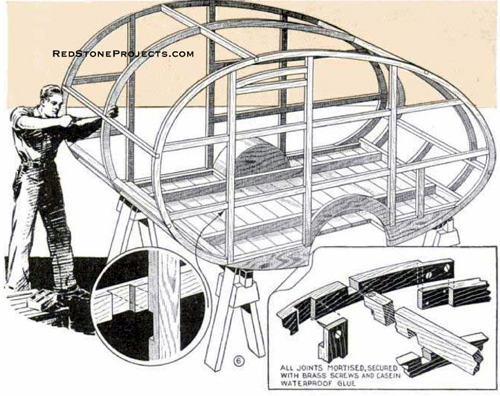
Now build the chassis frame as shown in Fig. 2, screwing
the tongue-and-groove floor boards to the 2 by 4-in. cross members while
the frame is upside down. Next, install the tow bar and the spring shackles.
In making up this structure, there are several points to watch.
| Make certain that it is square and that it remains so
until you get all the floor boards screwed in place. Tack on temporary
braces, if necessary, to hold it in the squared position. The strength
of the whole chassis depends on the care with which you assemble this part
of the structure. The housed joints joining the 2 by 4-in, members should
be a snug fit. If the joints are an imperfect fit, the vibration and strain
to which the parts are subjected will cause them to loosen to such an extent
that the lag screws will not hold effectively. Turn the chassis over and
set up on sawhorses to keep it steady while going ahead with the construction. |
|
|
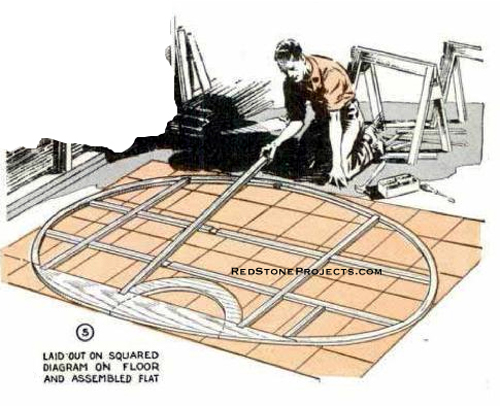
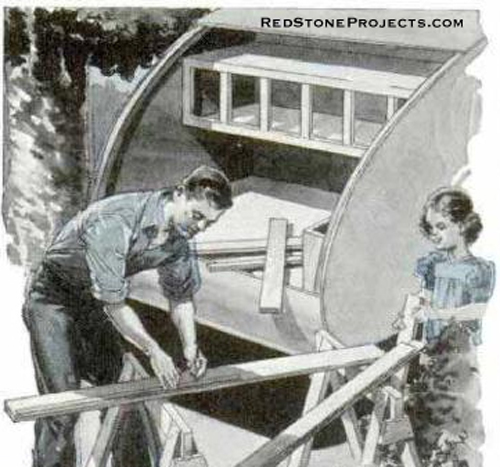
| Body Frame: As specified, spruce is the best wood
to use for the body frame. If it is not available then use selected white
pine. Practically all frame members are 1 1/8 by 1 1/2 in., the curved
members, Fig. 4, being band sawed from 8-in. boards.
To simplify the work, lay out a squared diagram full size
on the garage or workshop floor, Fig. 5, and outline the entire frame.
It then will be an easy matter to get each piece in proper proportion and
location. Note that right and left frames are practically the same, Fig.
4, and are altered simply by cutting away different portions in each This
method keeps the frame true until entirely assembled. The finished job,
with the frames joined by the crossbeams, will appear as in Fig. 6. Casein
glue and brass screws are used throughout. |
| In assembling these frames keep in mind that strength
depends largely on the accurate fitting of the joints. The lower details
in Fig. 6 show the variations in half-lap joints used in the assembly.
As you see, there is no cross bracing on the framework itself. Rigidity
depends entirely on the strength of the individual members, the accuracy
of the joinery and the sheathing material which goes over the framework. |
|
|
Get a restored copy of these vintage Compact Vintage
Teardrop Trailer Plans with 23 Pages of Enhanced and Enlarged
Figures and Illustrations and Searchable Text.
All Orders Processed
On a Secure Server
|
|
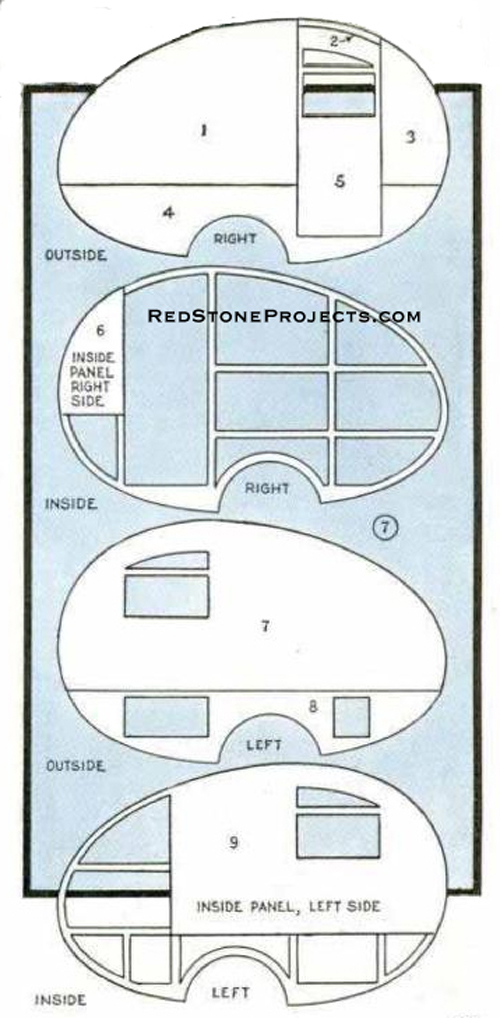
For the purpose of clarity, the body framework is shown assembled
in Fig. 6, but in actual procedure the side frames are first used as templates
to lay out and cut the sheathing, which is of 1/8-in. hard-pressed board.
This will be covered in Part II, which follows in an early issue.
The center member, Fig. 6, is cut to the same curve as
that of the side frames. It is assembled full length and after installing
a header, a portion of it is cut away at the rear of the body and used
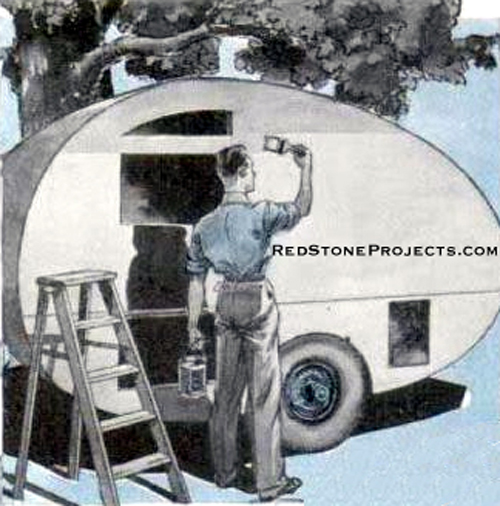
as a center rib for the flush lid which closes the "kitchenette." Now,
while you have the construction at this stage, is a good opportunity to
paint all the parts. Use a priming coat first, thinned so that the wood
will absorb a good portion of it. Then follow with at least one coat of
full-bodied paint in the color desired. Be careful to work the paint well
into the joints, particularly the openings between the floor boards, in
fact, it's a good idea to prime the tongue-and-groove edges of the floor
boards before you lay them.
| Also prime the top edge of the chassis frame members.
These latter precautions will prevent absorption of moisture. If you decide
to prime the side members remember that certain parts will be exposed in
the finished job. So, it's well to smooth up with sandpaper before applying
paint. |
|
PART II - Sheathing, Interior Furnishings, Kitchenette
By CHARLES W. BRENTNER
WEATHER-TIGHT Sheathing: Now that you have the
chassis and the side frames finished, you use the latter as templates in
laying out the side panels to size. These are cut from 1/8-in. tempered
hard-pressed board. Before you cut the board, note carefully the number
and arrangement of the pieces on the right and left sides of the body as
in Fig. 7. Five pieces are required for the right-side frame on the outside,
but only one small piece, No. 6, is needed for the inside. The balance
of the exposed frame is covered by a cabinet and clothes closet. Only two
panels are required for the exterior of the left side and one large panel
for the interior. |
|
| An easy way to cut hard-pressed board by hand is to clamp
the side frame to the large sheet and cut with a fine-tooth compass saw
or with a hacksaw blade, reversing the blade so that the teeth cut on the
up stroke. Smooth the edges of the board after sawing with a block plane. |
| This done. you lay the panels aside while you assemble
the body frame and the fenders over the wheel wells. The latter are finished
with semicircular pieces of plywood screwed to the inside of the wheel-well
openings and an arch, made of the same material, is built into the side
frame on each side over the well. Then the galvanized-iron fender is fastened
over this with screws. These parts are shown in place. With the frame assembled
and squared up, you're ready to put on the sheathing. This is fastened
with oval-head screws and washers spaced approximately 6 in. apart. Metal-trim
moldings finish up this part of the job. |
|
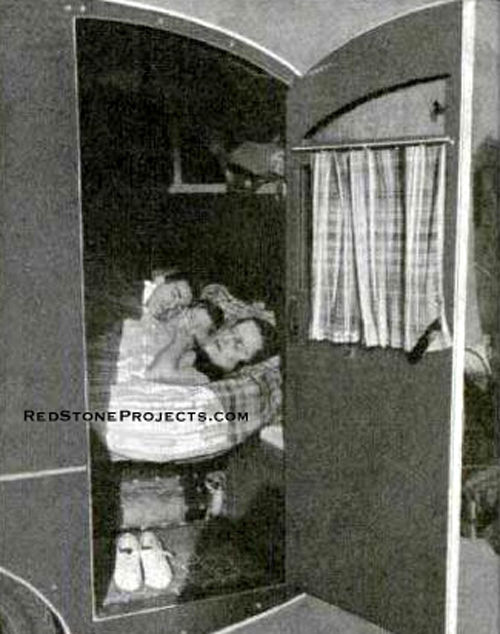
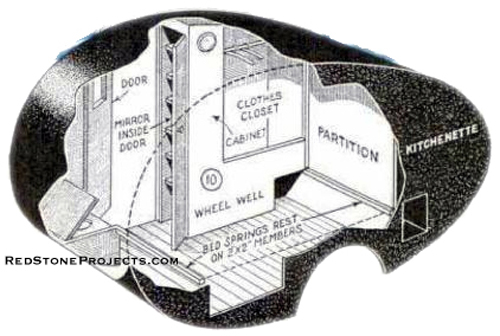
| Sleeping Quarters: The two details in Fig. 8 give
sizes and locations of the built-in equipment. A standard bed spring and
mattress unit is supported by two cross members, but before this is shoved
in through the rear (the kitchenette partition is not yet installed) the
cabinet and clothes closet on the right or door side are built in, in the
positions shown in Fig. 10. A small chemical toilet is built forward, just
inside the door. Thin wallboard, supported by suitable framing, is used
in the construction of this equipment. The rear partition, Figs. 8 and
10, is also of the same material. |
|
|
Get a restored copy of these vintage Compact Vintage
Teardrop Trailer Plans with 23 Pages of Enhanced and Enlarged
Figures and Illustrations and Searchable Text.
All Orders Processed
On a Secure Server
|
|
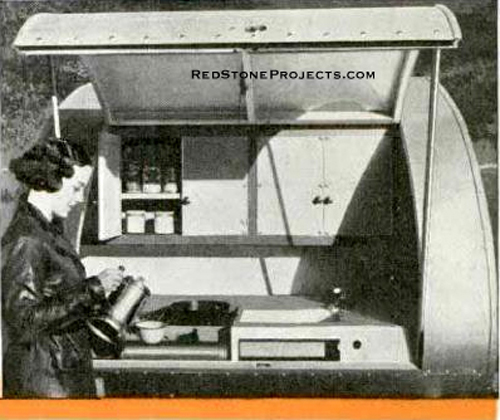
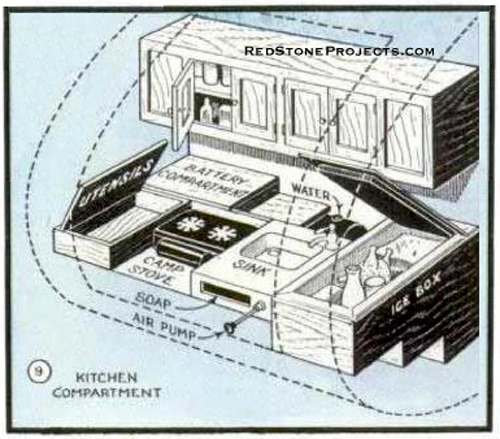
| Kitchenette: After installing the partition, the
kitchenette can be built in the individual's favorite method of cabinet
work. In the original, Fig. 9, the units were built separately and then
set into the rear compartment, the perspective view showing the general
arrangement. When not in use, stove, sink and water-tank compartment are
covered with hard-pressed board in tile pattern, making a neat, clean table
in appearance. |
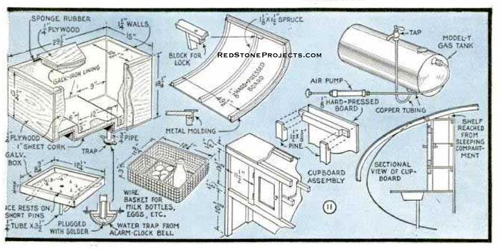
| Icebox Is Cork - Insulated: A large icebox is
built into the original trailer; the details being shown in Fig. 11. As
you will see, a stepped-box of plywood is made first and lined with 1-in.
sheet cork, then a galvanized sheet-metal lining with corners soldered
is made to fit over the cork insulation.
Around the edge of the lid is a strip of sponge-rubber
weatherstrip to make a tight seal The drain pipe is fitted with a water-seal
or trap made from an alarm-clock bell. This prevents loss of cold air from
the box. The ice tray shown is especially adapted for trailer use, being
fitted with a pair of stiff spring feet, and with nail ends about 1/2 in.
long soldered to the sheet-metal bottom so that the ice melts down upon
them and will not slide about. No nails should be used in assembling and
fastening either the icebox or the other kitchenette units in place. Use
screws instead. They hold better than nails of any size under the conditions
of vibration to which these parts are subjected. Not only that, but units
fitted into close quarters such as these can always be removed intact if
assembled and fastened with screws of proper size. |
| It's a good idea to anchor the stove and sink securely,
otherwise these units might be thrown about loose in the compartment should
the trailer be called upon to travel over a rough road or steep mountain
trail. |
| Water System and Sink: A Model-T Ford gasoline
tank is fitted out for an air-pressure water system, Fig. 13. The filler
cap should be provided with a tight gasket. A few strokes of the pump will
force up water for a considerable period.
The sink can be made of galvanized sheet iron, or a small
porcelain enameled one, made for the purpose, can be had for a moderate
sum. Over the worktable is a cupboard made in the conventional manner,
as in Fig. 11. Hard-pressed board is used for the paneling, and all framing
is 3/4 by 1 1/2-in. pine. The top of this cupboard serves as a shelf for
the sleeping compartment on the other side of the partition. Construction
of the lid for the kitchenette is similar to that of the body, and details
are given in Fig. 11. The edges are bound with aluminum running-board molding. |
|
| Door Has a Transom: A great deal of convenience
is built into the one door. It has a screened transom ventilator fitted
with a removable glass pane, a screened window that can be lowered, a lock,
window latch, and curtain rod. The framing is the same as the rest of the
body, and is covered both sides with 1/8-in. hard-pressed board. Fig. 14,
the sectional view, illustrates the inner construction, while Figs. 13
and 15 show perspective views of the door assembly. |
| The sliding window moves in felt-covered slots and the
pane is otherwise protected against rattling and chafing, as the drawings
will show. Holes for the rivet and handle in transom pane, Fig. 15, are
bored either by tempering a twist drill and keeping it lubricated with
kerosene or, with a short length of tubing and valve-grinding compound.
Method of removing transom pane is shown in Fig. 15. |
|
|
Get a restored copy of these vintage Compact Vintage
Teardrop Trailer Plans with 23 Pages of Enhanced and Enlarged
Figures and Illustrations and Searchable Text.
All Orders Processed
On a Secure Server
|
|
| These panes are cut from plate glass with an ordinary
glass cutter, and the edges smoothed with an oilstone. The window on the
left side is swung out by a bracket on the inside, working through the
screen. The transom vent above this is the same as in the door, and the
frame assembled as shown, Fig. 12. |
| Also on the left side are two removable panels, one to
give access to storage space under the bed, the other to the battery box.
Each is fitted with a lock, and with two pins at the top that set in holes
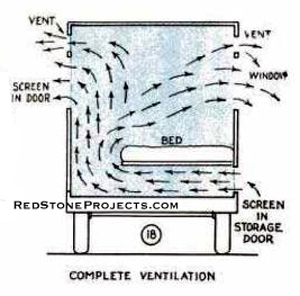
bored for the purpose, Fig. 16. The larger panel is taken out in warm weather,
in camp, and a screen substituted, giving excellent ventilation as in Fig.
18. |
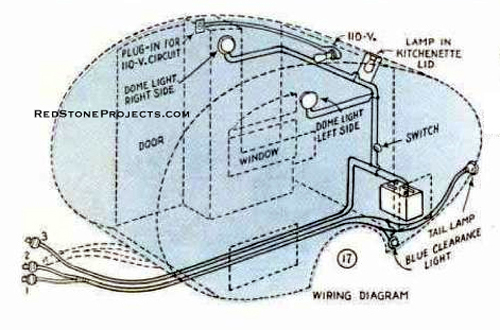
| Wiring: Three circuits are installed for lights
in the original trailer, Fig. 17. One is a plug-in for 110-volt lines,
while the other two are for 6-volt lines from car and from storage battery
in the trailer. The wiring can be extended to any point in the trailer
for convenience. *** |
Any 2 Vintage Trailer Plans
$19.95 FREE Shipping |
|
Select 2 Vintage Travel Trailer Plans
|
|
|