Free Shipping
Build a Shanty Boat
Vintage 21 Foot Houseboat Plans and Instructions
|
"Luxury" Shanty
Boat Plans
Build a Vintage 21 Foot
Budget Houseboat
 |
PDF Format |
|
|
All Orders Processed
On a Secure Server
|
Price $12.95
|
|
Get a restored copy of these vintage Houseboat Plans
with 11 Pages of Enhanced and Enlarged Figures and Illustrations
and Searchable Text.
|
We will email these plans, to the address provided
with your payment, within 48 hours following receipt of your order.
|
|
| More Vintage
Boat Plans |
|
|

|
|
|
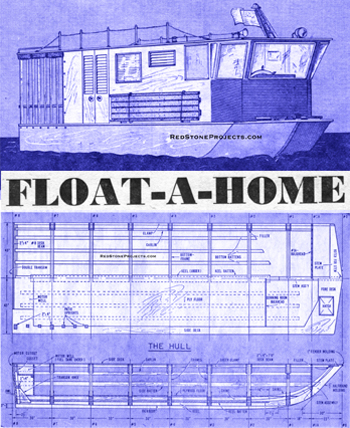
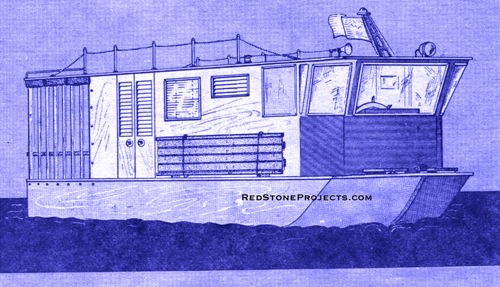
Figure 1. DIY Shanty Boat
|
|
| A HOUSEBOAT is a unique water craft in that it combines
most of the comforts of home with the mobility of a boat. Of course, use
is limited to sheltered waters, and speeds are slow in comparison to more
sea-worthy vessels.
Float-A-Home is a 21-footer that provides plenty of living
space for three or four persons. An extremely simple houseboat to build,
it features a strong hull with a heavy keel and close-spaced framing. This,
coupled with a relatively low profile, makes it a very stable craft.
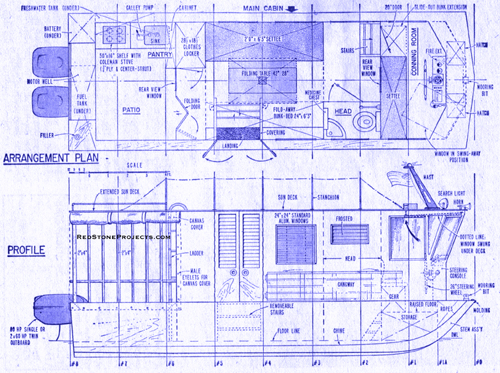
Features include a conning room designed to provide an
unobstructed view forward and to the sides through glare-proof, swing-away
windows. The settee behind the helm extends to make a full length berth,
and in the main cabin, steps at the companionway can be removed to make
way for a fold-away berth. Of course, the entire interior arrangement can
be worked out to best suit your individual needs. Shown is an arrangement
where a section of the after deck is left open to provide a patio effect
on the starboard side, while the galley is to port. |
|
Figure 2. Shanty Boat Arrangement Plan and Profile
|
|
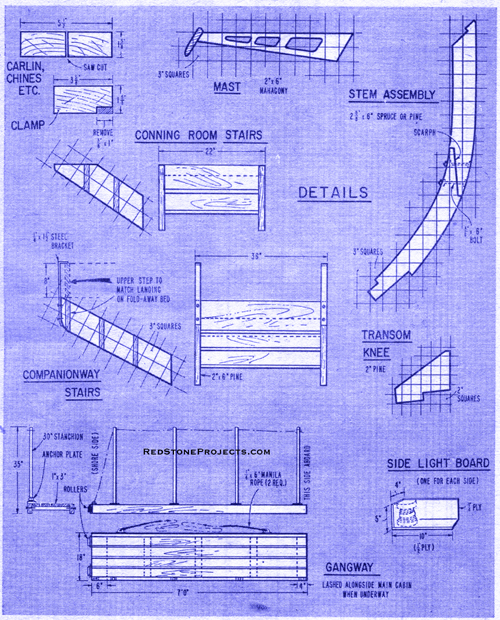
| Make up full-size patterns for the stem, transom knee,
and mast, as shown in Fig. 4, and for the stem plate as shown in Fig. 3.
Cut out these members from the proper stock as shown on the plans, and
assemble the stem. Fasten the two sections of the assembly with two 3/8-in.
x 6-in. #10 bolts, after countersinking for the bolt heads. Fasten the
stem plate to the stem with two 2-in. #10 flat head screws.
Make all measurements for framing directly on the wood
stock, and cut out the pieces. Cut out the transom panel and frame #1A
from 3/4-in. marine plywood. In all the following steps, be sure to coat
mating surfaces with marine resorcinol glue before final fastening with
screws, bolts, or nails.
Make up the transom as shown in Fig. 6, and the balance
of the frames as shown in Fig. 6 and Fig. 3. Use plywood gussets to reinforce
the frame corners. Notch all frames for keel, chines, and clamps, and notch
frames #1 and #1A for the stem assembly. |
|
Figure
3. Shanty Boat Elevation and Plan View of the Hull
|
Get a restored copy of these vintage Houseboat Plans
with 11 Pages of Enhanced and Enlarged Figures and Illustrations
and Searchable Text.
All Orders Processed
On a Secure Server
|
|
| Line up the assembled frames, upside down, spaced as
shown in Fig. 3. They can be held in position by temporary 2 x 6-in. battens
nailed to each side. Attach the transom knee to the transom, and install
the stem assembly in its notches in frames #1 and # 1A.
Notch the keel for the transom knee, as shown in Fig.
6, and install the keel. It is fastened to the transom knee with two 3/8-in.
x 6-in. #10 bolts, and to each frame with a similar bolt long enough to
go through the keel and frame (and through keel, stem, and frame at #1).
Countersink for all bolt heads, and fill the holes with wood putty. It's
a good idea to cut a rabbet groove along each side of the keel at the fairbody
(the line where bottom paneling meets the keel) to take the edges of the
bottom panels. If this is not done, you should fiberglass this joint to
make it watertight and strong.
Next attach the clamps. These and the chines and carlins
are cut from lengths of 1 5/8-in. x 5 1/2-in. stock, as shown in Fig. 4.
Cut a notch along the bottom edge of each clamp, as shown. The top edge
of the plywood side panels will lie in this groove. In fastening the clamps,
start at the transom and work forward, alternating from one side of the
boat to the other at each frame. This helps to keep stress on the framework
even. |
|
Figure 4. Shanty Boat Structual Member Details
and Dimensions
|
| Add the chines in the same manner; trim the ends of the
clamps and the chines so the chines will fit flush against the forward
ends of the clamps, and against the stem plate. Fasten clamps and chines
with two 1 1/4-in. #10 flat head screws at each joint. Now the temporary
side battens can be removed.
Tack bottom and side battens temporarily in place, and
mark all the frames for their notches. Remove the battens, cut out the
notches, and refasten the battens permanently with 2-in. #10 flat head
screw at each joint. Fair all framework so planking will lie flat.
Use lengths of builders paper to make templates for side
and bottom planking. It will be necessary to butt sections of plywood together
to make up the required length for each panel. All butt joints should be
backed along their entire length with 6-in. wide butt blocks of 3/4-in.
plywood. |
|
|
Figure 5. Shanty Boat Superstructure
|
|
| Install the side panels first, and trim the edges flush
with the chines. Use 1-in. #8 flat head screws, spaced about 2-in. apart,
and fasten to each frame as well as to transom, clamps, and chines. Install
the bottom panels in the same manner, trimming the edges flush with the
sides. Rubbing strips can be added, and fiberglassing can be done at this
time.
Give the finished hull at least three coats of a good
marine paint, and allow to dry thoroughly. Follow the paint manufacturer's
instructions carefully for best results. Turn the hull right side up, and
paint all interior surfaces that will be difficult, or impossible, to reach
after flooring, bulkheads, cabinets, and other joiner work is done.
Install the floor battens in the same manner as the bottom
battens were done. Install the carlins as shown in Fig. 3 and Fig. 5, and
finish off the hull interior with Masonite or 1/4-in. marine plywood ceilings
(interior side paneling). |
|
Figure
6. Shanty Boat Framing, Bulkhead and Transom
|
Get a restored copy of these vintage Houseboat Plans
with 11 Pages of Enhanced and Enlarged Figures and Illustrations
and Searchable Text.
All Orders Processed
On a Secure Server
|
|
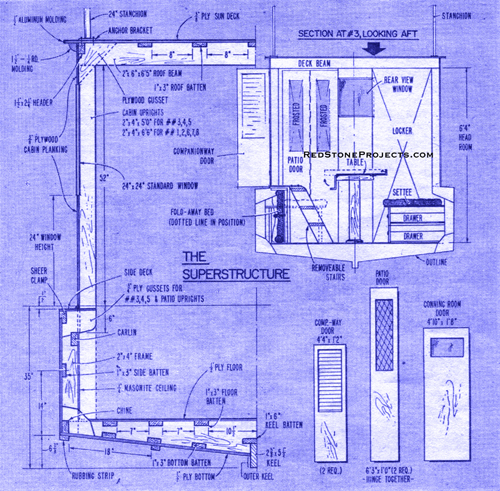
| Make up the superstructure by installing the uprights
as in Fig. 5. Note that full-length uprights are at all frames except 3,
4, and 5, where the uprights reach just below side deck level. This allows
installation of berths that extend slightly under the side decks, giving
a little more floor room inside the cabin.
Install the roof beams across each pair of uprights, after
notching them for the headers. Install the headers in the same manner as
hull clamps and chines, then notch for the roof battens and install them.
Fasten cabin panels and the sun deck in place, with 1-in. #8 flat head
screws spaced about 2-in. apart, and add the finishing trim and molding
after the narrow side decks and fore deck have been fitted. |
|
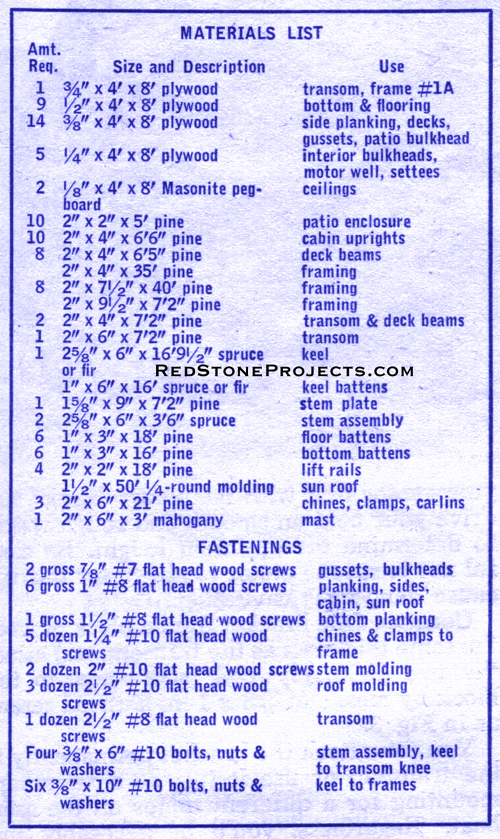
Shanty Boat Materials List
|
| Windows, doors, and other finishing touches can be added
as shown in the plans, or the entire superstructure can be modified to
suit your individual ideas and the availability of door and window units
in your area. Make up the motor well as indicated in Fig. 2 and Fig. 3,
and a steering console of your own design. Install mast, lights, cabin
fittings, and all hardware and furnishings.
Mount a single motor or two motors totalling no more than
120 horsepower on the transom, and you're ready for the water. *** |
FLOAT-A-HOME SPECIFICATIONS
Length 21 Feet
Beam 7 Feet 3 Inches
Power 120 hp. Maximum
Cost $850 approx. |
|
|
