|
|||||||||||||||||||||||||||||||||||||||||||||||||||||||||||||
|
Build a 17 Foot House Trailer Vintage 1934 Do It Yourself Trailer Plans
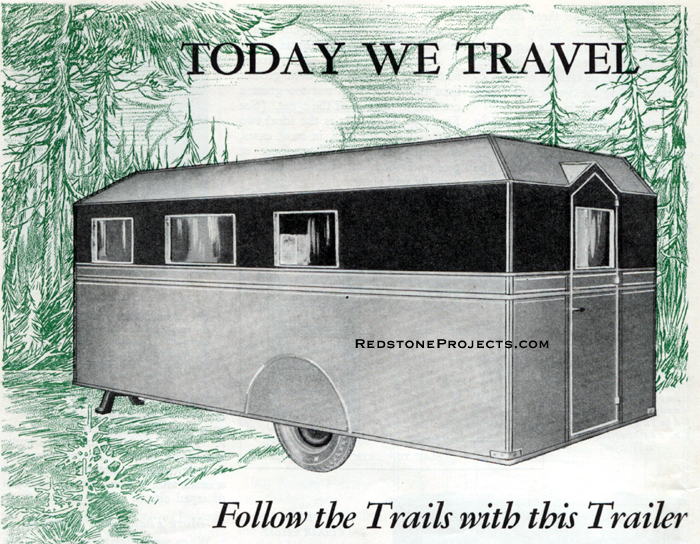
Follow the Trails with this Trailer People in every walk of life, and for various reasons, travel, and as certainly as that fact is established, these same people must live wherever they travel, regardless of the reason which actuated them. Thus we have a perfect alibi if one is needed for the existence of the house trailer. Primarily, a trailer is used for the delightful purpose of seeing the country, getting into the out-of-the-way places with convenience and comfort. It may be used on those colorful fishing trips, for hunting, and for all vocational purposes. From the business standpoint, it may be utilized to sell goods, to lecture, to pursue the occupation of a traveling auditor, to carry polo ponies and race horses, to repair locks and sharpen shears.
A few years ago it was not at all uncommon to encounter scores of people who had never been out of their own country, and countless numbers who had never traveled out of the State in which they were born. Today on the highways we meet and pass untold numbers of people who have traveled over many States and carried their tin can trailer homes behind their automobiles. See America in a Trailer Without question a house trailer is the finest and cheapest way to see any or all parts of the forty-eight States of the Union, Canada, Mexico and the Canal Zone. The idea was developed primarily for the reason that there are good roads everywhere. All you need to have is any car and a good, well built trailer, designed along modern lines. We are told upon trailer which is well planned for its function costs the automobile owner only about 5% additional in expense to draw it. These are the two dominant reasons for the stupendous increase in the use of trailers during the last few years. In one of the States there is a trailer for every three and one-half cars owned in that State. We are told they are building more trailers every day. This is something which may not be said of any other article being produced during these depression times. While this mode of travel is becoming very popular, it is, perhaps, very natural that the people who have been stricken with the fever of building their own house trailer will not all follow the sensible and reasonable course in such building. Skill Is Required When the old, wheezy, original automobiles lumbered by the first horse stampeding days and the public generally began to recognize their unlimited possibilities, all kinds of crafts began to put in an appearance on the highways. These crafts were generally cumbersome and unwieldy ; uncomfortable, and withal expensive. As time progressed, people began to learn that the engineering ideas which made the old buckboard behind old Dobbin a dependable conveyance had their limitations, and so, by a process of elimination, buggy axles, buckboard springs and surrey bodies faded out of the picture. So it is with the house trailer. The finest automobile axle and automobile frames in the world just cannot adapt themselves to the demands of the satisfactory house trailer, and it is bound to cost a number of people a considerable amount of money to get that fact placed in some proper niche where they will never forget it. The early days of the automobile made it always necessary to have a blacksmith's shop as an auxiliary to the garage to put in frame sections, truss rods to strengthen frames and axles, and various braces and supports. Automobile engineering today has changed that picture. The cabin trailer picture is changing too. It is a natural resultant of improved highways and of considerable advertising of one's own country and adjoining countries. Those who have followed the highways and byways become confirmed addicts to this form of traveling and are able to see more country comfortably than by any other means of locomotion. Independence and economy are the highlights in moving about with a trailer. Packing and unpacking, pitching tents in rain and blow, are obviated. Your home is behind your car ; a roof over your head and a comfortable bed available. Your luncheon table is conveniently ready for that voracious appetite. You have the convenience of home at every stop as well as on the road.
Remember a paramount point when you finally conclude to build your itinerant home on wheels; a makeshift job will not do. The man of real skill and experience may be able to construct essentially all parts of a trailer from axle to the finished cabinet work within, and the junk yard may be an available source of questionable material, but even he
Points to Remember There are several very specific points to consider in trailer construction. To build these without recourse
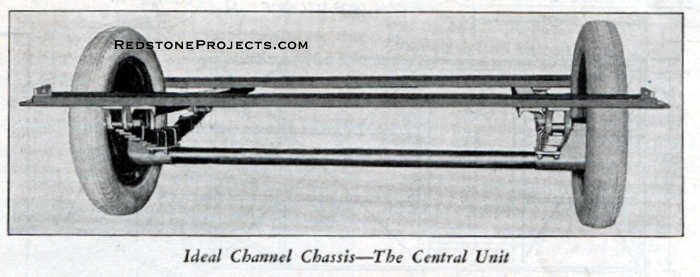
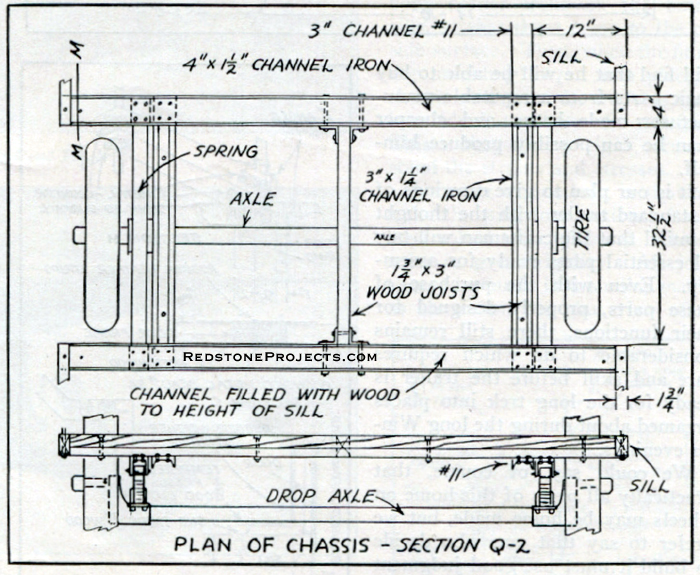
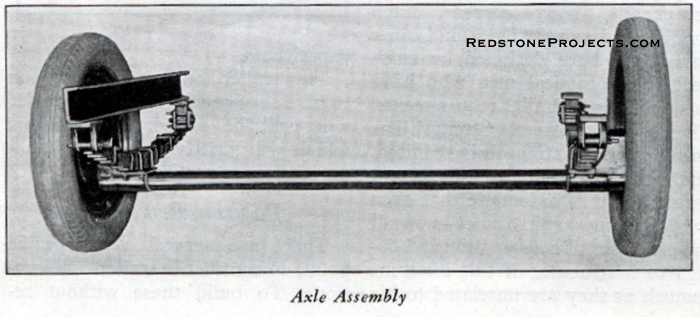
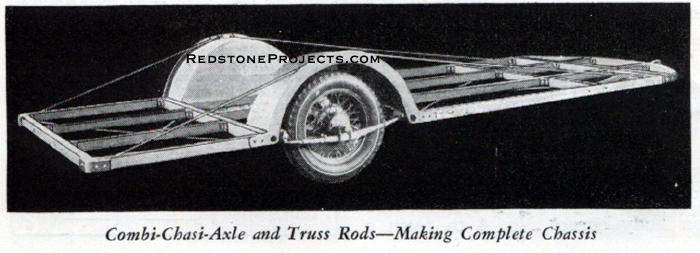
Every trailer should have ample road clearance so it may travel along over well crowned roads and make progress where rutted roads predominate. There must be broad spring supports and a low floor line. A triumvirate of essential factors is lightness, rigidity and roominess. The combination of the first two is difficult to obtain by the novice. To the experienced designer, however, these are factors which are actually built into modern trailers of which the one we describe is outstanding. Rigidity is assured in this trailer by the use of truss rods. These rods may be readily adjusted at any time, if required, by the use of wrench on a nut. This particular trailer, because of this built-in feature, will not develop squeaks and play. Roominess is provided in it through the use of a wide tread. Construction Suggestions If the craftsman will adopt a construction plan and follow it closely, he is bound to produce a staunch, sturdy trailer. Painstaking work is the backbone of success. Substitute parts or methods are not "just as good." Experience, through construction of scores of dependable trailers, has convinced the writer that there is no royal road to success and no substitute for tried out parts and materials. The backbone of the chassis illustrated is the channel frame section shown at Q2 on the sketch. The 4" channel should have 1 1/2" flanges and 3/8" flat section. The two cross sections are 3" wide x 1 1/2" flanges with a 1/4" web or flat section. All of the dimensions shown arc for a 72" tread.
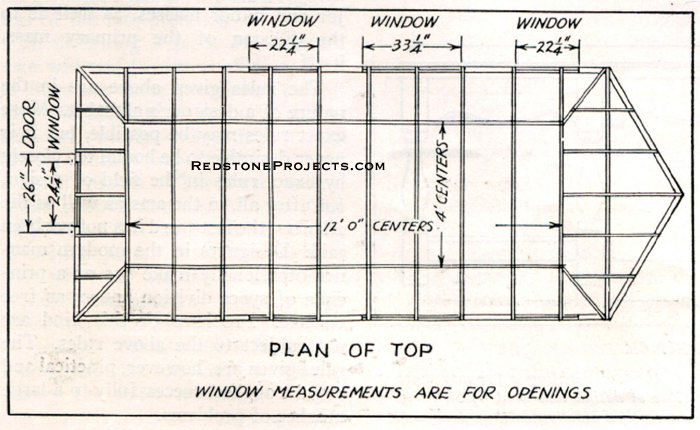
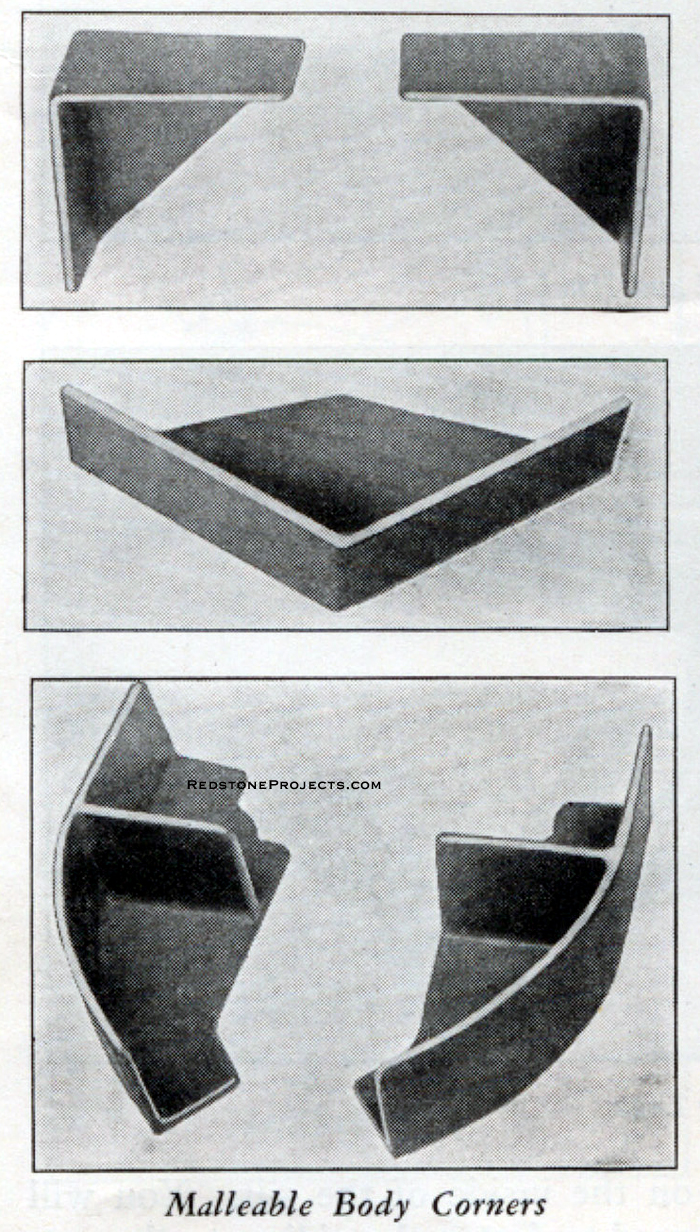
Rivet or bolt this frame securely. Bolt the spring brackets to the bottom. Remember that the length of the chassis may be reduced by eliminating one or more of the studdings. These are set 16" center to center. The length may be increased by the addition of one or more studs. Refer to the side elevation of the trailer for stud placements. Joists and Sills Clear white pine or white spruce, well seasoned, are fine woods for sills and joists. Other woods, secured locally, are as dependable, but remember lightness and strength are paramount. The stock is 1 3/4" x 3" and does not necessarily need angle steel lamination, although it should add rigidity. If steel is used, use a light gauge, as shown in section K, on the inside of the sill. You will need to fasten the siding to the outside. Corner Studs The rear corner studs are shaped from 2 3/4" x 2 3/4" sawed stock and set into the body corners No. 2. The bottom sills butt against these studs. Section A-1, L, and L-1 show the front corner studs. They are set out on body corner No. 4 to form a straight side. However, they must have a shoulder setting on the top of the sill as shown. Studs and Stud Brackets The strength of this trailer is due to the truss rods, malleable corners and stud brackets. These parts are shown in section Q and side elevation. Brackets are used at both top and bottom of the studs and also on wood truss at section Q, by bending slightly on the wood truss fitted between studs and over truss rod Q-1. Place a thin block under the lower leg of this bracket as shown at section Q. On the top of the floor, where the floor lies on the outside sills, set a plate 1" x l 3/4" onto which the studs set. Section K shows this. The stud brackets No. 7 are countersunk on the outside to provide a straight surface for the siding. Refer to section K. Body Corners and Siding The siding should butt against the body corner irons on the bottom sills, so that these come to the outside surface. Then, when the finishing moulding is put into place, as shown at section B, there is metal into which to screw the moulding. This makes a very rigid corner to stand the strains and stresses. A corner of one joist is shown in a sketch, using four sections of angle steel bolted with 3/8" bolts. This results in great rigidity. All joints should be made in a similar manner as shown on the plan view of the
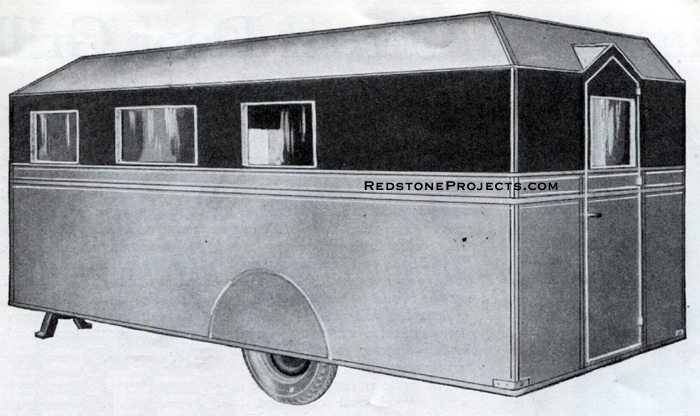
The Tongue and Wheel Arch The tongue, as shown, is made of 2" channel iron. The fastening points are the same if angle steel is used. It should be fastened to the sill and joint with angle steel, riveted to the side of the tongue and bolted to the frame as shown at section R. This scheme of fastening will not weaken the channel. The wheel arch is shown in the side elevation of the trailer and at section P. Construct this exactly as indicated with sawed timber. These arches seat on the sill, not on the floor. Screw cleats inside the sill at this point, on which to fasten the flooring, with 1/2" bolts run through the sills and through the end of the chassis channel.
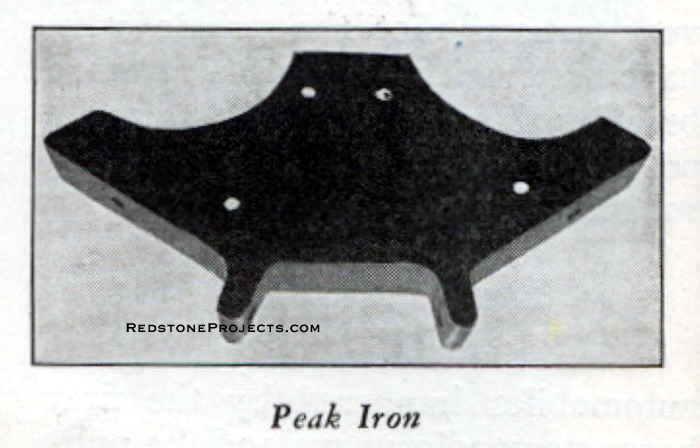
Doors for the wheels are not essential, but add much to the appearance of the trailer. If you do not desire them, simply face the openings with 1 1/4" steel half oval moulding, such as is used on the rest of the body. In section A the side quarters of the roof are shown covered with 3/16" composition material. Use the same material on the top deck. The joints are made as shown at sections A and A-2. Cement and cover the joints with a narrow strip of sheet metal and fasten with screws as illustrated. Put on the drip molding and fill the joint with black cement, then cover with molding as shown in section. A. Solder all metal strip joint coverings at the corners where they join. Use barbed body nails for fastening and solder the heads. Drawings Are Clear The drawings and sketches which illustrate the foregoing descriptions should give to the craftsman all necessary details for beginning the construction of this excellent trailer. Further instructions will follow in the next issue of POPULAR HOMECRAFT. Where references have not been made to the plans, we have considered the sketch itself fully self explanatory. Today We Travel
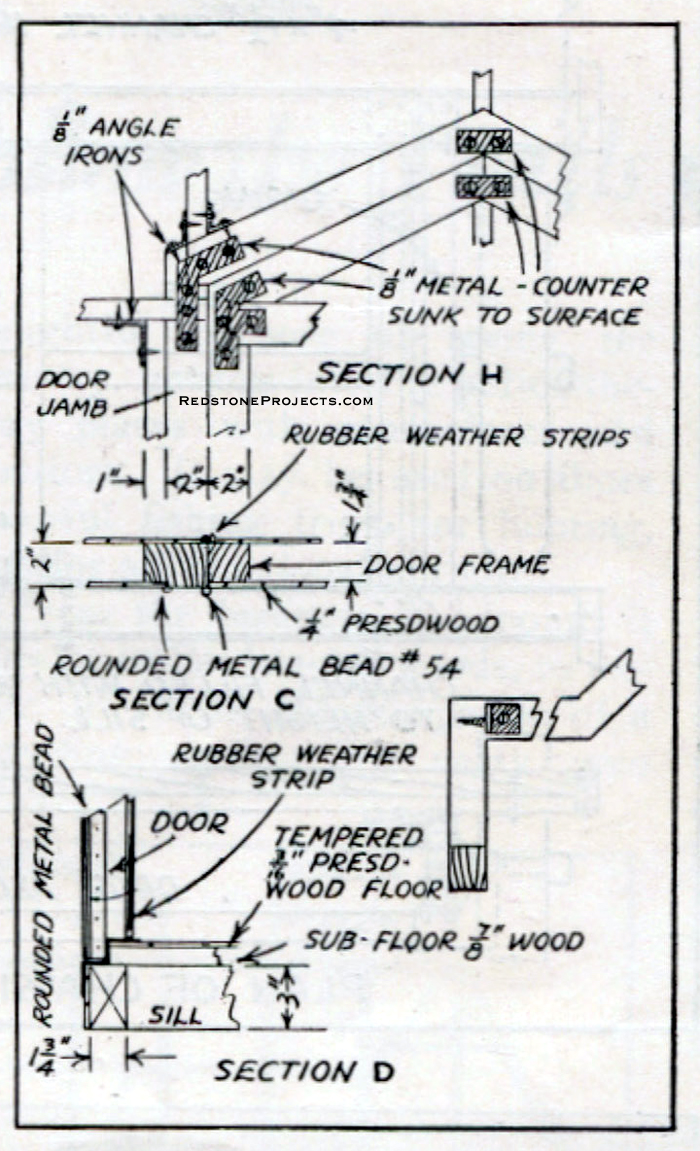
THE response to the description of the trailer given in the last issue of POPULAR HOMECRAFT has more than met our expectations. We emphasized the fact that a trailer must be well built, of standard parts, to stand the wear and tear of travel over a period of years. Well constructed, this trailer should give many years of dependable service. And we wish to re-emphasize the fact that all basic parts should be secured from a dependable dealer ; parts which have been designed by experts in the field. While some craftsmen may have the ability to construct many of the parts, such as studding brackets and body corners, it is questionable whether the expended time justifies the saving in expense. The first article on the building of this trailer described the various essential parts of the structure and working drawings of the wood fabrication. Refer to these in the following description. Floor and Iron Rods The floor is laid on the sill construction first, then the plate shown in Sec. K. Be sure the plate is true before executing the studding. Always use felt on a wood floor. Paint the floor first and lay it over the wet paint. Then put on a good linoleum block flooring or special flooring.
Molding or Beading The drawings show 1/4" composition material for exterior and inside. This material is Masonite, a name applied to all Presdwood. This particular material must be Tempered Presdwood. It may be obtained from any good lumber dealer or builders' supply house, and is a composition which will stand up under all weathering conditions and strains. It may be painted as well as wood. Fasten the Presdwood with flat head screws, countersunk, and cover the heads with a good body builders' putty. Brass screws are not recommended; they twist off too readily. The composition material is not made in sheets larger than 4'x12"; therefore, it is necessary to joint the material as shown in the drawing in the previous issue, rear elevation. Make the horizontal joint on the line of molding 2-M. The molding is 3/4" wide. The lower molding in Sec. E and the bottom molding F, are 1 1/4" half oval iron. This should he fastened with long flat head stove bolts, reaching through the studding above and the sills at the bottom. All nuts should be countersunk where they interfere with the interior finish. The heads of these bolts and the end joints, where the molding is joined, should be soldered and filed smooth. The top 3/4" molding, 2-M, in rear elevation, covers the composition joint just under the windows. This molding is known as W.D.9, to fit 1/4" Masonite. Top or Drip moulding G covers the lower end of the quarter deck. Lapping over this is another molding, as shown in Sec. A. Lay this on white lead or block top cement and screw it down securely.
Molding Trims Perpendicular moldings should be used where the sheets of material join, and where paneling is desired. Also where the siding joins the door jambs, as shown in Sec. C. This molding is half oval steel, and is fastened with countersunk flat head screws, soldered.
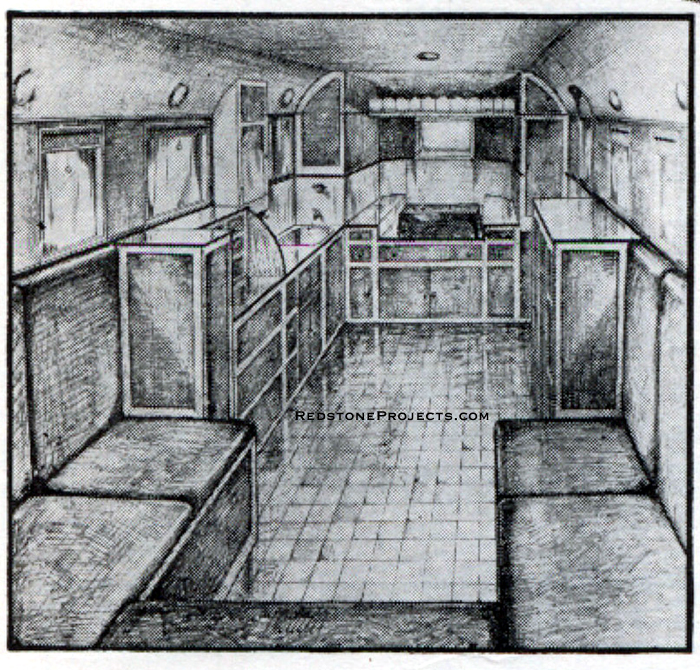
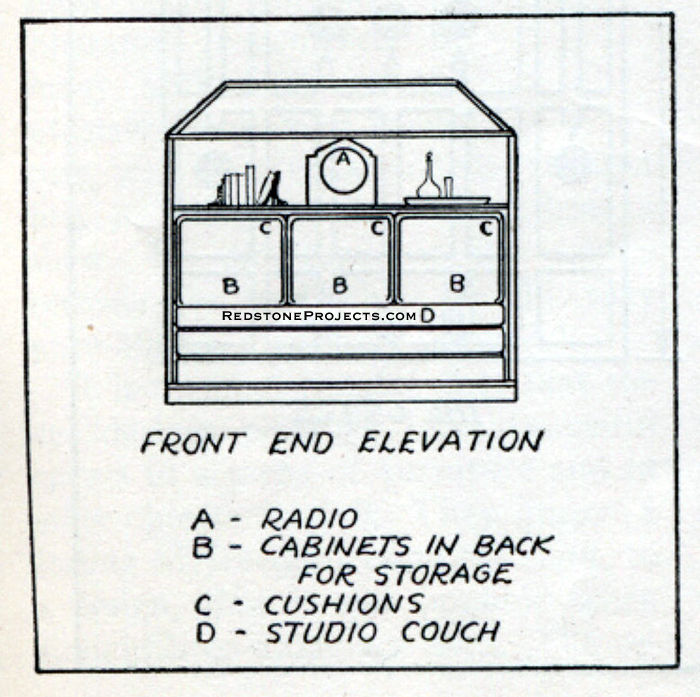
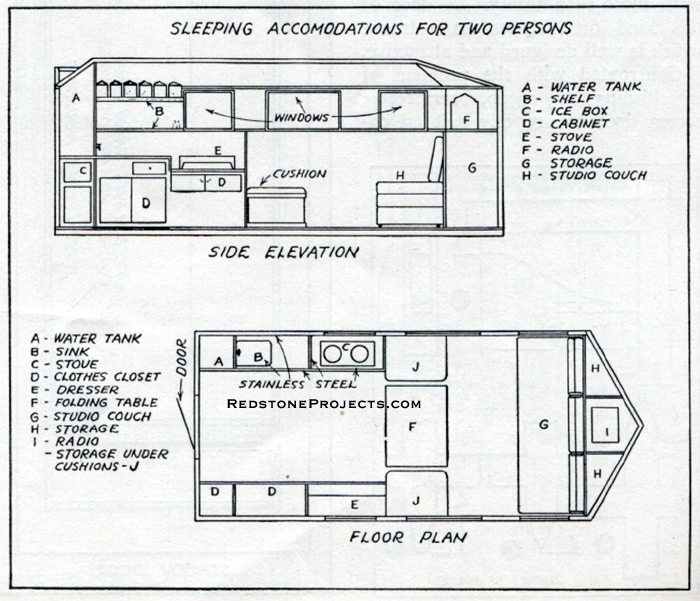
The Interior We can no more than suggest an idea or two for the interior, in as much as the worker will wish to arrange it to suit his own fancy, as well as pocket book. There is no rule for the placement of stove, beds, studio couch, or any other part of the interior ; it is entirely a personal matter. Two suggestions for interior arrangements are given ; accommodations for two persons and for four persons. The inside woodwork may be any kind, and painted or stained as desired. Many of the interior fixtures may be constructed of composition board, such as is used for the exterior. It will not split, will take paint, and is very satisfactory for cabinets, cupboards, tables, cushion backs and partitions. It saves space and weight.
|