Free Shipping
Build a 10 Foot Teardrop Trailer
Vintage 1947 Plans for a Trailer for Two

|
Trailer for Two Plans
Build the Original 1947 Teardrop Trailer
 |
PDF Format |
|
|
All Orders Processed
On a Secure Server
|
Price $12.95
|
|
Get a restored copy of these vintage Tiny House Trailer
Plans with 21 Pages of Enhanced and Enlarged Figures and Illustrations
and Searchable Text.
|
We will email these plans, to the address provided
with your payment, within 48 hours following receipt of your order.
|
|
|More
Vintage Trailer Plans|
|
|

|
|
|
|
September 1947 Mechanix Illustrated Cover
|
|
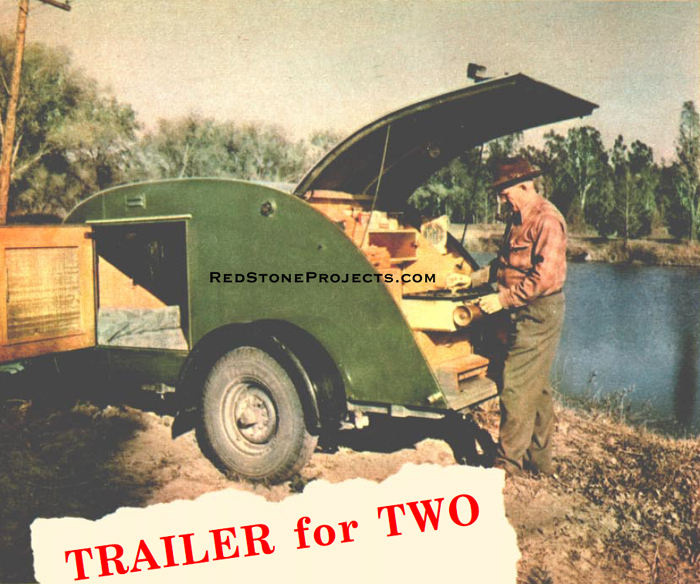
Trailer for Two
A streamlined home on wheels that's light and easily
towed; has a double-berth and complete kitchenette.
|
By Hi Sibley
GETTING away from it all doesn't mean giving up the comforts
of home, for with this compact camp trailer you bring them right along
with you. As it's only a fraction of the size and weight of a full-grown
trailer, you can take this 10-ft. tourer wherever a car will go. And when
you reach some ideal spot beside a lake or stream, up goes the hood over
the kitchenette and in a matter of minutes there's an appetizing meal cooking
away on the pullout stove. Under the same hood, there's an icebox (for
the big ones that didn't get away), a water tank, folding table, and cupboard
space for a raft of food. After you've finished tucking away your share
of it for dinner, you can open one of the doors and there's a full-length
mattress waiting for you when you turn in. And if you like fresh air when
you sleep, just open the screened-in panels on the doors.

|
Original trailer designed by Howard Warren of
Riverside, Calif. has traveled thousands of miles
|
The interior of the trailer has good sitting headroom
and a bureau with plenty of storage space for clothes. There's even an
electric light for reading in bed. Now let's take a look at the drawings
on these pages and then get on with the actual construction.
|
|
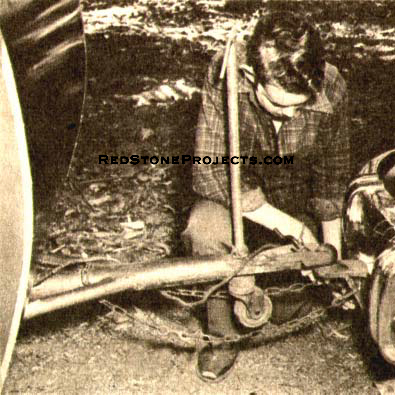
Standard hitch connects trailer and car. Threaded
caster levels body floor when parked.
|
The trailer has a welded angle-iron chassis that's illustrated
in Fig. 2. This doesn't extend the full length of the body so that you
can remove the camp body and substitute an open box type. If this might
give your wife ideas about building a rock garden, then make the chassis
the full length of the body and play safe. The chassis should be built
up of 1/4 by 2 by 2 in. angle iron, mitered and welded at the corners and
with cross members welded to the side frames. Be sure and grind off all
the rough spots.
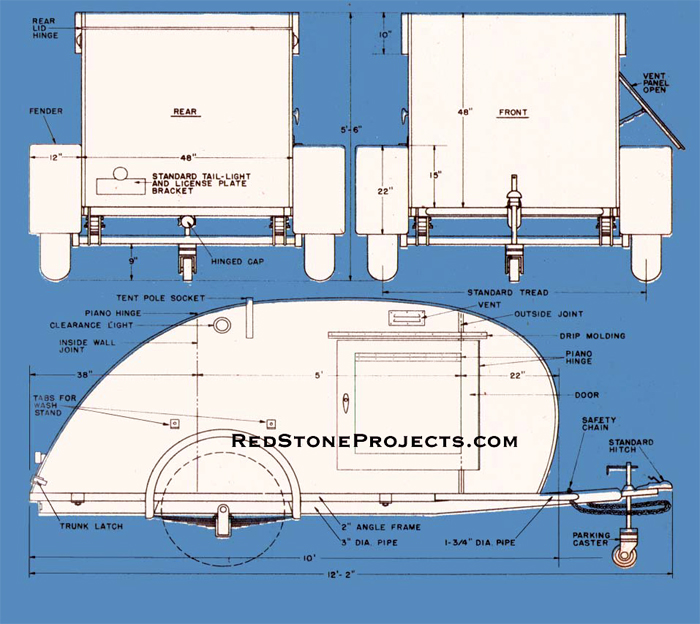 |
Figure 2.
Front, rear and side exterior elevation views with
dimensions
|
If you're going to use it for pleasure
alone, you can use a little lighter stock and save on the weight at the
locations indicated, weld the forward spring hangers to the side frames
and the rear spring shackle brackets to boxed sections of the frame. The
tow bar extends the full length of the frame and should be welded to the
cross members, with the forward end canted up slightly by bending the pipe
as shown in Fig. 1.
A standard hitch should also be
welded at the front end. Incidentally, that hinged cap at the back end
of the pipe is a stunt of Mr. Warren's for stowing his fishing rods inside
it. The stake sockets indicated on Fig. 2 can be omitted if you're not
going to use the chassis for hauling. Two standard 34 in springs with a
welded box -section axle fastened to them with U-bolts, support the chassis
and absorb road shocks. All in all, the construction is a bit heavier than
you'd normally require for a camp trailer alone but it will really take
the gaff. The next operation on the program is to make the simple hardwood
frame which is bolted to the side and end members (also the stake sockets,
if you're using them) of the chassis. The front end of the frame is bolted
to the diagonal pipe braces. Next, cut the floor from 5/8 in. plywood,
and glue and screw it to the frame and then drill holes through the assembly
and bolt it down to the chassis as shown in Fig. 2.
Your next chore is to make the sides
of the body, using 1/4 in, plywood panels covered with the same thickness
of Masonite. Lay the latter face down on a level floor, spread the glue
and drop the plywood on top, then spread a dropcloth or tarpaulin over
the sandwich? and cover it with dry sand to press the layers together.
If you can't get 12 ft. panels, you'll have to make a joint near the front
edge of the door (see Fig. 1). When the glue is dry, cut the sides to shape,
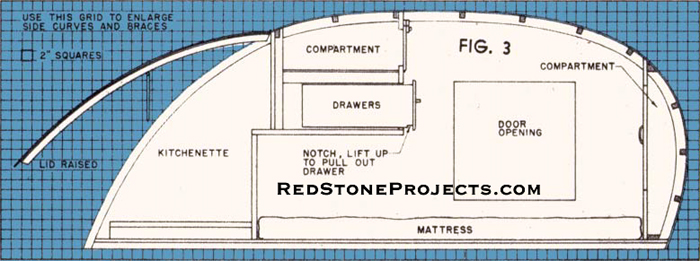
following the dimensions in Fig 1. and the pattern in Fig. 3. and then
cut the openings for the doors and vents.
Use the same grid to bandsaw the
1/4 in. by 2 in. plywood braces to shape. After these are glued and screwed
to the sides (from the inside), cut notches through the braces and the
plywood (but not through the Masonite covering) for the 1 by 1 1/4 in.
beams which support the top.
|
|
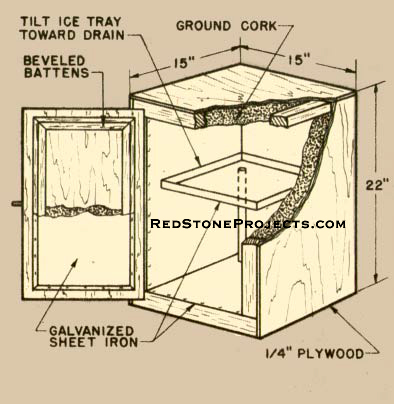
Ice Box Detail
|

|
|
Water Tank Detail
|
|
|
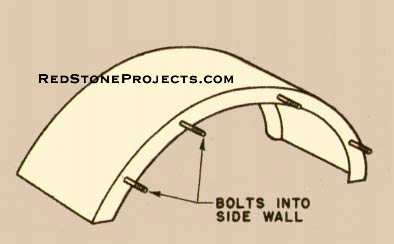
Fender Detail
|
Get a restored copy of these vintage Tiny House Trailer
Plans with 21 Pages of Enhanced and Enlarged Figures and Illustrations
and Searchable Text.
All Orders Processed
On a Secure Server
|
Figure
1.
Illustrated parts breakdown and assembly plans
|
You're now ready to assemble the sides to the floor, fastening
them along the bottom with screws into the frame. Then cut the beams to
the correct length and glue them in place, using a wood screw at each notch.
Cut the framing for the forward and rear partitions from 5/8 in. plywood,
with openings in the forward one for the doors leading to the front compartment,
and install the partitions. Figs. 2 and 3 will give you the location and
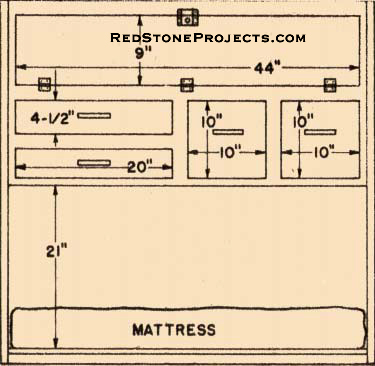
details of these. Next, add the framing for the compartment and drawers,
including slides, of the bureau.
|
|
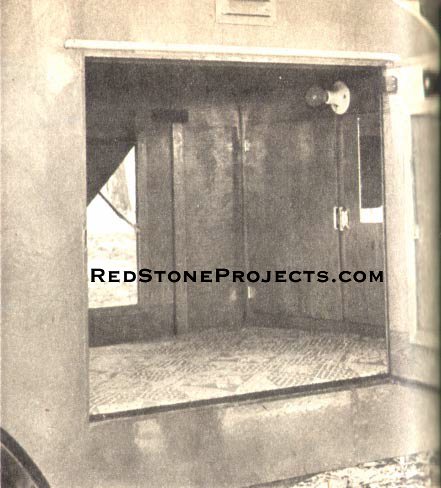
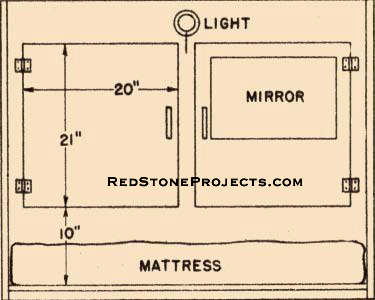
Rear view of the interior showing full-length
mattress and storage space in bureau above it.
|
|
|
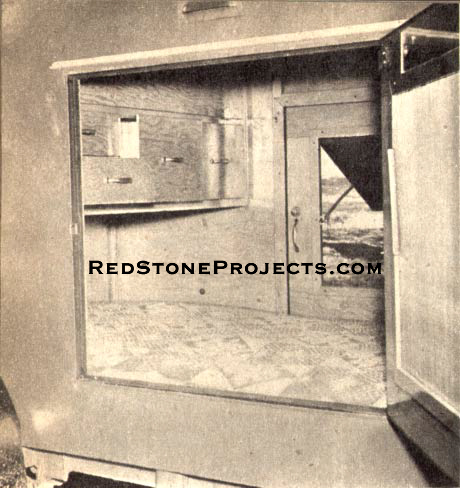
Forward end view of interior. Storage compartment
doors must be high enough to clear bedding.
|
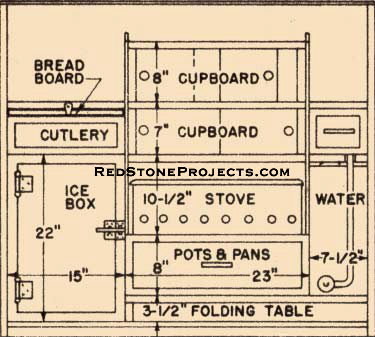
The kitchenette comes next, and here the arrangement will
depend on the equipment that you plan to use. If you're using the usual
two-burner camp stove, you can follow most of the dimensions and details
in Fig, 2 and the detailed drawing of the kitchenette on page 117. Make
the ice box and water tank first, following the detailed drawings for these,
and install them in place. The tank rests on a shelf with space beneath
it for a regular-sized bridge table for chow time. When these units are
in place, add the framing for the utensil compartment, the top of which
forms a base for the stove. Don't forget to line this space (and under
the cupboards too) with sheet asbestos to reflect the heat. The framing
for the cupboards, bread slide and cutlery drawers should then be fitted
in place. Make all the cupboard and compartment doors, bread slide, bureau
and kitchenette drawers, etc. at one time and don't forget to notch the
latter so they won't tumble out and strew your wife's underwear or the
knives and forks all over the place. The cupboard doors, made of 1/4 in.
Masonite, sliding in rabbets, should have small hooks to keep them closed.
When you're finished with all the cabinet work, the body should look like
the drawing in Fig. 2.
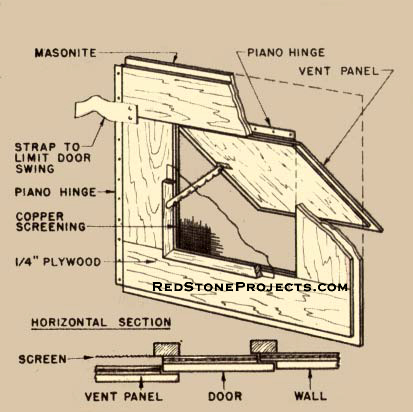
|
|
Side Door Detail
|
|
|
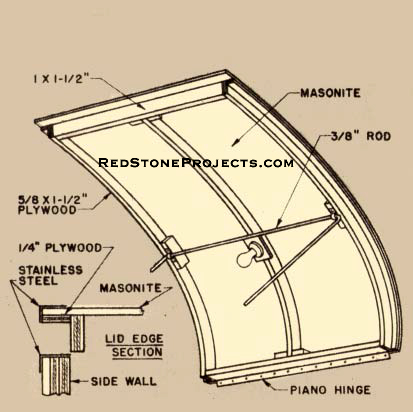
Kitchenette Lid Detail
|
Then, while you still have room to work inside, add the
wiring for the clearance lights which will connect to the regular car lighting
circuit. The interior lights, one over the front compartment doors and
the other on the rear lid, are wired later and connected to a separate
battery. The 1/4 in. Masonite top can now be glued and screwed to the side
braces and beams, using a stainless steel angle molding to cover the seams
at the sides.
|
|
Kitchenette
|
|
|
Bureau Looking Aft
|
|
|
Forward Compartment
|
|
Arrangment of storage spaces for cooking equipment
and clothing may be altered to suit individual requirements. Double doors
at forward end should be hung on offset hinges and have latches.
|
The kitchenette lid is then made, following the details
in the small drawings and the pattern in Fig. 3. The lid is hung from the
top with a long piano hinge and a 3/8 in. rod installed as shown in the
drawing to hold it up. You're on the home stretch now and the next job
is to make the side doors. These are hung from the sides so that when closed
they'll be flush with the outside walls. A regular car door handle and
a simple bar lock inside, complete the hardware on them. You can now paint
the outside of the trailer and varnish the interior. Make the fenders from
heavy sheet metal and bolt them to the side walls.
|
|
Figure 3.
|
Any 2 Vintage Trailer Plans
$19.95 FREE Shipping |
|
Select 2 Vintage Travel Trailer Plans
|
|
|
|
