Free Shipping on All U.S. Orders
All Orders Processed on a Secure Server
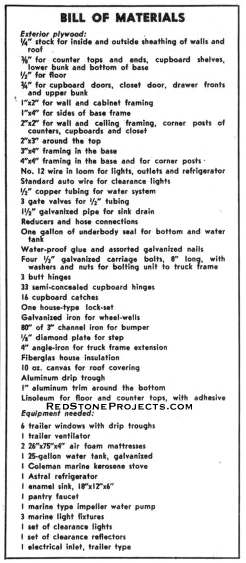
Mobile Vacation Home Plans
Build a Vintage Movable Bugout Cabin
|
Mobile Vacation Home Plans
Build a Vintage Movable Bugout Cabin
 |
PDF Format |
|
|
All Orders Processed
On a Secure Server
|
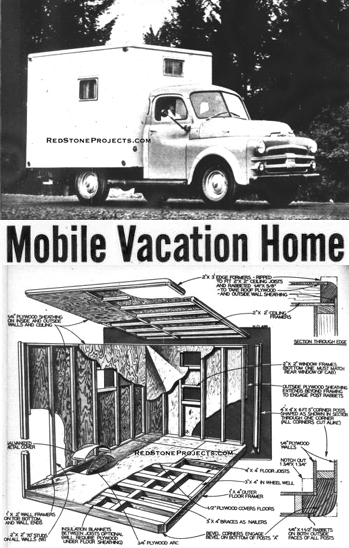
Price $12.95
|
|
Get a restored copy of these vintage Mobile Vacation
Home Plans with 11 Pages of Enhanced and Enlarged Figures and Illustrations
and Searchable Text.
|
We will email these plans, to the address provided
with your payment, within 48 hours following receipt of your order.
|
|
|More
Vintage Trailer Plans|
|
|

|
|

|
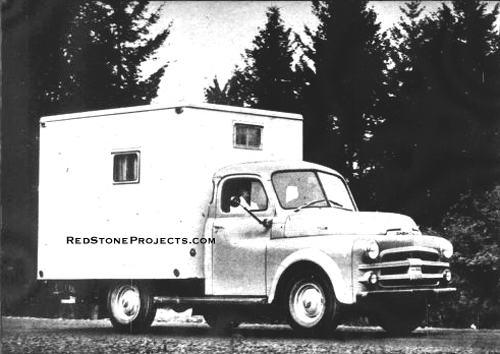
Mounted on a truck chassis (above),
The rolling home can be taken
right to your favorite vacation spot.
|
|
Wherever the open road
may take you, this
compact home-on-wheels
provides comfortable
lodging for two after a
long day's driving.
By Ken Hore
|
|
|
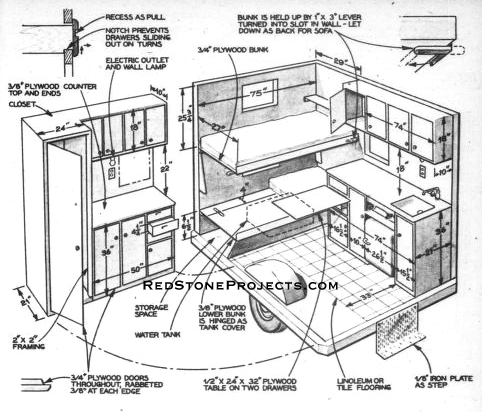
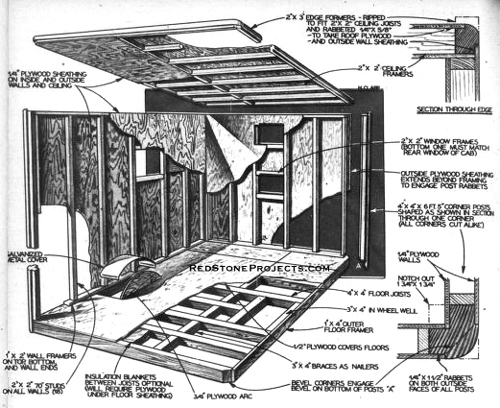
Figure 1. Mobile Vacation Home Interior Details and
Dimensions.
|
| I WANTED a two-person, dual-purpose cabin. It had to
be mobile for trips anywhere in Canada, the United States and Mexico, and
adaptable for use as a semi-permanent vacation home and bug out cabin in
the woods. Since I'm a retired bookseller, not a craftsman, I needed a
simple project that could be built by anyone, so I worked up plan accordingly.
I built the cabin and mounted it on the chassis of a 3/4-ton
pickup truck. Then I took it on a five-month, 17,000 mile trip. Soon it
will be set on concrete blocks for a vacation retreat. Maybe it'll prove
to be of interest to you. If so, you can easily build it by following these
instructions and studying the photos and drawings.
The first step it to check the location of the wheels
of your truck to be sure that they will fit the wheel-wells, as shown on
the framing plan for the bottom. Of course, all plan dimensions can be
altered to suit your individual needs, size of truck, etc.
|

The simple stud-wall, box-type construction of the
the cabin is completed before tackling the cabinet work. Plywood is used
for the walls,
ceiling and flooring.
|
|
| When the floor frame is completed, nail and glue 1/2-in.
sheet plywood to it to make the floor. This should be trimmed flush at
the edges and the corners beveled, as shown in the drawing. The molded
portion of the corner posts will be cut to cover this bevel. Turn the floor
section over, attach the insulation, and then nail and glue the 3/8-in.
plywood sheeting to the bottom. |
|
|
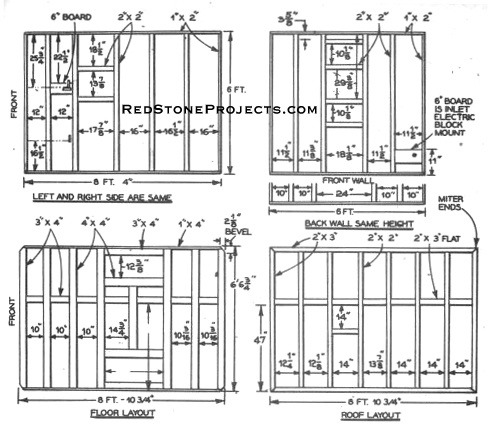
Figure 2. Mobile Vacation Home Framing, Sheathing,
and Roof to Wall Joint Details.
|
| The floor section should now be turned right side up,
set on small blocks and leveled. Considerable care should be taken to get
it level so that the rest of construction will be true.
The walls and top are framed next, using the lumber sizes
specified on the plans.
Quarter-inch plywood is then nailed and glued to the inside
of the wall framing and the bottom of the roof. The plywood extends beyond
the wall-framing on each end so as to fasten to the corner posts. Extend
it to 1 3/4-in. on the sides and 1 1/2-in. on the front and back walls.
The plywood ceiling is set flush with the rabbeted edge formers. Countersink
all nail heads and cover with plastic wood to make a smooth surface.
When the entire unit is assembled, including nailing and
gluing the corner posts, the cabinet work is begun. Material cut from the
corner posts and molded roof framing need not be wasted, for it can be
utilized in the concealed framing of the counters and wall cupboards.
At this point the wheel wells can be boxed in. Cut the
well arcs from 3/4-in. plywood. These arcs are fastened to the floor and
then the wells are covered with galvanized sheeting. Then lay down Fiberglass
batting and bend a piece of 1/4-in. plywood over this |
|
|
Figure 3. Left and Right Side, Front and Back Wall,
Floor and Roof Layout and Dimensions.
|
|
| The corner posts for the counters and clothes-closet
are 2x2's, rabbeted to take the 3/8-in. plywood ends. Rounding the exposed
comers gives a finished look.
Use great care in cutting the openings over the stove
and sink in the counter top. These pieces can be covered with linoleum
in such a manner as to give an unbroken appearance when the stove and sink
are not in use.
The cupboard doors, closet door, and drawer fronts are
made of 3/4-in. plywood, rabbeted 3/8 x 1/2-in. Holes are used in the doors
instead of knobs. The drawer fronts are routed to a depth 1/2-in. producing
drawer pulls. If the drawer slides are notched in front, as shown in the
detail drawing, they will not slide open when the truck is speeding around
a corner.
The hinged edge of the upper bunk rests on a 1-in. strip
along the front wall. It is fastened to this by three hinges. Under each
end, near the outer edge, is a 1 x 3-in. oak lever. It is loosely bolted
to the bunk near the inside end. A slot to receive it is cut in the wall
and block, as shown in the wall-framing plan. The lever turns in and out
of this slot. This proves to be a simple and effective means of holding
the bunk in a horizontal position.
The top of the lower bunk is 3/8-in. plywood, hinged about
four inches from the cabin wall to give access to the water tank, in the
center, and stowage space on each end. |
|
|
Notching the drawer slides at the front will keep
them from sliding open when the truck is in motion.
|
| The bunks form a settee when the upper one is lowered
to a near-vertical position to serve as a back. The table is set up immediately
before the bunk. It is made by cutting a piece of 1/2-in. plywood, 24 x
32-in. The top edges of the two middle drawers are just 29 1/4-in. from
the floor. When each of these is pulled out about two inches, the table
may be laid across them at standard table height.
Wiring and piping are installed next. All wiring is run
inside the side walls and roof. |

|
|
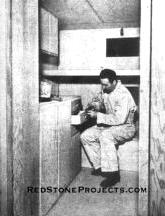
Interior view shows sink, closet and lower bunk before
finishing. Note refrigerator under stove.
|
| The piping runs along the right side. A fresh water intake
and a waste water drain are both cut in through the base, directly under
the sink. The electric power inlet is located in the forward end, using
a block and hole, as shown in drawing. It connects with a switch box.
At this point of construction, install the water tank.
It is coated with auto body underseal to prevent sweating. Set it on heavy
felt and hold in place by notched frames, screwed In. This will enable
the tank to be removed rather easily, if the necessity should arise.
Now the roof can be finished. The top should be covered
with good canvas cement, and the canvas covering, preferably in one piece,
is stretched and worked down carefully. Staple or tack it in the center
at one end and stretch tightly, fastening at the other end. Work similarly
from the side centers. Stretch the canvas as tight as possible, and make
a series of small folds around the corners.
When the canvas adheres firmly to the top and is fastened
on the ends and sides, install the aluminum drip gutter, beginning in the
middle of one end. Set this in a good bedding compound. When it is completely
installed, trim off any surplus canvas below it.
Painting is next. Be sure to use plenty of sealer. Counting
sealer, prime and finish coats, the original dual-purpose cabin had five
coats outside and four inside. Give the canvas top three coats of aluminum
paint. |
|
|
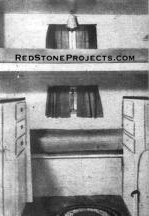
Bunk Mattresses and linoleum on the floor and counter
give the painted cabin an attractive appearance.
|
| Now the linoleum can be laid on the floor and counter
tops, adding metal trim around the counter as the final touch. A 1/2 x
5/8-in. bead should be installed around the inner part of the door frame.
Weather stripping should be added to it, to keep out dust.
The windows (with drip trough), door and ventilator are
installed and cabin a ready for mounting on the chassis of your truck. |
Any 2 Vintage Trailer Plans
$19.95 FREE Shipping |
|
Select 2 Vintage Travel Trailer Plans
|
|
|