Free Shipping on All U.S. Orders
All Orders Processed on a Secure Server
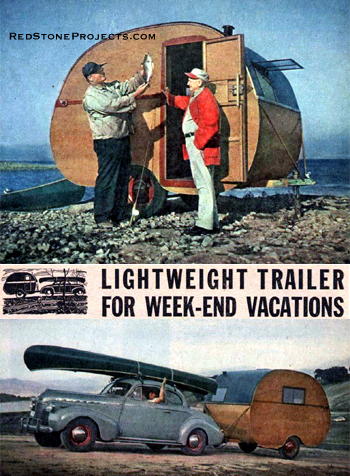
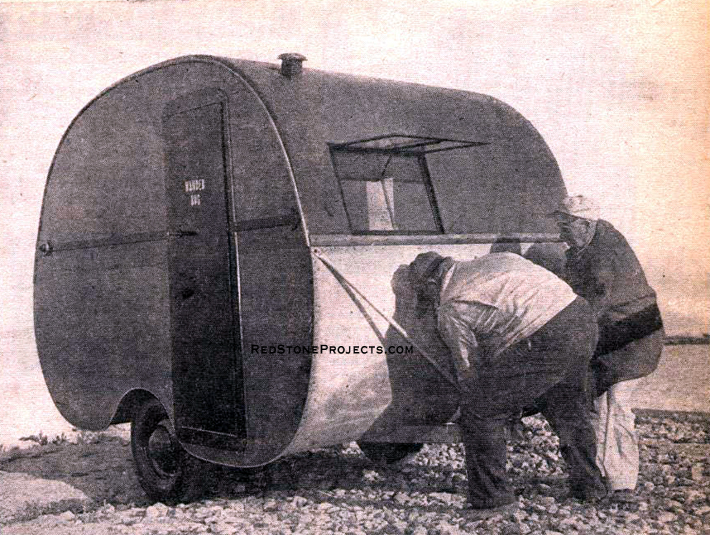
Wanderbug Lightweight Weekend Vacation Trailer
Homebuilt Vintage Camping Trailer
|
Wanderbug Lightweight Weekend Vacation Trailer
Plans
Homebuilt Vintage Camping Trailer
 |
PDF Format |
|
|
All Orders Processed
On a Secure Server
|
Price $12.95
|
|
Get a restored copy of these vintage Wanderbug Lightweight
Weekend Vacation Trailer Plans with 20 Pages of Enhanced and
Enlarged Figures and Illustrations and Searchable Text.
|
We will email these plans, to the address provided
with your payment, within 48 hours following receipt of your order.
|
|
|More
Vintage Trailer Plans|
|
|

|
|
|
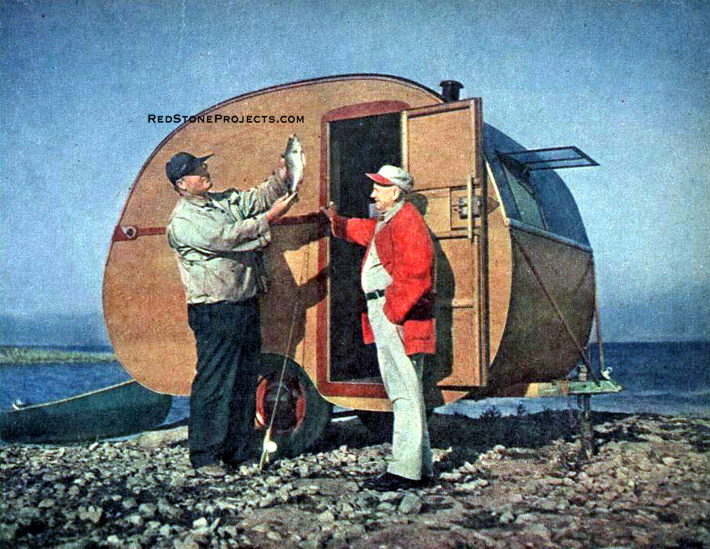
Homebuilt Vacation Trailer Has Sleeping and Storage
Space
|
| THE call of the open road has sounded pretty faint and
hoarse these last few years, but now, at last, there's a peacetime summer
on the way.
And that's not all. Millions of vacation hungry Americans
are also getting under way - making plans, charting routes, readying equipment.
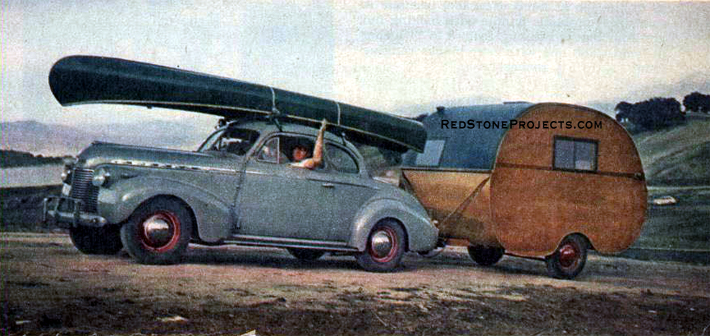
In case you've forgotten what it's like, vacationing by
car takes more than an unlimited gas supply. But the Wanderbug trailer,
shown here, has what it takes - light weight, road appeal, plenty of sleeping
and storage space, and all the fixings for a month away from sidewalks
and shops.
You can't buy the Wanderbug, but you can build it from
scratch at surprisingly low cost. Start work now for a happy summer on
the road. |
|

|
| Less than a thousand pounds of fully equipped trailer
makes the kind of companion your car will be glad to take along on any
trip. For all-year living, or leisurely travel on the main highways, the
big commercial jobs still deserve your vote. But for quick week-end trips,
cross-country jaunts over the mountains, or side-road excursions, you will
want a lightweight traveler that gives you plenty of road clearance, tracks
smoothly at any speed, and will even follow you off the road like Mary's
little lamb.
You can get some of these things just by tying a kiddy
car to the rear bumper, but you'd still be missing a good bet, for this
trailer is no toy. It sleeps two adults and has plenty of room for two
children on the floor, not to mention storage space for the family's needs.
Measuring 10 feet in length and 6 1/2 feet in width, it
allows full headroom for a six footer with shoes on. You can get some idea
of what it's like from the pictures on these pages; for a still better
view of the finished job, see the color photos by Frank Lindgren, Jr.
Cost is bound to be a major factor in any project of this
size, but no close approximation can be given because many of the parts
will vary according to availability, regional price differences, and quality.
Reasonable estimates of the total coat run from about $200 to $450. |
|
|
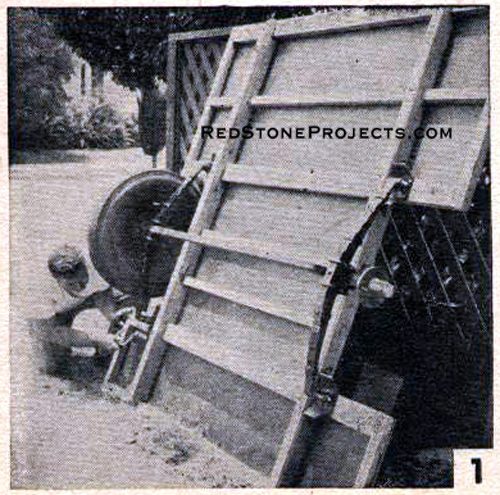
Figure 1. Installing the undercarriage on the
trailer frame.
|
| It will be helpful to have most of the materials on hand
before beginning construction. The sizes of window, door, and vent openings
will depend on the fixtures you can procure, and your axle and spring assembly
will govern the size of the fender wells and the spacing of the frame members.
Hand tools are all you really need, but of course power
tools will help a great deal. First, clear a space on the ground and lay
out the frame as shown in a drawing below. Smear all joints liberally with
waterproof glue, make sure crosspieces are square with the stringers, and
bolt the pieces together with carriage bolts and lag screws; the side members
will have to be counter bored for the lag screws.
As shown in the drawing, the forward crosspiece between
the wheel openings is centered exactly 4 feet from the front edge. Place
a sheet of 3/8 inch by 4 foot by 8 foot waterproof plywood sideways across
this portion of the frame, saw off 18 inches from the length, and secure
the plywood with glue and drive screws. Trim another piece to cover the
remainder, fasten it down, and saw out the wheel openings. |
|
|
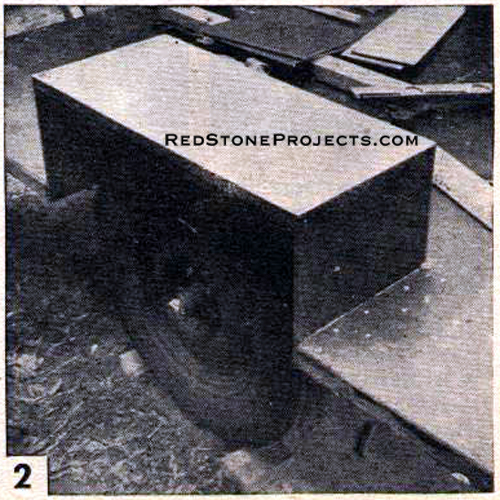
Figure 2. Building the trailer wheel wells.
|
| Turn the frame over and install the undercarriage assembly.
If you have the facilities for welding and metal working, you may be able
to assemble a running gear from scrap, or renovate a junkyard bargain.
Or you can purchase a complete undercarriage from a trailer supply house.
Figure 1 shows a typical installation. |
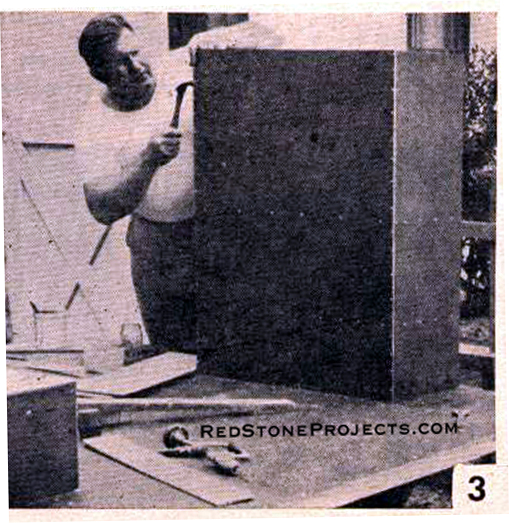
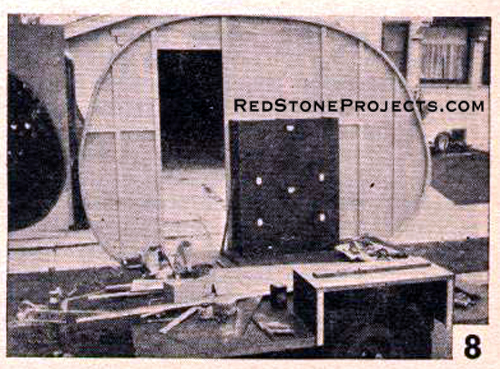
| Using the same 3/8 plywood, build up the housings over
the wheels (Fig. 2). The one next to the door is made quite high (Figs.
3 and 8) and will become a sideboard cabinet. |
|
|
Figure 3. The doorside wheel well extends into
a sideboard cabinet.
|
| How well the trailer will track will depend largely on
the accuracy of the tongue installation, and this, in turn, requires that
the axle be perfectly square with the frame. Bolt a pair of two-by-four
arms to the hitch-jack combination you have selected, and line up the tongue
very carefully before notching and bolting the arms to the first two crosspieces.
Assuming that the axle is squared, the tongue is aligned when the distance
from the midpoint of the hitch ball to the point where one wheel joins
the axle is exactly the same as the corresponding distance on the other
side. |
|
|
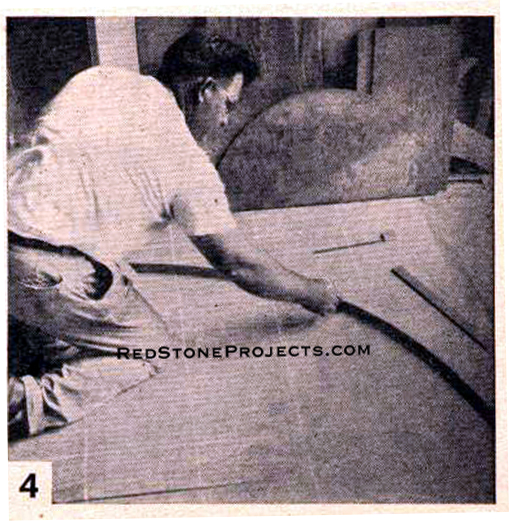
Figure 4. Transferring the trailer sidewall pattern
to the 1/4 plywood.
|
| Side walls are made of 1/4 inch plywood. With the long
edges placed together, lay out one 3 foot by 10 foot and one 4 foot by
10 foot sheet on a smooth floor. Chalk off the surface of the wood into
1 foot squares with a long straightedge. Transfer the pattern from the
squares on the facing page, and fair up the lines with a long strip of
flexible wood as shown in Fig. 4. Cut out the pattern with a keyhole saw,
but don't spoil the waste you cut off, for this will be needed to make
a jig. Using the out pieces as a pattern, mark and saw the second wall. |
|
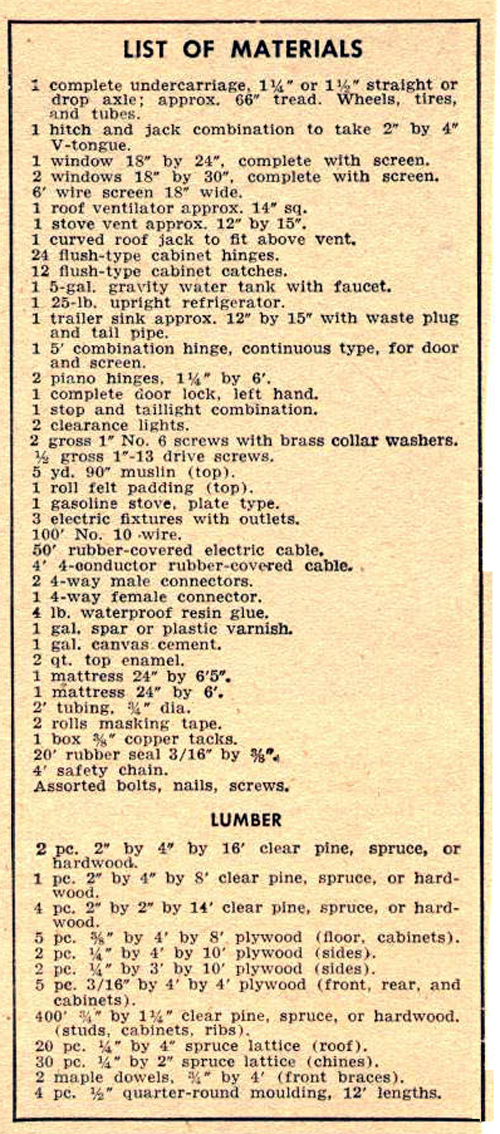
| Nail together the outline pieces as shown in the foreground
of Fig. 5. Cut some scraps of two-by-twos and two-by-fours into 3 inch
lengths, and nail them to the outline edges at 12 inch to 15 inch intervals
(Figs. 6 and 7). Lay the jig on the ground and fasten to it with shingle
nails 1/4 inch by 2 inch spruce strips from a point a few inches below
the front floor line to a few inches beyond the rear floor line. Smear
this first strip liberally with thick glue, and nail another strip to it,
taking care to stagger the end joints. Continue adding laminations until
five thicknesses have been built up. If you have supply of small clamps,
it won't hurt to use them while the glue is setting, but proper fitting
and nailing should be enough. |
|
|
Figure 5. Joining the trailer sidewall outline
pieces.
|
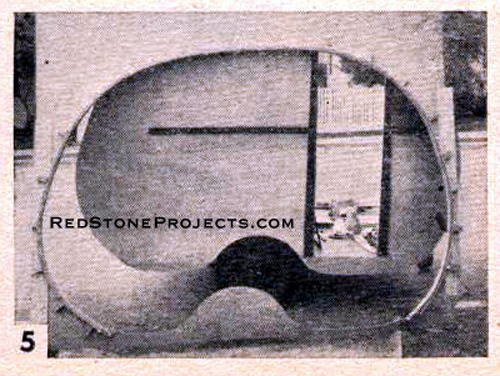
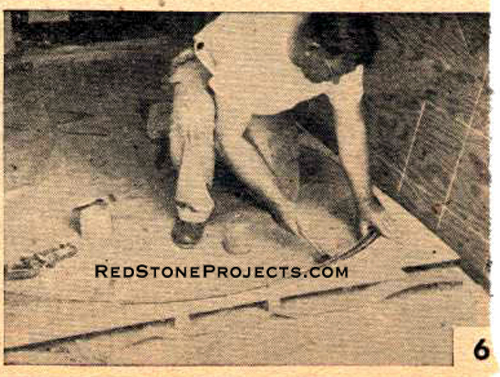
| After the glue has dried, hacksaw through the nails that
fasten the first chine strip to the jig, leaving the nails right in the
wood. Plane the edges until they are flat and smooth. Build a duplicate
chine for the, other wall. |
|
|
Figure 6. Building a jig to bend and laminate
the trailer chines.
|
| Haul out the side walls and glue and screw them to the
chines. Cut out the door opening on the right side, and save the pieces
to make the door (Fig. 8). In the left wall cut an opening of proper size
for the window you have purchased. |
Get a restored copy of these vintage Wanderbug Lightweight
Weekend Vacation Trailer Plans with 20 Pages of Enhanced and
Enlarged Figures and Illustrations and Searchable Text.
All Orders Processed
On a Secure Server
|
|
|
|
Figure 7. Laminating the trailer sidewall chines.
|
| Haul out the side walls and glue and screw them to the
chines. Cut out the door opening on the right side, and save the pieces
to make the door (Fig. 8). In the left wall cut an opening of proper size
for the window you have purchased. |
|
|
Figure 8. Cutting the door and windows in the
trailer sidewalls.
|
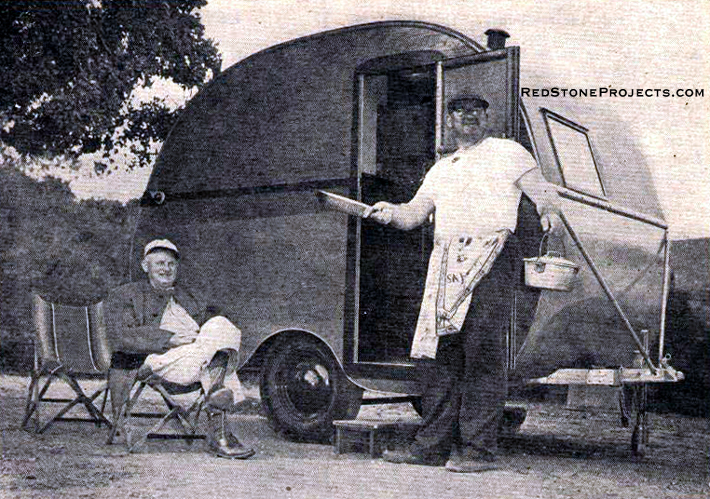
| WHAT with spring getting under way, many people who last
month passed up this invitation to build a lightweight trailer may now
be ready to change their minds. It's not too late to start construction,
but don't try to build your trailer from the information given in this
installment alone.
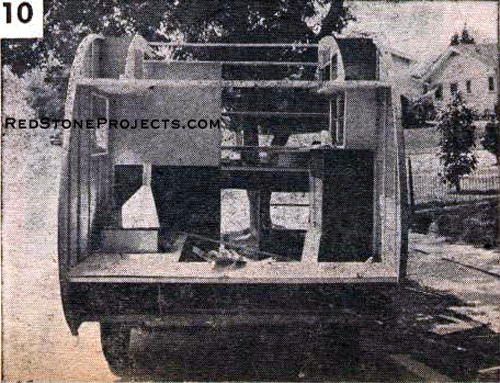
Part I covered the construction of the chassis, walls,
end chines. The next step is to stud the sides with 3/4 inch by 1 1/4"
strips of pine, spruce, or hardwood. Locate the studs as shown in Fig.
8, and in the drawings on the facing page, using such fixed positions as
floor edge (Fig. 9), door, and window openings as guides. Fasten all studs
with glue and collared screws, and place those on the second wall exactly
opposite the corresponding members on the first (Fig. 10). |

|
|
Figure 9. Attaching the wall studs to the trailer
sidewall.
|
| On the outside of each wall you will need a batten strip
to cover and reinforce the plywood joint. Make this of 3/8 inch plywood
2 inches wide. Using similar 3/8 inch by 2 inch strips, build a border
around the door opening, leaving a 1/2 inch margin except on the hinge
side. A door is then cut from the same plywood to fit this frame, and screwed
to the 1/4 inch plywood pieces previously cut from the wall to form the
door opening. With rubber stripping added, this construction makes a relatively
rustproof door.
Mounting the walls to the frame is a job that may require
some help from the neighbors. Glue and screw the right wall to the sideboard
cabinet over the wheel, and use whatever temporary bracing may be needed
to keep the sides perpendicular to the floor. When the location of cross
ribs is decided upon, square them across and notch them into the chines. |
|
|
Figure 10. Install the corresponding frame members
on the opposite sidewall.
|
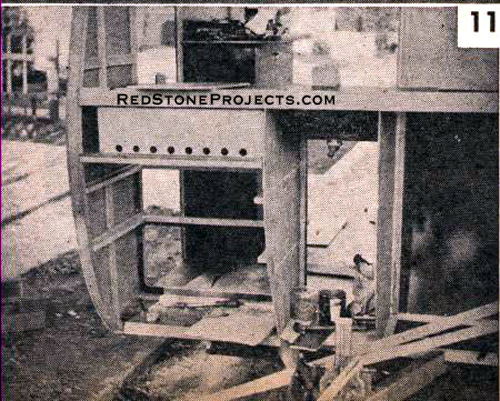
| Plywood will be used for all cabinets, and edges can
by given a finished appearance as shown in detail A. This detail is dimensioned
for 1/4 inch plywood, and has to be adjusted to suit the 3/16 and 3/8 inch
stock used for some of the cabinets.
A sheet of 3/8 inch plywood 3 feet wide, fitted across
the front and flush against the sides, forms the front of the galley. Fasten
it securely to the forward door stud, and to the corresponding stud on
the other side. Allow the top of the galley to overlap about 6 inches into
the closet area to provide a shelf for the water tank. Before fastening
the top, build a frame of the 3/4 inch by 1 1/4 inch stripping to help
support the sink. The stove may be treated in the same manner, or it may
be let in slightly below the surface (Fig. 11). In the latter case, with
a keyhole saw cut the plywood very carefully, and use the cut-out portion
as a cover. |
Get a restored copy of these vintage Wanderbug Lightweight
Weekend Vacation Trailer Plans with 20 Pages of Enhanced and
Enlarged Figures and Illustrations and Searchable Text.
All Orders Processed
On a Secure Server
|
|
| Build the front and side of the clothes closet of 3/16
inch by 4 foot by 8 foot gum plywood. Notch a rib into the chines across
the top, where it will support the stove vent you have selected. Overhead
cabinets, shown in Fig. 13, come next. Determine the shape of the longitudinal
pieces by marking them off against the corresponding chine curves. Use
3/4 inch stripping for the frames. |
|
|
Figure 11. Setting the stove in the trailer kitchen.
|
| To make the side bed, set in a 12 inch piece of 3/8 inch
plywood parallel to the left wall and about 22 inches away, using ribbing
stock again as a frame. For the second bed, a similar piece of plywood
has to be installed crossways at an equal distance from the rear wall.
A piece of 3/16 inch plywood, 24 inches wide, is used as a top for each
bed. Before fastening it to the bed frame, rip the top about 6 inches from
the wall edge and install a length of continuous hinge. This arrangement
will enable you to lift the cover without removing the mattress. Crosspieces,
notched into the bed supports, will add strength.
Space two ribs across the highest portion of the wails
to carry the ventilator you plan to use. Then rib the remainder of the
top and ends at approximately 12 inch centers (Fig. 12). Ribs should be
closest at points of greatest bend.
If your friends and family are still gleefully watching
you work, call them into service for the next operation. First bevel off
the lower edge of the front frame two-by-four. On a stiff cardboard pattern,
cut tight notches around the tongue arms, and transfer the pattern to a
sheet of 3/16 inch by 4 foot by 6 foot 8 inch plywood. Gum is preferable
to the fir panel for this use, since it shows less tendency to raise and
weather under strain. |
|
|
Figure 12. Installing the trailer roof ribs.
|
| With two people holding the plywood, glue and screw it
to the beveled two-by-four. Mark and bore the opening for the sink and
icebox waste hoses, and fit the drainpipes before continuing to fasten
the wall. Bend the plywood carefully to the shape of the wall, and fasten
it to chine and ribs at short intervals (Fig. 14). This front wall should
come up to the midpoint of the galley top rib. Trim any excess beyond this
point, and also trim the overhang flush with the sides.
A similar procedure can be followed with the rear wall,
which reaches the middle of the window base rib. Any remaining gaps on
the underside or around the tongue can be patched with sheet aluminum.
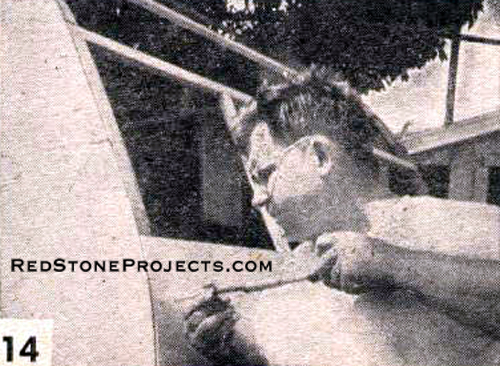
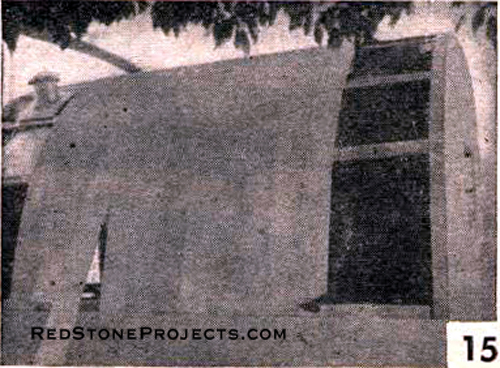
For the roof and the remainder of the front and rear walls,
use 1/4 inch by 4 inch spruce planks. Fit them smoothly along the ribs
(Fig. 15), and secure them with 5/8 inch screws. Round off the exposed
chine corners so that they will not tear the fabric roofing. |

|
|
Figure 13. Overhead cabinets inside the vintage
travel trailer.
|
Before covering the top, fit the windows and ventilators,
but do not install them. Cover the cracks between the roof planks with
masking tape and secure a layer of felt padding on top of the planks with
canvas cement. Stretch the roll of muslin sheeting tightly over the padded
top, and fasten it in place with copper tacks placed about 1 inch apart.
When cutting felt and muslin for the window and vent openings, leave about
1 inch of excess material which can be tacked tightly into the frames.
|
|
Figure 14. Bending and installing the front wall
of the trailer.
|
After Installing these fixtures - preferably with waterproof
caulking compound -give the top a coat of canvas cement thinned with the
solvent recommended for it by the maker. All exposed plywood on the trailer
should now be sanded well and coated with a thin mixture of waterproof
glue. Three coats of a good spar or plastic varnish will complete the weatherproofing
job, and two coats of enamel take care of the appearance. Use two applications
of varnish, enamel, or lacquer inside. |
|
| For minimum electrical wiring, fasten a female four-way
connector to the steel member holding the hitch ball to your car. The four
wires lead, through a rubber covered cable, to the stop light, taillight,
battery, and ground. A corresponding male plug is attached to a 3 foot
section of four wire cable, which goes to the interior of the trailer.
Tail and stop-light wires (as well as a ground) are then run to the tail-stop
combination that is bolted to the rear wall. Branches from this light are
also run to the clearance lights. Battery and ground wires run directly
from the connector to three conveniently located interior fixtures. By
using regular screw-based bulbs and sockets, the same outlets may be made
to change over to 115 volt service when available. |
|
|
Figure 15. Roofing the trailer with 1/4" spruce
planks.
|
| Front braces relieve vibration in the tongue and steady
the trailer in motion. To make them, cut four 6 inch lengths of 3/4 inch
electrical conduit or brass tubing, fit one on the end of a 3/4 inch dowel,
and bolt it through the chine. Cut the dowel to proper length, fit another
piece of tubing, and bolt the end to the hitch. Install a duplicate brace
on the other side. |
|
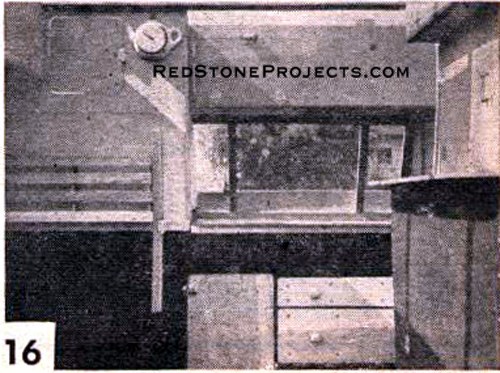
|
Figure 16. Vintage Wanderbug travel trailer interior
view looking forward through the front window.
|
| With the hitch ball installed and the safety chain bolted
to the tongue, you're ready to roll. And if your travels up to now have
been limited to hotels and tourist camps, you are about to discover a brand
new freedom in vacation motoring. |
Any 2 Vintage Trailer Plans
$19.95 FREE Shipping |
|
Select 2 Vintage Travel Trailer Plans
|
|
|