Free Shipping
Build a Hardside Pop-Up Camper Trailer Plans and Instructions
Build this Vintage Pop-Up Camper On a Utility Trailer
|
Hardside Pop-Up Camper Trailer Plans
Build this Vintage
Pop-Up Camper On a Utility Trailer
 |
PDF Format |
|
|
All Orders Processed
On a Secure Server
|
Price $12.95
|
|
Get a restored copy of these vintage Hardside Pop-Up
Trailer Plans with 13 Pages of Enhanced and Enlarged Figures
and Illustrations and Searchable Text.
|
We will email these plans, to the address provided
with your payment, within 48 hours following receipt of your order.
|
|
|More
Vintage Trailer Plans|
|
|

|
|
|
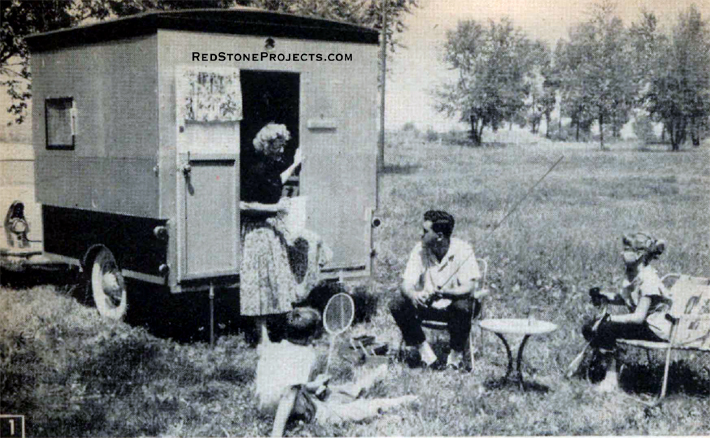
Family outings are no harder on the budget than
staying home - and they're 10 times more fun - with this quick converting
trailer home.
|
| ALL you members of the "Thank Heaven It's Friday Club"
will find this convertible, collapsible trailer outfit just about the perfect
answer to that question of how to get out of town fast after you've put
in those 40 hours.
Just pop the folded-up house unit into the utility trailer,
pick up a few groceries, and you're off to the wilds without a waste motion.
Bring the kids along too. There's room for them and they'll love the whole
deal. |
Get a restored copy of these vintage Hardside Pop-Up
Trailer Plans with 13 Pages of Enhanced and Enlarged Figures
and Illustrations and Searchable Text.
All Orders Processed
On a Secure Server
|
Figure
2.
|
|
Figure
3.
|
Get a restored copy of these vintage Hardside Pop-Up
Trailer Plans with 13 Pages of Enhanced and Enlarged Figures
and Illustrations and Searchable Text.
All Orders Processed
On a Secure Server
|
| On the highway you'll find that this rig, with its low
profile and low center of gravity, slips along behind you without fuss
and doesn't eat up the horsepower like some of the big blobs you'll be
passing up. At your destination, about 10 minutes is all you need to get
set up for the night.
Then when you return home, if you feel you must, slide
out the house unit and you've got the utility trailer for every day, practical
use.
The ingenious folding house is not complicated. Construction
is straight-forward, employing standard materials.
You can build the whole outfit from scratch, as described
in this article, or if you already have a suitable utility trailer you
can modify the dimensions of the house to fit it. |
Get a restored copy of these vintage Hardside Pop-Up
Trailer Plans with 13 Pages of Enhanced and Enlarged Figures
and Illustrations and Searchable Text.
All Orders Processed
On a Secure Server
|
Figure
4.
|
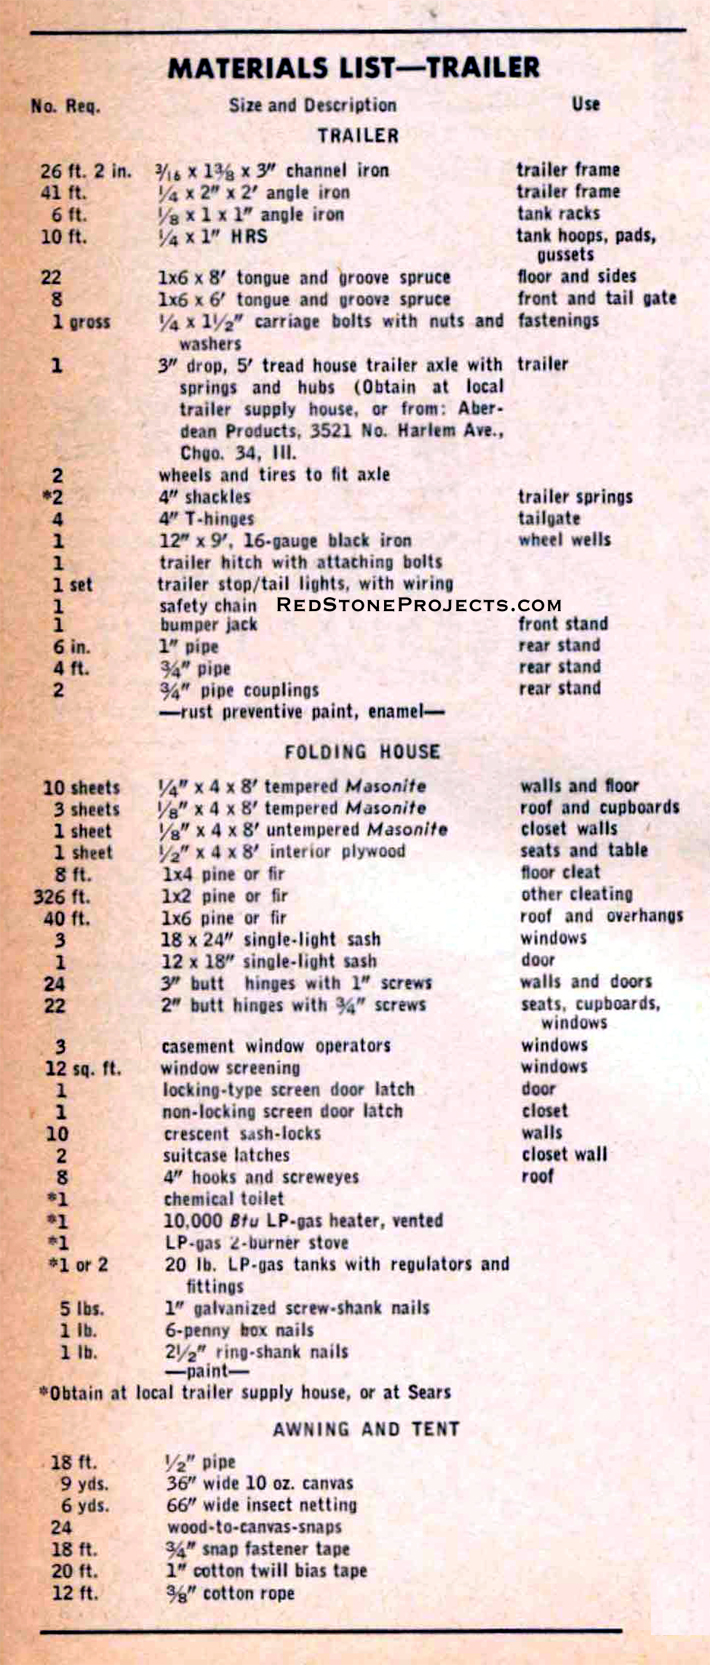
| Building the Trailer. If you decide to build a
new trailer, start by cutting the steel and welding it up according to
Fig. 2. Note that the front cross member is welded onto the main rails
flange up; the other three are flange down, and the two middle ones are
notched over the rails. Do the work on a flat surface to be sure the finished
frame will be true. Weld on the angle iron side rails and corner posts,
coping where necessary. Add the hot rolled steel (hrs) gusset plates to
reinforce the notched cross rails (Fig. 2A).
Notch and bend up the tongue, fit the LP-gas tank hoops
and braces, and weld this assembly to the front of the frame (Fig. 2B).
Weld hrs pads on the main rails where the spring shackles
of the trailer axle assembly you have selected will land.
On the rear cross rail, weld two 3-in. lengths of 1-in.
pipe, threaded and split on their bottom ends (Fig. 2C).
Now paint all this ironwork with a good rust-preventive
paint, and you are ready for the flooring.
Lay the 1x6 tongue and groove floorboards fore-and-aft,
cutting out gaps for the wheel wells, and secure them with 1/4 x1 1/2-in.
carriage bolts, with nuts underneath. Plank in the sides the same way,
but cut a curved notch at the wheel wells. All nuts must be on the outside.
Make the wheel wells (Fig. 2) of 16-gauge black iron secured with carriage
bolts. You can make a cleated tail gate, if you wish, that bolts on when
needed.
Paint all this new construction with the rust-preventive
paint, and follow with an exterior enamel.
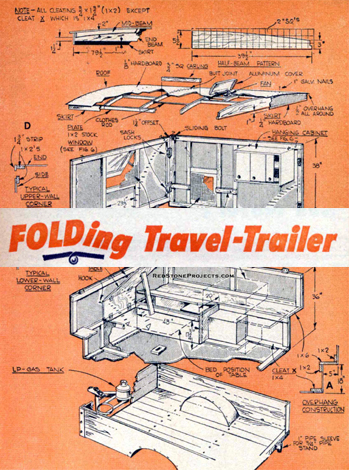
House Bottom. Start assembly of the house bottom
right in the trailer. Fit 1/4-in. hardboard in the trailer with 1/2-in,
clearance all around (Fig. 2). Cleat it as shown, using 1 in. galvanized
screw shank nails driven through the hardboard into the cleats.
Then add the 18-in.-high lower side walls, cleating with
1x2s at all joints. Box in the trailer wheel wells with the same hardboard-and-cleat
construction. Make the front wall of one piece 36 in. high. Nail 1x6 overhangs
along each side wall (Fig. 3A). Then continue the side walls to a final
height 1 1/4 in. less than the front wall, to allow for folding the upper
walls. Use two cleats (Fig. 3B) in all four corners.
Make the rear wall (where the door will be) the same height
as the front wall. After nailing the cleats flush with the top edges of
the walls, chamfer the hardboard edges 45° (Fig. 3C) to shed water.
Cabinetry. Inside joinery of the bottom half of
the house should be completed now. The layout shown (Fig. 4) works very
well for family groups or for hunting and fishing, but if you prefer some
other arrangement, you can probably work it in without affecting the folding
feature of the house.
Build the dinette first, using 1/2-in. plywood cleated
at the corners and edges. Hinge the seats to the house overhangs. Make
the table top of 3/4-in. plywood, in two pieces hinged together so it can
be propped up in the table position or dropped to the bed position without
taking it apart.
Wall in the lower half of the closet, but do not cut the
door opening yet. There is room for a small gas-fired heater between the
wheel well and closet wall. If you install a heater, box it in with sheet
aluminum lined with asbestos paper. Run the gas line through the storage
compartment and out the front wall just above the front wall of the trailer.
Note: Be sure to install your heater with proper venting, as no open-flame
heater should be permitted to operate in a confined space without it. |
|
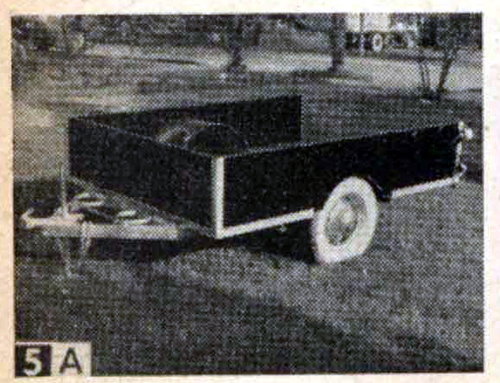
The photo-sequence starting here shows the quick
transition from utility trailer to assembled house trailer.
|
|
|
Figure 5(A) The Basic Trailer.
|
 |
|
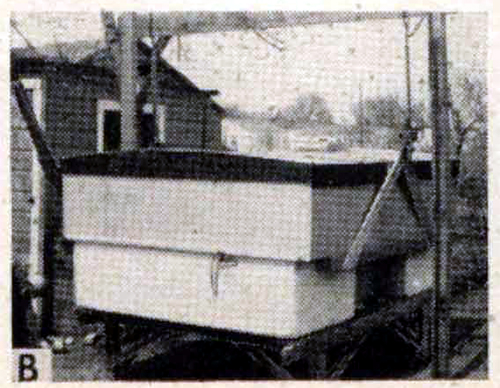
Figure 5(B) the folded house suspended in its
trestle.
|
 |
|
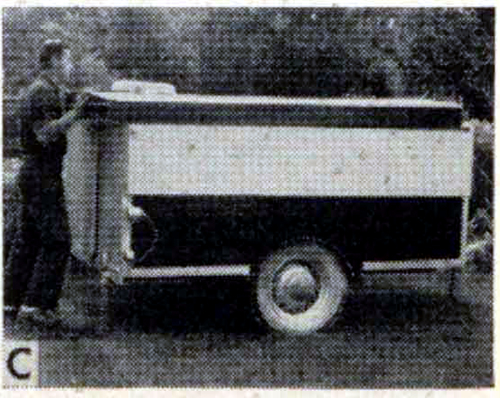
Figure 5(C) Ready for the road.
|
 |
|
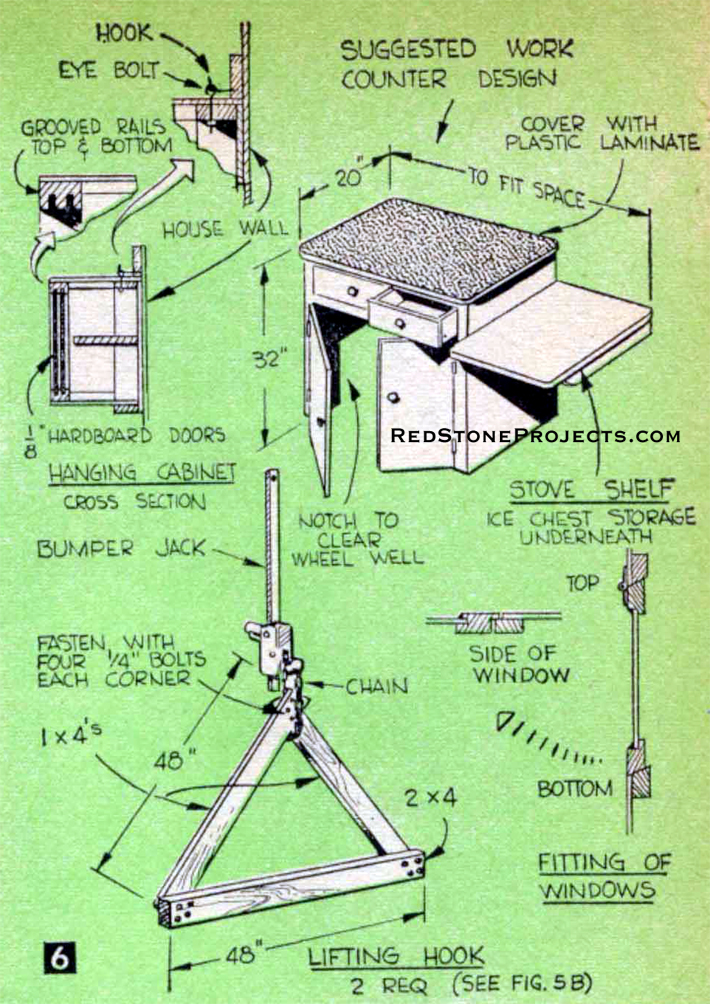
Figure 6.
|
| Construct the cabinet and work counter (Fig. 6) at the
right side of the house next. Design of this structure can be adjusted
to accommodate a different stove and ice box arrangement if desired. You
could use a portable ice-chest in the ice-box space, or use one of the
new trailer-size refrigerators. Lead the gas line from the stove down to
the floor along back of the sill into the closet, and tee it into the heater
gas line. Cover the counter top with 1/8-in. hardboard, or plastic laminate.
Upper Walls. Construction of the upper walls is
the same in principle as that of the lower walls. Note the arrangement
of the corner cleats (Fig. 3D) that allows adjacent walls to come together
in a snug closure. Don't forget to chamfer the lower edges of the upper
side walls before attaching the lower-edge cleats (Fig. 3C).
The finished height of the side walls is 1 1/4 in. more
than that of the end walls so that when all four walls are folded, the
lip of the roof will cover the wall edges. Cut the window openings in the
hardboard of the side and front walls before nailing on the vertical cleat
members, which must project 1/4 in. inside the openings (Fig. 6). Then
cleat the openings and bevel their tops and bottoms. Bevel the window sash
to correspond to this and rabbet the sash sides to fit the 1/4-in. projection
of the cleats.
Use four hinges uniformly spaced on each of the four upper
wall sections and nail the sections together temporarily at the corners.
Cut out the rear door opening and use the cut-out pieces
to build the door. This door will open outward, so let the cleats around
the opening project inward 1/4 in. Fit the window sash in the door to fold
inward, hinging it at the bottom (Fig. 4). Now that you can get back inside,
install sash-locks in the upper wall corners to hold the corners together.
The Roof. Make up the pattern (Fig. 3E), then use
it to lay out the five roof beams. Use good straight-grained lumber for
this. Cut the plates and carlings to length, then nail the frame together
with ring-shank nails. Note that the roof frame dimensions are the same
as the outside surfaces of the walls. Nail the hardboard skirt around the
roof frame; this overlaps the side walls both in the folded and unfolded
positions.
Cover the roof with 1/8-in. hardboard, letting it overhang
1/2 in. all around. Caulk the butt joint between the sheets on the center
roof beam. Do this whole job with the roof frame in place on the house
to insure trueness.
Now go inside and install the hooks that hold the roof
on (Fig. 3). Also inside, make the upper half of the closet walls, hinged
together for storage when traveling, then cut out and finish the closet
door. Attach this folding wall with sash-locks. You can also make a removable
hanging cabinet (Figs. 3 and 6) to hang against the wall over the work
counter.
If you need the extra sleeping capacity, make an upper
bunk that stows against the roof when not in use, or on the lower bunk
when traveling. This can be a three-quarter size link-spring bed spring,
used upside down so its side frame acts as guard rails. Use a cotton-filled
mattress on this bunk.
Make the lower bunk/dinette cushions out of a three-quarter
size cotton-filled mattress cut into sections and covered with denim, tightly
fitted.
To finish up inside, install the chemical toilet, secure
the stove, tack screening over the window openings, and install a clothes
rod in the closet. |
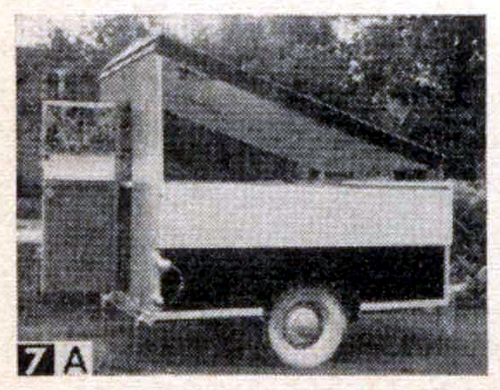 |
|
Figure 7(A) Front erected and roof started up.
|
 |
|
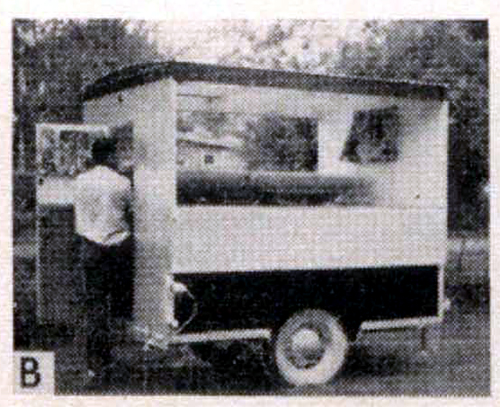
Figure 7(B) Roof and ends in place, side wall
going up.
|
|
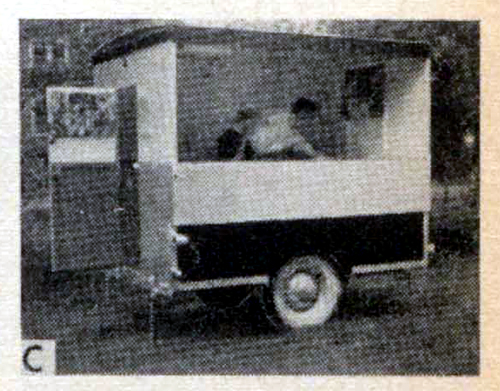
|
Figure 7(C) Raising the last side wall.
|
Get a restored copy of these vintage Hardside Pop-Up
Trailer Plans with 13 Pages of Enhanced and Enlarged Figures
and Illustrations and Searchable Text.
All Orders Processed
On a Secure Server
|
Figure
8.
|
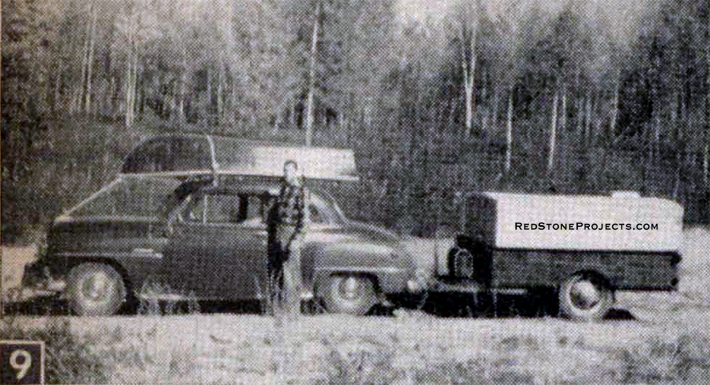
|
|
Woodsmen can have all the comforts of home, even
on remote back roads, with this compact, easy trailing outfit.
|
 |
|
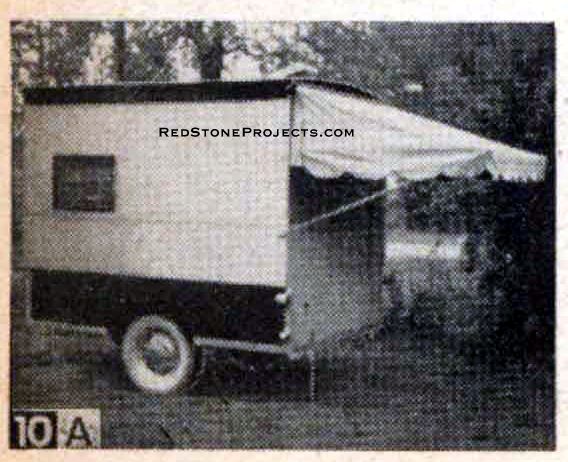
Figure 10(A) Canopy erected.
|
 |
|
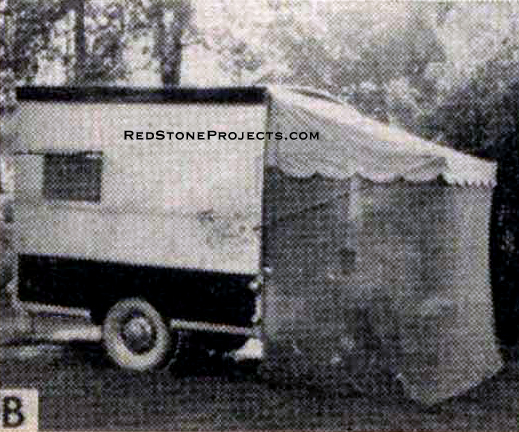
Figure 10(B) Mosquito netting porch added.
|
| Optional Features are an electricity supply and
the ventilating fan. You can install an automobile battery on the tongue
between the gas bottles and run wiring in to the needed points inside.
For the ventilator, use an auto heater motor and fan blade. Make an aluminum
cover for it, hinged on spring hinges, with a bead chain to hold it closed.
Water can be carried in cans inside, under the stove.
Paint the house, inside and out, to suit your taste, and,
for a finishing touch, get someone on the distaff side to sew up some curtains
for the windows.
To steady the rig when it is in use as a house trailer,
slip two pieces of 3/4-in. pipe with welded-on feet (Fig. 2) into the slit
pipe pieces on the rear cross rail of the trailer and clamp them at the
desired height with pipe couplings.
Support the front end with a bumper jack if you want to
unhitch your car.
For hot, buggy locations you may want to make an insect
netting "front porch," roofed by a canopy. Figure 8 shows a suggested design
for this refinement.
Finally, you will need some way to get the folded house
into and out of the trailer. For this, make a trestle (Figs. 5B and 6)
and use two bumper jacks as hoists to lift the house up by the overhangs.
Then you can run the trailer in or out or leave the house sitting on two
low wooden horses.
Pop-Up Trailer Materials List
|
Any 2 Vintage Trailer Plans
$19.95 FREE Shipping |
|
Select 2 Vintage Travel Trailer Plans
|
|
|