Free Shipping
Build a Jack-In-The-Box Trailer
DIY Folding Tent Camping Trailer Plans
|
Jack-In-The-Box
Camping Trailer Plans
Build this Vintage Pop Up
Travel Trailer
 |
PDF Format |
|
|
All Orders Processed
On a Secure Server
|
Price $12.95
|
|
Get a restored copy of these vintage Pop Up Camper
Trailer Plans with 11 Pages of Enhanced and Enlarged Figures
and Illustrations and Searchable Text.
|
We will email these plans, to the address provided
with your payment, within 48 hours following receipt of your order.
|
|
|More
Vintage Trailer Plans|
|
|

|
|

|
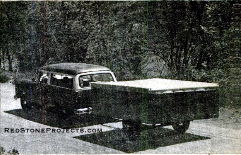
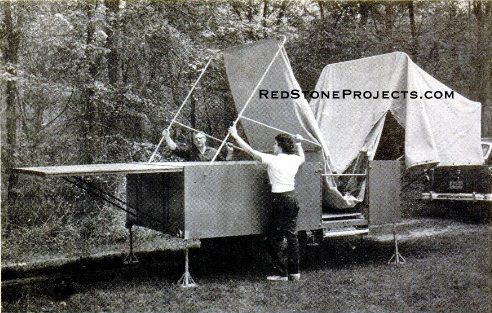
| in a matter of minutes. "Umbrella" top tucked inside
unfolds quickly to provide shelter and sleeping for four. Tow safely at
high speeds and sets up in 20 minutes. |
|
PART I
|
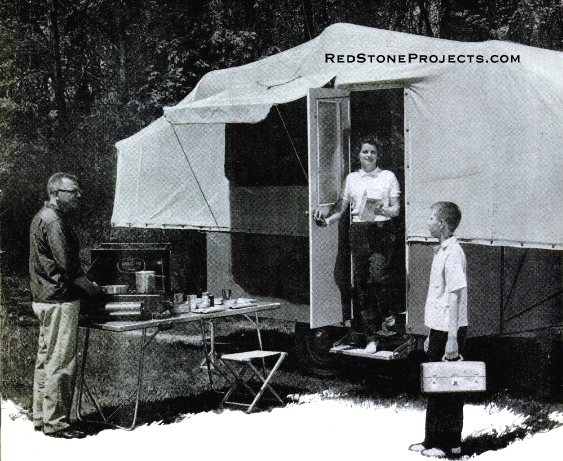
| ROUGHING IT in the backwoods is almost like being at
home when you hitch this box on wheels to your car. For, aside from lacking
the conveniences of modern plumbing, it contains all the other comforts
of home to make vacation camping a real family treat.
The Clifford De Leeuw family of Grand Rapids, Mich., builder
of this unique camping trailer, found it so in exploring the primitive
region of northern Michigan. Free of worry of finding a motel for the night,
they found they could park in undeveloped areas at no charge and be snug
and as comfortable as bugs in a rug.
Two full-size beds (5 X 7 ft.) supported on lids that
open like the covers on a box, provide comfortable sleeping for four outside
the actual living area. If necessary, two more persons can be bedded down
on air mattresses placed on the floor. Dining inside is done on a folding
table, with the built-in cabinets along the sides being used as seats.
Headroom at the center measures 8 ft. 4 in. and the door, 6 ft., to make
crouching and ducking unnecessary in entering and standing inside. |
 |
|
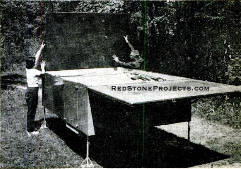
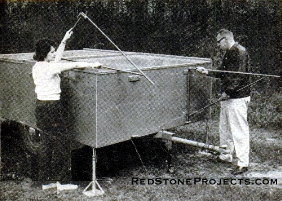
| Compact as a nut in a shell, all the paraphernalia
you need to camp in style and comfort is tucked away in a plywood box on
wheels measuring only 7 x 10 ft. |
|
| Above, lids of the box, when flung open and supported on the removeable
pipe brackets, provide outboard bunks for the two full-size mattresses
which stow on the trailer floor. |
|
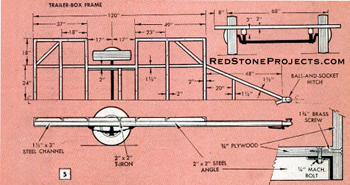
| First study Figs. 4 and 5. The trailer is built on a
commercial drop-type, front-axle assembly which you buy. Pick one that
has wheels that match the size of those on your car so the spare tire can
be used in an emergency. The bed on which the trailer body is built is
welded together from lengths of steel angle and channel. This part, plus
the tent top, you may have to have made for you. |
|
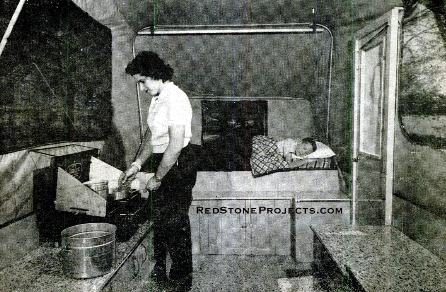
| Roominess and brightness of the trailer interior stems
from the out-of-the-way bunks and windows on all four sides. Cabinet tops
provide work surfaces and seats. |
| Outdoor fir plywood (marine grade) is used for the floor
and body. The welded bed is floored first, cutting out the plywood over
the wheel wells and fastening it to the bed with 1/4-in. machine bolts
spaced 12 in. apart. The joint of the floor panels should center on the
T-angle member of the bed. The sides and end panels of the body lap the
floor and the bed, and the end panels lap the edges of the sides at the
corners. Brass screws and waterproof glue are used to join the plywood,
driving the ones around the bottom into the edges of the floor panels and
spacing them 4 in. apart. Don't bother cutting the door opening until after
the panels are in place.
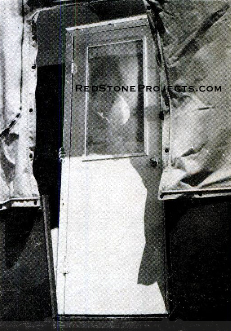
The four corners of the body are reinforced with steel
angles placed on the inside. The swinging door is hinged to a frame which
in turn is hinged to the floor so that both store flat as a unit on the
trailer floor. Bolts passing through the frame and steel angles screwed
to the edges of the door opening in the trailer body to hold the frame
upright. En route, the door opening in the body is fitted with a separate
panel which is held in place with four slide bolts. The bunk lids are hinged |
Get a restored copy of these vintage Pop Up Camper
Trailer Plans with 11 Pages of Enhanced and Enlarged Figures
and Illustrations and Searchable Text.
All Orders Processed
On a Secure Server
|
|
|
| with piano hinges and are supported by removable pipe
brackets. Fig. 3, that slip into fixtures permanently attached to the ends
of the trailer body. The brackets store on top of the lids in wells created
by strips of molding applied around three edges, 1 1/2 in. in. Dot lift-type
snaps are later screwed to this molding for buttoning the canvas top. Adjustable
leveling jacks, Figs. 1 and 2, are placed at the four comers of the trailer
box to prevent rocking. The jacks are carried in the car to be available
first hand. |
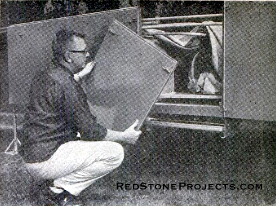 |
| Separate removable panels close regular door opening
in the side of the trailer body when en route. Notice retractable commercial
trailer step below opening. Step can be a box and stowed inside. |
|
 |

By Clifford J. Deleeuw
PART II
|
| After completing the trailer body with cabinets, and
making the folding canvas top, you are ready to hit the road for the "shakedown
cruise". |
 |
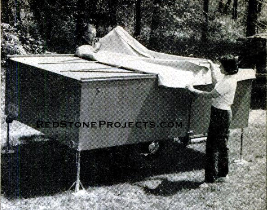
| The folded top is raised from its resting place above
the cabinets and secured in place in a matter of minutes. |
| LAST MONTH in the first installment on building this
unusual canvas-top camping trailer, we gave instructions and details for
completing the trailer frame and body. Now you are ready to construct the
interior storage cabinets and counters. Before doing this, however, it
Is a good idea to lay tile or linoleum over the entire floor area. Covering
the floor at this stage avoids having to cut around cabinets after the
interior arrangement is built in.
Fig. 6 suggests a cabinet arrangement, but this is optional,
and the cabinets may be built and arranged to suit individual requirements.
In the original arrangement, two-shelf cabinets built along both sides
and the front end of the trailer were found to provide sufficient storage
space. This arrangement leaves ample room to install a small refrigerator,
water tank, or a sink unit. Because of sanitary conditions, however, a
large insulated jug with spigot was preferred for a water supply. When
constructing the side cabinets do not let them extend past the wheel wells. |
 |
| Supporting arms for the bunk panels, which are stored
on top of the folded panels, are installed first. The arms fit into brackets
attached permanently to the ends of the trailer. |
|

|
| Otherwise, they will interfere with the door and its
frame when folding it down to rest on the floor. Keep the cabinet tops
flush with the ends, particularly at the door opening in the trailer box.
Also be sure to allow at least a 6-in. clearance between the upper surfaces
of the cabinets and the top of the trailer box.
The canvas top folds into this space when traveling. If
of uniform height, the cabinet tops may be used as seats when dining or
entertaining. Before building in the cabinets, study your needs carefully.
Then build them accordingly. You may find you will need more drawer space
than pictured, for example. Or, it may be necessary to space the shelves
differently in each cabinet. Plywood of 3/4-in. thickness is ideal for
construction of the cabinets. It will serve for the doors too, and will
provide tops strong enough to be used as seats. Chrome edging will protect
the edges of the tops.
The door is next. The frame is made of 2 x 2-in. stock
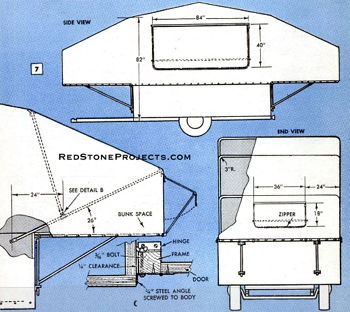
and is mounted as previously stated. See detail C of Fig. 7. Made of outdoor
plywood, the door is 2 x 6 ft. in size, and is hung to the frame by means
of three butt hinges. The screened opening in the door may be any size
desired. Save the cutout. It is used as a storm panel, which is inserted
in the opening from the inside, and is held in place by turn buttons or
storm-sash spring clips. The opening Is screened from the outside, screening
being tacked in place and the tack heads covered with molding. Having completed
the trailer and body unit, you now are ready for the folding canvas top.
This is detailed in Fig. 7. |
 |
| After erecting the canvas top, the door-and-frame
unit is swung up into place and secured, after which the canvas top over
the doorway is snapped to the frame. |
|
|
|
Get a restored copy of these vintage Pop Up Camper
Trailer Plans with 11 Pages of Enhanced and Enlarged Figures
and Illustrations and Searchable Text.
All Orders Processed
On a Secure Server
|
|
| The bows, or top-supporting members, may be made of 1/2-in.
pipe, aluminum rods or thin-wall conduit. For the original trailer, thin
wall conduit was used because pipe adds considerable weight, and aluminum
rods, while ideal, are quite expensive. When bending the conduit to form
the End bows use a minimum radius of 3 in. Be careful to avoid buckling
the metal. The bows are assembled to the inside surface of the trailer
body by means of standard couplers. The second bow from each end is assembled
to the end bow with standard awning fittings. See detail B of Fig. 7.
The tent top is made of 9-oz. army duck, tailored to the
bows and the doorframe. Unless you are adept at this type of work. it is
best to have the canvas cut and sewed by an awning maker. Zipper-fitted
hems are provided for the bows as shown in detail A, Fig. 7. When lowering
the top, the center hem must first be unzipped to allow the canvas and
bows to fold down properly. The canvas is attached in place by lift-type
snaps located on the sides of the trailer body, around
the doorframe and along the sides and ends of the hunk lids.
For ventilation and illumination, two large windows are
provided on opposite sides of the canvas top and two small ones at the
ends. The windows are covered with plastic screen sewed to the canvas.
Canvas flaps are provided over each window. They are sewed to the canvas
at the tops of the windows, and fitted with zippers along the sides and
bottoms. If you feel that the two large windows and the screened door are
ample for ventilation, the end windows may be eliminated. |
|
| When setting up the trailer, place the stabilizing
jacks at each corner first. Next, remove the tarp, install the supporting
arms for the bunk panels and swing the latter into place. Then erect the
folding top, secure it to the snaps, and finally erect the door-and-frame
unit and snap the canvas top to it. |
|
|
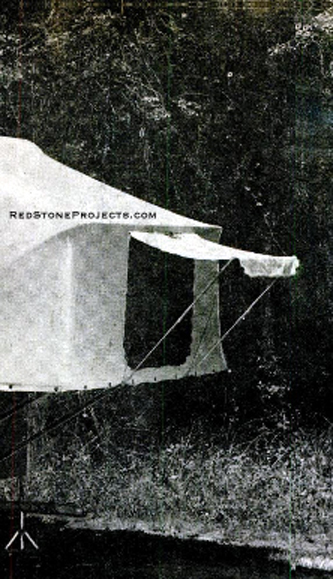
| Awnings not only add to the appearance of the trailer
but, more important will keep out the sun. The window flaps can be converted
to serve as awnings by sewing 2-in. tapes horizontally to the inside surfaces
about 2 in. up from the bottom to provide hems. Metal tubing 1/4 -in. in
diameter is slipped through the hems. Rods pivoted to the side of the trailer
body slip into the ends of the tubing to support the flaps awning style.
Make the tubing pieces slightly shorter than the widths of the flaps. This
will prevent interference when the tubing is left in the hems.
When traveling, the folded trailer is covered with a canvas
tarp of the same material as the top. The tarp is fastened to the lift
snaps on the trailer body. For sake of appearance, the tarp should be tailored
to the body. Here, as with the window flaps, the tarp may be made to serve
a dual purpose. It may be used as a canopy over the door and large window
by using supporting rods and a zipper to attach it to the canvas top.
If desired, retractable trailer steps may be purchased
for entering the door, or a step unit may he built of wood and stored inside
the trailer when traveling. A tongue jack is desirable for use when the
trailer Is unhitched. The jack should be of the folding type and should
be attached permanently to the tongue. |
Any 2 Vintage Trailer Plans
$19.95 FREE Shipping |
|
Select 2 Vintage Travel Trailer Plans
|
|
|