Free Shipping
Build a Low Profile Pickup Camper
DIY Standing Room Truck Bed Mounted Camper Plans
|
Low Profile Truck Bed Camper Plans
Build this Pickup Mounted Drop In Camper You Can Stand
In
 |
PDF Format |
|
|
All Orders Processed
On a Secure Server
|
Price $12.95
|
|
Get a restored copy of these vintage Low Profile
Truck Bed Camper Plans with 15 Pages of Enhanced and Enlarged
Figures and Illustrations and Searchable Text.
|
We will email these plans, to the address provided
with your payment, within 48 hours following receipt of your order.
|
|
|More
Vintage Trailer Plans|
|
|

|
|
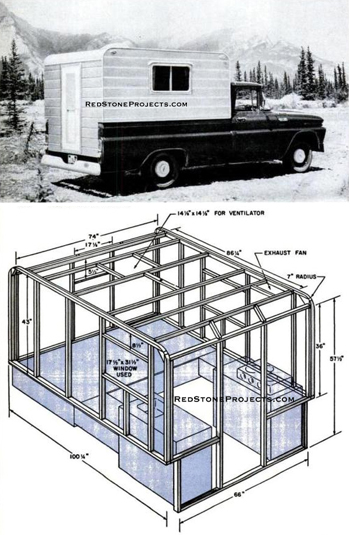
Build a High-Low
Pickup Camper
You can stand tall in its work area
and yet park it in your garage. Every
feature is designed for maximum comfort
|
|
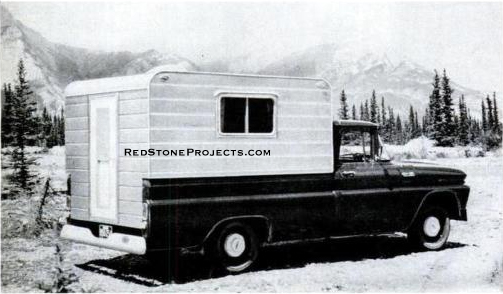
This Compact Camper can go nearly anywhere
the open half-ton pickup can and is rugged enough (and it's insulated)
for the high country. It provides all the facilities, except a head, that
two wanderers need.
|
|
|
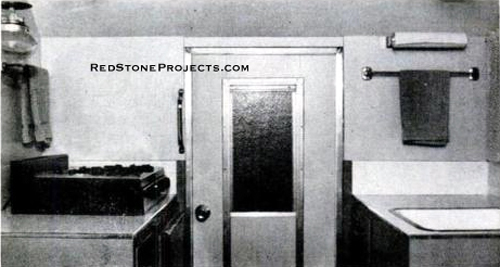
Interior View of completed camper looking
aft shows the comfortable galley area. Between sink and stove is a sump
offering 5 feet 11 inches of headroom. Stove and lamp are gas operated.
|
|
| IF TRAILER CAMPING suggests roughing it because of equipment
apparently designed for midgets. take heart This life-size pickup camper
sports custom conveniences and structural features not otherwise available.
It will make you glad to hit the road instead of just glad to get back.
This camper tops the ready-mades because:
-
It offers headroom of 5 ft. 11 in. in the work area, and
yet ...
-
You can drive it through an 8-ft. high garage doorway.
-
It's light enough to be carried on a half-ton pickup truck,
and yet ...
-
It's rigid enough to avoid racking.
-
It has a full-size double bed.
-
It has generous closet space for two adults.
-
It's adequately insulated.
-
Its low profile makes it the perfect bug out vehicle.
-
It provides most of the conveniences found in the better
campers, such as propane gas tank, stove, lamp, water storage tank and
pump. cabinet sink, refrigerator, 12-volt exhaust fan over the stove and
screened windows and door.
The camper costs about $650 to build, as against $850 for
a comparable commercial vehicle. What makes it worthwhile to build - the
headroom and garage ability - is a combination totally lacking in commercial
versions.
The feat of combining these features was achieved by placing
a pit, or sump, in the floor of the truck, a half-ton Chevrolet pickup
with an 8-ft. wide side body. This truck was selected because it has a
wood floor that makes modification easier. When it's off-season for the
camper. you can hoist it with a winch in the loft of your garage and still
be able to park the truck under it.
The camper weighs 670 pounds - light enough to ride easily
on the half-ton vehicle, which is more economical and easier to drive than
a 3/4-ton unit. Significant fringe benefits from the camper's low height
are its clearance height and stability, reducing wind resistance and side
sway. Rigidity is provided by oak framing, glued and screwed throughout
to 1/4-in. plywood.
You'll go a fair piece before you find a camper with a
mattress wider than 48 in. The full-size double bed (54x74 in.), in this
unit triples in brass as a table or ironing board with the loose section
inverted and as a sofa with that section tipped up against the closet.
Defer building the camper until the door and windows are
on hand or until you are reasonably sure of their dimensions. The door,
windows, stove, sink, refrigerator, propane lamp, roof ventilator and other
trailer supplies can be purchased through a trailer supply catalog such
as that of All-Trailer Parts and Accessories, Elkhart, Ind., but some items
may be obtained locally through camping equipment dealers.
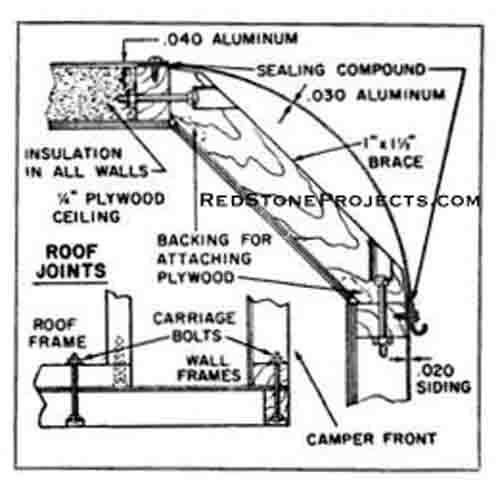
Standard aluminum camper siding comes in 8-ft. lengths,
but it would be worth a search to turn up 10-ft. siding to avoid seams.
Otherwise, you can buy truck siding or have a tinsmith cut .020-in. aluminum
to length and pleat it on his brake for appearance. |
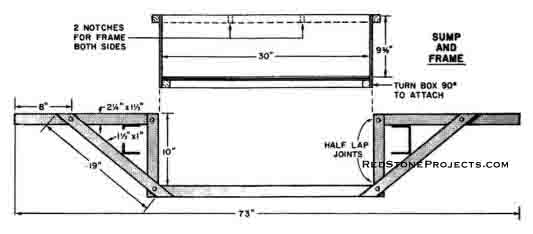
| Get To Work On The Pickup
The 10x30x30-in. sump sits between the chassis frames
behind the rear axle, normally a storage area for the spare tire. In the
1962 pickup used here, construction is as detailed below and in the drawings.
First, remove the tailgate, rear bumper (temporarily)
and spare-tire mounting brackets. Remove the bolts holding the pickup body
to the chassis. Then take out the floorboards between the wheel wells and
remove the two channel irons behind the rear axle. |
|
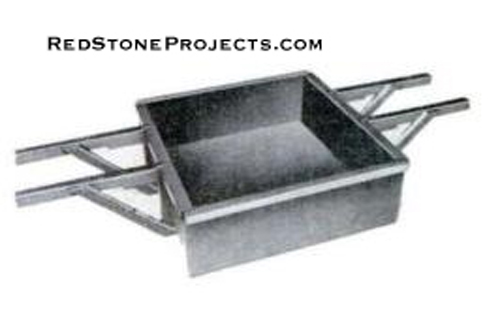
Sump Framework in Chevy pickup must replace
channel irons and spare tire brackets. Oak frame with half-lapped joints
is held together with carriage bolts and waterproof glue. Treat with pentachlorophenol.
|
|
| Fabricate two oak frames with waterproof glue and bolts,
as shown in the drawing above and the photos on page 133. Clamp the channel
irons to the oak frames to transfer the bolt holes. Make the sump box of
3/8-in. exterior grade plywood with a 5/8-in. bottom. The box with its
own frame is screwed and glued to the transverse frames. Coat both box
and frame inside and out with a wood preservative and paint. Slide the
assembly in place and bolt. You will need longer bolts than were removed.
Next, cut a sheet of 5/8-in. exterior grade plywood 43x97
1/8 in. to replace the floorboards. Coat it with the preservative. The
plywood floor is screwed to the box, which serves to reinforce it and its
frame. |
|
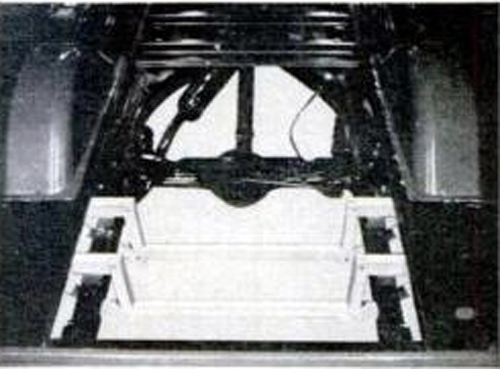
Complete Sump Assembly will take exposure
to the elements. It is joined with waterproof glue and counter sunk screws,
waterproofed and painted with gloss enamel before being mounted on the
chassis.
|
|
| More recent models of the truck are built similarly,
except that chassis frames are closer together - 27 1/2 in. apart instead
of 36 in. To optimize the floor space, build the sump as follows:
Make the horizontal pieces of 2 1/4-in. oak as before
for floor supports, 21 in long. These will be bolted to the chassis frame
and the pickup floor.
Because no sump floor supports are provided, the floor
should be built of 3/4-in. plywood, and because of its narrowness, extra
toe room should be provided by extending the floor out under the chassis
on both sides. |
|
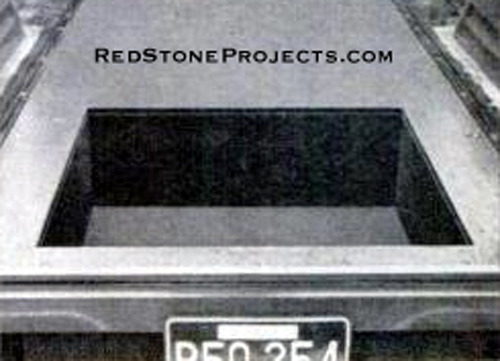
Pickup's Flooring between the wheel wells
is replaced with exterior grade plywood, which is screwed (not glued) to
the sump box framework. This strengthens the box and keeps the interior
dust free.
|
|
| Wall Panels Are Prefabricated
Cut all framing with half-lap or butt joints to result
in the dimensions given in the perspective drawing on page 134. Assemble
each wall of the camper separately. Framing studs should be placed to create
a wall thickness of 1 1/2 in.; similarly, each plate should be placed flat.
Note that the upper corners of the side frames are rounded on a 7-in. radius.
Glue up oats scrap to make these corner inserts.
Fasten 1/4-in. plywood to the "interior" surface of each
frame with flathead screws, countersunk. Let the seams on the side walls
fall in the closet area. Apply glue to all joints and to contact areas
of the plywood. |
|
|
Get a restored copy of these vintage Low Profile
Truck Bed Camper Plans with 15 Pages of Enhanced and Enlarged
Figures and Illustrations and Searchable Text.
All Orders Processed
On a Secure Server
|
|
Clamp the walls together and drill them for 1/4-in. carriage
bolts. Glue and bolt together, with the end frames between the side frames.
Fabricate the braces between the end frames and the roof. (See detail drawings
on page 135, bottom.) The braces are of regular oak framing stock. Run
strips of wood between the ends of the braces to provide a surface for
the edges of the interior plywood to bear on.
Turn the camper upside down. Glue and screw 3/8-in. plywood,
39 1/2x77 in., for the fixed portion of the bed platform to the bottom
edges of the front and side walls. Cut and reinforce a 24x74-in. piece
of 1/4-in. plywood for the other half. Attach a 3/4x1-in. frame with two
lengthwise members inside it to the center 43 1/2 in. of this loose platform.
Cover the bottom of the frame with 1/4x24x43 1/2 in. plywood and face the
sandwich with 1/4-in. plywood 4 1/2 in. high. The upper portion of this
will hold the mattress edge.
From 3/8 - and 1/4-in. plywood, build the laundry hampers
to fit over the wheel wells, reinforcing them inside with full-length glue
blocks (see drawings on pages 136 and 137). The hampers sit inside the
truck body, but their tops are attached to the undersides of the camper
frame, butting the bed platform. Cover the overhangs in the galley area
with 3/8x5 1/4 in. plywood strips. Later, you can attach the hampers' free
ends to the galley units.
| Construction of the hampers requires that the loose bed
platform, which rests across the hampers, sit 1/4 in. higher than the fixed
one. However. with 5-in. foam mattresses, this difference doesn't matter.
Glue and screw 1 1/2x1 1/2-in. reinforcing ribs to the
bed platform, as shown in the floor plan to page 136. Reinforcements, measuring
3/4x1 in., are run outside (and attached to) the hampers from a point 3
3/4 in. from the rear frame to one 2 1/2 in. from the front of the camper.
Another piece runs between the forward ends. These reinforcements stop
short of the rear because of the narrowing tailgate area.
To finish up the forward section, build a box without
a top or front to house the water tank, as shown on pages 136- 137. Made
of 3/8-in. plywood, the box reaches from the free edge of the platform
to the 3/4-in. reinforcement on the other three sides. Add reinforcing
strips to its bottom. Drill for the fill pipe at the left side of the bed
platform and front wall so that the spout will clear the truck cab. |
| Attach the box to the underside of the bed platform:
install the water tank. Later, after the siding is on and the fill line
installed, couple the tank to the fill line and pump and then screw on
the removable front panel.
Space underneath the tank shelf will store the spare tire
displaced by the sump. Runnerless drawers can he placed alongside for additional
storage.
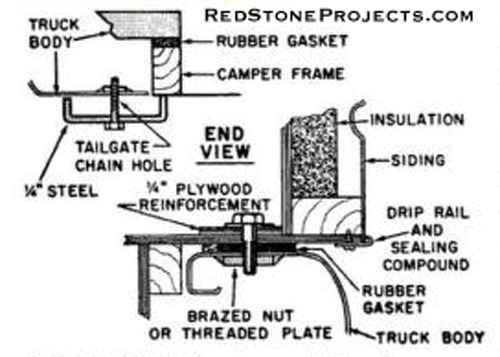
Paint the underside of the camper. When it's dry, attach
strip-rubber gasketing to the inside of the lower section of the rear frame
where it contacts the truck's tailgate area.
To load the camper on the truck, run a 3/8-in. eyebolt
through the roof strut provided for it and through a 2x4 temporarily placed
inside for support. Then hoist it with a winch (see side view, page 137).
Fabricate the U-shape straps as shown in drawing above, drilling them to
fit bolts that thread into the vacant tailgate chain holes. Tightening
the bolts will snug up the camper to the truck, making a seal at the gasket
just installed.
Glue 1/4-in. pieces of plywood to the spots where you
will drill 7/16-in. body bolt holes through the camper and into the top
of the pickup's body panels, as shown above and on page 136. The forward
holes should fall inside the closet, not in the sleeping area. Remove the
camper and apply sponge rubber gasketing to it under the holes. |
Get a restored copy of these vintage Low Profile
Truck Bed Camper Plans with 15 Pages of Enhanced and Enlarged
Figures and Illustrations and Searchable Text.
All Orders Processed
On a Secure Server
|
|
|
Attach with machine screws or braze on 5/16-in. strips of
steel to the underside of the holes in the truck. The steel strips must
be drilled and tapped for 5/16-in. bolts. Each time the camper is bolted
down, the U-straps may be removed.
Frame the sink and stove cabinets to accommodate their
fixtures: the sink, shelf and drawer on the one hand and refrigerator on
the other. Only 3/8-in. plywood need be used for countertops if the area
around the sink is reinforced to a thickness of 3/4-in.: only 1/4-in. plywood
is needed for the rest of the cabinets. You will have to make cutouts where
the cabinets cross the wheel wells. Also, keep the wells in mind when placing
the refrigerator.
The clothes closet is built out from the wall and then
faced with 1/4-in plywood. Each side section is 18 1/2 in. wide and the
center, 37 in. Closet pole should be attached between upper front panels
and the front wall, just below the slope in the wall. This will provide
32 in. of hanging space. Use two hanger rods in the center section.
| Cement 1-in. polystyrene insulation to the plywood between
the studs, but the roof should be fully packed with it to permit the use
of light-gauge roofing.
Drill holes through the ceiling and insulation for wiring
to dome lights. Install a cigarette lighter socket in the side of the sink
cabinet for an electric shaver (with adapter and converter). |
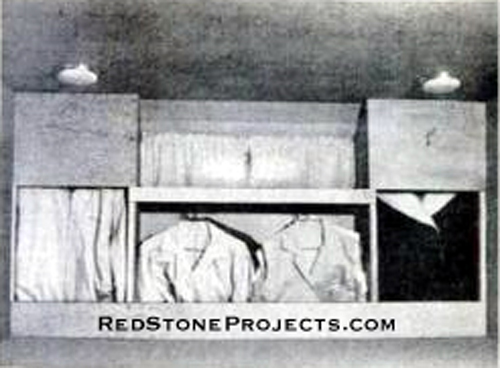
| Closet For Two covers the front wall of the camper.
From rods behind the top panels, there are 32 inches of hanging space.
The shorter center space has rods. Drawers below the bed hold bedding and
other clothing. |
|
| Run a No. 10 wire from the fuse panel, fused at 15 amps,
to the left rear corner of the truck. Hook it with a ground wire and a
line from the taillight into a connector into which the camper's wiring
can be plugged. This will be under the sink.
Run No. 12 wires from the No. 10 line and ground to the
fan switch and cigarette lighter. Run No. 16 wire to the dome light locations
from the hot side of the fan switch. From the taillight lead, run No. 16
wire to the ICC clearance light locations.
Attach the base of the propane lamp to the wall over the
stove counter. |
| Next Comes the Skin
If aluminum truck siding is used because of its readier
availability, install it wrong-side-out to simplify finishing the corners.
Determine the location of the ribs for appearance and economy of material
and mark where they fall on the framing. Notch the framing to accommodate
them.
Drill holes for the clearance-light wires and attach siding
with 3/4-in., 18-gauge aluminum nails, spaced 3 in. apart and close enough
to the edges to be hidden by corner molding. Use inverted drip rail and
sealing compound to attach the lower edge of the siding to the frame.
Attach the roofing at front and rear (overlapping at the
middle and on the sheets that curve down to meet the siding) with sealing
compound and 3/4 in., No. 8 aluminum sheet-metal screws. Use the sealing
compound wherever metal butts metal or overlaps.
Apply drip rail, inverted, as corner molding at the top
of the sides and down the corners, fastening it with the sheet-metal screws.
Install the door, windows, roof ventilator, exhaust fan
and water tank filler tube using sealing compound in each case. Connect
and attach the clearance lights, orange in front and red in rear.
Apply countertop laminate and edge with metal trim or
self-edge. Cut in and install the sink and water pump, hooking up the pump
to the water tank with 3/8-in. copper tubing run through the hamper. |
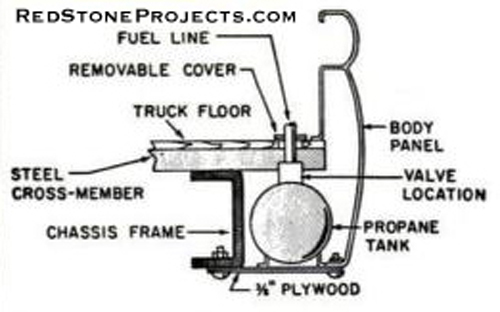
| Just forward of the right rear wheel, a 5 1/2-gallon
horizontal propane tank is installed, as shown in the drawing above. A
smaller size tank could be mounted behind the wheel under the stove, but
the 5 1/2-gallon size will last for five weeks of camping, using the lamp
and cooking all meals on the stove. A slot should be cut in the pickup
floor under the water tank shelf to accommodate the pipe rising from the
valve on the tank and to provide a hand hole for operating the valve from
inside the camper. Provide a cover with a hole in it for this slot, which
can be slid up the pipe for access. |
| Bolt the stove to the countertop. Run gas lines from
the stove and the propane lamp under the counter, through the hamper and
down to the tank valve.
Drill holes through the truck floor for drains from the
sink and refrigerator, and drill one in the comer of the sump to drain
spills. Fit this one with an adjustable vacuum-bottle stopper. Get a small
rubber cork or plug to seal the eyebolt hole in the roof. Finally, provide
for grounding the siding to the truck.
Sandpaper the interior, fill all screw holes and paint.
Install the dome lights and other interior hardware. Cut the foam mattresses
to fit, then let the lady of the house take over for such jobs as making
curtains and zippered mattress covers, placing towel racks and other accessories.
A screen-door catch will do nicely in holding a wastebasket in place against
the side of the sink. Carpeting for the truck floor between the wheel wells
and vinyl tiles for the kitchen sump floor are finishing touches. *** |
Any 2 Vintage Trailer Plans
$19.95 FREE Shipping |
|
Select 2 Vintage Travel Trailer Plans
|
|
|