Free Shipping on All U.S. Orders
All Orders Processed on a Secure Server
Vintage Tent Trailer Plans
Build a Tent Camper on a Bolt Together Frame
|
Vintage Tent
Trailer Plans
Build a Tent Camper on a Bolt Together Frame
 |
PDF Format |
|
|
All Orders Processed
On a Secure Server
|
Price $12.95
|
|
Get a restored copy of these vintage Pop Up Tent
Trailer Plans with 19 Pages of Enhanced and Enlarged Figures and Illustrations
and Searchable Text.
|
We will email these plans, to the address provided
with your payment, within 48 hours following receipt of your order.
|
|
|More
Vintage Trailer Plans|
|
|

|
|
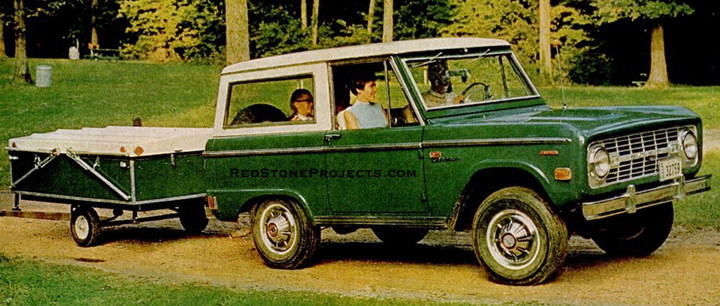
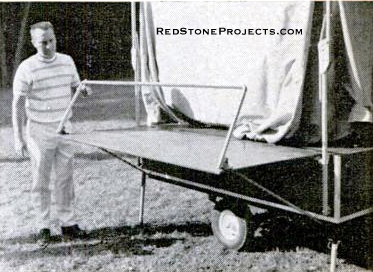
Hard Top Tent Camper Rides
Dual- Use Trailer
|
|
|
Compact for trailering, the camper is easy to
maneuver into choice campsites. Table attaches to outside for open-air
dining (below).
|
 |
|
Build it on a chassis you already own, a boat
or bike trailer, and get double use, or buy a standard bolt together trailer
for ease of constuction.
By MACK PHILIPS |
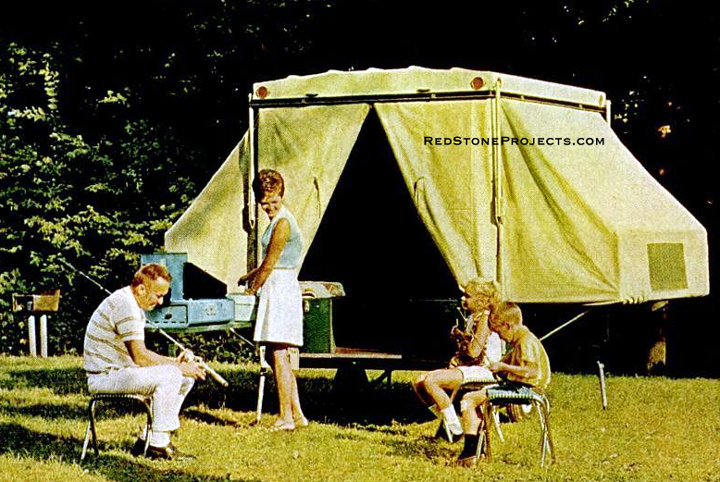
| A hardtop folding trailer is to the old-fashioned camping
tent what a modern sports car is to a Model T. The convenience of easy
setup, combined with the greater comfort of flattop head room and sleeping
high off the ground. have made this type of camper one of the most popular
on the road.
Many readers have requested plans for building one, but
we felt such a project should have a special feature not available in the
many fine commercial models that range in price from a basic $300 sleeper
to fully equipped luxury rigs costing nearly $3,000.
I, too, wanted to build my own camper for family vacations,
but I hesitated to invest in a vehicle that I'd be able to use only once
or twice a year and which would take up year-round parking space - especially
since I'd need another trailer for hauling jobs.
My Solution: Build a detachable camping unit that
could he mounted on an existing trailer chassis. If you already own a boat
or bike trailer, you can easily adapt my design to fit it. If you're starting
from scratch, you can buy a bolt-together trailer chassis (I chase one
from Sears' catalog, but many others will do the job) and adapt it to additional
uses.
The camper body detaches from the chassis in half an hour
- the time it takes to jack it up, unplug wiring and remove a handful of
bolts. Since the camper is basically a flat bottom box, you could insulate
the floor and mount it on skis for a wintertime camper. or even put it
aboard a motorized raft and have a waterborne shelter.
How It Works: Erected for use, the foam-plastic
top (reinforced with glass cloth and resin) is supported on four hinged
conduit corner posts. Part of the raising load is counter balanced by a
pair of heavy screen door springs at each hinge joint. Should those springs
weaken in time, they can be replaced for about a half-dollar each.
The tent portion of the camper is permanently fastened
around the inside of the hardtop, and it all tucks under, storing compactly,
when the tamper is folded.
The inner portions of both bed frames are a fixed part
of the body. The outer portions hinge out to make a portable bedroom (for
four) about 12' wide. The tent is stretched over the bed frames, and held
to the body and frames with snaps and elastic shock cord. Center head room
inside is about 6 ft. 2 1/2 in.
Folded, the camper is sealed weathertight for travel or
storage with weatherstripping around the door and under the edge of the
hardtop.
|
|
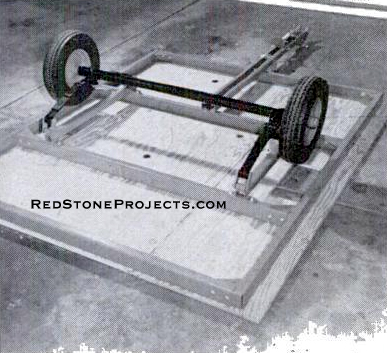
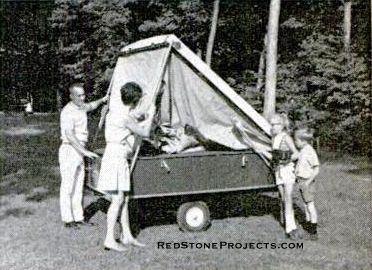
Upside-down, trailer chassis is positioned
on camper floor so you can mark for Tee nut holes. Trailer detaches for
other uses.
|
|
|
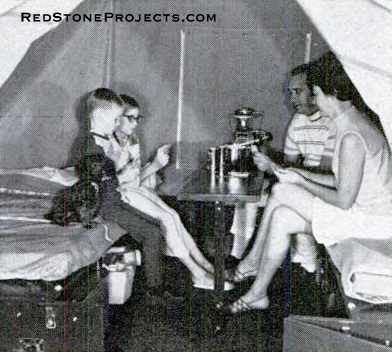
Dual-use table comes inside for shelter
or privacy. When removed, there's standing space for four. Note Storage
under beds.
|
|
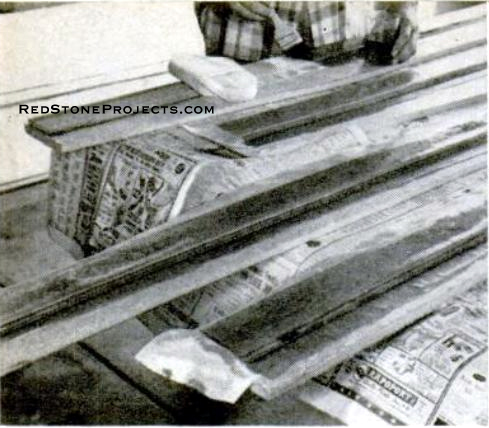
| Materials Are Standard: All the various round
shapes used to build the camper are standard sizes of steel pipe, thin
wall electrical conduit, Reynolds "do-it-yourself" aluminum tubing, and
wood closet pole. Aside from a bit of white pine for stiffeners, all wood
is exterior plywood. Body material is 3/8 in. exterior Masonite X-90 primed
house siding. One 4-by-8 sheet is required.
You may choose - with a sturdy sewing machine and a good
seamstress - to tackle the canvas work yourself, following the assembly
details given in our plans, or you may want to have the tent portion made
up by a local tent and awning or upholstery shop, as we did.
One morning we turned the completed camper over to a small
shop That makes a lot of custom boat covers, pickup covers, tents and the
like. We had it back all completed the same evening. The price was quite
reasonable, considering the 20-plus yards of heavy 12-ounce duck they used
for the job. They were willing to oblige with any degree of fanciness in
the way of zippers, colors, window size, and so on.
The Foam-Plastic Top: The only thing very special
in the way of materials is the urethane foam used for the top. We've made
arrangements with a plastic-foam supplier to offer 1/2"-thick four-pound
(Per cu. ft.) rigid urethane foam plastic in sheets sized for easy handling.
A sturdy glass cloth is already applied to both sides with a temporary
"glue" - just enough to keep the cloth stuck in place while you're working
with it and applying resin. This is a tremendous help in easing assembly.
(For address, see end of article.)
We chose the new Sears No. 6157 trailer because it is
low-priced, readily available by mail (shipped knocked down,
it weighs about 200 pounds), and because it was just about the right length
(82 in.) to support full-length beds, and wide enough (63 1/2 in.) to give
a roomy center aisle (39 in. wide). Catalog price: $140.
The body overhangs the frame 1 in. at both ends and 3
in. on each side; this gives good support to the body and still allows
it to be removed from the frame.
Modified Sears foldaway trailer jacks attach permanently
to the body and temporarily to the frame to support it when jacked up for
leveling and provide 5 in. of adjustment. If you do not intend to remove
the body you may want to buy foot-operated camper jacks from a local camper
dealer and weld or bolt them directly to the frame.
A trailer chassis of the size chosen is ideal for the
alternate installation of a plywood deck with a light steel angle around
the edge for transporting two bikes, a snowmobile, or a garden tractor.
Sideboards added to a plywood deck make a good utility hauling trailer.
One drawback of this Sears trailer is that it does not
have fixed-hub wheels for its 4.80-by-4.00-8 four-ply tires. This means
you have to remove the wheel bearings to change a tire. You may want to
build your own chassis from locally available components, or purchase a
comparable bolt-together chassis with the same dimensions. A good mail-order
source for axles, springs, and wheel assemblies for homebuilt will be found
in the parts-suppliers list (end of article). |
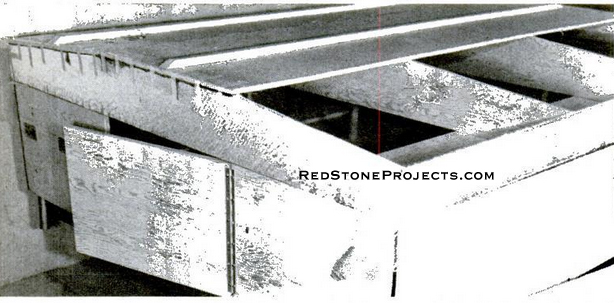
| Built of waterproof, marine plywood, she is as water
tight and sound as a boat. Trailer itself is 12 1/2 feet long (overall),
6 feet 5 inches wide, and six feet in height. The cost of material will
run approximately $300.00, including running gear, and a full-size inner
spring mattress. Trailer wheels and axle purchased at a trailer parts house
are best, but if expense has to be watched, purchase the front end of a
late model car at some wrecking yard.
After checking the wheels for alignment, the spindle bolts
should be welded solid, making wheels and axle one unit. When 2000-pound
springs are U-bolted to the axle, they may have to be underslung - this
you will have to check, as axles differ. Angle iron or old automobile frames
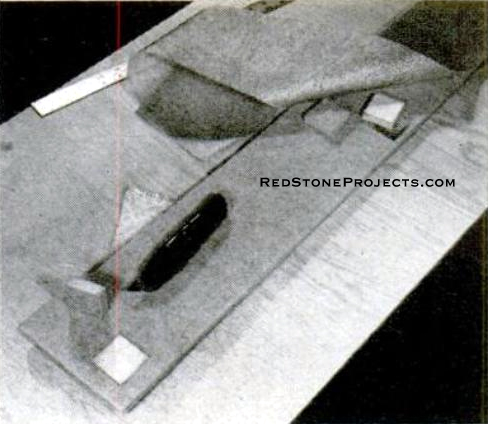
are cut and assembled, Fig. 1. |
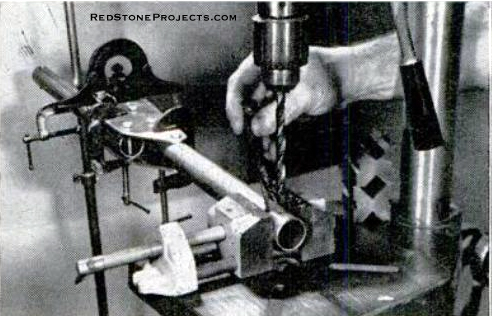
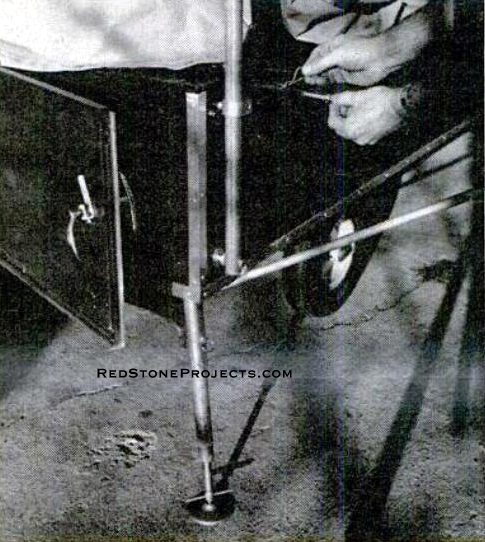
|
|
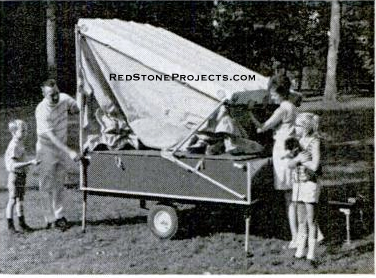
Takes two to raise the roof
|
|
Unfasten latches and lift one end of the
top, pinning hinge joints of support tubes. Jacks are already extended,
pinned and leveled.
|
|
|
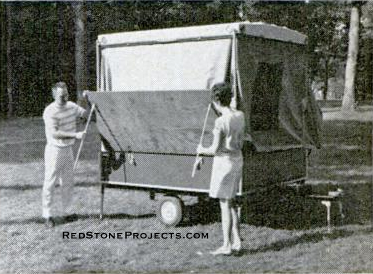
Lift other end until the first end's supports
can be seated and
pinned into body brackets. Then pin hinge brackets
of other end.
|
|
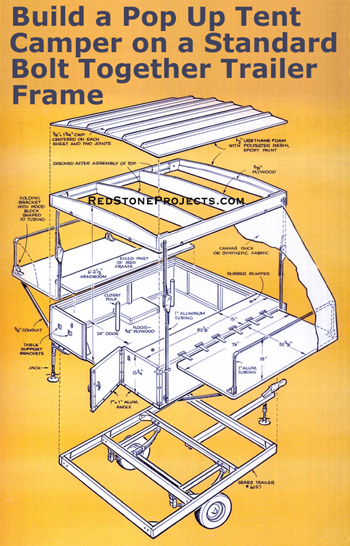
| You can make the camper almost any length (the foam top
sheets are 7 ft. 4 in. long) and any width, but keep these facts in mind:
Body length must be at least 4 1/2 in. longer than the bed frames to allow
for folding, and the bed frames should be at least as long as the mattresses
used. Body width can be a little greater than the 70 in. called for in
the plans (if you want a wider aisle), but if you made the body narrower,
the folded-in bed frames will overlap. This is of no great consequence
except that it will cut down storage space between the frames and the top.
As dimensioned, the folded bed frames just clear each other at the center.
Choose a chassis of at least 1,000-pound rated capacity
(our trailer with Sears chassis, loaded with essential camping gear, weighs
about 750-800 pounds), capable of being safely towed at highway speeds.
To give adequate support to the camper body, a narrow
chassis such as a boat trailer with wheels outboard of the frame could
be modified by adding bolt-on steel-angle outriggers to the frame rails.
For maximum stability, a trailer should have about 10
to 15 percent of its total gross weight in the form of a tongue load. On
a unit of this size, you wouldn't want to exceed 125 pounds. Knowing the
camper body will weigh a pretty evenly distributed 500 - 550 pounds, you
can plan on where to position it on a chassis
How To Go About Building: Recognizing that dimensions
and procedures may change with the size and materials you choose, here
is how to go at the project.
Saw the 3/4" exterior plywood for the floor. Widthwise
it takes a full sheet plus about half another. Ends, and the remainder
of the second sheet are used for raw panels, door, gussets, wheel wells,
etc. Join floor pieces with a spline joint, using 3/8 in. plywood as the
spline.
Cut out openings for wheel wells, allowing an inch clearance
all around for oscillation. Well depth (2 in. in our case) is calculated
on the basis of the height that the tire could come through the floor if
the spring should bottom.
Drill 7/16 in. holes around the top flanges of the frame
for bolting on the body. We used 18 bolts, locating one hole as near each
corner as possible and evenly spacing them around.
Lay the chassis upside down on the floor and mark frame
hole locations. At the same time, drill and cut four pieces 1/8 in. by-1/8
in. by 1 in. steel angle to fit across the floor to add rigidity and support
the floor when the body is undecked. Drill holes for Tee nuts. Counterbore
these holes from the top side so the Tee nut flanges can be driven flush
with the floor. |
| |
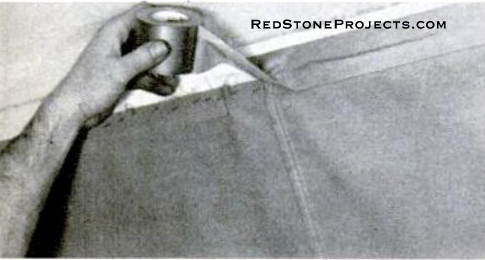
| Swing out bed flaps at each end and attach
the tubes that brace these against the camper body. Shakes folds out of
the tent fabric. |
|
|
Pivot up tent supports at outer edge of
flaps. Then snap tent to flaps and body. To fold the unit for travel, reverse
the procedure.
|
|
| Coat the floor bottom and the inside of the wheel wells
with asphaltic coating, cut for easy brushing with naphtha if you wish.
The 4-by-8 sheets of 3/4 in. exterior plywood make the
bed frames - one bed from each sheet.
Glue and screw the preassembled sides and ends to the
floor. Use waterproof resorcinol glue for all gluing on the camper. Before
adding the inner "benches" that form the fixed part of the bedframes, drill
the floor corners for the telescoping jack housing conduit. Fit the door,
leaving a gap at the piano hinge for the 3/16 in. weather stripping to
be applied later.
Regular boat-glassing polyester resin, mixed with a catalyst
so it will harden, is used to "glass" the top.
Three sheets of urethane make up the top. The fourth
sheet
is cut into strips (using a utility knife) for the side and ends. Make
the top about 1/8 in. larger in each direction than the body. Strip back
the glass cloth and insert l/2 in. plywood plugs where corner-post bolts
and latches will be. Glue (with resin) 3/8 in. plywood strips to inside
surfaces of side and end pieces. When set up, cover with 6 in. cloth tape.
Cut the three top sheets to length and glue a wood rail strip down the
center of each.
Set the sub-assembled side and end pieces right on top
of the body. Apply resin at joints. Nail plywood to plywood at comers with
finishing nails. Use masking tape to hold plastic together while curing.
Cut scrap plywood the same shape as the endpieces to give
temporary support to top sheets, as shown in the photo. Bevel edges of
top sheets to fit well at center joints. Apply resin at all joining surfaces
and tape in place.
When cured, apply resin to the rail strips that hide the
joints in top sheets, tape them in place, and turn the top upside down
on a flat surface. Nail through the foam near the edges and into the rail
strip, using large headed plasterboard nails to pull the fairly limber
foam into full smooth contact with the rail strip.
Bevel all foam edges topside with a knife and round them
smooth with coarse sandpaper. Leave the bottom corners of the top square
about 1 1/2 in. up for application of molding.
Apply resin and glass tape over the rails (6 in. wide),
and all edges and joints inside and out (2 in. wide). Glass in corner-reinforcing
plates. Fill any objectionable voids with epoxy putty.
Give the entire top a full coat of resin to bond the cloth
to the foam. Sand out any rough spots and feather the tape edges. Apply
another complete coat of resin and sand completely smooth. Paint the entire
top with two coats of automotive enamel, sanding between coats. Priming
is not required.
Drill support-rod bolt holes, install molding, latch plates,
lifting handles, and reflectors. Apply pressure-sensitive weatherstrip
around the edge under the molding. |
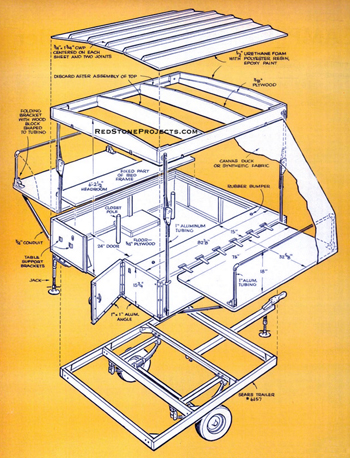
|
Exploded view of tent trailer built on
a bolt together chassis construction with dimensions.
|
|
| Set the Body on the Chassis: Bolt it down. Install
the hinging bed-flaps. Drill the frame for the studs that hold the lower
end of the bed-flap support tubes. Epoxy and screw on the hinges that hold
the top end of the tubes. Trim tubes so flaps are level when folded out.
Make up and install corner jacks.
Paint the body inside and out. Attach aluminum molding
around the body, sealing with caulking.
When installing lights, keep in mind that wiring should
be along the frame, with connectors installed near the rear light locations,
if your trailer is to be undecked. Carpeting or other floor covering may
be installed now.
Set the top on the body. Fasten latches to compress weatherstrip
all around. Make up and fully assemble the four hinging corner-support
tube units, including the bolts that fasten them to the camper. Drill pin
and bolt holes the same size as the fasteners to make the assemblies as
tight as possible.
Using one unit as a fixture, insert bottom bolt in body
hole, position tube exactly vertical, then determine and mark location
of support brackets at all four corners.
Apply clear lacquer or exterior polyurethane to all exposed
metal parts that may corrode or rust.
Fold hinging supports and insert bolts into top and body
holes. Locate and install support brackets under folded tubes. The top
can now be raised, supports pinned, and locknuts installed to bolts inside.
Check out the lights, tire pressures. hitch, and jack.
Be sure all bolts are tight. Once your license plate is attached, take
the trailer for a shakedown spin.
Safety and Law: If you buy a new chassis, it will
be called an "incomplete vehicle." To comply with federal laws, it must
have two red tail lights, two red reflectors, two brake lights, two turn
signals, and a clear license plate lamp. A trailer should also have Class-A
amber reflectors at all four front corners and red reflectors at rear corners.
If your trailer is over 80 in. wide, the law calls for clearance lights.
A good trailer hitch - with at least a 1-inch ball - is
needed on the car. Be sure to install safety chains as well.
Check your state laws regarding trailer licensing. You
may have to reach an understanding on dual us of the chassis where laws
require special licensing of a camping trailer. Your project may well be
called either "home-built" or "reconstructed." |
|
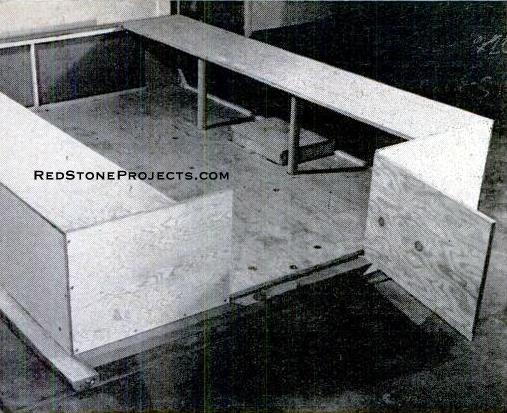
The camper body is a plywood box with hinged flaps
on each side.
|
|
Assemble the body on blocks, using simple
butt joints secured with waterproof glue and screws. Screwheads are covered
with caulked aluminum molding after unit is painted. Note wheel box between
two support posts.
|
|
| Un-deck the Body: Procedure may vary with your
particular construction, but basically you unpin and lower the corner jacks.
Remove all the bolts that attach the body to the frame. It may be necessary
to remove two of the frame jack brackets, as well. Jack the body evenly
about 1 in. off the frame - to clear the angles under the floor, and simply
pull the chassis out from under. Reverse the procedure to remount the body.
If wheels are much higher than the frame top, some provision
must be made to jack the body higher to clear. We suggest you remove the
wheels.
The body must be securely blocked for support if stored.
The jack and floor construction are not suited for extended support without
the frame. Don't, under any circumstances. get under the body while it
is supported only on jacks. |

|
Bed-flap support tubes are flattened at
one end to slip over heavy T-hinge (narrow the hinge tongue if necessary).
Screw and epoxy hinge to wood.
|
|
|
Flaps are hinged to body with 7/8-inch
gap along the side to let top clear when camper is folded. Notch to left
of hinge is for clearance of side latch.
|
|
|
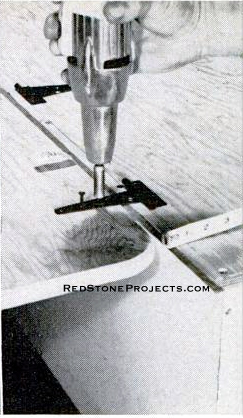
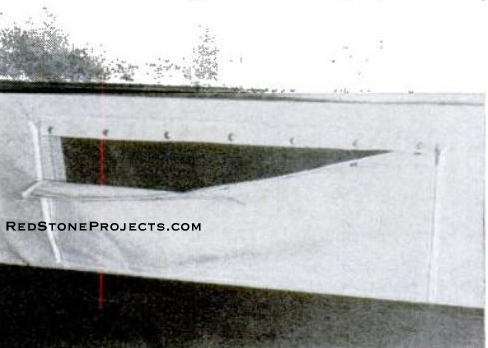
Accurate drilling of tent assemblies (shortened
mockup show here) is essential for folding. Level hinge plate in both directions
and drill holes on centerline.
|
|
|
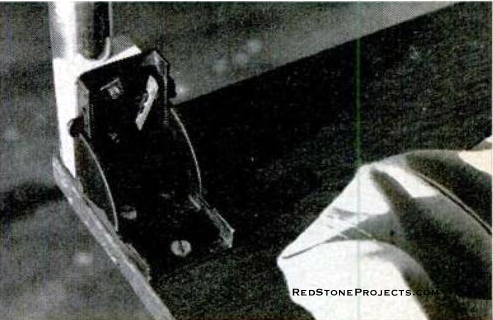
Pin support tubes into braces as you lift
the top. Brackets are formed on homemade jig. Note also how jack is pinned
to frame bracket when extended for stabilizing.
|
|
|
Folding leg brackets are adapted to hold
aluminum tubing by bolting through hardwood cradles. Tubing support tent
at outer edges of bed flap as shown in sketch.
|
|
|
Retracted jack is locked for travel by
means of a slot that prevents unscrewing and by off-center pin hole. Support
tube is shown in folded position, with top down for travel.
|
|
|
Putting the Top on the Tent Camper
|
|
Plywood strips reinforce side and end panels.
Fasten 3/8-inch thick strips to inside faces of foam (flush with base edge)
using resin; cover with 6-inch cloth tape, more resin.
|
|
|
Reinforce foam where support-tube bearings
and latches attach. Cut away 2-inch squares, glue in 1/2-inch plywood inserts
to keep foam compressing under force.
|
|
|
Glue up foam top by setting it on body
assembly; keep resin drops off body with waxed paper. Partially-driven
finishing nails and masking tape hold parts together while curing.
|
|
|
Shaped blocks of 3/4-inch plywood are glassed
inside four corners to add bearing for top support tubes. Note that the
plywood center struts in previous photo are now discarded.
|
|

|
Apply top edge molding over a bead of caulk.
Plastic insert hides sheet metal screws that fasten molding through foam
and into the plywood reinforcement strips inside.
|
|
|
Self-stick fabric tape can hide raw edge
of tent where it's stapled to the plywood strips inside the bottom edge
of the fiberglass top. It helps interior appearance.
|
|
|
Combination screen-flap windows made be
made any desired size. Inside view shows how flaps can be zippered at sides
to allow partial opening without losing privacy.
|
|
|
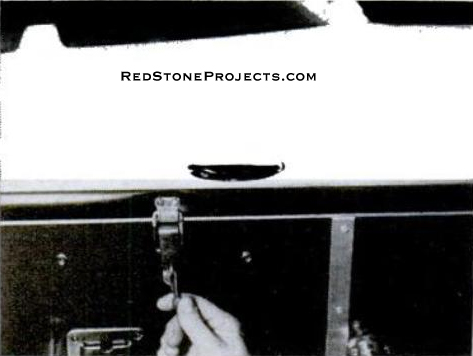
Latches are snapped for travel - two to
a side - to prevent top from coming loose. They can be locked with cotter
pins. Note plated window lift to aid in raising top.
|
|
| Where to Buy the Materials:
Urethane foam comes 1/2 in. thick, four-pound density
with unsaturated cloth laminated to both sides. W. H. Porter, Inc., 4240
No. 136th Ave., Holland. Mich. 49421, offers four 24 in by 76 in. sheets
packed in a protective carton for shipping via freight. The price to is
$45 f.o.b. Holland (freight charges collect).
For "T" handle, extruded aluminum molding, trim molding
with insert strip, wheel assemblies, springs, and axles: Viking Camper
Supply, 99 Glenwood Ave., Minneapolis 55403.
For the No. 149 folding leg brackets: Minnesota Woodworkers
Supply, 925 Winnetka Ave., Minneapolis 55427.
For "epoxy-bond" adhesive putty, shock cord, stainless
table brackets, "Dot" snap fasteners, polyester resin, glass-cloth tape:
Defender Industries, 384 Broadway, New York City 10013.
For nylon rod, polyester resin: Cope Plastics, 111 W.
Delmar Ave., Godfrey, Ill, 62035.
Sears items: your nearest Sears Roebuck retail or catalog
store. The camp stove shown in the photos is Sears No. 72301. The sink
is a Porta-Sink brand. Camper mattresses are Sears No. 79012. |
Any 2 Vintage Trailer Plans
$19.95 FREE Shipping |
|
Select 2 Vintage Travel Trailer Plans
|
|
|
