Free Shipping
Build a Budget Houseboat
Vintage 20 Foot Trailerable Houseboat Plans
|
Budget Houseboat Plans
Build a Vintage 20 Foot Self-Contained Houseboat
 |
PDF Format |
|
|
All Orders Processed
On a Secure Server
|
Price $12.95
|
|
Get a restored copy of these vintage Budget Houseboat
Plans with 11 Pages of Enhanced and Enlarged Figures and
Illustrations and Searchable Text.
|
We will email these plans, to the address provided
with your payment, within 48 hours following receipt of your order.
|
|
| More Vintage
Boat Plans |
|
|

|
|
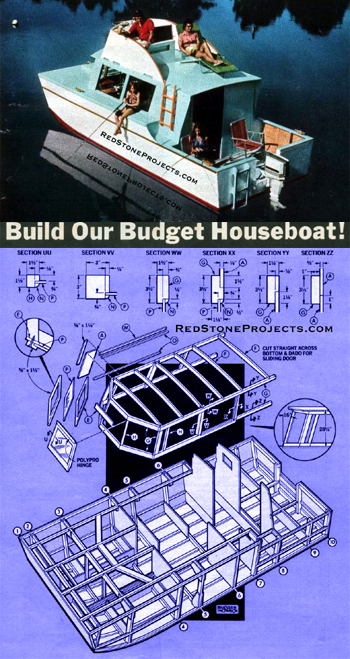
Build Our Budget Houseboat!
By Hal Kelly
|
| WHEN we first thought of doing a story on a little trailerable
houseboat we you could build yourself we thought it a pretty good idea.
Little did we know then that it wouldn't be until we'd finished, looked
at what we had, then totaled up the cost of building that we'd realize
just how good an idea it really was. Honestly, if we weren't so modest,
we could claim our Budget Houseboat to be the best thing in boats since
girls. It has so many good features it's difficult to decide where to begin.
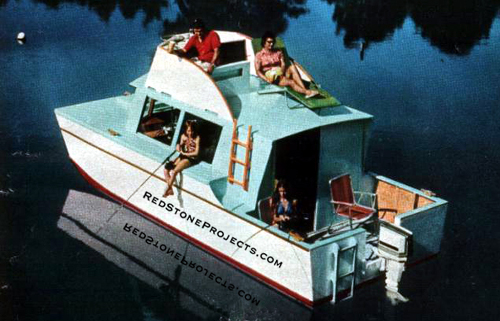
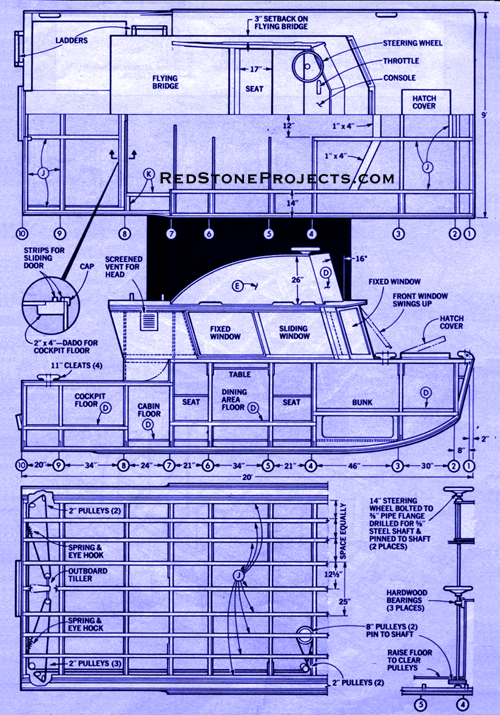
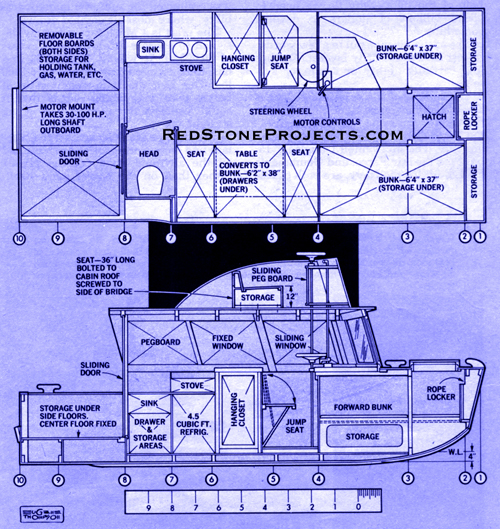
In the first place, Budget Houseboat is like a camper
that goes on water. She's 20 ft. long with a 9-ft. beam, containing 300
sq. ft. of usable floor area. This means that while she can accommodate
two in outrageous comfort, she can easily take a family of four on an extended
vacation and be entirely self-contained. There are two full-size permanent
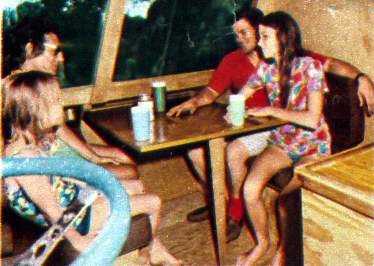
bunks in the forward section of the cabin. The dining table, in the rear
section of the cabin, seats four and then drops down to convert into an
extra bunk 6 ft. 4 in. long and 38 in. wide. Cabin headroom is 6 ft. 2
in., and two cots can be stationed to the rear of the cabin area. |
|
DINING table seats four, then drops flush with
seats to form an extra bunk inside.
|
|
|
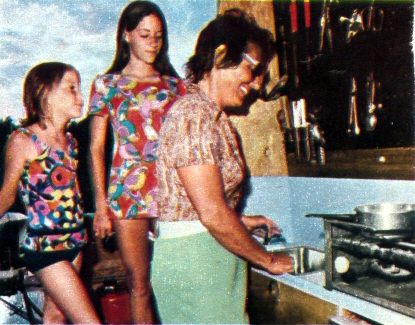
GALLEY area, next to table and rear of cockpit.
Fridge is installed under the stove.
|
|
| In the second place, Budget Houseboat's storage and work
areas are just as much a marvel. She features a large size enclosed head
up front, room for a 4 1/2-cu.ft. fridge, sink and two-burner stove in
the galley, storage and drawer under the sink, and storage under the bunks,
dining table, rear cockpit, and in other scattered areas. Part of the storage
in the cabin is a 2-ft-wide hanging closet.
And in the third place, deck area doesn't end on the cabin
level, as you can see. Budget Houseboat sports a full flying bridge more
than 6x9 ft. in size, with more storage area in it. The bridge has an alternate
steering console, two seats and deck area for a couple of lounge chairs,
plus the capability of taking a convertible Bimini top. |
|
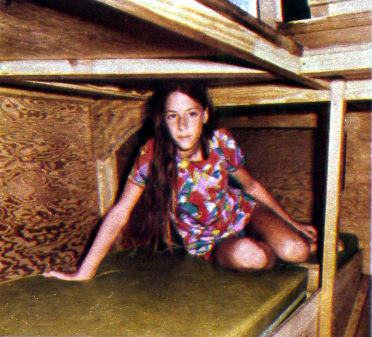
VIEW of one of the two forward permanent bunks.
Thereâ€â„¢s full standing room between.
|
|
| But that's not all. Budget Houseboat may sound like a
barge from the foregoing, but she handles like a dream. The little home-on-the-water-away-from-home
is designed to hang a 30-hp outboard, and with this kind of power she can
do 15 mph with four people aboard! Her draft is only 4 in.
Piloting from the bridge is the way to go. Back her off
to a cruising speed of 8 mph and the motor is just a whisper with gas consumption
minimal. It's quiet enough so you can listen to a radio under way. Two
side windows slide open sideways, the front window in the cabin swings
up, and there's a good size hatch cover up front that can be opened to
let the breeze drift through the boat.
And there's more. Since Budget Houseboat is trailerable,
you never have to worry about the campgrounds being full, on the water
or on the road. When you're ready to camp just throw out the anchor and
settle down for the night.
But the best thing about Budget Houseboat may be the thing
we've left to the last. Cost for building the hull and superstructure of
the craft came to just under $800 for us, and if that isn't thrift, a Scotsman
doesn't wear kilts. Of course, that doesn't include hardware, appointments
and motor, the cost of which will depend on how fancy and powerful you
want to get. And this is no weekend project. We spent about 500 man-hours
of spare time work on her. But to buy a commercially built houseboat of
this size you'd spend at least $5,000 and it wouldn't have the built-in
extras this one has. In short, Budget Houseboat is a vessel with the livability
of a camper, the feel of a cabin cruiser and the thrift of a Scotsman.
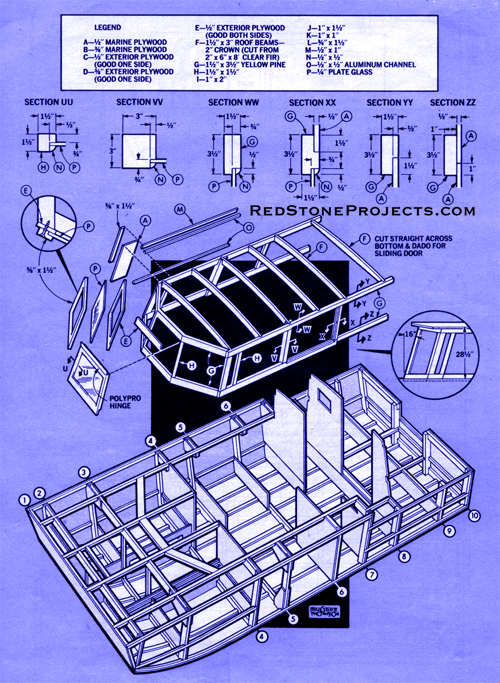
We used 3/8-in. marine plywood as hull planking, with
1/2-in. marine plywood on the roof, bow and transom. Then, to keep costs
down, we used 3/8-in. exterior plywood (good one side) on partitions, bunks
and floorings, etc. But we fiberglassed well above the waterline and used
fiberglassing and 3-in. tape on every seam, corner and joint.
Framing is standardized by using 1 1/2x3 1/2-in. (true
size) long leaf yellow pine cut down for battens, etc. This lumber is tough
to work with but almost rot proof. Easier working and maybe just as good
would be white or red cedar, but it may cost more. |
| Before beginning construction study the plans and text.
Then order your materials. Note that all sections in the boat are divided
by gussets on the ribs. This simplifies construction and adds strength.
All the ribs except the front three are of the same outside dimension.
It's best to make up a jig to hold the sides and bottom
at the proper angle while the dividers are being nailed and glued in place.
The motor mount is bolted and glued in place on the transom before the
ribs are jigged. You can make the sides 5 ft. long for ease in assembling,
then simply cut them off flush with the deck when you turn the boat right-side-up. |
|
|
In making the jigs for setting up the ribs, use two outside
beams about 21 ft. long (made up of smaller pieces if you want) and set
9 ft. apart. At each rib station nail a 10-ft 2x4. The ribs are nailed
temporarily to these 2x4s, so be sure to get the spacing exact.
Starting with the center bottom batten, glue and screw
the battens in place on the ribs with one 2-in. No. 10 flathead screw into
each rib. You can save considerably by using zinc chromate screws in this
area since the water will never get to them. Elsewhere use bronze. If you
use cedar, the battens should take the bend up front pretty nicely. If
you use harder wood, such as the yellow pine, you'll have to slit them
across (like a split clothes pin) to a point about 5 ft. back to get them
to bend. Apply glue, bend, then clamp them together until dry. |
Get a restored copy of these vintage Budget Houseboat
Plans with 11 Pages of Enhanced and Enlarged Figures and
Illustrations and Searchable Text.
All Orders Processed
On a Secure Server
|
|
|
| Notch the ribs to take the side battens after the boat
is jigged. Cut the bottom battens off flush with Rib 2 and assemble Rib
1 with the boat on the jig. Set up the storage section and rope locker
dividers, then plank the front rib with 1/2-in. plywood. On the transom
and bow, use 4x8 marine plywood pieced on one side to make up the 9-ft.
width. Use 1/2-in. plywood 2 in. wide to back up this joint. Later you'll
fiberglass it (and all other joints) with 3-in. tape.
Then glue and nail the sides of the front bunks to the
bottom battens. They make the front section stronger since they're structurally
part of the boat, and this operation is much easier to do now before the
bottom is put in place.
Next come the sides, which are temporarily screwed in
place. From the inside, mark where all the battens, ribs, etc., come into
contact with the side planking. Also mark off the bottom curve up front
and at the back where the cockpit drops down. Then trim the excess planking
along these curves. Drill pilot holes, about every 3 in., in the planking
where it contacts the frame, transom, bow. sheer and chine. Drill pilot
holes also on battens and frames, but here every 4 in. |
| Coat the framing and marked areas with glue, and using
the temporary screws as guides for position, nail the planking in place.
Have a helper hold a weight on the inside of the battens as you nail so
it will pull the planking snugly to the frame. Use the same procedure on
the bottom, which goes on next.
With the bottom in place, apply its fiberglass. Glass
up the side about 10 in. Mix color with the resin (we used red) and you'll
paint and glass at the same time. Fasten a 1-in. rubstrake around the sides
about 8 in. up from the transom. This is nailed from the inside and goes
over the fiberglass. Paint the keels and the bottom is finished.
Now is the time to pull her loose from the jig and turn
her over. If you do it by hand it'll take 10 or 12 men. Set her on a few
2x4s on the floor and begin gluing and nailing the deck framing in place
and finishing off the dining area, sink, closet, etc. The deck planking
goes from the front back over the bunk area that runs into the cabin. There'll
be less waste if you turn the panels from front to back and sides to center.
Fill in the middle area with smaller pieces.
Then begin cabin framing. It's best to start with the
sides of the cabin and bottom of the front windows. Then put on the roof
beams, which are cut from 2x6 clear fir and assembled to give the roof
a 2-in. crown. Cut dadoes into the outside beams for the cross beams to
fit into. Glue and screw the outside frame to the cross beam using 2-in.
No.10 flat-heads, two to each cross-beam end.
Now for the cabin roof. Use 2 1/2-in. thick 4x12-ft. panels
of marine plywood and glue and nail them in place. Use a 3/4 in. x 1 1/2-in.
block under the seam where they butt together. Don't notch the roof beams
for the block though, since that would weaken the roof. Apply blocks between
beams. Later glass the seam with 3-in. tape on the roof.
With the roof in place, frame the windows. Cut a piece
of 1/2-in. plywood, with the window area cut out to fit over the frame
of the front windows. The two outside front windows will be fixed in place,
so caulk the 1/4-in. plate glass and fasten it with L-shape window trim
screwed in place. The center front window swings out and is made to fit
the space. You can use a Polypro continuous hinge, which can be bought
by the foot. The side rear windows also are fixed and are caulked and held
in place by a small strip of wood. The windows at the front of the side
are fitted to slide in a U-shape aluminum track. Drill a few 3/16-in. holes
into the track from the outside so water won't collect in it.
With the inside finished, coat it with a clear wood preservative
such as Woodlife. You can use paint, but a natural finish is easier to
keep clean and lets the wood breathe to prevent rot.
Before painting the outside, cover all seams, corners
and joints with fiberglass and 3-in. tape. When it's hard, sand in the
edges and do the painting. We used Glaze White, to which you can add your
own coloring. It'll take about 6 qts. for the deck and cabin and about
6 for the sides and flying bridge. It'll cover both wood and fiberglass
and can be brushed or rolled on. Where you want a good footing mix white
beach sand with the paint and roll it on as a last coat.
The flying bridge is the last item of actual construction.
Build the console and sides as a unit, with the seat as another unit, and
both fitted to the shape of the roof. Be sure to check its positioning
so the controls run up nicely to the console. Bolt the console unit to
the cabin roof with 6 carriage bolts, with the head end of the bolts in
the cabin. Then screw the seat into position against the side of the console.
On the opposite side put one carriage bolt through roof.
In hooking up the steering, run both cables down the left
side of the boat, with one running to the left side of the motor and the
other branching out to run under the cockpit floor to the right side of
the motor. It'll take seven 2-in. pulleys and about 45 ft. of cable. Use
springs to keep the cable taut.
For alternate steering from the bridge, use a simple 5/8-in.
thick metal rod running from the bottom of the boat to the bridge. We used
three simple wooden bearings to hold the rod. Fasten a steering wheel to
this shaft in the cockpit and another to the top of the shaft on the bridge.
Use PVC pipe to go over the outboard controls, and thus control speed,
backward and forward from either the cockpit or bridge. This steering system
is a bit of off-hand engineering, but it's simple and works nicely.*** |
|
|