Free Shipping on All U.S. Orders
All Orders Processed on a Secure Server
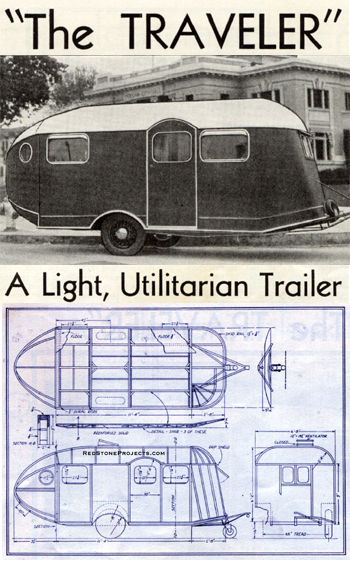
Vintage Traveler 17 Foot Trailer Plans
Build It Yourself Wood Framed Travel Trailer
|
Vintage "The Traveler" 17 Foot Trailer Plans
Build It Yourself Wood Framed Travel Trailer
 |
PDF Format |
|
|
All Orders Processed
On a Secure Server
|
Price $12.95
|
|
Get a restored copy of these vintage Traveler 17
Foot, Wood Framed Travel Trailer Plans with 17 Pages of Enhanced and
Enlarged Figures and Illustrations and Searchable Text.
|
We will email these plans, to the address provided
with your payment, within 48 hours following receipt of your order.
|
|
|More
Vintage Trailer Plans|
|
|

|
|
 |
| ONE WHO TRAVELS the highways and byways cannot but be
impressed by the fact that the trailer method of getting places and living
is firmly established. As a result of our nomadic tendencies, we have created
trailers which are really inhabitable, easy in locomotion, comfortable
for riding, rigidly constructed and well designed. Experimentation has
removed many of the unwieldy and uncomfortable aspects of the old, swaying
trailer. Today, in the main, they conform to all practical requirements,
and designers are constantly attempting improvements in line effects, lightness
and rigidity. And essentially paramount is the question of lightness. The
reason is obvious.
Rigid in Construction
Strength, of course, cannot be sacrificed, but modern
airplane construction gives an object lesson on building structures of
great strength and rigidity and yet they are light and portable. So the
same principles are being applied to trailer construction.
Rather than construct a trailer of larger pieces of stock
and nail assembly, one may use the lighter, strong woods, build strong
joints and assemble parts with glue and screws. This trailer conforms to
all good practices in construction; and the worker must exercise care in
workmanship, for the structure is subject to much stress and strain. Build
honestly and it will stand up well for years.
This trailer complete with built-in features, exclusive
of couch, should not weigh over 1200 pounds. Considering its generous proportions,
this weight is nominal. And its cost is also nominal. Materials should
cost in the neighborhood of $400.00. One, of course, may have the desire
to utilize fine cabinet woods on the interior which will increase the cost.
But, with excellent materials, the ultimate expenditure is nominal for
so satisfactory a trailer, and one so generous in proportion.
Frame of Spruce
The frame of this light trailer is constructed entirely
of spruce. This wood possesses considerable strength in proportion to its
weight and is an ideal wood for this purpose. Duralumin has not been used
because it is fairly prohibitive in cost, and considerable difficulty would
be encountered in welding the pieces together. Tubing presents its own
problems and is less satisfactory as to cost and time.
The drawings are essentially complete. There are interval
dimensions which have not been recorded, because the workman proficient
enough to construct a trailer, also wishes to follow his own ideas on modification
in design. All necessary dimensions are given, and explanations are adequate.
Information which may not appear in this article will appear in the next,
and final, installment.
The first step in construction is laying out the frame.
The outline is made from 1 1/4" x 2 1/2" straight grained spruce, accurately
machined.
Cut the pieces to measure as shown by the sketches. Make
tongued joints wherever possible and reinforce them with glue and wood
screws. A good grade of glue is necessary. In some instances, we will suggest
water-proof glue.
After all pieces have been cut to size, they are set up
on a level floor on which a chalk outline has been accurately laid out.
This is the start of the frame, so the dimensions and outline must be double-checked.
The finished job depends much upon accuracy here. Use knife lines in scoring
for the joints. The front curved pieces are joined to the side as illustrated
in the sketches. This is merely a reinforced butt joint cut at about 45-degree
angle. The two members join at the point where the curve of the one member
ends. These are securely held with glue, screws and block. The piece which
is cut from the straight member is used as a filler, as indicated in a
second sketch. |
 |
|
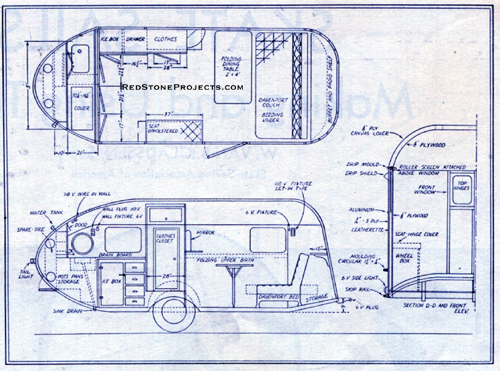
Blueprint plan and elevation views of the trailer
spruce frame with dimensions
|
Get a restored copy of these vintage Traveler 17
Foot, Wood Framed Travel Trailer Plans with 17 Pages of Enhanced and
Enlarged Figures and Illustrations and Searchable Text.
All Orders Processed On a Secure Server
|
| The pieces for the wheel housing run clear across the
frame. They are half checked over the spars, and all but 1/2" of stock
is cut away. The back cross piece is not put on until the floor is laid.
It is then placed over the floor across the back and held with 5/16" bolts
through to the spars. |
 |
|
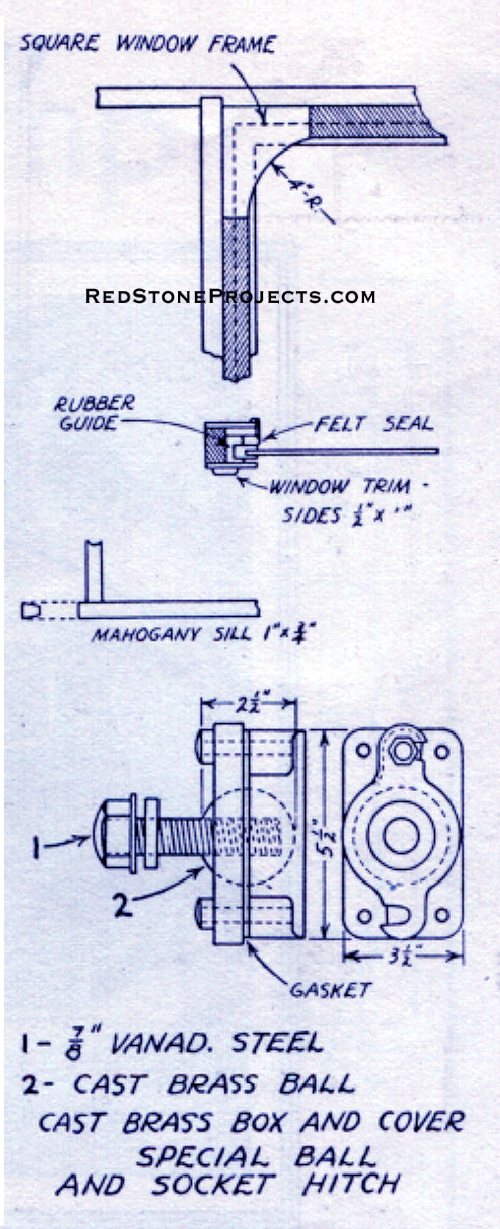
Trailer window frame and hitch construction details.
|
| Before assembling the framework, the spars and channels
may be made. The spars are three pieces made as shown. One side is left
off until reinforcing and trussing is put in. The center spar needs no
reinforcement, for the springs are attached to the outside spars only.
Laying Out the Spars
The three spars are laid out on the chalked floor line.
The outside pieces are then assembled and blocked to line up with the spars.
Square up all pieces and then assemble them. First, however, prepare the
front cross pieces where the angle starts upward. This piece is made in
an identical manner to those at the wheel housing.
Holes may now be bored for the 5/16" Dural rods. The rods
are threaded at each end and are placed close to the cross pieces at the
bottom. The front cross pieces, connecting the two curved pieces, may now
be joined in a bevel joint to the curved pieces.
The spars may be cut off to suit the curve at the sides.
The curved side pieces at the front may either be sawed out of a segment
of two thicknesses of 1 1/4" stock glued and nailed together. Or it may
he made of thin laminations glued in a form to the proper curve. The worker
may choose either plan.
Careful joint making is essential in constructing the
frame. It must be straight except for a crown of about 1/4" across the
floor and lengthwise, a 1/2" convex. The width crown may be taken care
of by the rods; the length by blocking. This may now be done by raising
the frame to a convenient height, and accurately leveling it in preparation
for laying the floor.
Laying the Floor
Plywood, 3/8" thick, of Oregon Pine, makes an excellent
floor. The laminations, of course, should have been put together with waterproof
glue. Fitting the panels crosswise will be found to be the most convenient.
Glue and screw a batten at the joints, but better still, allow the joints
to hit on a cross piece. The panels are glued with a water-proof glue and
nailed with cement coated nails, and held with screws placed about 8" apart.
The underside of the floor must be water-proofed. But
first set in the corner braces with glue and screws. Turn the frame on
edge and apply a coat of asphalt paint.
The springs might be secured at this point in construction,
also a short length of 2" angle Duralium about 5' long to take the spring
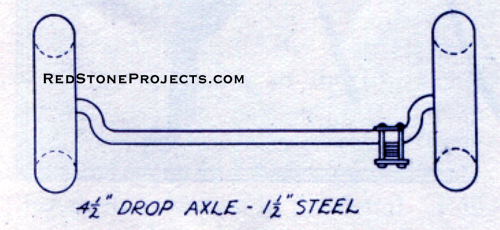
shackles. This may be bolted onto the reinforced spar. The drop axle of
chrome vanadium steel may now be set up, and if the right tread is used
the wheel clearance will be found to be correct.
The spring and axle assembly may he set on now if desired.
The spring must be of proper curve to allow about 6" of axle play. A 2"
spring about 40" long is about right. Springs which are longer may cause
side sway. Install rubber bumpers. Use tires 6:00 or larger. |
|
|
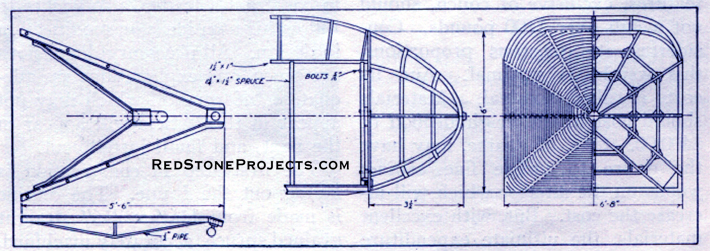
Trailer tongue and rear fairing framing elevation
view with dimensions.
|
| |
| Location of each upright may now he found from the drawings.
These must be accurately marked. Each upright should be cut as shown to
extend in about 3/8” into the header. The uprights are screwed to the floor
with a brace cut from 1 1/4" x 1 1/4" angle Dural about 1/8” thick. The
upper piece of frame, 1" x 1 1/2", is now marked and cut to receive the
uprights, then coated with glue and screwed from the top downward. The
framework is now complete except for the front and rear.
Now cut the front curve from two segments of 3/4" stock.
Being thicker than the sill, allow the excess to extend below. Fit the
front cross piece as shown in the sketches, allowing this curve to match
the lower one. Set up this front part for testing before final assembly.
If everything checks, finally assemble with glue and screws. Use no nails.
Pilot holes for the screws may be advisable, as spruce splits rather easily.
Screws about No. 6 or No. 7 are satisfactory for the floor; on other places
about No. 10 are long enough to hold well.
The framework is now complete except for the top bows.
It must be braced well. The bows are sawed from five-ply stock, 3/4" thick.
First make a templet to ensure accuracy. The bows are 1 1/2" wide on the
circle and joined to cross pieces at the top. The cross piece should be
about 1 3/4" wide and the same thickness as the bows. Thus 1/4" will need
to be planed off from the center to match the bows making a slight crown
to the roof. One complete bow for the top should be made; others are made
to match this to assure uniformity. The top braces are set lengthwise,
one in the center and one on either side.
Longitudinal braces are of 3/4" x 1 1/2" spruce. The last
two bows are made shorter, as the drawing shows, and the longitudinal ones
dipped down to suit. After the bows are set to the located points, they
are secured with Dural braces, as for the uprights. The front corner bows
may be set, glued and screwed at top and braced below. This completes the
main framework except for the curved piece for the door. For this, glue
up tapered pieces and plane them to the correct curve. Then saw to shape
and set firmly in place.
The next installment is the final. one. In this we will
explain how to cut and fit the streamline end piece, how to cover the framework,
and discuss the interior cabinet work. Actual photographs of the interior
will show how convenient and compact a trailer may be made. |
|
|
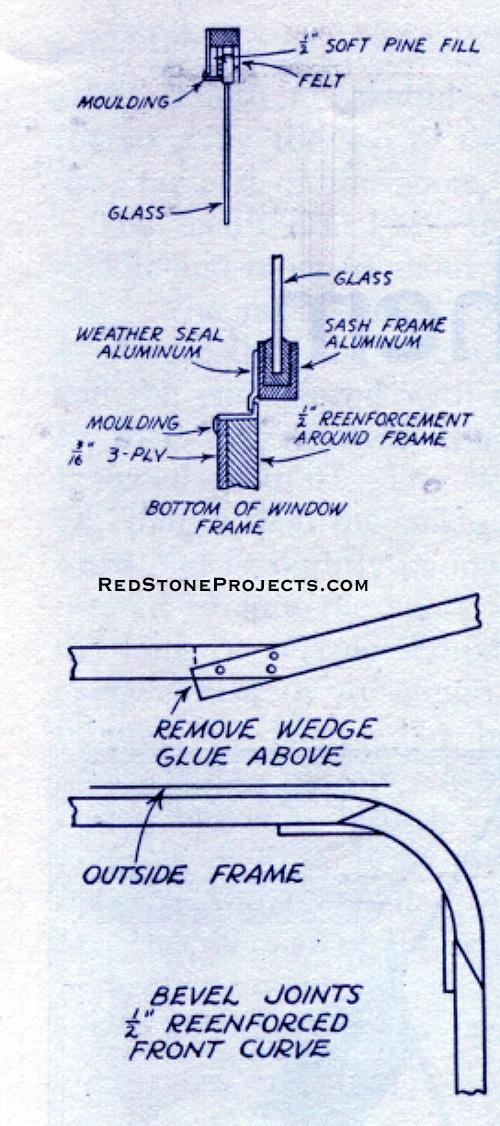
Trailer window sash and curved framing
member construction details.
|
 |
|
Trailer plan and elevation view of interior appointments
and exterior finish details with dimensions.
|
Get a restored copy of these vintage Traveler 17
Foot, Wood Framed Travel Trailer Plans with 17 Pages of Enhanced and
Enlarged Figures and Illustrations and Searchable Text.
All Orders Processed On a Secure Server
|
 |
|
Travel trailer drop axle.
|
|
|
|
Travel trailer hitch tongue dolly.
|
 |
 |
|
| In the last issue we carried the workman thru to the
completion of the framework of the Traveler, except for the construction
of the streamline end piece: This piece, which measures 3 1/2', is made
separately on the floor, with the fiat side down. It may be finished independently
except for those points where it fits onto the trailer proper.
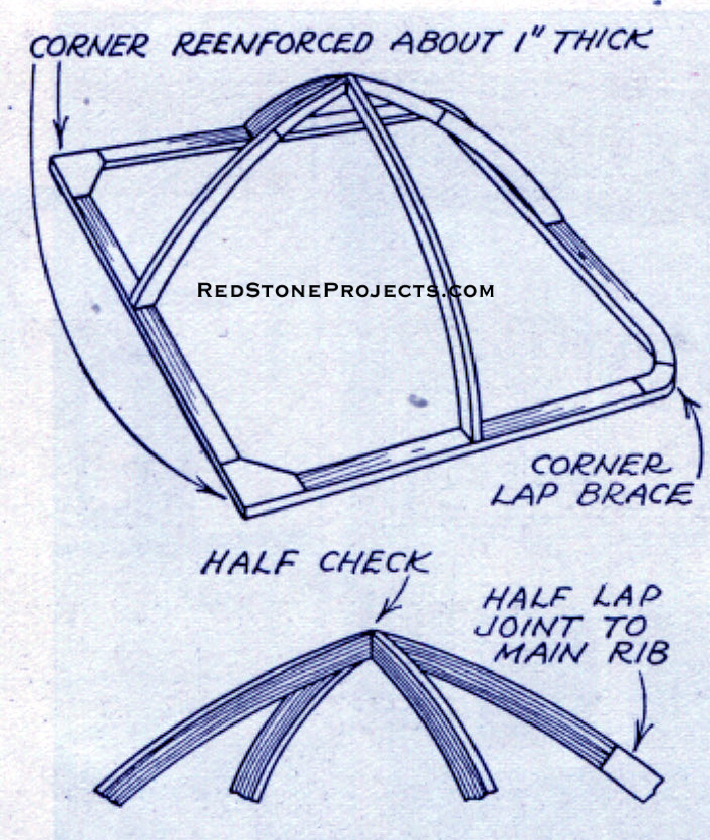
The main frame, matching the end of the trailer, is laid
out and half checked together and assembled with glue and screws. From
this are set the curved bows, which are best determined in curve by using
spruce strips soaked in water and fastened at each end to a fiat strip
to hold the curve. The curve is marked with a pencil onto 3/4" spruce,
making the two side ribs and the top and bottom ribs. These may be sawed
out. The center piece, or top of the streamline end will need to be made
separately. It is about 14" long, sawed to the right curve, and 1 1/2"
wide, half checked together like a cross. These are half-lapped to the
long ribs, the ribs fastened with braces to the flat floor frame. This
is the skeleton, with four side ribs, on which to complete the end. Eight
additional ribs are cut from laminated stock. The curves of these may closely
approximate those shown on the plans (previous article) for the eight corner
pieces, two each for the bottom corners, and two each for the top corners.
These must be worked out with a piece of wet spruce, as mentioned before,
laying it on the corner and lining across with a straight edge. Brace the
curved strip securely. |
 |
|
How to laminate the curved ribs of a vintage travel
trailer.
|
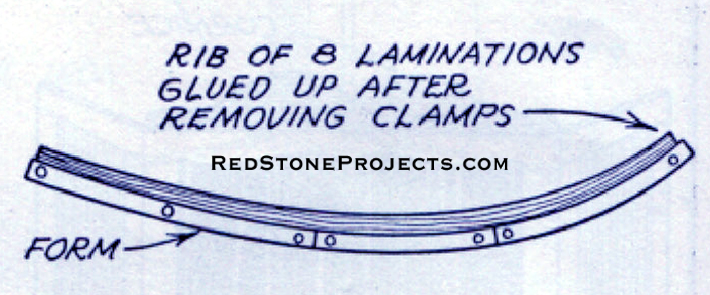
| After the curve has been determined, a form made from
11/2" stock is sawed out of the outside curve, then sawed out about 3"
from the line. This form may be fastened to any heavy stock. Pieces of
spruce 3/16" thick and 3/4" wide are then ripped to a length a little longer
than required. Eight of these are bent dry. Lay all pieces together and
bend in the form, holding them in place with clamps. A block of the reverse
curve of the form will ensure better gluing. Eight bows are made in this
manner.
Covering with Plywood
When the bows have been completed and set in place, the
corner braces may be set. The door frames for the spare tire may be set
in and reinforced. The end then may be covered with 1/8" plywood, except
where it may interfere with assembly. Now the framework of the structure
may be covered with 3/16" plywood. Do not cover the window openings. This
will utilize 4' x 6' plywood running lengthwise and with battens glued
and screwed inside over the joint.
Lower the trailer bed before starting work and see that
the frame is square and true. After the side covering is put on the streamline
end, it may be set on and batted. If all measurements have been accurately
made, this will fit perfectly, and when batted to the main frame it becomes
an integral part of the trailer.
After the panels have been set on the sides, the top may
then be covered to the side line with 1/8" plywood, down over the back,
and extend over the joint where the end is fastened to the top bow. It
is glued and nailed to the curve of the end piece, as well as to the last
bow. While plywood has been mentioned for covering the framework, there
are also fine composition materials on the market which are not expensive,
are durable, light and serviceable. The worker may select his own medium. |
 |
| |
Assembling the laminated ribs of the streamlined
travel trailer end cap.
| The window openings are reinforced, as shown in the drawings
of the previous article. The leatherette covering may be applied with shellac,
after priming the surface first with rather heavy shellac. |
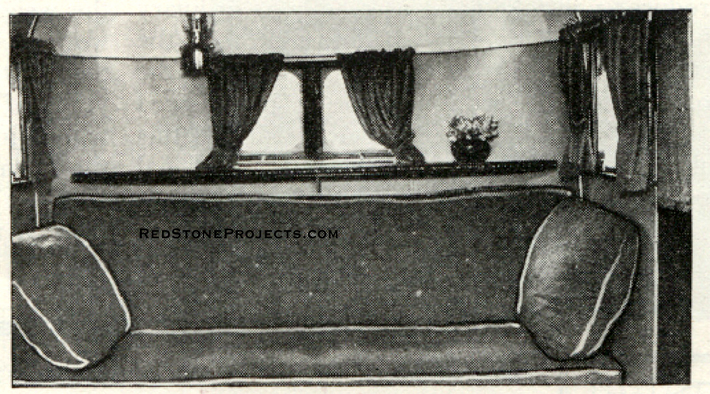 |
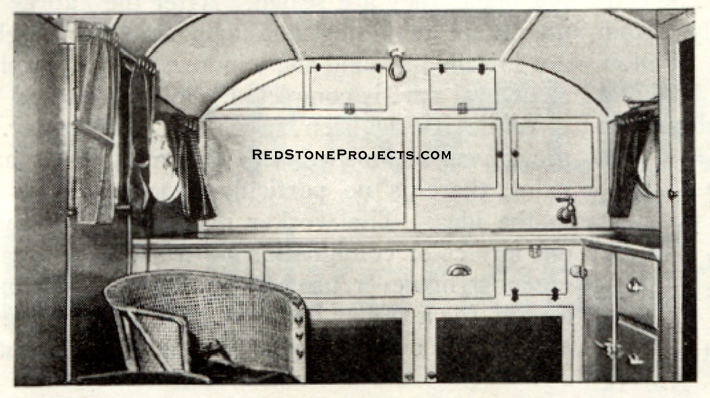
Above is shown a closeup of the comfortable convertible
bed.
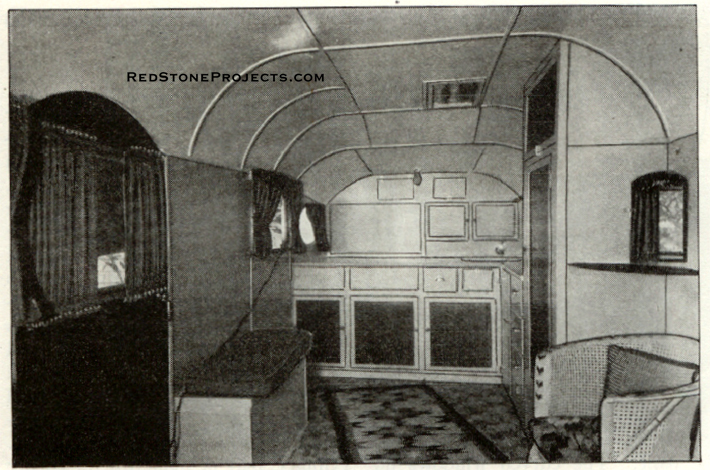
Below is shown a larger view of the interior with
couch
showing at the right.
|
 |
| Covering the Top
Canvas is used to cover the top. The panels are first
padded evenly, and special attention paid to the low places at the front
curves. The canvas is then stretched carefully. Avoid all wrinkles and
gatherings. Follow with a priming coat of white lead and oil. Finish with
a coat of aluminum paint.
Now screw the drip mould in place. The skid rail is beveled
and fastened at the place designated below the plywood and directly onto
the 1 1/4" x 2 1/2" frame. Counter bore the rail at reasonable distances
apart to take the head of the screw. A No. 12 screw of adequate length
is sufficiently large.
The portion of the skid rail which is curved is sawed
and fitted, as shown on the plans. These curves may be readily cut with
a band saw, but careful work must be done if the fitting is to be accurate.
This applies with considerable force to the top bows.
Window guides and corners may be finished next. If the
lower corners were left square, much extra labor may be eliminated, but,
of course, whether square or curved, may be left an optional matter. An
aluminum strip, as shown on the sketches, prevents water seepage. The sash
has standard aluminum channel mitered corners, with an angle brace screwed
on at the corners. These braces just fit inside, leaving the outside smooth.
The machine screws are 6-32, and the holes to receive them may be easily
hand tapped.
The front windows hinge from above and swing out. The
moulding acts as a weather lip and is painted to match the body. Use double
strength glass in the sash. Seal it with putty and wood strip against the
pane. The curved windows do not open; they are sealed. After the aluminum
moulding and drip shield are installed around the windows, the structural
part is completed.
While it has been suggested that the canvas be finished
with aluminum paint, there is no particular finality to the idea. The worker
may work out any color combination he wishes. He must, however, use high-grade
materials, for a trailer is out in all kinds of weather and it requires
a mighty good finish to withstand seasonal changes.
Interior Cabinet Work
The photographs of the interior will perhaps give a better
idea of arrangement than can possibly be given thru a written description.
However, there are a few essential things to be done before built-in structures
are
made. First, full consideration must be given to lighting. The plan shows
certain details and indicate space arrangement, but every craftsman has
his own ideas of conveniences, and will wish to plan his own layout, to
a fair degree at least. So be sure all outlets are placed properly, then
proceed to covering the ceiling and. walls. Templets may be made for the
corner gores which run from rib to rib.
Light panel stock may be bent fairly well, but such material
as Presdwood will probably conform much better. It is light, permanent
and acts as an excellent insulator. The joints may be covered with strips
or battens of the same material. Or spruce may be used if the covering
is of paneling. The sense to select colors which produce the greatest amount
of light. This trailer was finished in ivory enamel for the ceiling and
light tan on the walls. |
 |
|
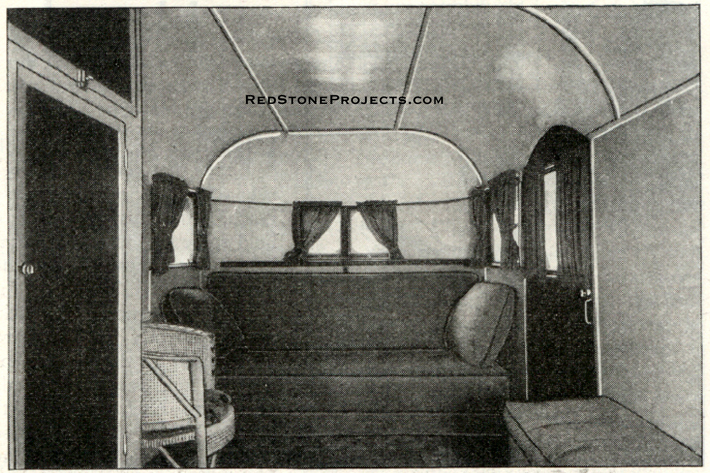
Above is a view of the interior looking forward.
Note the compact arrangement of the “commissary.” Below is a closeup view
of the convenient kitchen.
|
 |
| All built-in structures should be made of light stock,
or composition panels may be utilized. The latter will take paint as readily
as ordinary stock, or it may be left natural, as the worker prefers. Refinements
in the cabinet work may be as pronounced as desired. It is not possible
in this space to go into such constructional details. We can no more than
suggest a comfortable, convenient layout.
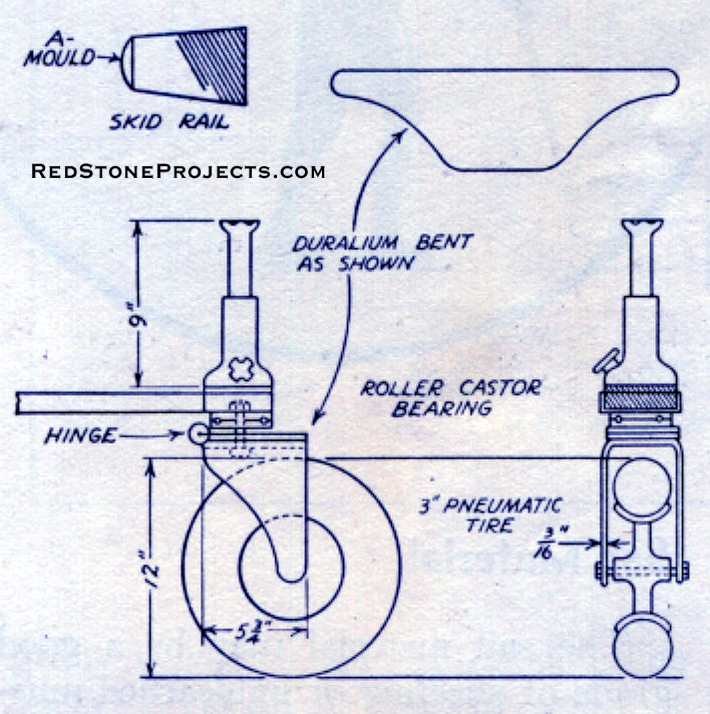
The Tow Brace
The tow brace is cut from angle iron and welded together,
as shown in the details. The angle of the hitch is determined by the location
of the hitch on the car. This must be a solid cross member on the back
of the car. The small wheel is held up by a clip while the trailer is towed
and the jack removed. This wheel is standard with a 3" pneumatic single
tube. It is set in a fork made of 3/16" Dural cut according to pattern,
as shown and bent cold with a sheet metal brake.
The caster bearings are any large thrust ball bearing,
and a large strong hinge to which extension wings have been welded. This
wheel permits the trailer to be moved about with facility by one person
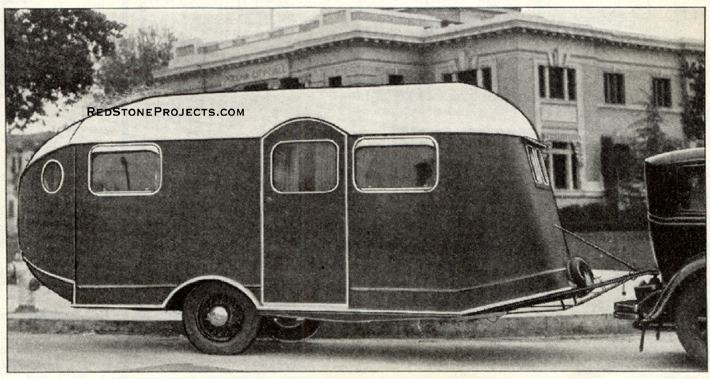
on any smooth roadway. It is held by a clamp when not in use. This trailer
is so constructed that it will be found to tow very easily without side
sway. The end is readily lifted from the car, as the weight on the small
wheel is about 140 pounds only, exclusive of the weight of the couch. If
careful work has been done, when completed the craftsman may reasonably
expect years of dependability and certainly will enjoy many delightful
days on the open road and in wayside camp sites. It is a traveling home
in every respect, restful and comfortable. |
Any 2 Vintage Trailer Plans
$19.95 FREE Shipping |
|
Select 2 Vintage Travel Trailer Plans
|
|
|
