Free Shipping
DIY Vintage Hardside Travel Trailer
Build a Home of a Thousand Addresses
|
DIY Vintage Travel Trailer Plans
Build this Vintage
Camping Trailer
 |
PDF Format |
|
|
All Orders Processed
On a Secure Server
|
Price $12.95
|
|
Get a restored copy of these Vintage Travel Trailer
DIY Plans with 33 Pages of Enhanced and Enlarged Figures and
Illustrations and Searchable Text.
|
We will email these plans, to the address provided
with your payment, within 48 hours following receipt of your order.
|
|
|More
Vintage Trailer Plans|
|
|

|
|
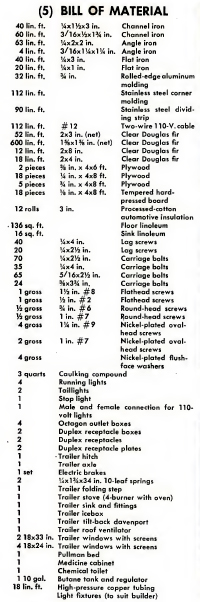
The bill of materials, Fig. 5, lists major items.
Dimensions are given in Figs. 3 and 4. Angle beams 1/4
by 2 in. are welded crosswise under the main frame, which is a 3-in. steel
channel having a plate welded to the open side to form a strong box beam
as indicated in Sec. B-B, Fig. 4. Forward ends are brought together in
a vee and further strengthened with two 1 1/4-in. angle irons and a triangular
plate, which is welded across the end. Mountings for the spring shackles
are welded to the angle beams, which also are boxed for a length of 18
in. by welding on a second angle as indicated in detail A of Fig. 4. Ten-leaf
springs 1/4 by 1 3/4 by 34 in. are used. When tightening the bolts in the
spring eyes draw up the nuts snugly and then release them half a turn.
This will prevent them from binding.
Next come the floor joists, which are 2 by 3-in. stock
set on edge to be the same height as the steel main frame. They are bolted
to the cross beams as in Sec. B-B, and the heads countersunk. Several makes
of axles will be suitable. The one used in the original trailer was tubular
with a 2-in. drop. Type of brakes used is a matter of choice but they should
be installed according the manufacturer's recommendations. However, if
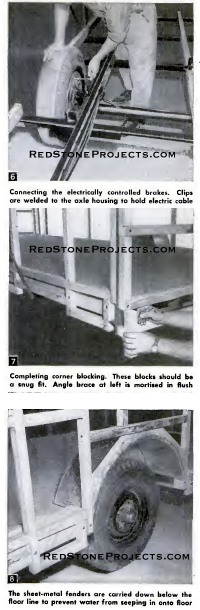
electric brakes are used, anchor the cable along the axle as well as the
frame with steel clips welded on as in Fig. 6.
Get a restored copy of these Vintage Travel Trailer
DIY Plans with 33 Pages of Enhanced and Enlarged Figures and
Illustrations and Searchable Text.
All Orders Processed
On a Secure Server
|
|
|
The three floor joists are indicated by dot-dash lines in
Fig. 4. Note that one joist is off center 48 in. from the left side to
permit using a full-width plywood panel here. The plywood floor, which
is 3/4 in. thick, is glued to the joists and further secured with countersunk
screws. Both ends of the floor extend beyond the joists, making a total
of 17 ft. 1 in. This is to fill 1/2-in. gaps in the ends caused by channel
iron framing.
All of the wooden framing is 2 by 2-in. stock, S4S (surfaced
all four sides), and every joint is glued.
Before starting the frame, the windows, vent and door
should be obtained so that suitable openings can be allowed. End windows
are identical and the four in the sides
Get a restored copy of these Vintage Travel Trailer
DIY Plans with 33 Pages of Enhanced and Enlarged Figures and
Illustrations and Searchable Text.
All Orders Processed
On a Secure Server
|
|
|
are of the same size, 18 by 24 in. Dimensions for the left
and right sides of the framing are shown in Fig. 3.
Dimensions for the front and rear are given in Fig. 9. Cross
members of the window openings are glued and screwed with 1/4 by 4-in.
lag screws. Other horizontal members are glued and toenailed where necessary.
They are located so that a 4-ft. panel of tempered, hard-pressed board
will meet on the center line. All studs are bolted at the bottom to the
floor joists and at the top through the channel frame previously installed.
Horizontal members are then placed. Note the blocking on
top and bottom of the channel frame. This is to serve as nailing strips
for the plywood walls on the inside and hard-pressed board on the outside
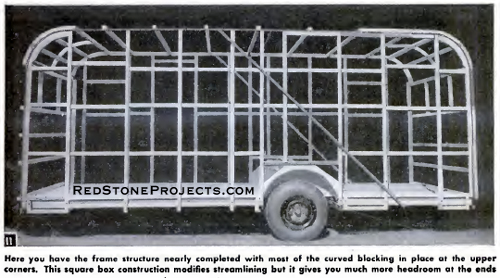
of the double walls as well as the roof. Blocking for the curved upper
corners is band sawed from 2-in. material. Fig. 11 shows this blocking
in place.
The door frame is rabbeted 1/2 in. as indicated in Sec. A-A,
Fig. 3. Along the bottom of the sides, blocking is installed between studs
where shown: between some of them the nailing piece must set on top of
the angle beam, Fig. 7.
Curved nailing pieces are installed in the wheel wells
to hold the upper flange of the fenders, which are of galvanized sheet
iron, the lower edges being bent to form a flange as well as an extension,
which comes below the floor to carry off water. There also is a flange
on the outside curved section. Fig. 8 shows the completed fender.
Four jacks are hung on brackets welded to the chassis
and when not in use swing up and are screwed against a hanger.
From now on, with the trailer framing done, construction
begins to go along much faster. For outside sheathing 1/8-in. hard pressed
board was used on the original trailer, but if this is not available, 1/4-in.
waterproof plywood is a satisfactory substitute.
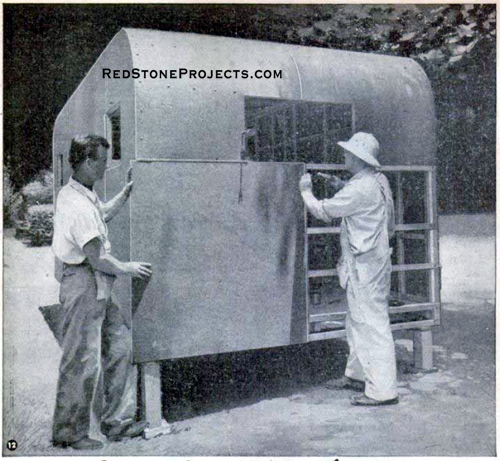
Stainless steel dividing strips first are installed on
the studs where the panels will join, also at the roof joints, Figs. 12
and 13. Install moldings as in the sectional views, Fig. 13.
Apply casein glue to all contacting surfaces of the wood
framing and begin installation with the bottom panels. fastening with 1-in.
No. 7 nickel plated oval head screws run down over flush faced washers.
Screws should be spaced 6 to 8 in. apart, depending on the location. Both
ends of the trailer are paneled alike except that on the forward end the
material is cut away to admit the steel drawbar frame. Metal bearing plates
are attached over the frame members with heavy screws as shown in the front
view, Fig. 13.
On the roof. calking compound is applied liberally to the
dividing strips as well as over the oval head screws and washers. Panels
are cut and fitted as in the top view, Fig. 13. At the curved ends the
material should be bent down gradually, screws beingdriven in on both sides
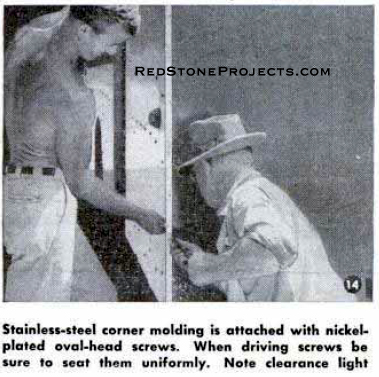
as the bending proceeds. After the roof has been applied, stainless steel
corner strips are installed as in Fig. 14.
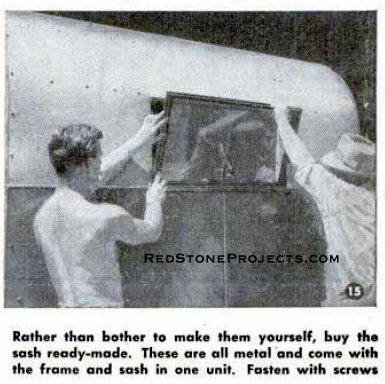
All metal sash and frames fitted with screens are used.
This type of window is shown in Fig. 15. Side windows are the same size,
18 by 24 in., but those on the ends are 18 by 33 in. Before the windows
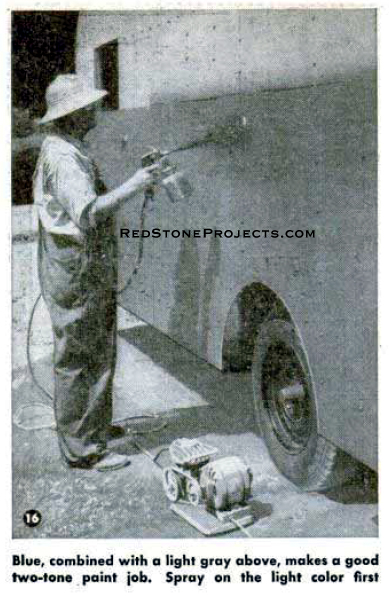
are permanently installed it's a good idea to do the paint job. Color combinations
are a matter of choice, of course, but blue and light gray make a pleasing
two-tone job. On the original trailer body, the blue was masked at the
window
sills all around and the balance, including the roof, was
made a light gray. Use a top-grade outdoor enamel and apply with a spray
gun as in Fig. 16. Wheel disks, chassis and the sash and frames are black.
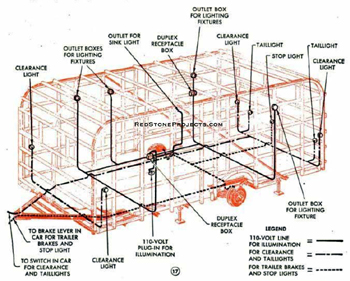
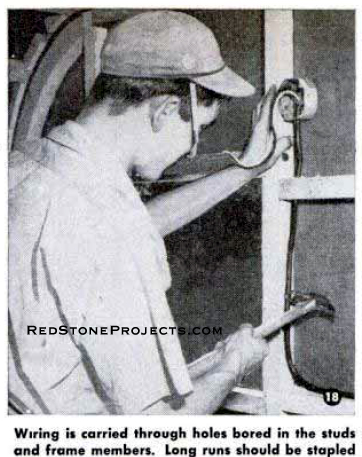
Before installing inside paneling, the trailer should
be wired as in Fig. 18. If you are not experienced in this work, have it
done by a licensed electrician. Wiring diagram is given in Fig. 17. Note
that all cables are carried under the floor, as the channel frame does
not permit going over the ceiling.
When 110-volt current is unavailable for illumination, it
is possible to use 6-volt current from the car battery. To do this, substitute
6-volt bulbs for the 110-volt ones. These are available with bases that
will fit the regular 110-volt sockets. Then provide some means of connecting
an extension cord to the car battery or circuit and plug it into the 110-volt
circuit. Don't forget to change bulbs before using 110-volt current. If
an electric refrigerator is to be used, wiring must be calculated accordingly.
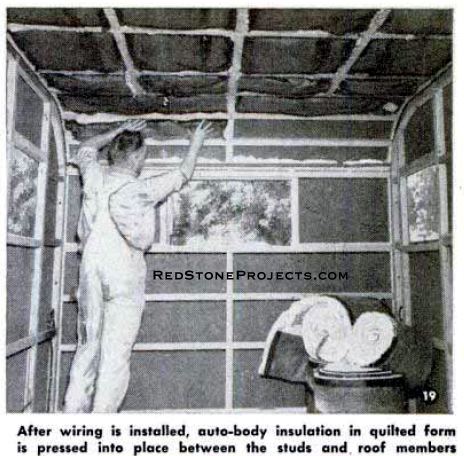
After the wiring is completed and tested, the job is ready
for the insulation of walls and ceiling. Automotive insulating material
of the quilted type is cut to fit snugly in the spaces between framing,
Fig. 19. Tacks hold the edges in place so that they do not lap over the
frame pieces.
A ready-made ventilator is reasonable in cost and easy to
install. Simply spread calking compound around the edges of the opening
and screw the flanges of the frame down on top of the roof. Edges of the
lid or cover come well down over the frame to prevent rain or dust from
being blown in. The ventilator is fitted with a copper screen and an operating
mechanism consisting of a worm gear and crank.
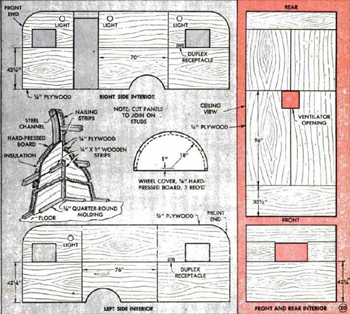
Birch plywood, 1/4-in. thick, makes the finest interior paneling,
but fir plywood of the same thickness can be used. Before installing, locate
nailing strips on the ceiling and walls as shown in Fig. 9. These are especially
important in the curved sections of the ceiling. Begin with the ceiling
paneling first, the panels being cut as in Fig. 20. Note that the curved
panels come down to the top of the windows and are notched at the ends
to allow the center to come down flush with the sides of the windows as
in the end view, Fig. 20.
The grain should run horizontally on these pieces. Layout
of panels for the left wall is shown in Fig. 20.
On this side cut out for the electric outlets and the
cable which comes through the wall over the sink. On the right wall cut
out the paneling for two lights flanking the door and one light and an
outlet near the rear window. Joints on the interior walls and ceiling are
covered with 1/4 by 1-in. hardwood strips.
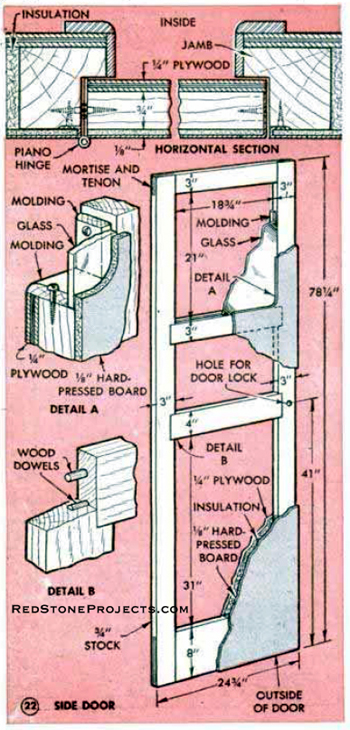
The door is of double-wall construction with insulation between
as in Fig. 22. The inside is covered with 1/4-in. plywood and the outside
with 1/8-in. hard pressed board edged with a molding to match the wall.
An auto-type door catch and handle is installed on the center
cross member.
The glass panel is set between the outside paneling and
the inside molding and the joint is filled with calking compound. A drip
molding is installed above the door and molding is nailed to the jamb on
the inside as in the horizontal cross section.
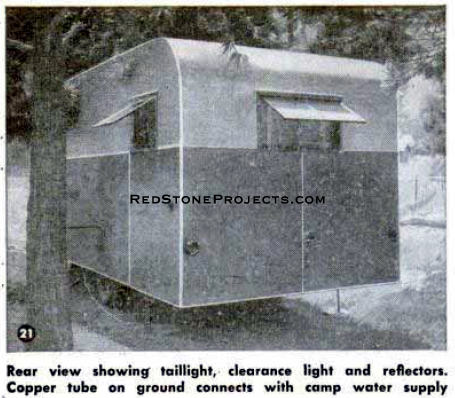
To finish up, semicircular pieces of hard-pressed board,
Fig. 20, are screwed over the wheel wells. Fig. 21 shows a rear view of
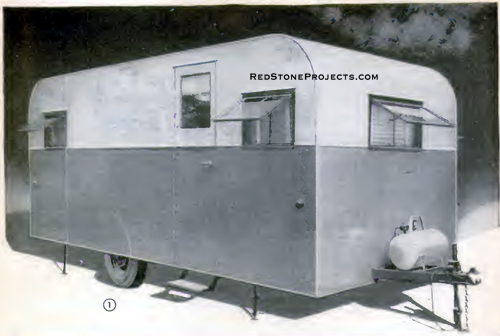
the finished trailer with lights, windows and wheel covers in place.
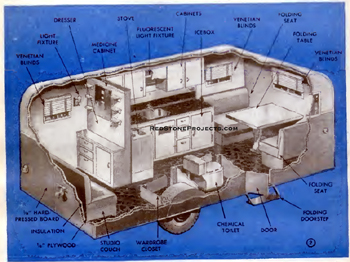
Numerous built-in features to make this trailer livable
include a stove, a kitchenette with sink, icebox and wall cabinets, and
a wardrobe and toilet.
A dining nook at the front folds into a bed for two and a
studio couch at the rear serves as a settee and sleeps two comfortably.
After completing the trailer proper, you are ready for
the various built-in features which make it livable.
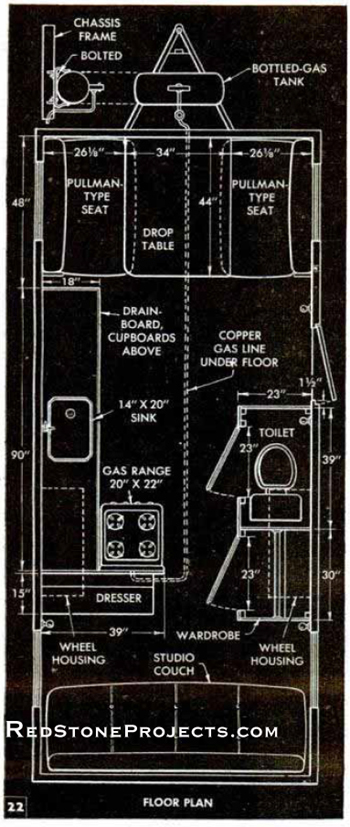
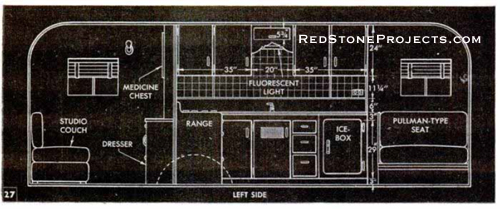
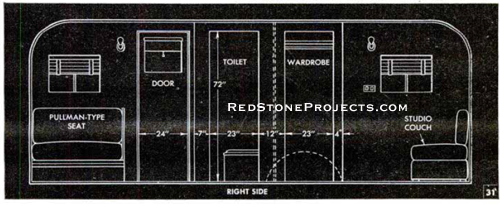
Arrangements are shown in the floor plan, Fig. 22 and
Fig. 2, the forward end serving as a dining room, and the rear end as a
bedroom with a studio couch that folds out to make a double bed. In between,
on the right side, are a toilet and wardrobe, and on the left side akitchenette,
complete with four-burner bottled-gas range, a sink with cabinets below
and cupboards above, and an icebox under the forward end.
The gas tank is mounted on the frame extension forward, outside
the living quarters. Under no circumstances is it permissible to locate
the tank inside, and in installing the gas line great care should be taken
so that the copper tubing is not kinked with the hazard of cracking, and
as few connections made as possible. Use the proper type of regulator for
the tank you select and run as much of the gas line as possible under the
floor.
Installation of the tank used in the original trailer
is shown in Fig. 22, the legs being bolted to the angles across the V of
the frame extension. General layout of the left side of the trailer is
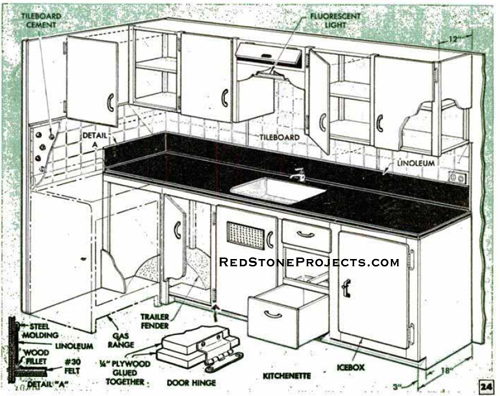
shown in Fig. 27 with the kitchenette dimensions given in full. Further
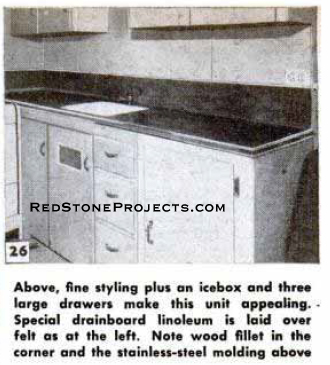
construction details on the kitchenette are given in Fig. 24.
An exceptionally long drainboard is provided and, with
the range at one side at the end, this will be found more convenient than
in the average house trailer. Throughout, the kitchenette unit has been
built and finished with exceptional care.
Cupboard doors, being built of two panels of plywood glued
together, will not warp, and the back wall is cleaned easily, being of
imitation tile. This attractive material is secured to the plywood by daubing
on tile cement every four inches and pressing the tileboard against it.
The same type of stainless-steel molding as used on the vertical joints
outside is used on joints of the tileboard.
A fluorescent light unit is installed just above the sink
to cast a pleasing glow over the entire work surface. The latter is covered
with 30-lb. felt, Fig. 25, and special drainboard linoleum, Fig. 26, and
bound with stainless steel molding. A narrow strip of the linoleum is installed
along the front and end of the drainboard, and bordered with molding.
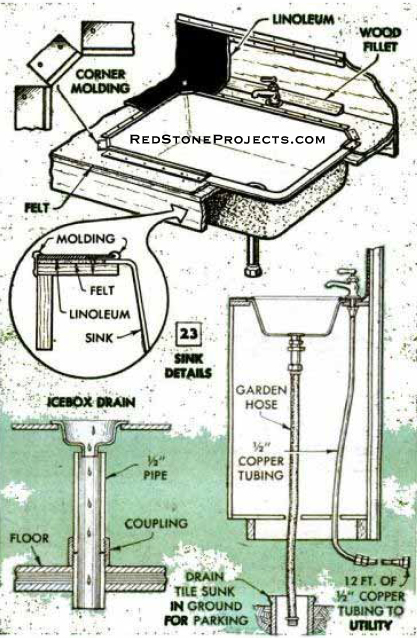
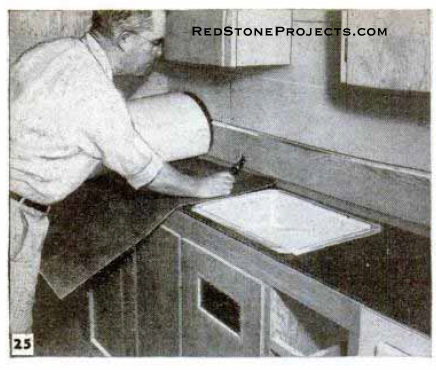
Details of sink installation are given in Fig. 23. First
the sink is set in the opening cut in the plywood top and the felt laid
up to the edges of it in cement. Next a stainless-steel strip with rolled
edge is lapped over the rim of the sink and nailed in place.
The corners are cut at 45 deg. Then the linoleum is cut to
fit right up to the roll of the metal strip and cemented to the felt, after
which edges are bound with stainless steel molding. Note that the rolled
edge molding is laid in mastic to render a watertight joint.
For drainboard use, select a linoleum that does not have
a burlap backing.
Such material is undesirable because if any water seeps
under it, each burlap strand serves as a wick to carry the moisture all
through the fabric by capillary attraction.
The water system is illustrated in Fig. 23, and is connected
to the local supply through copper tubing. The builder carries extra tubing
for this purpose. It can be disconnected when on the road. The drainage
is carried out through garden hose, and when parked for an extended time
a hole is dug in the ground and a drain tile set in it for a miniature
cesspool.
Arrangement of the icebox drain is also given, the small
amount of waste water merely dripping onto the ground below the trailer.
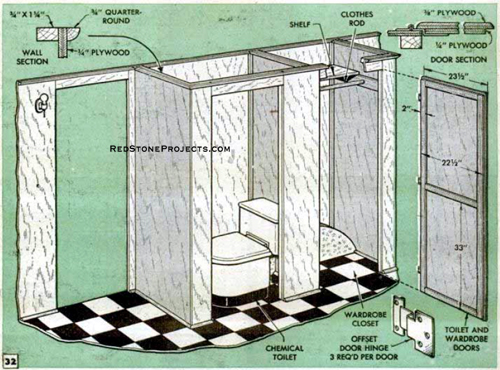
Arrangement of the right-hand side of the trailer is shown in Figs. 31
and 32. Much of the partition work can be built of 1/4-in. plywood left
over from paneling the inside, and reinforced with battens at top and bottom
and in corners. In this case 3/4 by 1 1/4-in. pieces were used, with quarter-round
molding on the floor and ceiling. Incidentally, joints of plywood on interior
walls are concealed with 1/4 by 1-in. strips.
The chemical toilet is a trim enameled one with a "tank"
for charcoal to absorb odors, and sets over one end of the wheel housing.
It requires no installation beyond screwing to the floor.
A shelf and clothes pole are provided for the wardrobe
adjoining the toilet Note that the wardrobe is built over most of the wheel
housing, which does not interfere with garments hung there.
Wardrobe and toilet doors are identical, except that the
latter has a handle on each side. Both are equipped with friction catches.
The doors are made from a single panel of 3/8-in. plywood with battens
of scrap 1/4-in. plywood on the inside, secured with casein glue and small
screws, Fig. 32. They are hung on offset hinges.
|
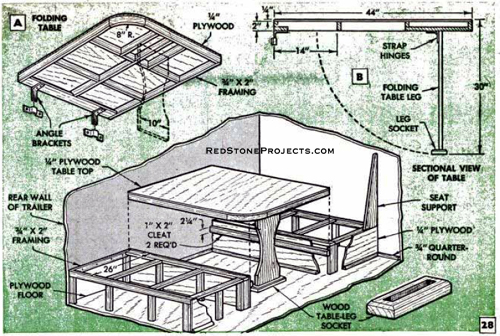
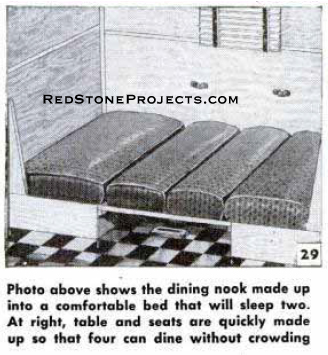
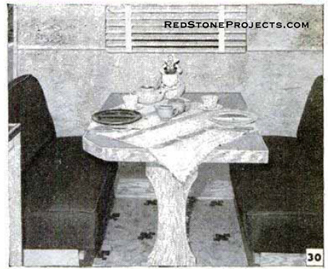
The folding table with Pullman-type seats, Fig. 30, will
comfortably accommodate four adults and is within easy serving distance
of the kitchenette. Framing of the seats is built as indicated in Fig.
28. The folding table is made to drop down between the Pullman seats, the
cushions of which are laid over it to form an extra bed, Fig. 29. The top
is built of 1/4-in. plywood over a frame of 3/4 by 2-in. material. The
corner near the icebox, detail A, is rounded to permit easier access to
the seat. The under frame around the curve is scroll sawed. Two angle brackets
in sockets support the table on the forward wall, and a folding leg Is
provided at the other end, fitting in a floor socket or slot, detail B.
To make a bed, the top is simply lifted out of the end supports and the
leg folded under and then. placed on cleats on the fronts of the Pullman
seats.
|
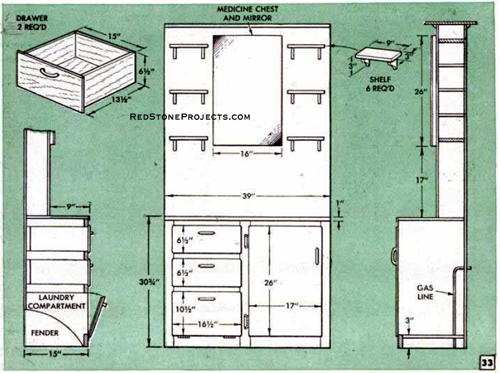
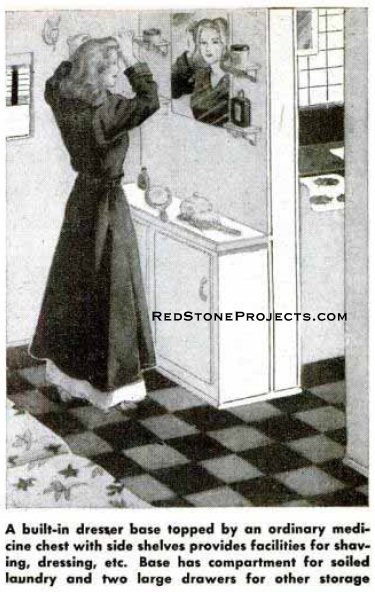
A dresser, Fig. 33, is built against the wall just back of
the stove. At the right a panel door opens into a shallow compartment for
general storage, and also gives access to the gas line into the stove.
On the left are two drawers and a door hinged at the bottom
for a soiled laundry compartment. This is deeper than the right-side compartment,
extending back under the sink drainboard and over one end of the wheel
housing.
Drawers are made in the conventional manner and are fitted
with plastic handles, as are all other drawers and doors inside the trailer.
The medicine chest is a standard item with glass shelves and a mirror on
the door. It is installed flush with the wall, and is flanked with small
shelves as illustrated.
In the final finishing of the interior, see that all joints
are covered with battens. In the original, 1/4 by 1-in. strips were used,
and in the upper curved corners 1/4-in. plywood with the exposed grain
crosswise was used, allowing bending to that radius.
Standard venetian blinds manufactured for trailer use
are hung over all the windows and, with the natural finish of the wood,
give a very pleasing effect. A manufactured doorstep is a convenience,
as it folds up and slides back under the body when traveling.
Many owners provide their trailers with pressure water systems
independent of any outside source in a camp, thus enabling them to have
water available regardless of where they park. Usually, this is done by
installing a tank either under the trailer or someplace inside it and then
providing fittings so it can be filled from outside the trailer and pressure
applied with a tire pump or an air hose. Connections can be provided at
the sink to use either the tank or an outside source of water supply.
For sake of safety, obtain the best hitch possible and
acquaint yourself with and obey all laws pertaining to trailers in states
in which you intend to use yours.
Any 2 Vintage Trailer Plans
$19.95 FREE Shipping |
|
Select 2 Vintage Travel Trailer Plans
|
|
|