Free Shipping on All U.S. Orders
All Orders Processed on a Secure Server
Build a Vintage 1937 Runlite Trailer
Lightweight Traveling Bedroom and Kitchen Plans

Vintage 1937 Runlite trailer lightweight traveling bedroom and kitchen plans.
1937 Vintage Runlite Travel Trailer Plans
Build this Compact Travel
Kitchen and Bedroom
Get these vintage trailer plans PDF Format
All Orders Processed
On a Secure Server
Price $12.95
Get a restored copy of these vintage Runlite Compact Travel Trailer Plans with 13 Pages of Enhanced and Enlarged Figures and Illustrations and Searchable Text.
We will email these plans, to the address provided with your payment, within 48 hours following receipt of your order.
|More Vintage Trailer Plans|
Designed for the person who prefers a light traveling bedroom to a more commodious pull trailer, this lightweight streamlined modern camper trailer is noteworthy for its low cost and unusual safety at high speeds.
Picture through the open galley hatch of the compact, lightweight Runlite travel trailer.
Looking into the "cabin" through
the open galley hatch.
Although quite portable, the "Runlite" has ample space for two full length spring mattresses. Below Body plan dimensioned to scale.
TRAILER owners incline to divide into two schools of thought: one group wanting the kind of trailer in which they can, if necessary, live permanently, the other preferring something rather lighter and more suitable for use on extended trips, such as vacations, where economy and high cruising speeds are of major importance. The Runlite has been designed for the latter group.

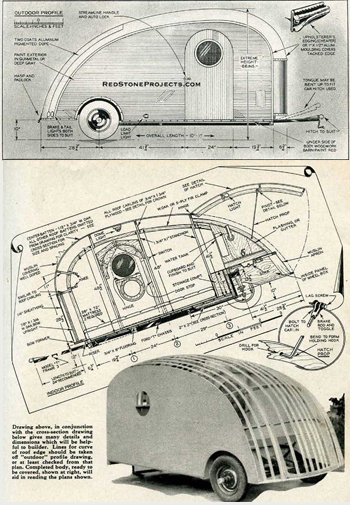
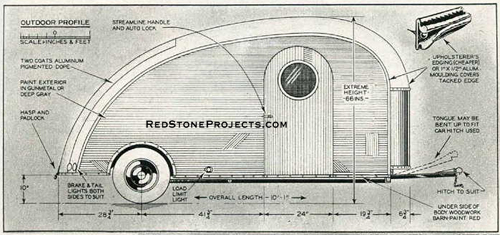
By placing the wheels quite far aft it has been possible to make this an underslung job, making it directly possible to combine really effective streamlining with marked stability. The weight of the whole trailer being so low, much of the weight is carried by the tongue, a matter of no particular concern in the case of the Runlite since it is normal for a load of 150 or even 200 pounds to be distributed on the hitch of all trailers.

The Runlite can actually be towed at a 60 m.p.h. gait without straining any good light car. Straightforward methods of construction are used in this design.

Vintage camper trailer plans showing the front and rear elevation view with dimensions.
There is practically no welding and absolutely no special machine work to be done. The roof, which at first glance may seem a problem, is actually simpler to construct than that of the average trailer.

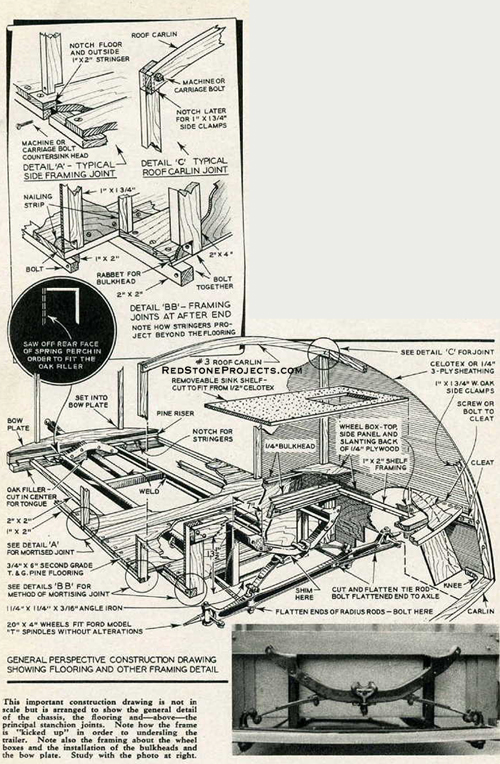
Another word before starting in on the actual construction work: Comparison will reveal some slight difference between photos and drawings in this article. It is quite unimportant and, as far as that goes, the curve, the width and the overall height may be modified to suit the builder's requirements.

Start with the frame. What few welded joints you will have to make are encountered here. If you lack the proper equipment or experience have the welding data by on expert. The cost will be low and the sense of security a good deal greater.

Use an old Model T Ford frame. At your local junk yard these should be anywhere from 75 cents to $2.75. Using a hacksaw, cut out a 13 1/2" length on each side 7" from the front end. Saw out the channels to fit and weld at right angles so that the frame now has a 13 1/2" kick-up as shown in the drawings. An angle iron tie piece 1 ¼"x 1 ¼" x 3/16" is welded across the bottom of the frame as shown in the perspective drawing of the frame. At the rear end the rear face of the spring perch is cut off with torch or hacksaw. Into the perch a 2"x 4", preferably of white oak, is carefully fitted. This beam should be the full width of the body and its obvious purpose is clearly shown in the drawings.

Exterior profile plan and dimensions of a vintage lightweight DIY camping trailer.
The profile lines of the Runlite, accurately scaled above, convey immediately grace and speed of the design. While the basic design should not be tampered with, headroom and width can be increased, if builder wishes, without harming the appearance of this fast-stepping trailerette.
Two more lengths of Ford T frame are used for the trailer tongue and the cross-member to which it is anchored. Joints here may be either by welding or bolting. It will be necessary to cut out the filler piece for the tongue, which is bolted securely to the spring perch as well as to the channel cross piece. Bolt or weld a standard hitch to the end of the tongue. The height of the hitch can be adjusted by heeling the tongue and bending upwards.

Only four leaves of the front spring are used. A shim is put under the perch clip bottom to compensate for the leaves removed. Second hand Model T steering tie rods are used in the manner shown for radius rods. The ball and socket fixtures for the frame end of the rods are from regular Ford radius rods. They should be welded on. The axle ends of the rods may be attached either by flattening and bolting direct to the wing spring perches, as shown, or drilled clear through the axle and bolted either side. This latter method provides an easy method of aligning the wheels. 20'x 4" wheels from a motorcycle pick-up trailer are used.

Photo of the completed Runlite vintage travel trailer showing the open rear galley as built by the author.
Photograph here shows to advantage the charm small trailers of this type hold. Note excellent proportions of this vest pocket trailer; its very low hung position, practical cooking facilities and obvious roominess. Although lacking bathoom facilities, it is hardly higher than a small car, it sleeps and feeds two adults!
Such wheels fit Model T Ford spindles without change. They cost about $4.00 each and the tires about the same. The completed frame, ball hitch, radius rods, wheels and tires should not cost over $20.00 with welding included.
 
 
The steering tie rod is cut in two, the ends flattened and bolted to the axle as shown. This completes the entire chassis and the rest of the job is straight woodwork (with a little tin work here and there).

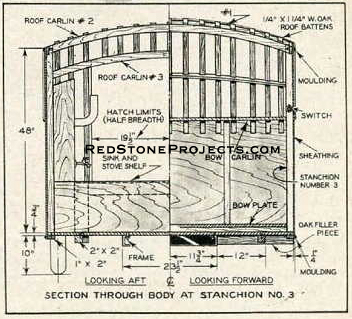
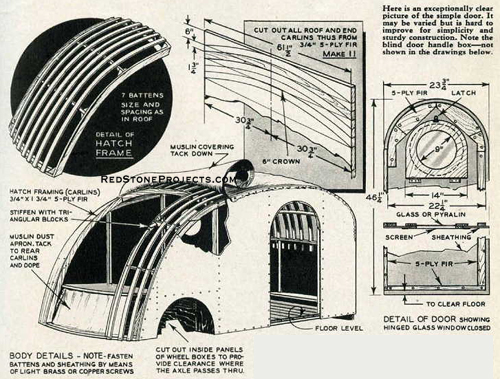
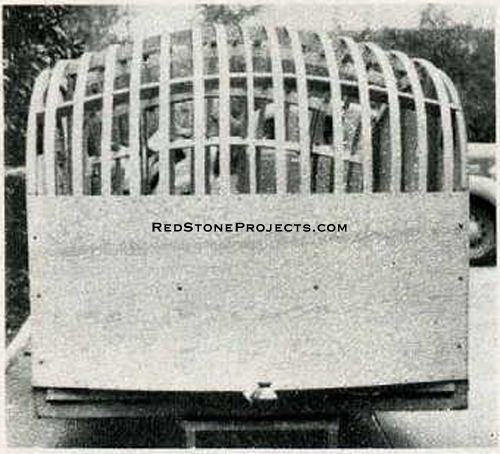
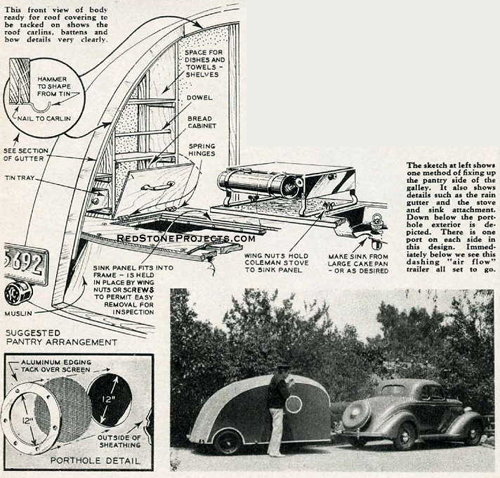
Build the floor as a foundation for the body. Second grade Oregon pine flooring, tongued and grooved, is bolted to the chassis frame starting at the rear end and working toward the towing end of the trailer. This flooring should be wide enough to finish 61 ½" wide after trimming the sides for straightness. Rabbet the first plank laid to hold the ¼" bulkhead as shown and cut out where necessary for the spring perch at the towing end. This cut out is later covered with tin - see drawings. Lay a straightedge along the sides and saw off flush.

Next screw in the 1" x 2" and 2"x 2" stringers to the underside of the flooring as shown in the drawing, allowing the ends to project several inches beyond the floor at the rear. Stanchions No. 3 and the 2"x4" uprights are mortised into these projecting ends and the stringers trimmed off flush as shown in the detail sketches.

The stanchion framing can now be completed. The heels of the stanchions are boxed into the floor and bolted into the 1"x 2" edge or side piece. With the main stanchions in the 1/4" plywood or hard Celotex bulkheads can be installed and the boxes for the wheels built up. Framing for cupboards, water tank, sink and so forth, is left until the body has been built.

Cut out the crown carlins and also the bow plate. Detail drawings give the dimensions and it will be noted that it carlins in all are required. Some of these are used for the roof, three being bolted to the main stanchions already installed. The remaining carlins are required for bow and stern, and for the hatch. Install the bow plate in the manner shown. It is cut on a 72" radius, is 3/4" thick and 6 3/4" deep. It is screwed to the riser strip which in turn is bolted to the filler piece in the spring perch.

The side clamps or roof strips can now be sawed to shape and mortised into the tops of the stanchions as shown. They may be lightly screwed until the outer sheathing is applied. This sheathing, of fir plywood, 1/4" thick, or hard Celotex, is screwed directly to the stanchions, floor edges and 1" x 2" outer strips. The carlins at the front and back of the trailer are put in with knees as shown. Do not apply the sheathing to the front end of the trailer until the roof battens have been bent in. If these prove stiff, soaking for half a day under the lawn sprinkler will render them pliable. They are fastened over the carlins without notches except where they bend into the front, or bow cabin. They are notched flush into this former. Use light screws to secure the roof battens.

The lift-up cover over the galley, called a hatch in the drawings, is built up in the manner show. The longitudinal carlins are cut to the same sweep as the roof from 3/4" plywood. Cut out four of these carlins, two of them being permanently attached to the stern portion of the body frame as shown. The other two of course form the sides of the hatch itself. A tin gutter should be hammered out and fitted along the edges of the hatch opening in the manner shown.

Plan view of the chassis and floorplan for the Runlite vintage pull behind camper trailer.
These plan views of the trailer chassis and floor frame, used in conjunction with the indoor profile plans below (and the sectional views of the body), should be studied carefully.
Attach the sheathing to the front end now. It will bend to the slight curve quite easily.

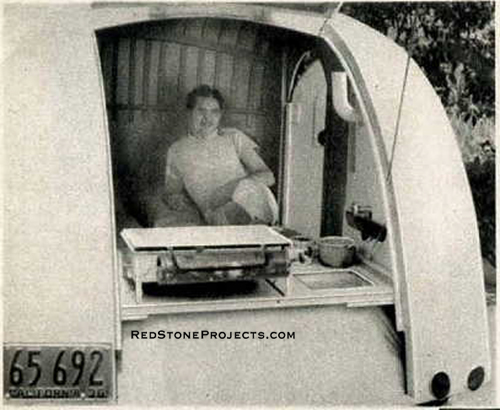
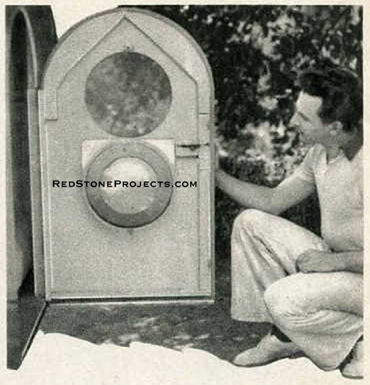
The door is clearly indicated. Lock arrangement and so on is left to the DIY builder though a streamlined blind door handle was used on the trailer pictured. A 12" porthole is cut into the door and another one exactly opposite in the sheathing on the other side.

A screen is secured to the outside of each port and inside they are furnished with hinged windows as clearly shown. Glass or airplane windshield Pyralin are equally satisfactory for these windows. It has been found that the two ports provide ample ventilation for even the hottest weather.

The next step is to cover the roof. Use grade A muslin costing 18 to 29 cents a yard at most stores. Start at the front end, tucking on 1" centers with small carpet tacks, and stretch lightly over the sides as you proceed toward the rear until the tail carlin is reached. With two gallons of aluminum pigmented nitrate dope, you will be able to render the roof drum tight and waterproof. Correct procedure in doping cloth is to lay the first coat on around the edges and work toward the center. The edges can be finished with either aluminum edging or regular upholsterer's edging. Both are obtainable at automobile supply stores.

The galley is pretty thoroughly covered in the various drawings. The space formed by the two bulkheads makes a good place for odd clothes or other stowage. It extends from wheel box to wheel box, is 18" deep and about 8" wide.

Immediately aft of this compartment the sink and stove shelf is located.

Drawing and picture of wall, ceiling and door construction details for a mini travel trailer.
Drawing above, in conjunction with the cross section drawing below gives many details and dimensions which will be helpful to builder. Lines for the curve of roof edge should be taken off the "outdoor" profile drawing, or at least checked from that plan. Completed body, ready to be covered, is shown at the right, will aid in reading the plans shown.
This shelf is made readily detachable so that the axle may be inspected if necessary or to permit the easy placing of a jack under the axle in case of flat tires.

The shelf rests on a light framing of 1" x 2" pine as shown in the drawings. It can be held in place by a few light screws or by four wingnuts.

Front and rear cross section views of constrution details for the Runlite, a small vintage travel trailer.
The stove is secured to it in the manner shown and a simple sink can be made from a large cake pan and set into the shelf with small screws.

A muslin apron, tacked from shelf carts to rear carlin and from wheel box inner panels, serves to keep the dust out. This apron should be doped.

The tank for water may be any size and the details of its installation will naturally depend upon the size used. In any case, it should be so arranged as to empty directly into the sink. Cupboards and shelves may be any way you prefer. A simple arrangement as used by Mr. Trenmore Garstone, builder of the trailer illustrated, is shown in the sketches.

Lighting details are left to the builder. Two dome lights proved ample for the mini Runlite.

Detailed drawing shown the framing joints and construction of a DIY travel trailer.
Picture of a completed travel trailer door with window detail.
Here is an exceptionally clear picture of the simply door. It may be varied but is hard to improve for simplicity and sturdy construction. Note the blind door handle box, not shown in the drawings below.
Detailed drawing showing the construction a vintage trailer roof frame, rear galley hatch and  exterior side door.
Front view of the travel trailer body ready for roof covering.
This front view of the body ready for roof covering to be tacked on shows the roof carlins, battens and bow detailers very clearly.
Paint the entire under portion of the trailer with barn red paint to prevent weathering. The interior, including the floor is finished cream. The underside of the muslin roof should not be painted. The exterior sheathing, is finished in Duco gunmetal.

Completed, your Runlite trailer should not cost more than $75.00 at the outside. It can be built for less if you know how and where to buy.

Drawing detailing constructions of the rear galley of the Runlite vintage travel trailer.
Save with Vintage Plan Deals
|See All Vintage Trailer Plans|
Any 2 Vintage Trailer Plans
$19.95 FREE Shipping
Select 2 Vintage Travel Trailer Plans


Any 3 Vintage Trailer Plans
$24.95 FREE Shipping
Select 3 Vintage Travel Trailer Plans
 
 
3

 
Any 4 Vintage Trailer Plans
$29.95 FREE Shipping
Select 4 Vintage Travel Trailer Plans


4
Any 6 Vintage Trailer Plans
$36.95 FREE Shipping
Select 6 Vintage Travel Trailer Plans


This modern chassis makes an excellent base for your teardrop trailer project, lightweight camping trailer, or vintage travel trailer build.
Teardrop Chassis Plans
Build a Teardrop Chassis
without Welding
eBook
PDF Format
Price $12.95
Learn more about these plans >>
Utility Chassis Plans
Build a Utility Trailer
without Welding
eBook PDF Format
Price $12.95
Lean more about these plans >>

Buy  Both
Build a Teardrop Trailer Chassis
and
Build a Utility Trailer
Together and Save 20% !
eBook
PDF Format
Price $19.95

RedStoneProjects.com Home
SAVE With Multi-Plans Deals!
Project Plans
Concealment End Table Plans
Quilt Rack Plans
Crossbow Plans
Catapult Plans
Craftsman Style Plans
Water Screw Plans
Tobacco Pipe Rack Plans
Shooting Sports Plans
Reloading Bench Plans
Closet Reloading Bench Plans
Brass Cleaning Bench Plans
Small Reloading Bench Plans
Corner Reloading Bench Plans
Two Sided Shooting Bench Plans
Nativity Stable Plans
Trailer Plans
No Weld Teardrop Trailer Chassis
No Weld Utility Trailer
Vintage Trailer Plans
Vintage Travel Trailer Plans Collection
16 Foot Canned Ham Vacation Trailer
Craftsman Hardside Folding Camper Trailer Plans
1947 Thousand Addresses Travel Trailer Plans
Bungalow Folding Tent Camper Trailer Plans
1937 Runlite Lightweight Travel Trailer Plans
1947 Treadrop Trailer for Two Plans
1935 Pullman Trailer Plans
1940 14 Foot Cabin Trailer Plans
1951 Lightweight Sportsman's Trailer
1956 18 Foot Family Vacation Trailer
1934 17 Foot House Trailer
DIY Pop Up Camper Trailer Plans
1960 Fold Up Trailer with Slide Out Plans
1953 Wild Goose Kamp Master Trailer Plans
1935 Jim Dandy Cabin Cruiser Trailer Plans
Vintage How To Build Trailers eBook
Hardside Pop-Up Camper Plans
Wanderbug Lightweight Vacation Trailer Plans
Streamline Family Vacation Trailer Plans
Tent On Wheels Folding Trailer Plans
Lil Guy Micro Camper Trailer Plans
Traveler Wood Framed Travel Trailer Plans
Vintage Roadside Chuck Wagon Trailer Plans
Pickup Truck Pop Up Camper Plans
Hardside Roof Top Pop Up Sleeper Plans
Low Profile Pickup Truck Camper Plans
Vintage Streamline Teardrop Trailer Plans
Vintage 1956 Camp Trailer Plans
Modern Conestoga Trailer Plans
1947 Trail Scout Camper Plans
Vintage Bolt Together Tent Trailer Plans
Vintage 1947 Wanderer Canned Ham Trailer Plans
Vintage Boat Plans
Sea Craft 25 Foot Cabin Cruiser Plans
21 Foot "Luxury" Shanty Boat Plans
20 Foot Budget Houseboat Plans
DIY Project Books
Build Three Working Model Catapults
Build Five Craftsman Style Tobacco Pipe Racks
Build a Reloading Bench and a Reloading Brass Cleaning and Sorting Bench
Vintage Trailer Mugs
Trailer Articles
Pulling a Motorcycle Trailer
Building a Motorcycle Trailer
DIY Tent Trailer
Build a Budget Tent Trailer
The Trailer Grows Up
Motorcycle Rallies
Americade Motorcycle Rally

 
Contact Us Privacy Policy Plans License