Free Shipping on All U.S. Orders
All Orders Processed on a Secure Server
Vintage 1956 Camp Trailer Plans
DIY Squaredrop Trailer Building Plans and Instructions
|
Vintage 1956 Camp Trailer Plans
Build a Vintage Squaredrop Trailer with Rear Galley
 |
PDF Format |
|
|
All Orders Processed
On a Secure Server
|
Price $12.95
|
|
Get a restored copy of these vintage 1956 Squaredrop
Camp Trailer Plans with 12 Pages of Enhanced and Enlarged Figures and
Illustrations and Searchable Text.
|
We will email these plans, to the address provided
with your payment, within 48 hours following receipt of your order.
|
|
|More
Vintage Trailer Plans|
|
|

|
|
| Do you like to go camping with your wife and kids? Or
maybe you're the fellow who likes to go hunting or fishing? If you are
like many others the expense of renting a camp or bungalow often makes
this outdoor pleasure prohibitive.
Mr. Art Harvey of Brockway, Pa., has nicely solved this
problem. Friday evenings, after work, he wastes no time getting home. Cleans
up, gets a bite, shoos the wife and three kids into the car and takes off
for a state park or some other favorite spot to spend the weekend. Does
he worry about accommodations that he will find there? No - because behind
his car he is pulling a camp trailer - one that he has constructed in his
spare time.
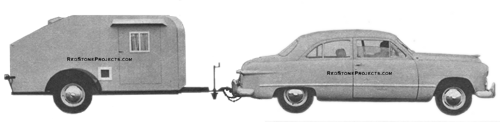
It isn't a large trailer, in fact it is smaller than the
average car, yet it has all the camping conveniences that he needs. It
is large enough for the whole family to sleep in. It has a built-in kitchen,
complete with water supply, ice box, food compartment, table and chairs,
stove and a clothes closet. The trailer is 10 feet long x 4 feet wide x
4 feet 10 inches high. It is a perfect trailer for a man who wants to travel,
or hunt and go fishing in.
The squaredrop trailer body is constructed entirely out
of wood - plywood sides with hardwood framing. It has traveled over 20,000
miles in the last couple of years, and it is just as sturdy now as the
day it was built. |
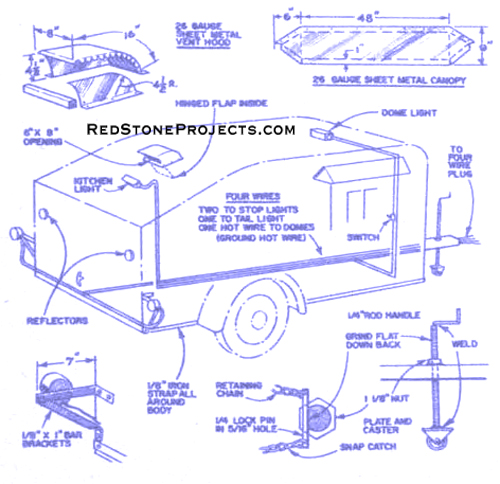
|
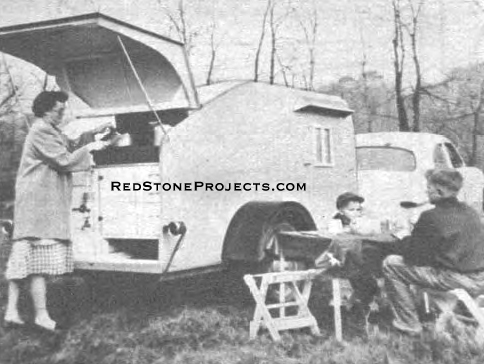
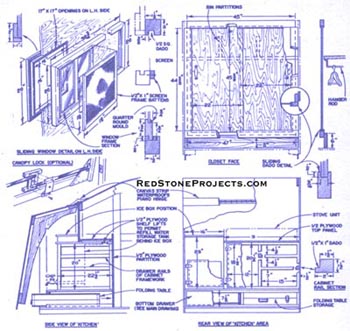
Kitchen canopy folds up for easy use. Note space
under stove used for table storage.
|
|
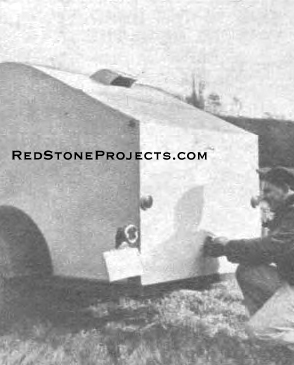
Rear of trailer features ventilator on top, two
reflectors, rear light and license plate.
|
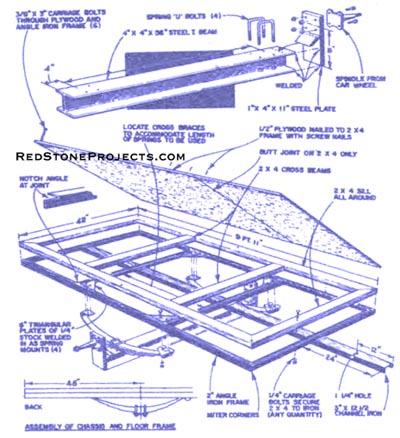
Start construction with the axle and wheel assembly. The
I beam should be 56 in. long, and be sure the ends are square. Take two
uprights, lx4x11-in. steel plate, and the two spindles that fit the trailer
wheels and trim them down to 11 inches. |
|
| On the I beam measure in on each end 4 in. and take the
spring you are going to use on that side and lay it across the I beam so
that the outside of the spring is on this line. Now take the U bolts and
slip two of them over the spring, and mark as closely as possible where
the holes are to come. Center punch and drill these holes slightly over
size as you will find it hard to make a perfectly snug fit. Repeat this
operation on the other end of the beam. When these holes are drilled and
springs are tried, and they fit to your satisfaction, remove them for the
time being. Now take the uprights and weld one on each end of the I beam. |
|
| |
| After the uprights are welded on solidly you weld on
the braces for added strength. The angle iron base frame is welded together
to give it greater strength and durability. Corners of the frame are cut
at a 45° angle and welded as shown in the drawings. The crosspieces
are butt welded in place. Their location is determined by the length of
the car springs used for the trailer. |
|
| After the crosspieces are butt welded into place, the
6-in. triangular plates are clamped inside the angle formed by the crosspieces
and the angle iron sides. The triangular plates are then welded into place.
These plates go where the spring mounts are to be bolted to. Set the springs
into place and mark and drill the mounting holes on the plates. Now, take
the 3-in. channel iron and weld it directly in the center of the frame.
Measure back from the end of the tongue a distance of 12 in. and with your
torch burn a 1 1/4 in. hole in the center of the channel iron. This is
where your trailer jack will go. |
|
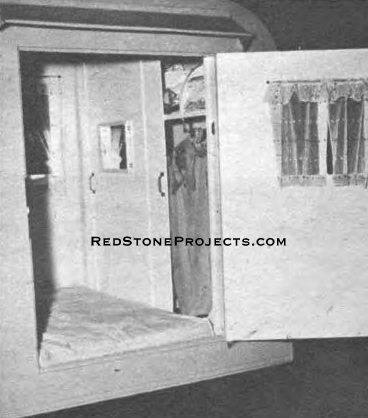
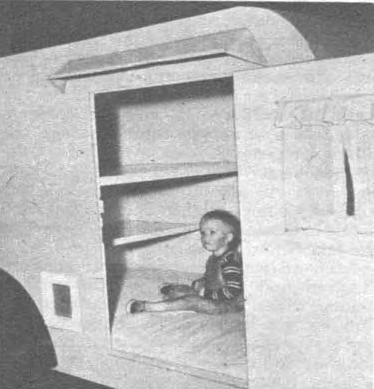
Interior view of the trailer shows the clothes
closet,
access door and left side window.
|
| Drill the holes that will hold the 2x4 hardwood frame
to the angle iron trailer frame. With a power drill, drill a number of
holes through the angle iron frame; this also includes the two crosspieces.
The holes can be drilled about 18 to 24 in. apart. You now have the frame
ready for the hardwood frame and plywood bed. The corners of the hardwood
sides and ends are cut at 45°. These pieces are then clamped on to
the frame for a good, even fit.
After the plywood floor is cut and attached to the frame
paste the linoleum piece down on the plywood bed. The linoleum doesn't
necessarily have to be a new piece as it is used for damp proofing the
trailer and makes cleaning and scrubbing the bed a simple matter. The wheels
can now be put on the trailer bed. |
|
| The trailer jack is next. Secure the 1 1/8 x 18-in. long
bolt; mill or grind a 7/8-in. flat on the entire length of one side of
it. This flat face is for locking the jack in place so that it will not
unscrew while the trailer is in motion; see detail drawing for correct
procedure.
The jack dolly can be secured through your hardware dealer.
It is welded to the end of the bolt. Take the 1 1/8-in. nut and drill a
hole through it as shown. The hole is to be large enough to receive the
1/4-in. locking pin. |
|
| Screw the bolt into the nut so that the dolly rests on
the floor. When you are satisfied with the way it sets take the 1/4-in.
rod and bend it into a crank and weld it to the top of the screw.
If you wish to buy the trailer jack you will possibly
find an ad in this magazine where you can purchase one. That also goes
for the trailer hitch as it is best to buy a hitch and be on the safe side.
The two pieces of 1-in. chain are welded about 3 in. from
the end of the tongue, one on each side of the channel iron; the ends of
these chains are to be fastened to the back bumper of the car. A heavy-duty
chain snap is welded to the end of each chain. If you do not have the right
type of back bumper, it would be a good idea to fasten heavy duty eyes
to clamp the chain snaps to. This is very important because if the trailer
hitch happens to come lose while you are traveling the safety chains will
hold it in place. |
|
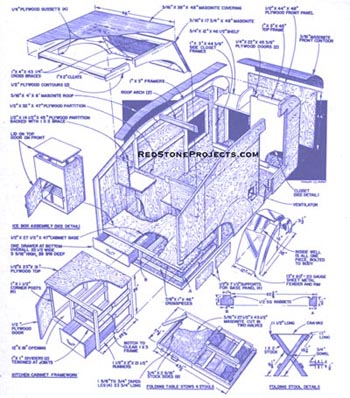
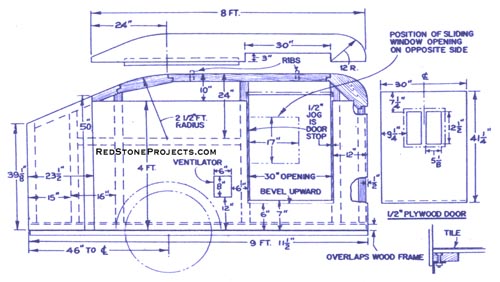
| The easiest way to construct the trailer cabin is to
lay out the plywood sides and cut them to the desired shape. After this
is done the 1x3-in. hardwood frame can be laid out and cut to fit the sides.
Follow the drawings for dimensions and details.
Build the clothes closet next. This can be constructed
as shown, or to suit your individual requirements.
When building the kitchen partitions be sure to measure
each piece's location before you cut it to size.
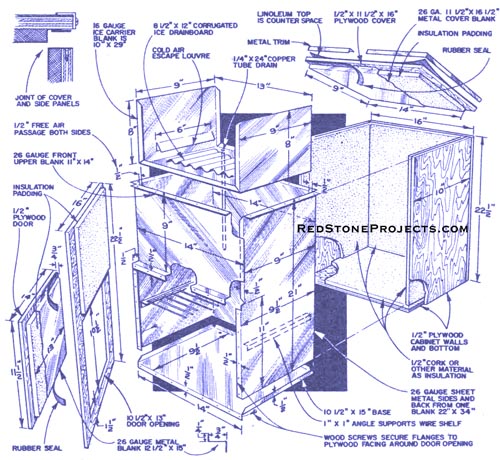
You will note that the four sides of the ice box are 22
1/2 in. high; front and back are 16 in. wide, the top sides 10 in. wide.
Before nailing the front on, lay out the food compartment door and cut
it out. Do not nail in the plywood bottom until the sheet metal core and
bottom insulation is installed. |

|
Compact arrangement of kitchen area shows
stove, ice box, water tap, storage drawers.
|
| Lay out the ice box sheet metal piece for the back and
top sides. When you have this piece cut and bent as shown, the rest of
the pieces will not give you any serious trouble. The upper front piece
is cut and soldered in place. Be sure that the entire length of each joint
is soldered. Next, the bottom is cut and soldered into place.
The ice compartment is built last. It is made from a piece
of 16-gauge sheet metal. This is a heavier gauge as the ice will set here
and it will be subject to some sliding around while the trailer is in motion.
The 8 1/2x12-in. piece of corrugated metal is placed on
the bottom of the ice compartment; the cake of ice will rest on this. Since
the metal is corrugated it will provide an easy escape for the melted ice
water, also keep the drain from being covered over and trapping the water.
You can now solder the copper tubing in place allowing it to stick out
a couple of inches through the bottom of the ice box.
Depending on the kind of material you use, you may find
it easier to install the core in the wood shell first and then put in the
insulating material.
Cut and bend the sheet metal of the ice box door as shown.
For insulating cork or some similar material can be used. Fasten the sheet
metal with small wood screws; the rubber seal is either glued or nailed
into place. |
|
| Before cutting the above pieces to size, set the ice
box on the kitchen cabinet base on the left side and snug against the trailer
side. This is a temporary set up only for measuring purposes. The distance
should be 31 in. from the right side of the trailer to ice box. This is
the space that the kitchen cabinet is to occupy. If the distance is other
than 31 in. then you must cut the kitchen cabinet pieces accordingly. The
height will not change. |
|
Interior view shows bunk arrangement.
Although not overly spacious, it will sleep a small
family.
|
| The water tank goes behind the ice box. A tank of galvanized
sheet metal of the right dimensions can either be made or purchased. At
the base of the tank on the right side drill a 1/2 in. hole and solder
a 1/2 in. piece of copper tubing. Make the tubing long enough to clear
the edge of the kitchen base. The copper tubing is bent so that it will
line up with the hole in the kitchen cabinet upright. Solder a threaded
fitting to the end of the tubing and screw on the faucet. |
 |
|
Completed camp trailer.
|
| After all parts of your trailer are constructed and installed,
and the outside painted with a good outdoor paint, you will find that you
have a really compact weekend trailer that will soon repay in pleasure
the time and money spent on it. *** |
Any 2 Vintage Trailer Plans
$19.95 FREE Shipping |
|
Select 2 Vintage Travel Trailer Plans
|
|
|