Free Shipping on All U.S. Orders
All Orders Processed on a Secure Server
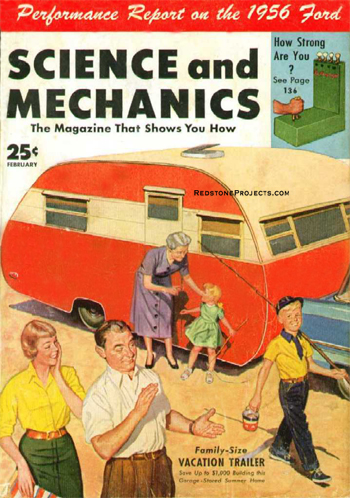
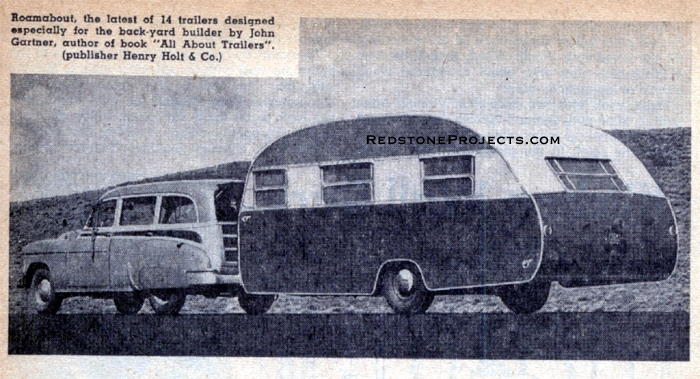
Build The Roamabout
18 Foot Family Vacation Trailer

Although 18 feet is considered the most practical vacation trailer size for the average family, plans for building this canned ham trailer in 14 and 16 foot lengths are included.
Restored PDF copy of vintage Roamabout Camper Trailer Plans with enhanced and enlarged figures and illustrations and searchable text.
1956 Camping Trailer Plans
Build a 1956 Roamabout 18 Foot Travel Trailer
Get these vintage trailer plans PDF Format
All Orders Processed
On a Secure Server
Price $12.95
Get a restored copy of these vintage Travel Trailer Plans with 41 Pages of Enhanced and Enlarged Figures and Illustrations and Searchable Text.
We will email these plans, to the address provided with your payment, within 48 hours following receipt of your order.
|More Vintage Trailer Plans|
The original Roamabout as it appears after being road  tested over 20,000 miles by Mr. and Mrs. Gartner and their three daughters on two transcontinental trips.
The original Roamabout as it appears after being road tested over 20,000 miles by Mr. and Mrs. Gartner and their three daughters on two transcontinental trips.
Roamabout
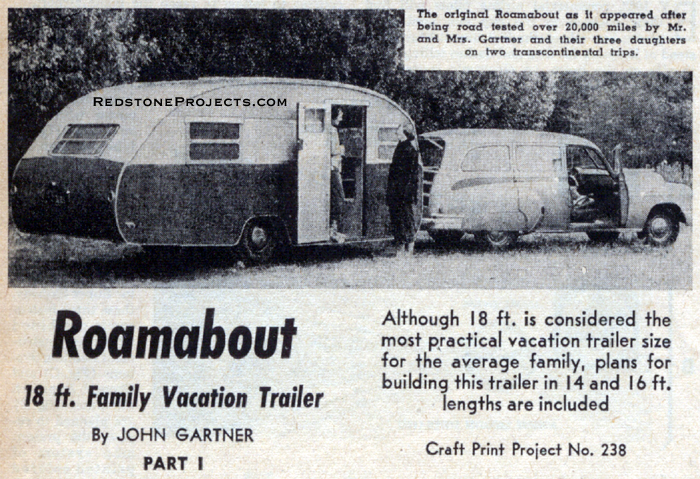
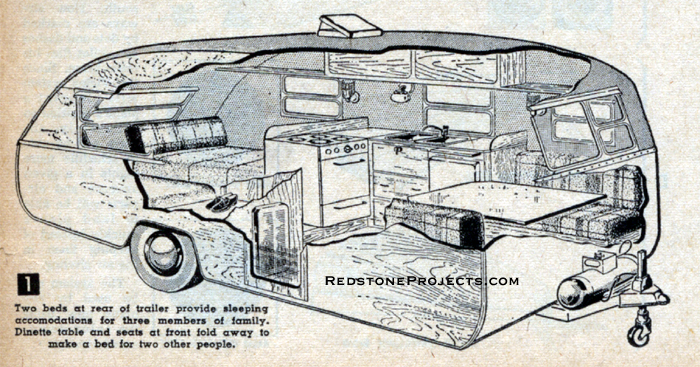
An 18 foot Family Vacation Trailer
By John Gartner
PART 1

You'll save money in two ways by building your own vacation trailer. First, because you can build it yourself for one half the cost of a comparably built and equipped new factory trailer. Second, because the two largest vacation expenses, lodging and meals, for you and your family will not be much more than if you stayed at home. 

The plus feature of having a vacation trailer is that even summer week ends can become short trip, fun packed vacation days. You'll find real comfort in Roamabout too, because it provides sleeping, cooking and eating

Two beds at the rear of the trailer provide sleeping  accommodations for three members of the family. Dinette table and seats at the front fold away to make a bed for two other people.
Two beds at the rear of the trailer provide sleeping accommodations for three members of the family. Dinette table and seats at the front fold away to make a bed for two other people.
accommodations for a family of five (Fig. 1), yet is small and light enough to be towed by a modest family car through the mountain states.

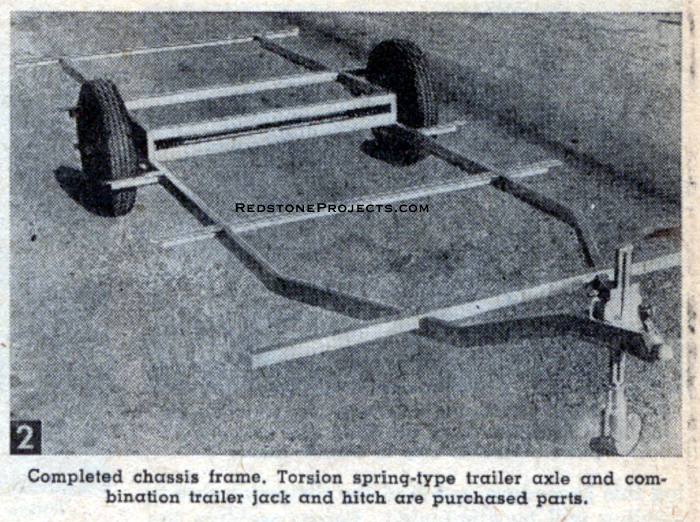
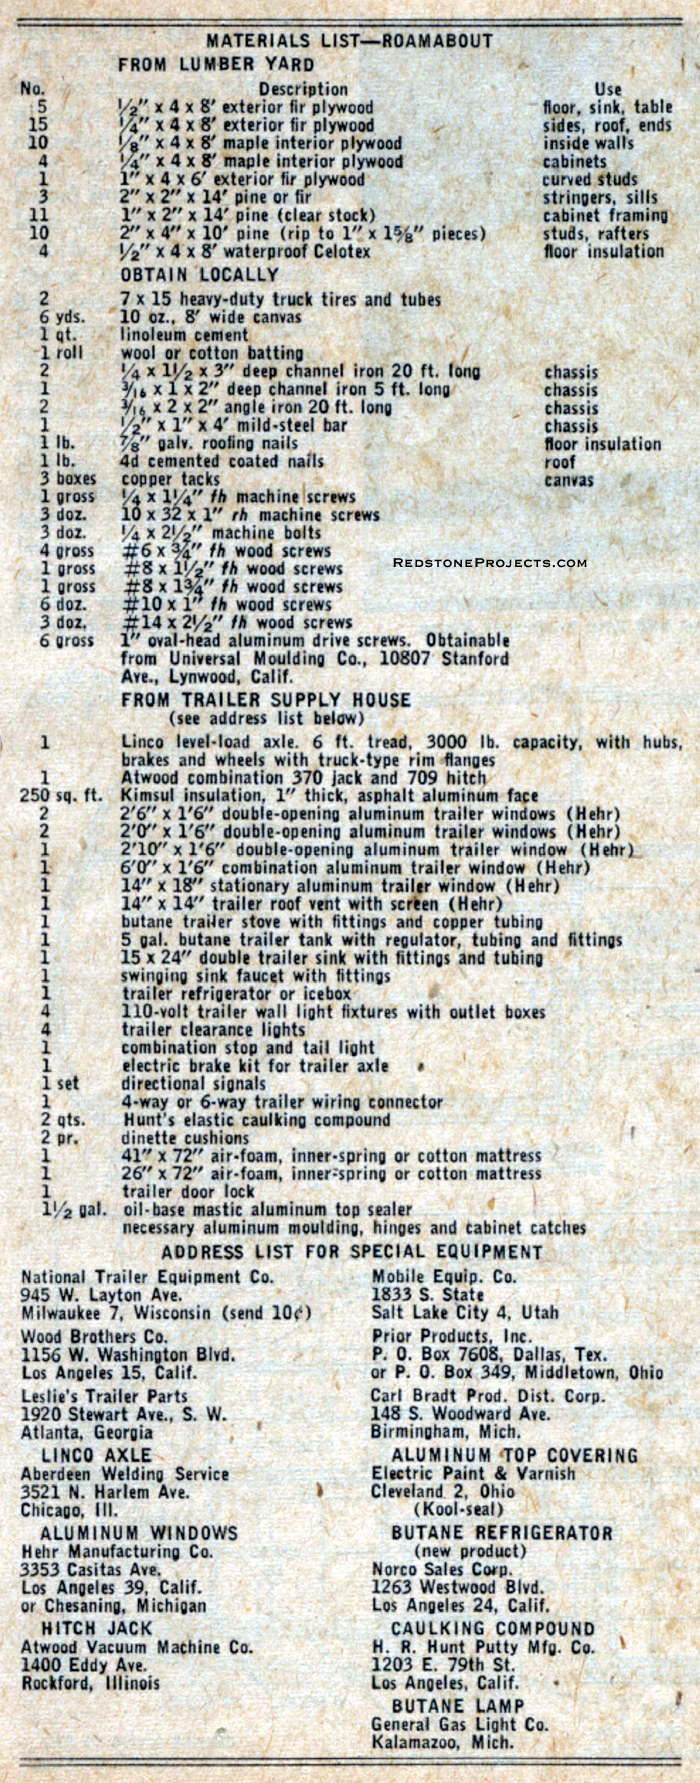
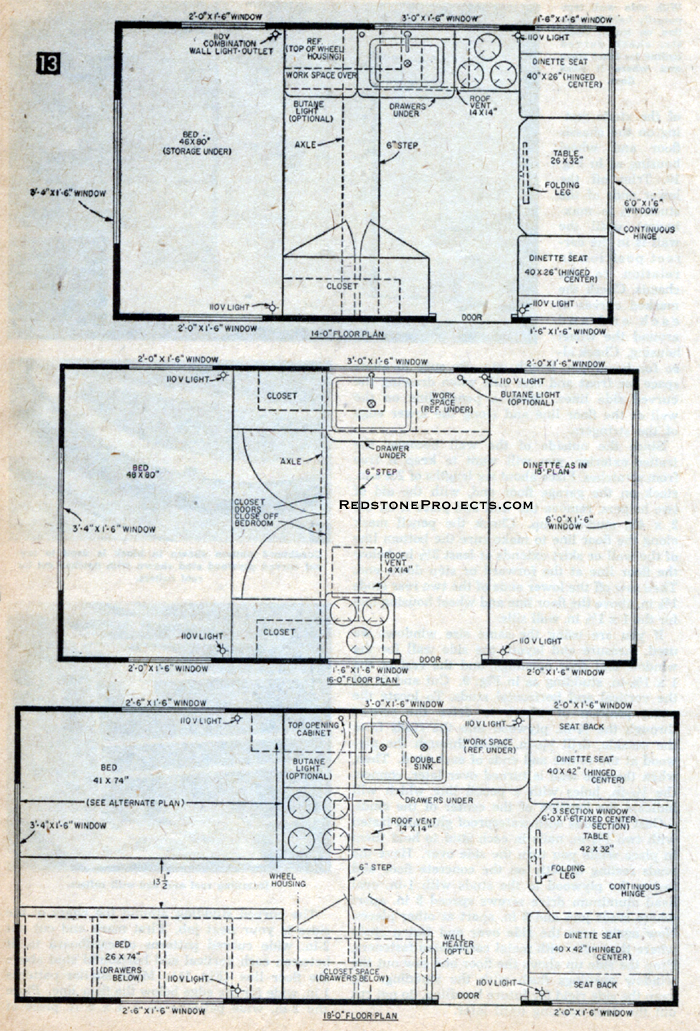
Repeated checks in towing with Chevrolet station wagons (1950 to 1955 six cylinder models with manual shift) show a mileage average of slightly over 15 miles to the gallon of gasoline. Fully equipped but without supplies, Roamabout has a certified weight of 2160 lbs. Actual weight on the road with supplies (and we carried plenty) is about 3000 lbs.

Due to the step down design and use of torsion spring axle, it has an extremely low center of gravity and tows remarkably well. This step gives 6 ft. 2 in. of headroom in the work area and an overall height of 7 ft. 2 in. which permits off-season storage in many existing garages. Tires can be deflated or removed for winter storage in garages having 7 ft. high doors.

Although it is difficult to make an accurate estimate of the cost of building due to the variances in prices of materials and parts, my actual cost was $900, but this included complete fabrication of the chassis at a local weld shop, six-ply truck-type tires, deluxe fittings, air foam cushions, apartment-size oven stove, vinyl floor covering, bird's eye maple hardwood lining and other special equipment. I believe Roamabout can be built for as little as $600 providing the builder does his own chassis welding and shops around for materials. Cost of building the 14 or 16 ft. models will be a little less, but not as much as one might think, since the same axle assembly, hitch-jack and interior equipment would be required. Floor plans for all three models are shown in Fig. 13.

Completed chassis frame. Torsion spring-type trailer axle and combination trailer jack and hitch are purchased parts.
Home trailer construction has been simplified in recent years by the availability through trailer supply houses of the same parts and equipment used by trailer manufacturers.

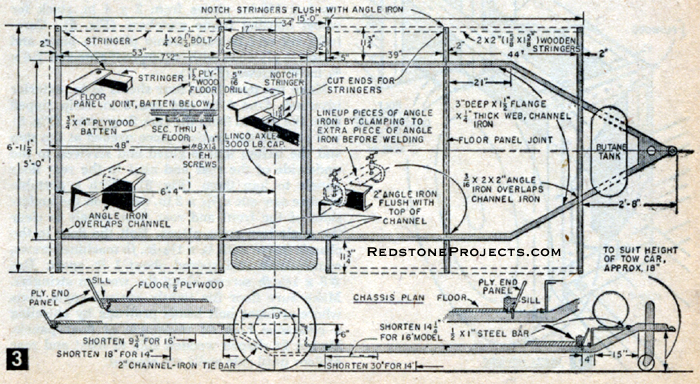
Before beginning construction, it is extremely important that all materials and parts be on hand so that each part can be fitted in its place as the trailer is assembled. Make the chassis frame (Fig. 2) first. The distance from the underside of the hitch to the ground should be approximately 18 in. If you intend to make the 14 or 16 ft. model, shorten the length of the 3 in. channels to the front and rear of the axle as noted in Fig. 3, but use the same number of angle iron cross pieces. If you are not an experienced arc welder, have the frame made up at your local weld shop: If you do the welding yourself, cut and fit all of the channel and angle iron first, then assemble with C-clamps and tack welds before running any continuous welds around joints.

Details of the Roamabout camper trailer chassis construction and layout.
Forward bolt hole lug on axle mounting block (shown in dotted lines) has been cut off so that the axle can be placed closer to step in chassis frame.
By following this procedure, much of the distortion due to welding will be eliminated. Before welding the 2 in. channel iron tie bars (Figs. 3 and 4) to the frame, cut off the forward mounting lugs from the axle assembly so that the axle can be fastened 2 in. closer to the frame step. Place the frame on the axle mounting blocks, align the axle so that it is exactly at right angles with the 3 in. channel iron members and weld the mounting blocks to the frame. Before welding, however, be sure that the axle torsion spring is compressed slightly to give the spindle arm free up and down play. Then fit the 2 in. channel iron tie bar to the frame and weld in place. Clean the frame to remove any grease or oil, wire brush the welds and give it a coat of zinc chromate paint followed with a coat of aluminum paint. When dry, cut four wooden stringers and bolt two to each side of the frame at the ends of the 
 
Vintage travel trailer wheel housing (well) construction.
Fitting side piece of camping trailer wheel housing in position.
Fitting side piece of wheel housing in position.
angle iron cross pieces. Notch the stringers so that they will be flush with the top of the three intermediate angle iron cross pieces and under the end angle irons. 

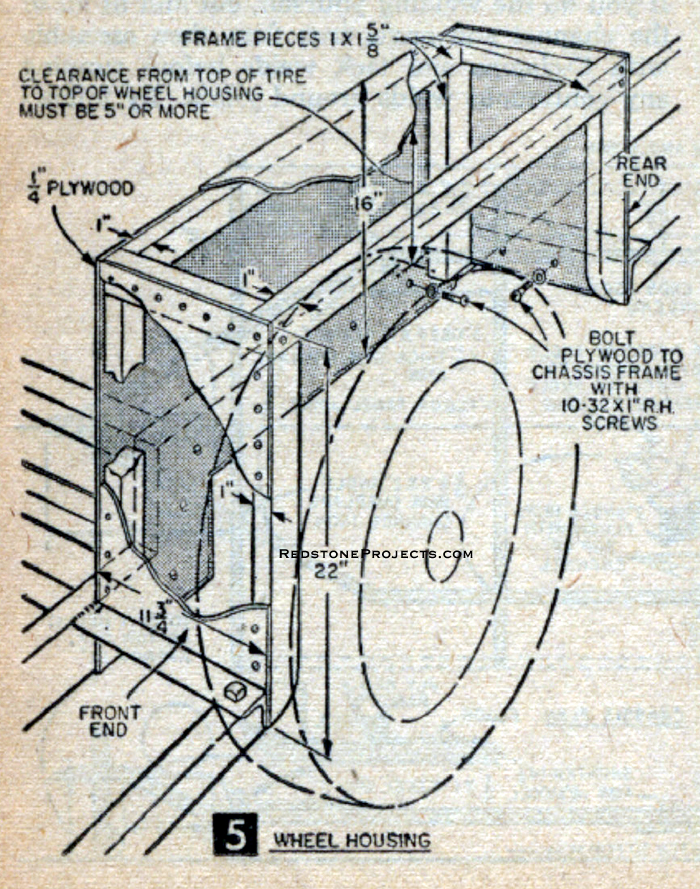
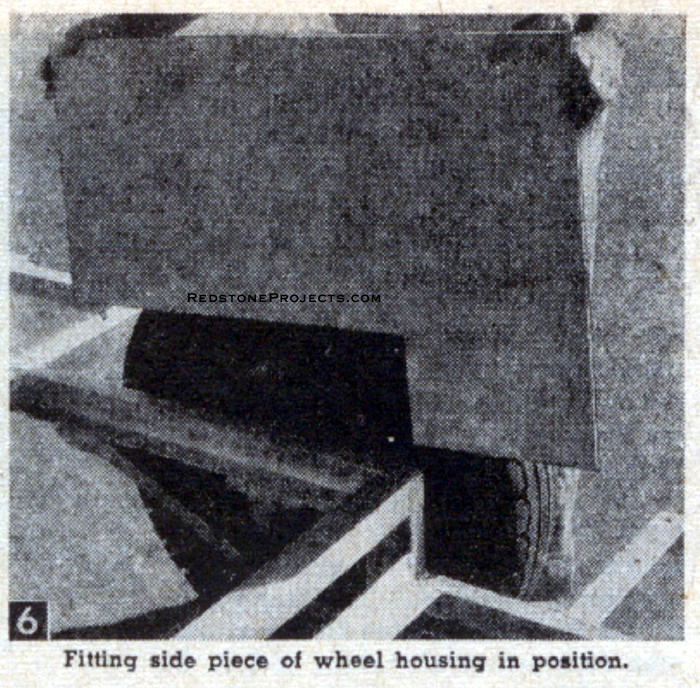
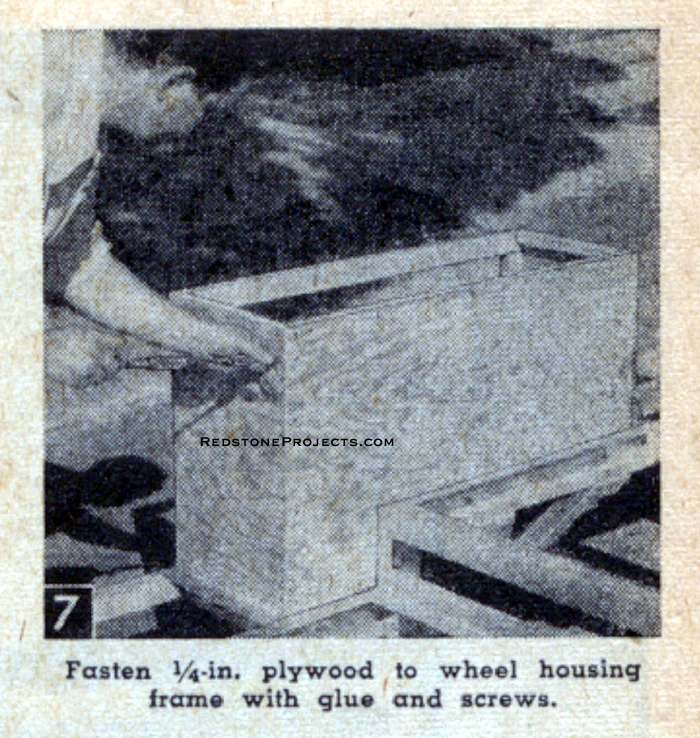
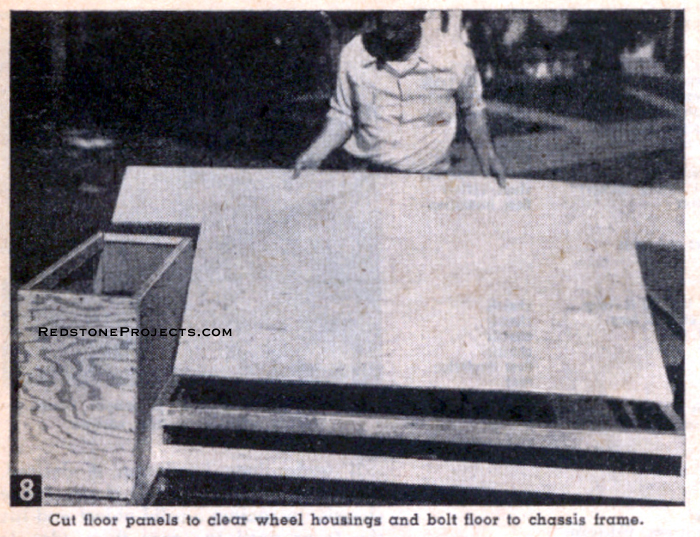
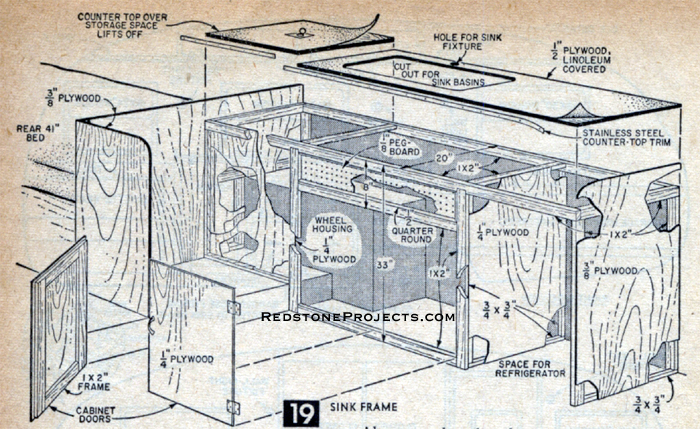
Make the wheel housings (Fig. 5) next. Since tires and wheel sizes vary and clearance above the wheel must be at least 5 in., first measure the distance from the top of the tire to the bottom edge of the channel iron frame and add 5 in. If you use the same axle assembly and tires we did, this distance will be 16 in. above the step and 22 in. below the step (Fig. 5). Measure and cut a piece of 1/4 in. waterproof plywood to size as in Fig. 6 and bolt to the channel iron with 10-32 machine screws spaced 5 in. apart. Cut the 1/4 in. plywood front and rear end pieces and bolt to angle-iron cross pieces.

Coat contacting surfaces with Hunts elastic caulking compound before bolting plywood in place to make a dust tight seam. With the three pieces of plywood in position, rip 1 x 1 5/8 in. pieces from 2 x 4 in. stock for wheel housing frame members (Fig. 5). Carefully cut and fit each frame piece in place and fasten to plywood with waterproof glue and #6 x 3/4 in. f.h. screws (Fig. 7).

Make the floor from four sheets 1/2 in. exterior plywood. One 4 in. and one 6 in. strip ripped from the second from the rear floor panel (Fig. 8) will provide the vertical piece needed at the step and the batten that is glued and screwed to the underside of the rear and next to the rear floor panels to join them (Fig. 3). With a portable electric saw cut a 3/16 x 2 in. rabbet on the undersides of the front and rear floor panels to clear the angle iron cross pieces. Bolt the floor to the chassis frame with 1/4 x 1 1/4 f.h. machine screws, countersunk and spaced about 1 ft. apart. Use #8 x 11/2 f.h. screws along the wooden stringers. Make sure floor fits tightly against angle irons where stringer bolt heads protrude by chiseling a clearance hole on underside of floor panels. Do not fit shaped wooden sills to front and rear of floor until side walls are erected. 

Roamabout trailer bill of materials.
Fasten 1/4 in. plywood to wheel housing frame with glue and screws.
If underfloor insulation is desired, now is the time to install it. Back the chassis up against a solid object and lift the front until the rear floor edge is against the ground. Remove the caster wheel and place jack end on top of a strong box. Then crawl under the chassis and cover all exposed underside sections of the floor with 1/2 in. waterproof Celotex fastened every 12 in. with 7/8 in. galv. roofing nails. Then lower the front of the chassis to raise the rear area and repeat the insulating process on the back section. Coat the entire underside with asphalt aluminum paint.

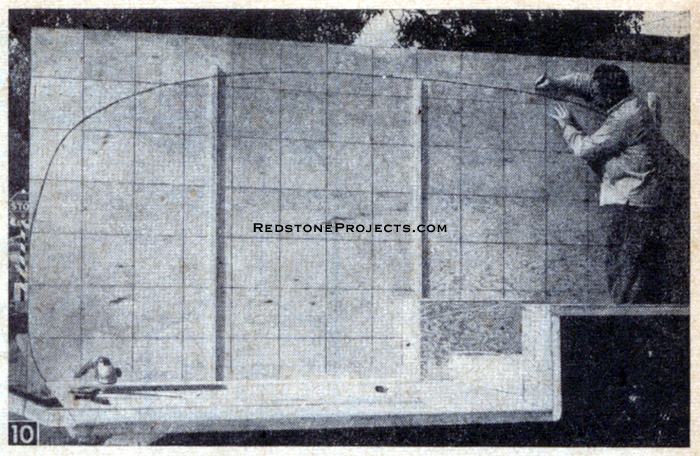
Your next step is the construction of the two side walls. Lay four sheets of 4 x 8 ft. exterior plywood 1/4 in. thick on the garage floor to form a large rectangle 8 x 16 ft. Measure and draw 1 ft. squares over the entire area and lightly sketch in the wall outline as in Fig. 9. A 1/2 x 1/2 in. strip of wood to bend and scribe against will aid you in drawing a smooth curve. If you care to increase the head room in the trailer, layout the roof line higher than shown. Dotted lines indicate outlines for 14 and 16 ft. models. Because all trailer window frames are flat, be sure to make the outline perfectly straight where the windows in the front and rear ends will be located. 

Locate and cut the three 1 x 1 5/8 in. studs (marked X in Fig. 9) 2 in. longer than the plans call for at their lower ends. The center stud straddles the vertical plywood seam. With the studs held in their exact position, drill small guide holes for nails through the studs and plywood at each end of the studs and the center where the four sheets join. Now, turn the entire large 8 x 16 ft. rectangle over so that the studs are on bottom. Separate the front and rear panels at the center and coat the center stud with waterproof glue.

Cut floor panels to clear trailer wheel housings and bolt floor chassis frame.
Cut floor panels to clear wheel housings and bolt floor to chassis frame.
Reassemble the panels on the center stud using nails in the small guide holes to align the panels to their original position and fasten to the stud with 1 in. oval head aluminum drive screws spaced 2 in. apart. Then slide out the two end studs, coat with glue and replace using nails in guide holes to relocate. Fasten with same size drive screws as you did the center stud. After blocking up the chassis level and solidly, get at least two helpers to raise and hold the wall panel temporarily on the right side of the chassis facing front.
1956 Roamabout travel trailer framing details.
Have the lower ends of the studs resting on the chassis floor and wheel housing as in Fig. 10. Trim off the lower ends of the studs (3/4 in. maximum) until the wall is in the correct position in relation to the chassis. Check the marked curves at each end and around the wheel housing.
With side wall temporarily held in position on trailer chassis, check curved outline for head room and where it joins floor.
Check also for headroom, length, etc. Be sure to allow space for front and rear sills when drawing the curved side lines. Mark a pencil line on the wall at the floor line and along the lower edge of the stringers. Since the outside of the wall becomes the trailer exterior, you will want to keep it free from scratches. Place about six lengths of 2 x 4 in. stock on the garage floor and, with the aid of two helpers, remove the wall and place it on the 2 x 4's, stud side up. Check the pencil mark along the floor line to make sure the bottom line of the wall or skirt extends at least 3 1/2 in. below the floor line at the forward or step down end. Then saw off the lower ends of the two rear studs 15/8  in. above the floor line and wheel housing line for the 1 x 1 5/8 in. wall sills.

If you are using the same size windows we used, measure and layout the side wall for the window and door openings, and the rest of the 1 x 1 5/8 in. studding as in Fig. 9. Cut and fit all the vertical and horizontal studs. 

To locate the exact position of where to drive the screws through the 1/4 in. plywood into the studs from the outside, drill 1/16 in. holes through the plywood at the center and ends of each stud. Then, when the side wall is turned over later, connect the 1/16 in. holes with a pencil line which will indicate the location of the center of the studs. Coat the studs with waterproof glue and fasten with two 11/4 in. nails in each stud to hold them in place while you turn the side over. Have the studs resting directly on the concrete floor and fasten the plywood to the studs with 1 in. oval head aluminum drive screws spaced 2 in. apart where studs join and 6 in. apart at other places.

Now, again turn the side over and fasten studs where they join with metal corrugated fasteners. Prop the side up above the floor and saw out the window openings flush with the studding. To keep the side rigid for future handling, do not cut out the door opening until later. 
 

Cardboard pattern shown in black is used to layout  curved plywood stud shown with notches cut for trailer roof rafters.
Cardboard pattern shown in black is used to layout curved plywood stud shown with notches cut for roof rafters.
Installing the trailer roof roof and end-wall rafters.
Installing roof and end-wall rafters.
The curved studding around the edges of the sides is your next job. First mark and cut out 2 in. wide curved patterns of cardboard to fit between each vertical and horizontal stud above the floor line (Fig. 11). Make similar patterns 1 in. wide for the edge below the floor line. Place the 2 in. wide patterns on a 4 x 6 ft. piece of 
 
Roamabout trailer floor plans for 14 foot, 16 foot and 18 foot models.
1 in. thick plywood. Properly laid out, the 4 x 6 ft. sheet will be enough for both side walls. Do not worry about direction of grain because the plywood has sufficient strength in any direction. Mark the 1 in. wide patterns for the edge below the floorline on scrap pieces of 1/2 in. plywood left from the floor. Cut with a band 
Saw out the trailer door opening and save the pieces to make  the door. Cut 18 rafters 6 ft. 11 1/2 in. long and fit into  the notches cut in the curved studs as in Fig. 12. Fasten with glue and two #8 x 1 3/4 in. f.h. screws at each end.
or jigsaw and glue and nail the 1/2 in. pieces only along the lower edge clinching the nails on the plywood strip side. Temporarily place the 2 in. wide plywood pieces in position on the side (do not glue at this time) and mark the position of each 1 x 1 5/8 in. rafter (Fig. 9) for notching. Space every fourth rafter 4 ft. on centers so that 4 ft. wide plywood can be used for the roof without cutting. After cutting rafter notches in the curved studs (Fig. 11), glue and drive screw the curved studs to the plywood sides. Drive the screws through from
Alternate bed section for 18 foot travel trailer plans.
the 1/4 in. plywood side about 1 in. from the edge because the edge is to be rounded off later. Trim the edges with a block plane and sander, and temporarily set the wall on the chassis to see that it fits properly. Now, using the right wall as a pattern, make the left side wall (Fig. 9). It is identical with the exception that it has a center window instead of a door. Be sure to put the studs on the right side of the plywood to make the sides pairs. Drill 1/4 in. holes spaced about every 12 in. through the sills as in Fig. 9. To permanently assemble the sides to the chassis, first coat the sides of the stringers and about 1 in. of the top of the floor along the side edges
Rounding off corners of the trailer roof and side walls.
Rounding off corners of roof and side wall with drawknife.
with caulking compound. Set the walls up on the chassis square with the floor of the chassis and brace solidly. Fasten the walls to the stringers with #10 x 1 in. f.h. screws driven through from the outside of the plywood and spaced 6 in. apart. Fasten the sills to the floor with #14 x 2 1/2 f.h. screws through the 1/4 in. drilled holes. 

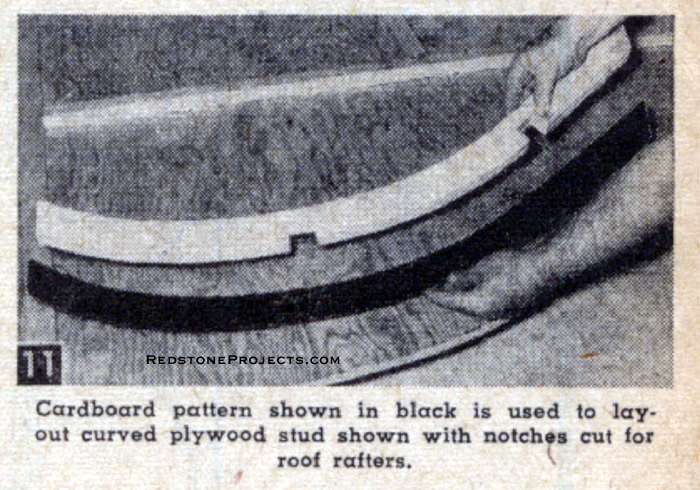
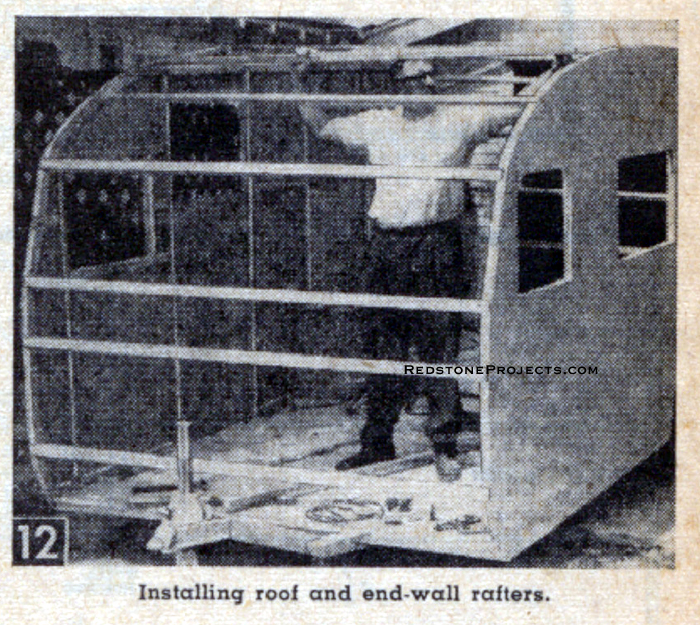
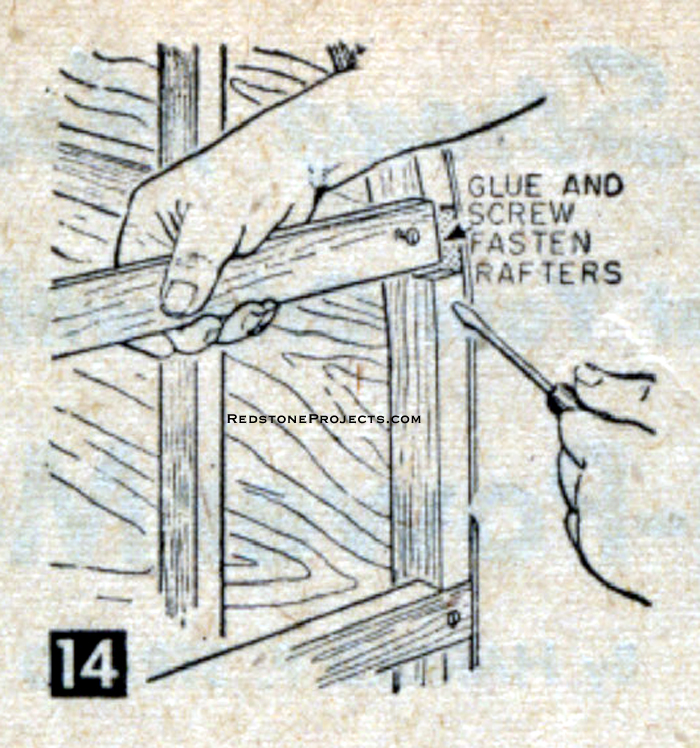
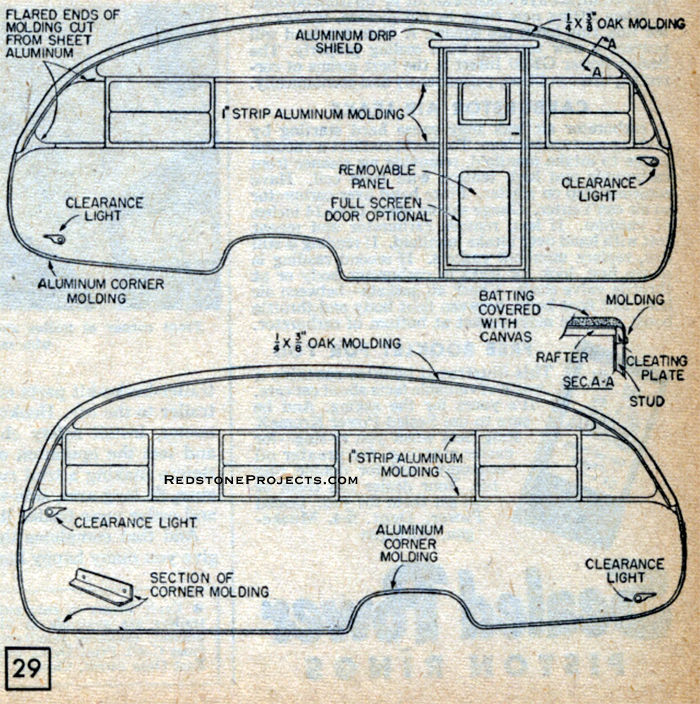
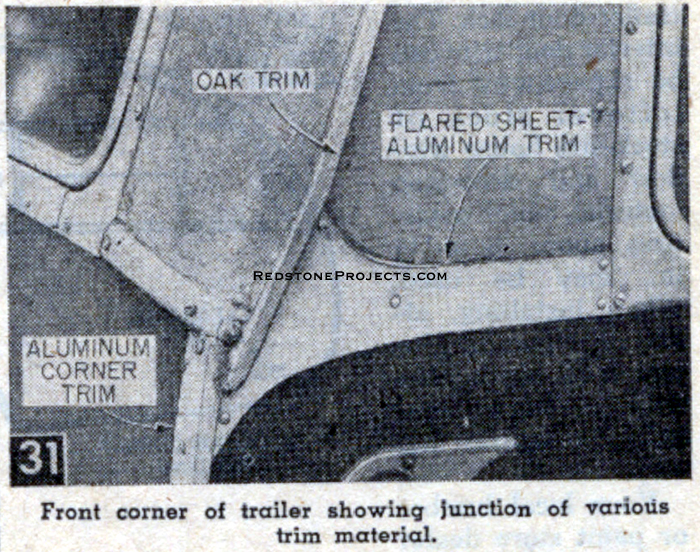
Saw out the door opening and save the pieces to make the door. Cut 18 rafters 6 ft. 11 1/2 in. long and fit into the notches cut in the curved studs as in Fig. 12. Fasten with glue and two #8 x 1 3/4 in. f.h. screws at each end (Fig. 14). 

Make the front and rear end sills (Fig. 3) from 2 x 2 in. stock. Bevel to conform with curve of sides and bolt to front and rear angle iron cross pieces. Mark the width dimensions of the front and rear windows on the rafters at each end so that the windows will be centered, and fasten two pieces of stud stock vertically between the roof rafters. Make a similar  frame for the roof vent above the spot where the cooking stove will be located. With all the frame pieces in place, bevel the edges of the rafters so that the plywood ceiling and ends will fit snugly. Use 1/4 in. exterior plywood for the roof and end walls. Cut the plywood pieces slightly over 7 ft. long and trim ends after installation. If you have trouble bending the rear panel, wrap it in a blanket and soak with hot water until pliable. Use #6 x 1 in. f.h. screws spaced 2 in. apart at the end sills and where the panels are joined, and 6 in. apart elsewhere. Use 4d (1 in.) cement coated nails to fasten the roof plywood to the curved studs. Place the nails about 3/4 in. from the edge to allow for rounding off corner with a plane or draw knife as in Fig. 15. Sand rounded corner with a disc sander to make it smooth and uniform. Leave the corners below lower window line square because they are later covered with aluminum corner molding. Electrical wiring, insulating and completing the exterior and interior of Roamabout to get it ready for that vacation will be described in Part 2 appearing in the next issue.

Roamabout, the latest of 14 trailers designed especially  for the backyard builder by John Gartner,  author of the book All About Trailers.
Roamabout, the latest of 14 trailers designed especially for the backyard builder by John Gartner,
author of the book "All About Trailers".
(publisher Henry Holt & Co.)
Roamabout
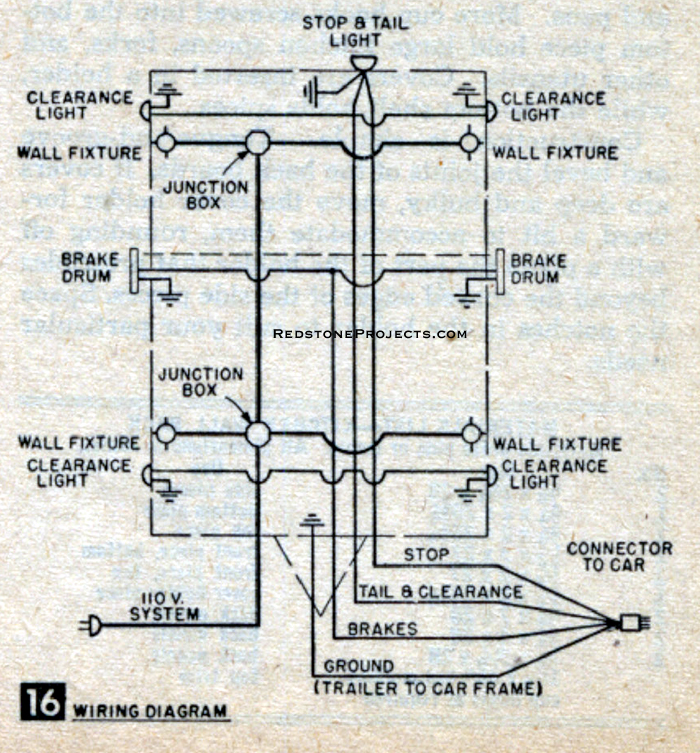
An 18 foot Family Vacation Trailer
By John Gartner
PART 2

With the roof and end-wall panels in place, and the corners rounded off as described in Part 1, installation of the electrical wiring is your next step. Brake, stop, tail and clearance lights are wired to a common connector at the tongue under the trailer (Fig. 16). Run the wires, which are plastic covered to avoid deterioration, under the trailer and up through holes drilled through the floor and sills. Fasten the stop, tail and clearance lights to the walls and connect to wires extending through holes drilled through the walls in back of light fittings. Staple the wires to the trailer underside and wall studs with insulated staples.

For the 110-volt interior lighting circuit, use #12 two-wire Romex cable again run under the trailer and up the side walls through holes drilled through the floor and walls sills. Carry the cables up to about 6 in. above the tops of the windows for connecting to wall light fixtures later (Fig. 17) when interior wall covering is applied. Use standard junction boxes fastened to the underside of the trailer floor where branch lines join.

Connect the outside end of the cable to a standard male connector for hookup with an extension cord to power supply. If an electric refrigerator is to be installed, provide an additional branch line to a convenience outlet located in the trailer wall near the refrigerator.

Roamabout travel trailer electrical wiring diagram.
The tank shown at forward end of the trailer in Fig. 18 is the butane storage tank containing fuel for the cooking stove and an interior emergency light. Purchase the tank and mount on its 1/2 x 1 in. steel support bars as in Fig. 6, Part 1. Temporarily place the stove in position in the trailer and run a 3 in. copper tubing under the trailer, and up through a hole in the floor from the stove fitting to the regulator on the butane tank. Coil the tubing at the fitting ends as in Fig. 18 to absorb vibration. Be sure to make all connections gas tight to prevent leakage, particularly inside the trailer. If a gas light is to be installed use 1/4 in. copper tubing from a tee-fitting on the stove line to the light. 
Right and left side plan view of the Roamabout trailer showing the position of the door, windows, living accommodations and details of  joining the the roof and sidewall.
Completed front end of trailer. All parts shown are exposed to weather. (A) Butane tank; (B) Regulator;  (C) Copper tubing; (D) 110v line cord from lights in the trailer; (E) 6-Way connector for brakes and clearance, stop and tail lights; (F) Safety chain: (G) Trailer hitch; (H) Jack.
Completed front end of trailer. All parts shown are exposed to weather. (A) Butane tank; (B) Regulator; (C) Copper tubing; (D) 110v line cord from lights in the trailer; (E) 6-Way connector for brakes and clearance, stop and tail lights; (F) Safety chain: (G) Trailer hitch; (H) Jack.
Make the sink frame as shown in Fig. 19; this also includes an enclosed space for the refrigerator or ice box and an open-at-the-top storage cabinet. Only major dimensions are given. Determine other dimensions from size of purchased sink basin and ice box. You can rip saw all 1 x 2 in. framing members from 2 x 4 in. stock. Or lumberyard 1 x 2 in. stock (which actually measures 13/16 x 1 5/8 in.) may be used. Cut out the sink top for the trailer-size sink basins before cementing the linoleum in place. Place the sink in position on the top, and mark for drilling a hole through the floor to run a 3/8 in. copper tube from a hose connection under the floor, just inside the sill to the faucet (Fig. 17).

Waste water goes through the sink drains into a Y-fitting and then by garden hose to another hose connection under the floor. If a trailer-type toilet is to be installed, place it as shown in Fig. 13 (Part 1). Follow the plumbing installation instructions received with the fixture. 

The trailer sink frame including an enclosed space for the refrigerator or ice box  and an open-at-the-top storage cabinet.
Once you have completed the plumbing and wiring, the interior insulation can be applied. Staple 1 in. thick insulating material with vapor barrier, or reflective aluminum, to the entire side walls between the studs and to the end walls from the floor to bottom of the windows.

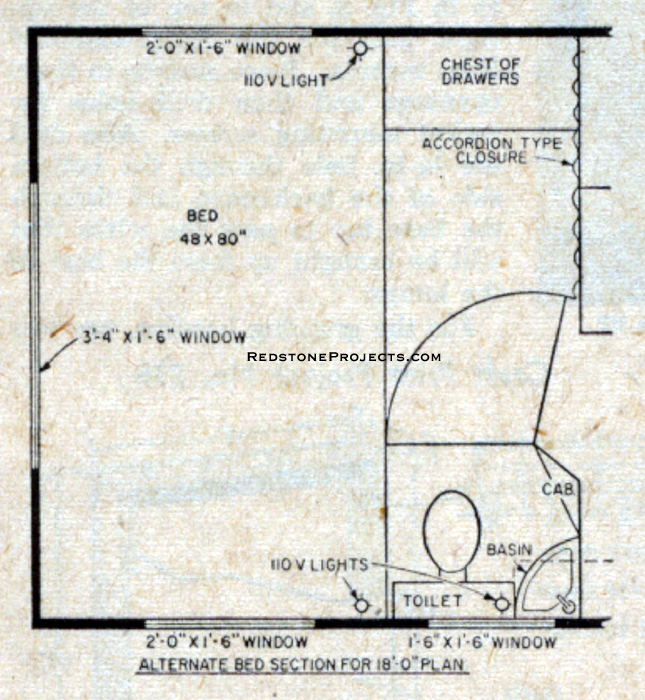
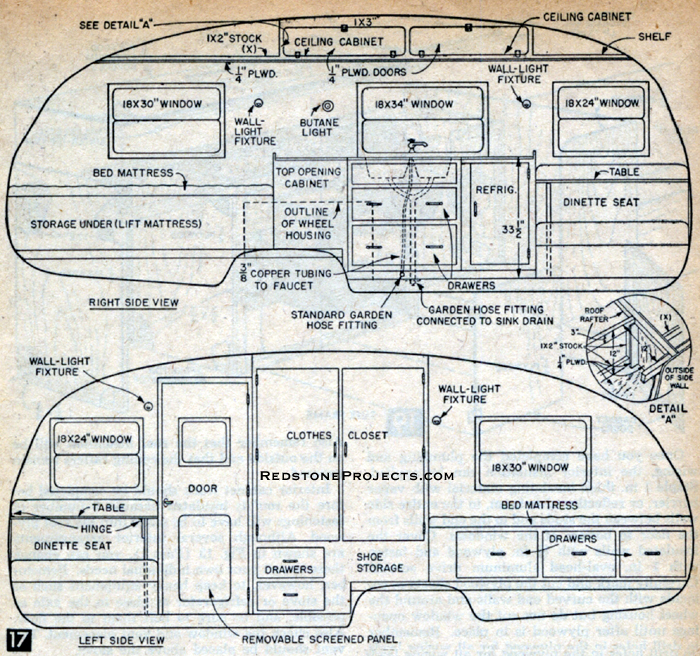
Cover the insulated walls with 1/8 in. plywood and fasten with 1 in. oval-head aluminum drive screws. Carefully mark and cut the plywood sheets to coincide with the curved end walls and around the wheel housing but do not cut the window openings until after plywood is in place. Remember to drill holes in the plywood for all wiring leads and the butane light tubing if it is to be included.

Also remember that the roof insulation will be on the outside and that the ceiling rafters remain exposed. Interior cabinet work should be completed before the roof is insulated because a number of fastenings will have to be made into the roof plywood.

Although several interior arrangements are shown in Fig. 13 (Part 1), you can change these to suit your own individual needs. Remember, however, to keep heavy equipment such as the stove or refrigerator as close to the axle as possible, and be sure to bolt them to the floor. 

Also check the window and vent placement. The vent should be placed above the stove. 

Plan for the frame for the 21 inch bed at the rear of the trailer.
Starting at the rear of the trailer, make the two bed frames (Figs. 20 and 21). The bed frames on the original Roamabout were made to fit the 26 and 41 in. mattresses we had custom made at a local mattress shop. You can, however, install one wider bed extending across the width of the trailer (see Fig. 13, Part 1) and then use a standard 48 in. wide mattress.

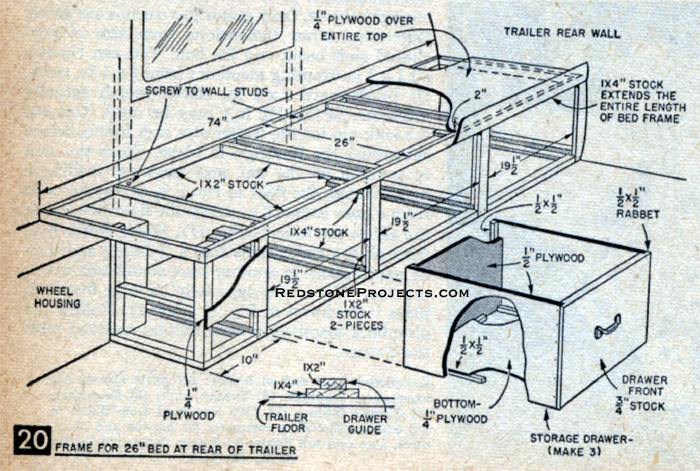
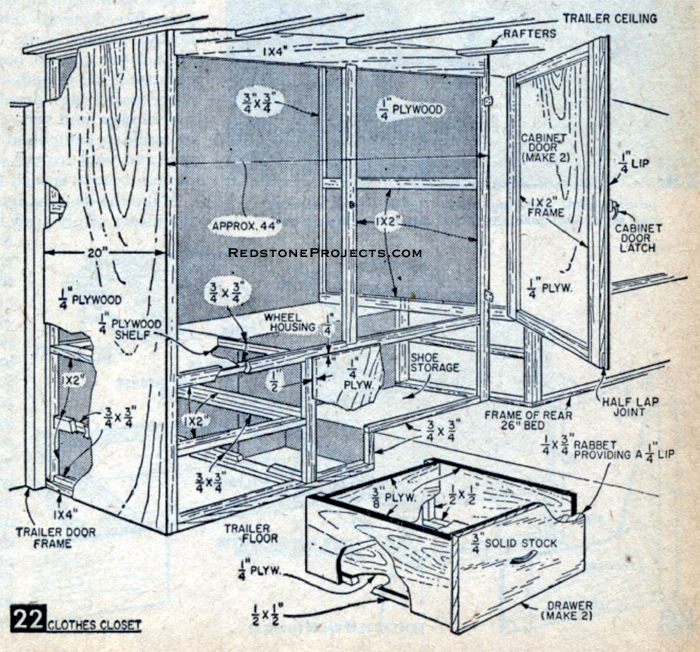
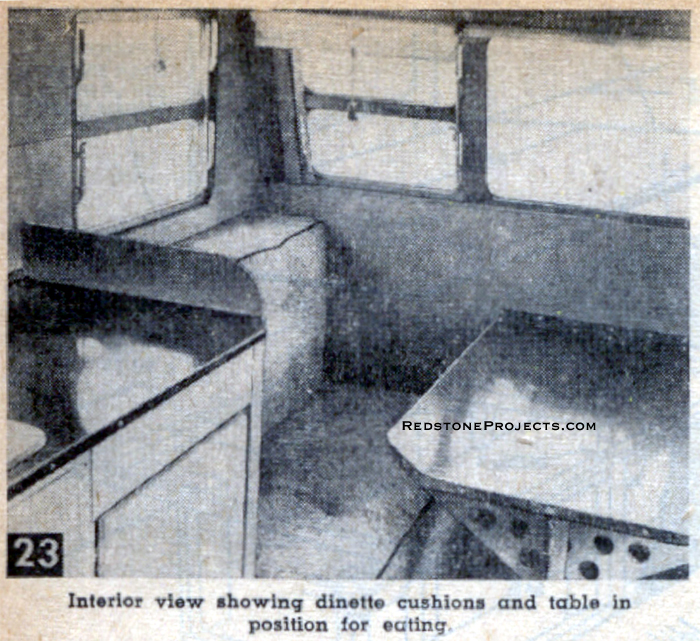
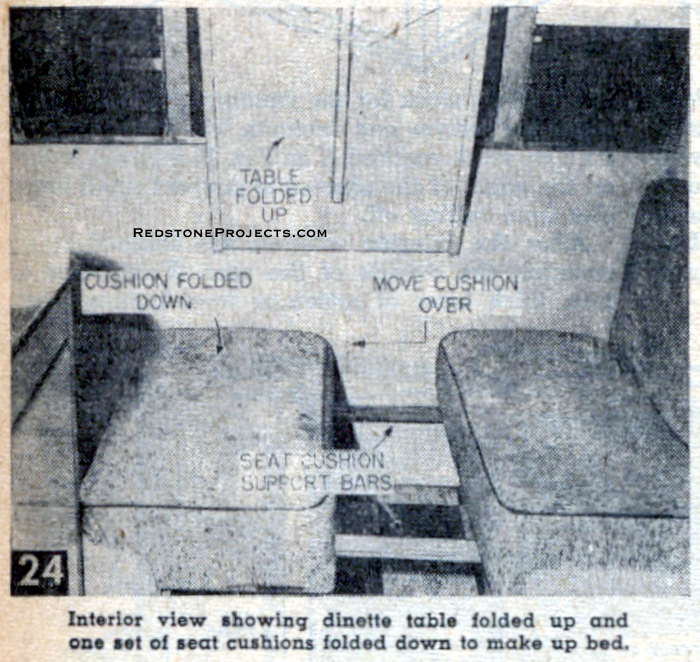
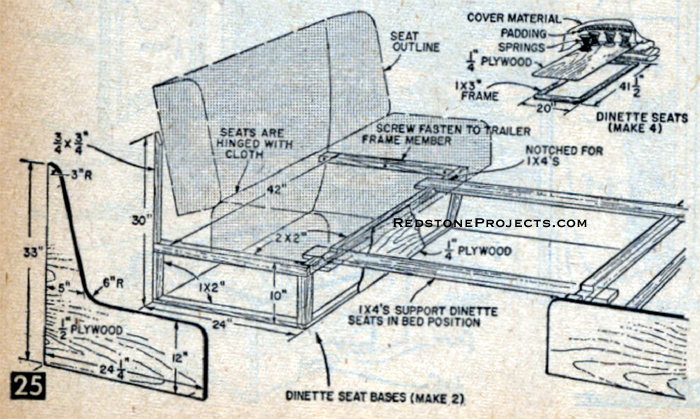
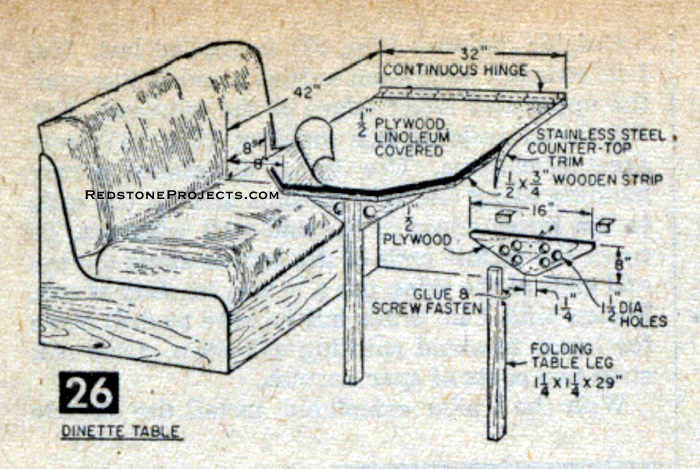
For the clothes closet, which extends from the floor to the ceiling, make the frame of 1 x 2 in. and 3/4 x 3/4 in. stock (Fig. 22). Fasten the 1 x 4 in. top framing member to the 1/4 in. roof plywood with screws driven through from the outside. Fasten the vertical frame pieces against the wall to the horizontal wall studs and the bottom frame pieces to the floor. Cover the two closet ends and front of the shoe storage compartment with 1/4 in. plywood and install the 1/4 in. plywood shelf.

Take the dimensions for the 1 x 2 in. cabinet door frame directly from the door openings so the frames will fit inside the openings when the doors are closed. Cover the frames with 1/4 in. plywood, allowing it to extend 1/4 in. beyond the frames all around. Hang the doors with standard kitchen cabinet hinges and door latches. 

Determine the drawer size from the closet frame and assemble as is detailed in Fig. 22.

The dinette seat and table arrangement, which is used for eating during the day (Fig. 23), converts to a bed at night (Fig. 24) . Make up four seat frames (Fig. 25) and have your local upholstery shop make the cushions hinging two together as in Figs. 24 and 25. To support the seats, install a seat base into each forward corner of the trailer (Fig. 25). Make the dinette table as in Fig. 26 and fasten to the front trailer wall with a continuous hinge so that the table can be raised and lowered. For the ceiling cabinet and shelves (Fig. 17) use 1 x 2 in. stock for the framing and 1/4 in. plywood for shelves and cabinets.

Plan for the frame of the 41 inch bed at the rear of the travel trailer.
The long piece of 1 x 2 in. stock marked X in Fig. 17 forms a ledge on the edges of the shelves to prevent small articles from rolling off. After the interior cabinets are finished start covering the outside of the roof. First place a 1 in. thick layer of cotton or wool batting over
Plan with details for the clothes closet of the travel trailer.
Interior view showing travel trailer dinette cushions and table in position for eating.
Interior view showing dinette cushions and table in position for eating.
Interior view of the camping trailer showing the dinette table folded up and one set of seat cushions folded down to make up bed.
Interior view showing dinette table folded up and one set of seat cushions folded down to make up bed.
Travel trailer dinette plans detail.
outside of the entire roof and down the end walls alongside the front and rear windows. Use about a 2 in. spot of linoleum cement every square foot to temporarily hold the batting in place and trim the edges of the batting so that the corners will be nice and rounded after the canvas covering is in place. If 8 ft. wide canvas is unavailable, sew together two 30 ft. lengths of 48 in. wide canvas with a double seam. Coat the outside of the rear end wall below the window with waterproof linoleum cement. Now, with the canvas draped over the top and end walls, carefully position the canvas over the cement and smooth out by rubbing with your hands to eliminate wrinkles. Tack the canvas along the bottom and lower edge of the rear window with copper tacks. Now, going to the front of the trailer, pull the canvas gently but tightly over the top and tack along the top edge of the front window (Fig. 30). Trim the canvas along the sides of the roof allowing enough material to extend about 1 1/2 in. beyond the rounded edge of the sides. Tack the canvas to the sides every 2 in. (Fig. 30). Do not tack on the roof proper, only along sides and window and vent edges. 

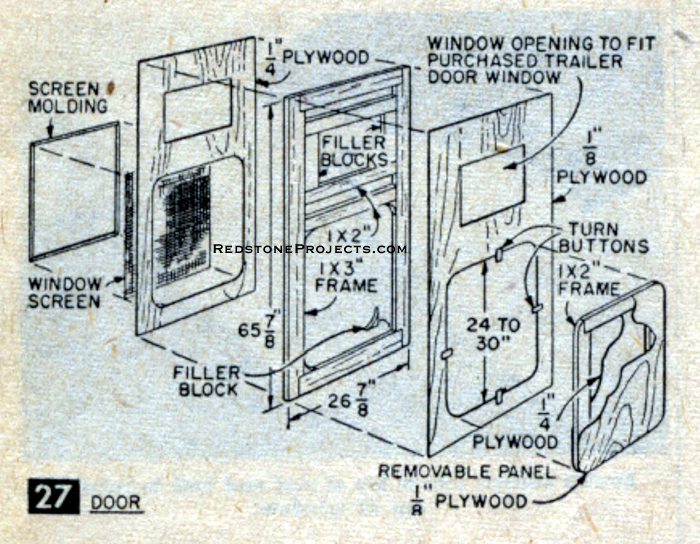
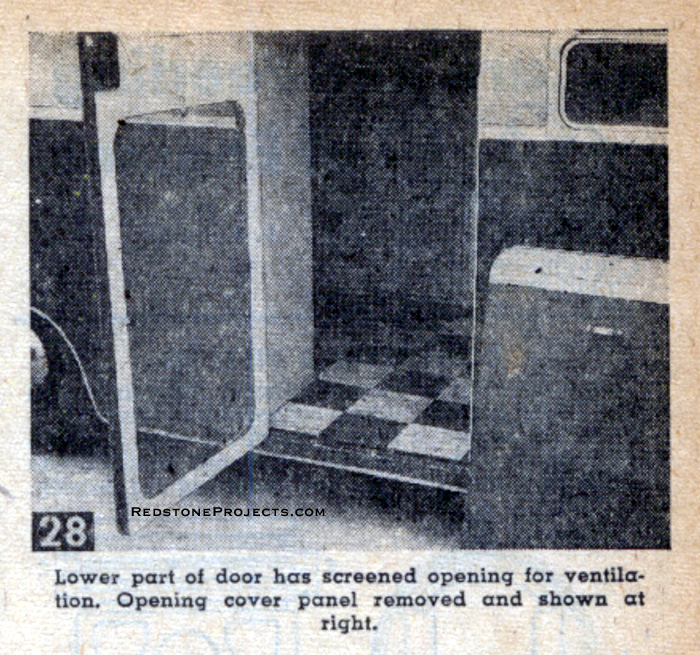
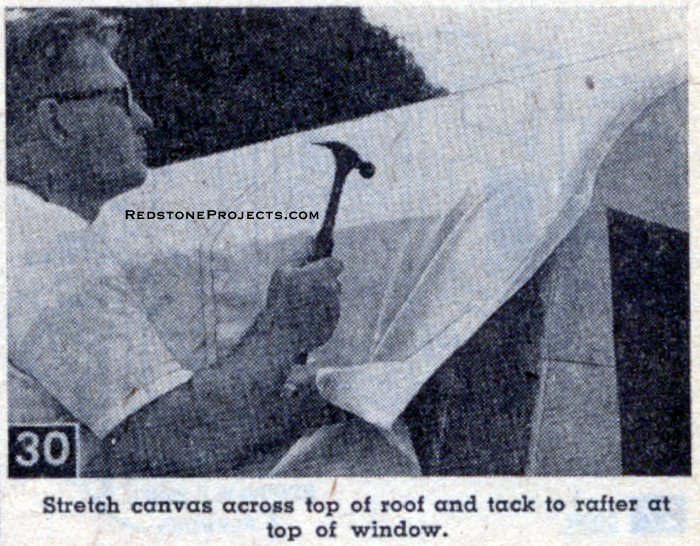
When completely tacked, cut out canvas around windows and vents, leaving about 1 in. of canvas to wrap and tack around openings. Before fitting windows and vent in place, give the canvas top two coats of oil-base mastic aluminum top sealer. This is a heavy, paste-like material that is waterproof and always retains some degree of elasticity. Do not use asphalt base aluminum mastic because it has a tendency to rot the canvas.

After sealer has dried, coat the edges of the window and vent openings with plenty of caulking compound and fasten the window and vent frames with #8 x 3/4 r.h. aluminum screws spaced 3 to 4 in. apart.

Make the door as detailed in Fig. 27. Use the pieces of plywood left after cutting out the door opening as covering material on the door frame. The removable panel is optional. You may prefer to make the lower part of the door solid. However, we found that by removing the panel on hot summer nights the ventilation was greatly improved which made sleeping much more comfortable. As shown in Fig. 28 the panel area is screened. Use a continuous hinge to hang the door and fit with a trailer door lock.

Vintage travel trailer dinette table plans.
How to build a vintage travel trailer door.
The interior door trim can be rip sawed from leftover stock or stock-size house window and doorstop material, which measures about 3/8 x 1 1/2 in., may be used. When installing, allow door trim to project 1/4 in. beyond the door opening to serve as both door trim and stop. Your local lumber or paint store dealer can furnish you with information for interior finishing, according to the type plywood you use. I used Cabot's wax stain in a silver gray color. You merely brush or wipe it on the plywood, allow to set for 5 to 10 minutes, then wipe off the excess. Rubbing with a cloth later gives it a satin finish.
Lower part of trailer door with screened opening for  ventilation. Opening cover panel removed and shown at right.
Lower part of door has screened opening for ventilation. Opening cover panel removed and shown at right.
For the outside finish, paint an exterior enamel could be used. Or use (as I did) 1 coat of Firzite tinted with colors-in-oil, followed by two coats of spar varnish. I used orange colors-in-oil to tint the Firzite used on the area on each side above the top window trim; lemon yellow between the upper and lower window trims; burnt sienna from the lower win-dow trim to the bottom. The canvas on the front and rear end walls was finished with a matching brown enamel. If the trailer is kept outdoors all year around it should be varnished each year.
How to install the roofing and exterior molding to a vintage travel trailer.
Outside molding (Fig. 29) is applied last. Use 1 in. strips of aluminum between and in line with the upper and lower edges of the windows. Cut the flared ends of this molding (Fig. 31) from sheet aluminum. Use 1/2 in. aluminum corner molding along the side bottoms and up the ends to the lower edges of the end wall windows. To cover the tacked ends of the canvas along the top and ends of the sides, use a 1/4 x 3/8 in. strip of oak. Fasten with 1 in. brads but be sure to drill holes for brads to avoid splitting oak strip. Give oak strip two coats of spar varnish.
Stretching the  canvas across top of the trailer roof and tacking to rafter at the top of the window.
Stretch canvas across top of roof and tack to rafter at top of window.
Front corner of trailer showing junction of various trim materials.
Front corner of trailer showing junction of various trim material.
With the trailer completed, install the electric trailer-brake-kit parts on your car and hitch the trailer to the car. Hookup the trailer wiring connector, install safety chains from car to trailer and test the operation of the brakes and lights. Before making a trial run on the highway, however, fit long arm, sideview mirrors to your car and order your trailer license plates. And that completes this project, which should give you many happy hours of low cost vacations. 
Save with Vintage Plan Deals
|See All Vintage Trailer Plans|
Any 2 Vintage Trailer Plans
$19.95 FREE Shipping
Select 2 Vintage Travel Trailer Plans


Any 3 Vintage Trailer Plans
$24.95 FREE Shipping
Select 3 Vintage Travel Trailer Plans
 
 
3

 
Any 4 Vintage Trailer Plans
$29.95 FREE Shipping
Select 4 Vintage Travel Trailer Plans


4
Any 6 Vintage Trailer Plans
$36.95 FREE Shipping
Select 6 Vintage Travel Trailer Plans


This modern chassis makes an excellent base for your teardrop trailer project, lightweight camping trailer, or vintage travel trailer build.
Teardrop Chassis Plans
Build a Teardrop Chassis
without Welding
eBook
PDF Format
Price $12.95
Learn more about these plans >>
Utility Chassis Plans
Build a Utility Trailer
without Welding
eBook PDF Format
Price $12.95
Lean more about these plans >>

Buy  Both
Build a Teardrop Trailer Chassis
and
Build a Utility Trailer
Together and Save 20% !
eBook
PDF Format
Price $19.95

RedStoneProjects.com Home
SAVE With Multi-Plans Deals!
Project Plans
Concealment End Table Plans
Quilt Rack Plans
Crossbow Plans
Catapult Plans
Craftsman Style Plans
Water Screw Plans
Tobacco Pipe Rack Plans
Shooting Sports Plans
Reloading Bench Plans
Closet Reloading Bench Plans
Brass Cleaning Bench Plans
Small Reloading Bench Plans
Corner Reloading Bench Plans
Two Sided Shooting Bench Plans
Nativity Stable Plans
Trailer Plans
No Weld Teardrop Trailer Chassis
No Weld Utility Trailer
Vintage Trailer Plans
Vintage Travel Trailer Plans Collection
16 Foot Canned Ham Vacation Trailer
Craftsman Hardside Folding Camper Trailer Plans
1947 Thousand Addresses Travel Trailer Plans
Bungalow Folding Tent Camper Trailer Plans
1937 Runlite Lightweight Travel Trailer Plans
1947 Treadrop Trailer for Two Plans
1935 Pullman Trailer Plans
1940 14 Foot Cabin Trailer Plans
1951 Lightweight Sportsman's Trailer
1956 18 Foot Family Vacation Trailer
1934 17 Foot House Trailer
DIY Pop Up Camper Trailer Plans
1960 Fold Up Trailer with Slide Out Plans
1953 Wild Goose Kamp Master Trailer Plans
1935 Jim Dandy Cabin Cruiser Trailer Plans
Vintage How To Build Trailers eBook
Hardside Pop-Up Camper Plans
Wanderbug Lightweight Vacation Trailer Plans
Streamline Family Vacation Trailer Plans
Tent On Wheels Folding Trailer Plans
Lil Guy Micro Camper Trailer Plans
Traveler Wood Framed Travel Trailer Plans
Vintage Roadside Chuck Wagon Trailer Plans
Pickup Truck Pop Up Camper Plans
Hardside Roof Top Pop Up Sleeper Plans
Low Profile Pickup Truck Camper Plans
Vintage Streamline Teardrop Trailer Plans
Vintage 1956 Camp Trailer Plans
Modern Conestoga Trailer Plans
1947 Trail Scout Camper Plans
Vintage Bolt Together Tent Trailer Plans
Vintage 1947 Wanderer Canned Ham Trailer Plans
Mobile Vacation Home Plans
Lightweight Expanding Trailer Plans
Simple and Rugged Truck Camper Plans
Vintage Boat Plans
Sea Craft 25 Foot Cabin Cruiser Plans
21 Foot "Luxury" Shanty Boat Plans
20 Foot Budget Houseboat Plans
DIY Project Books
Build Three Working Model Catapults
Build Five Craftsman Style Tobacco Pipe Racks
Build a Reloading Bench and a Reloading Brass Cleaning and Sorting Bench
Vintage Trailer Mugs
Trailer Articles
Pulling a Motorcycle Trailer
Building a Motorcycle Trailer
DIY Tent Trailer
Build a Budget Tent Trailer
The Trailer Grows Up
Motorcycle Rallies
Americade Motorcycle Rally

 
Contact Us Privacy Policy Plans License