|
||||||||||||||||||||||||||||||||||||||||
|
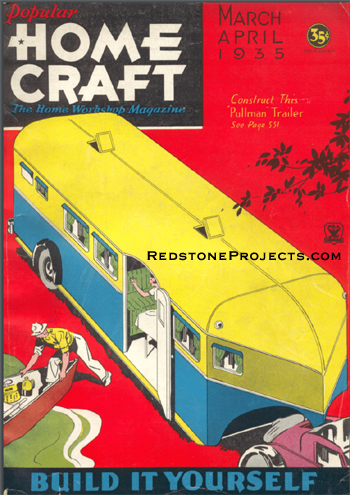
Vintage Trailer Plans Build this Pullman Trailer Yourself
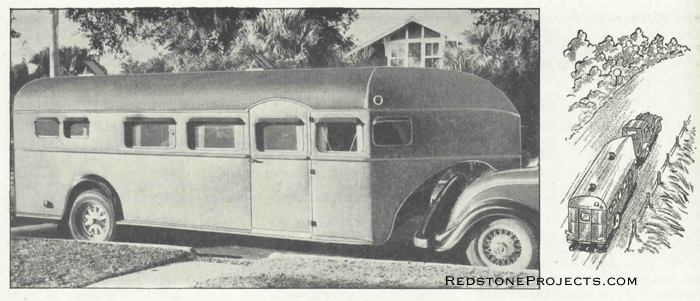
"PULLMAN" Trailer J. C. SPOONER We present here a real home on wheels where you may enjoy all home comforts on the long trail, or on week-end jaunts. Start to build it now so you may be prepared for the vacation days of next summer.
The trails will soon be calling, and with a home such as this trailer is, the craftsman may travel to out-of-the-way places with all the comforts of his own home. Now is the time to make plans, and we can think of nothing better than building this home on wheels in anticipation of your desires. Unquestionably, one of the most comfortable and economical modes of travel today is in a house car trailer. This is evident by the great increase in the number of them on our highways today. The writer recently took a 3,500 mile trip over a period of twenty-five days with four adults in the party for a total expense of one hundred dollars.
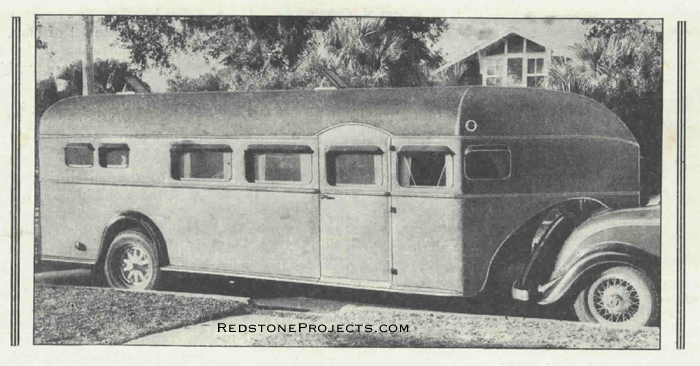
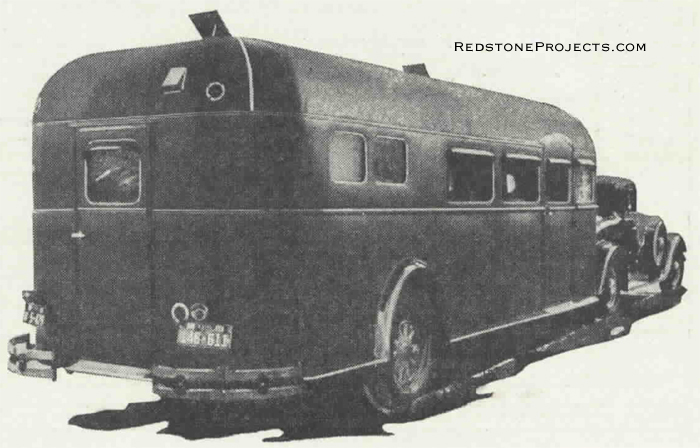
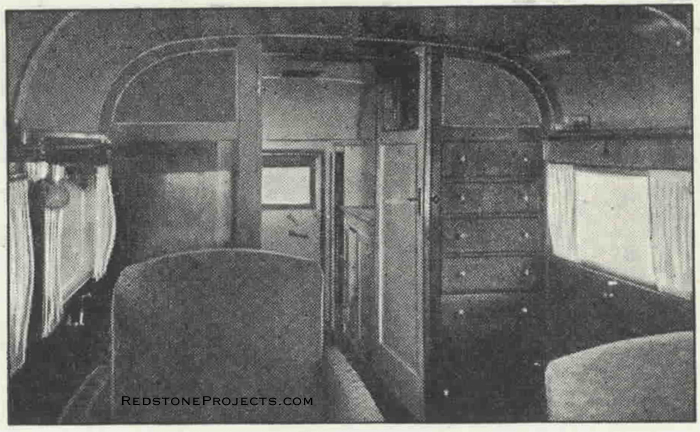
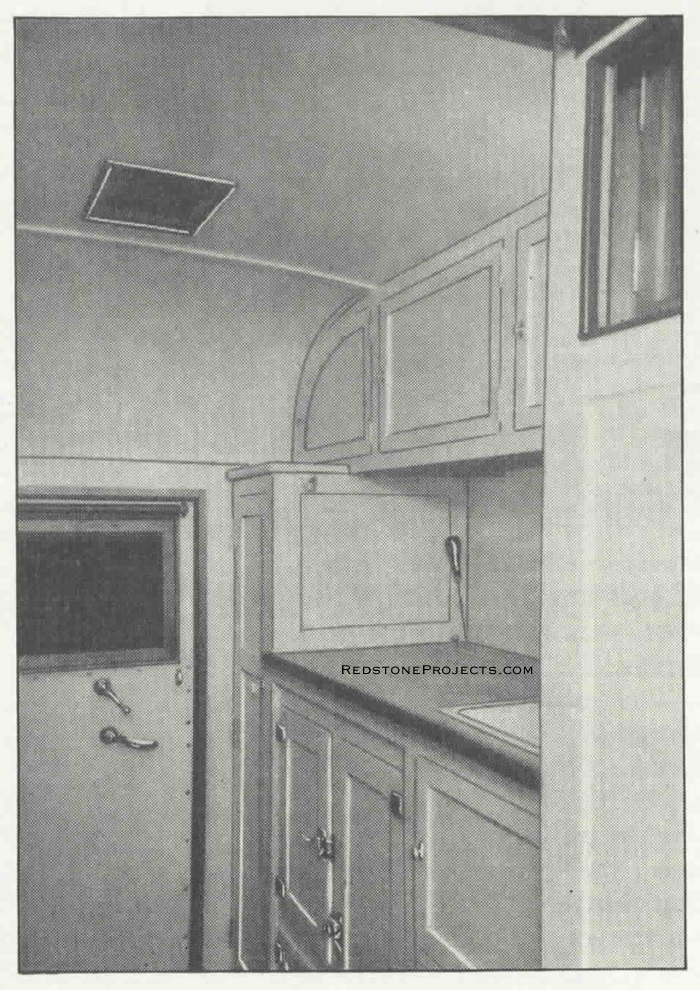
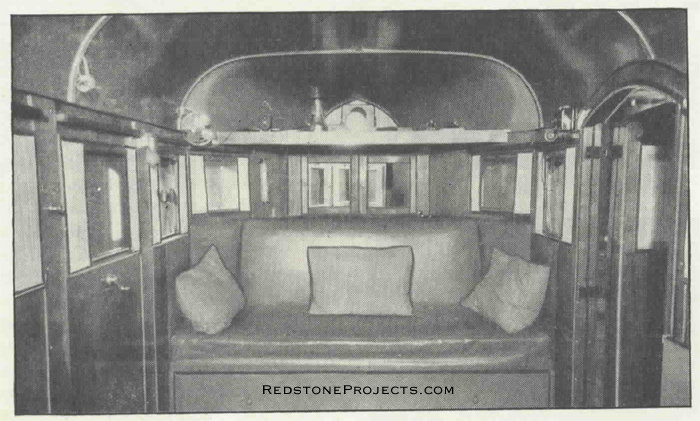
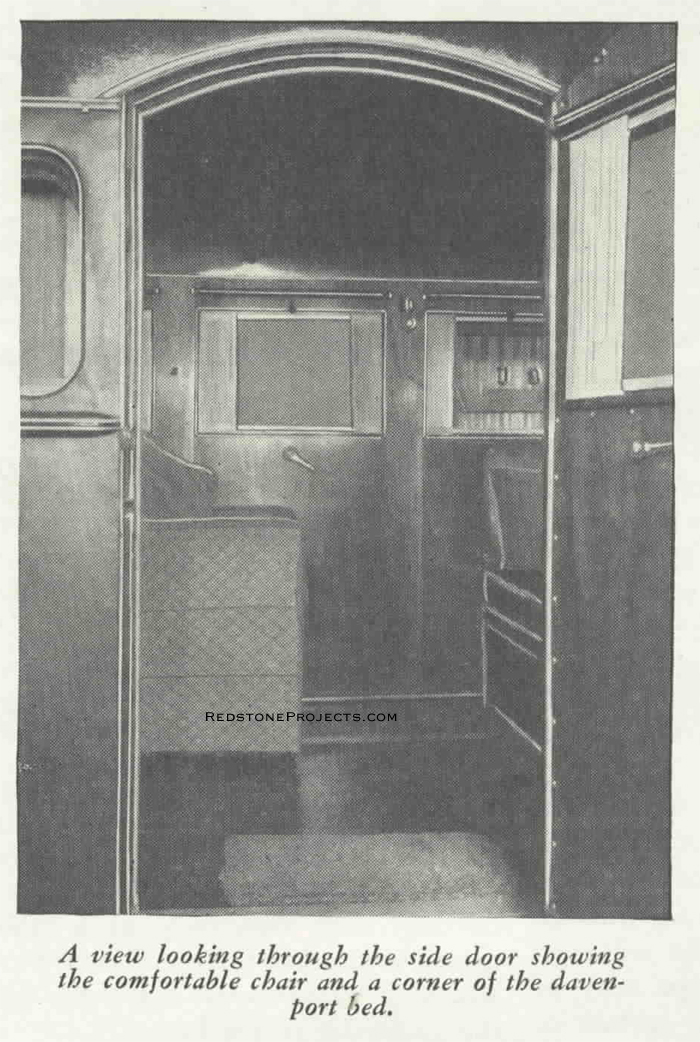
This trailer is roomy, having available accommodations for four persons, or generous facilities for two. It is ideal for travel with children for extensive trips or for weekend jaunts. It tows nicely be-hind any light weight coupe or roadster on the market today and has no side sway or any other undesirable motion ; it gives the sensation of gliding through space. Guests prefer riding in it rather than in the towing car, for there is no heat, fumes or vibration from the motor which might tend to make traveling unpleasant. The construction of this trailer is not a small undertaking but should not prove difficult for the fairly skilled craftsman. It will take patience, perseverance and time in order that the finished trailer may be a credit to the craftsman who builds it. If average care is used in the construction, this trailer should give years of dependable service. Fine Accommodations Provided The accommodations include built-in davenport bed, two single bed chairs, full length clothes closet, drawers for clothing, linen closet, toilet and shower bath, a complete kitchenette with ice box, sink, stove, running water and ample cupboard space.
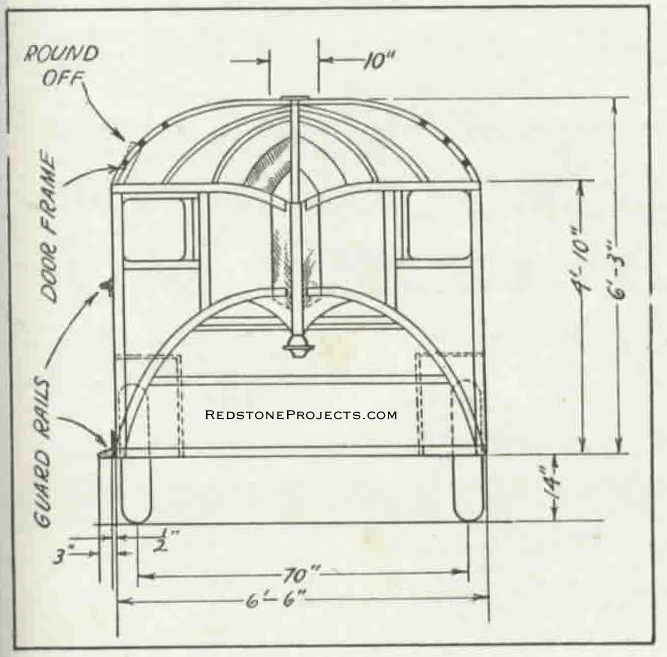
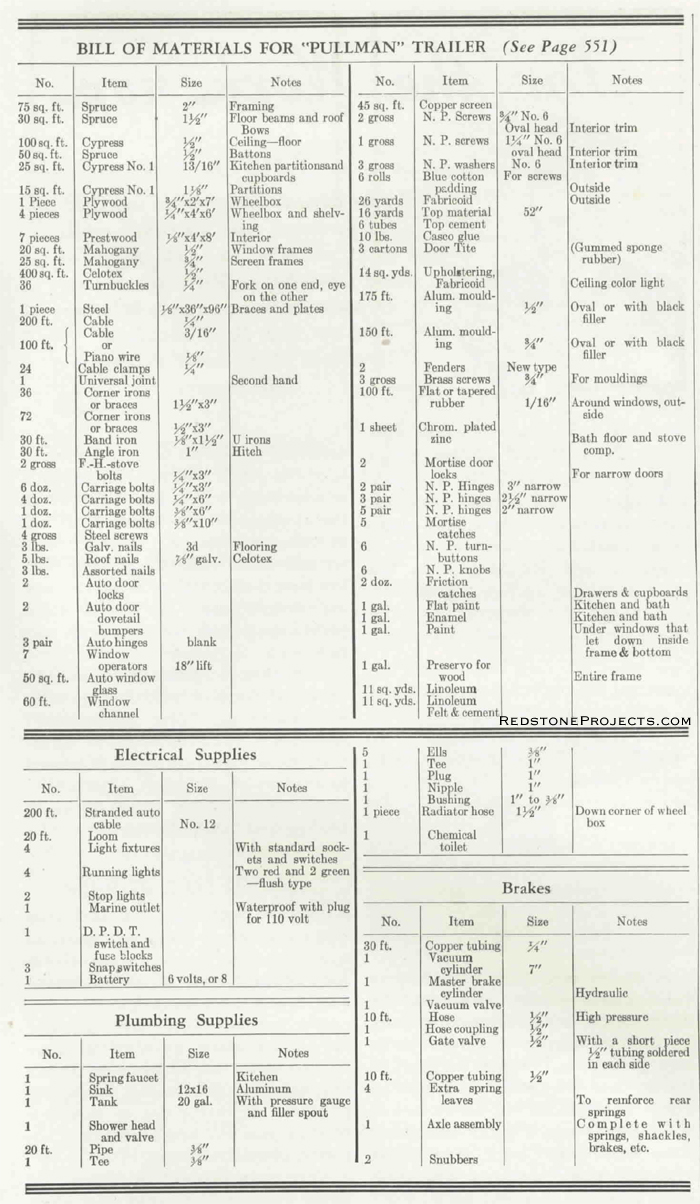
It is equipped with both six volt and 110 volt lighting. It is twenty-three feet long overall, with nineteen feet of usable floor space, six feet, one inch, inside width, and full six foot head room. It will weigh from 3,000 to 3,800 pounds, depending on the equipment used. It is very hard to give an accurate estimate of the cost of building this trailer because of the great difference in prices of materials in various parts of the country. However, this car can be built for from $700.00 to $900.00. The cost may be varied considerably by the use of various priced materials. For instance, this trailer is covered with the best grade of Dupont's Fabricoid, whereas there are several lower grades on the market. These figures include all sheet metal and machine shop work, as it is expected that the majority of builders will hire this work done. All plumbing materials, lighting equipment, beds, hitch and mechanical equipment, as well as the more common materials such as lumber, celotex, upholstering and bolts are included in this price range. The drawings of the trailer are sufficiently detailed so that any craftsman who understands the reading of drawings can easily obtain all essential dimensions. The plan view and elevations give all salient dimensions, and the numerous details of important parts and sections provide additional data which is not included on the plan view and elevations. While no figure numbers are referred to in discussing the building of this trailer, each detailed part is clearly indicated so that ready reference may be made to each sketch discussed. Also, space does not permit us to give all instructions in this issue, and, therefore, certain details are included herewith which will be discussed in the next and concluding article. The layout of the interior will also be thoroughly discussed in the final installment.
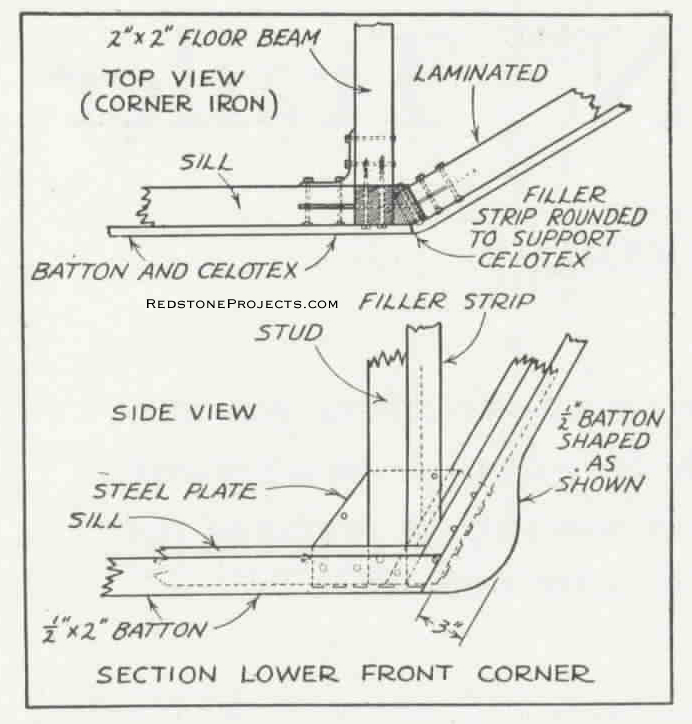
We will take it for granted that the average craftsman who is considering building this trailer will have a fairly complete set of hand tools. It would be advisable to have the use of a few motor driven machines, such as a circular saw, band saw and drill press. However, these are not necessary, providing you can have some of this mill work done at your local lumber dealer's. An electric hand drill of one-half inch capacity is almost indispensable. It will be necessary, before starting construction, to make six small horses fourteen inches high and about two feet long on which to assemble the trailer. Axle and Spring Assembly This trailer is not built directly on a chassis, although this procedure may be followed if desired. The sketches show clearly how the body may be attached to the chassis. The springs should be slung under the axle with a three inch block between the two. Two heavy 5/8" U bolts are used on each side to hold the spring to the axle. The strength of the springs will have to be determined by weighing the car and any good spring plant will make you up the right spring. The springs are mounted on the front with a conventional auto shackle and spindle, which should be fitted with an Alomite fitting. The rear end of the spring may be held with a conventional auto flexible shackle or the shackle shown, which employs two pieces of fine web canvas belting to take the flex of the spring. A frame of one inch angle iron is made to hold this spring, which should be well made and welded. This angle iron frame is bolted where possible to the floor timbers and where not possible to u s e bolts, lag screws may be used. The front spring shackle is bolted to a piece of 1" x 6" channel iron, which in turn is bolted to the floor beams. This will distribute the weight over three floor beams. Refer to the drawings for all necessary details. Construction of Frame Make all the individual parts possible before starting to assemble the frame. These include the wheel box, axle tunnel, curved pieces and floor beams. Rip out and dress to 2" x 2" a quantity of spruce for framing, which should be as straight as possible. The dimensions are given on the drawings and the shape of all curved pieces are also given. The curved pieces are made up of 1/4" spruce strips a little wider than two inches, to allow for dressing. No steaming will be necessary. Lay the lines down on a wood floor, using wooden cleats nailed to the floor for clamping. Use enough high-grade glue and sufficient clamps. Make a form for the rear corners and roof bows. The wheel box is made up of 1/4" plywood with the back piece of 3/4" plywood. The inside of the wheel box is lined with celotex, where the tires throw stones, cinders and mud, for the purpose of deadening noise.
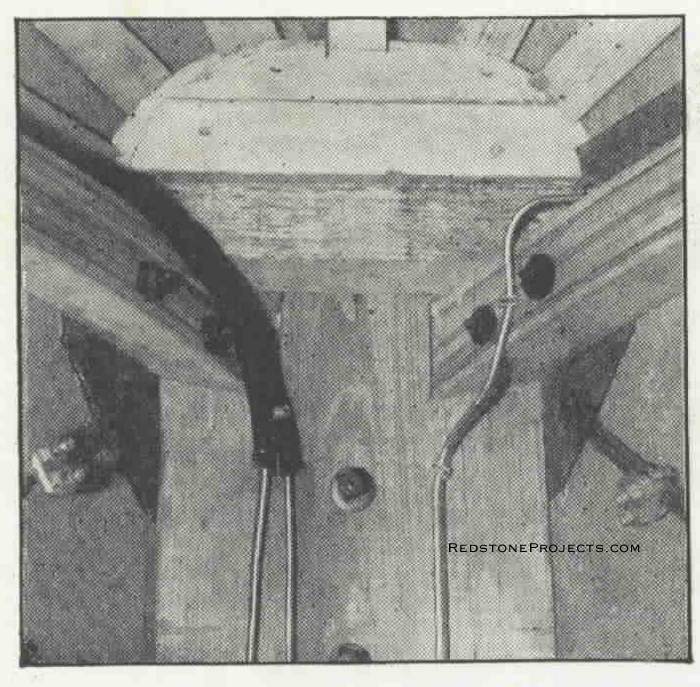
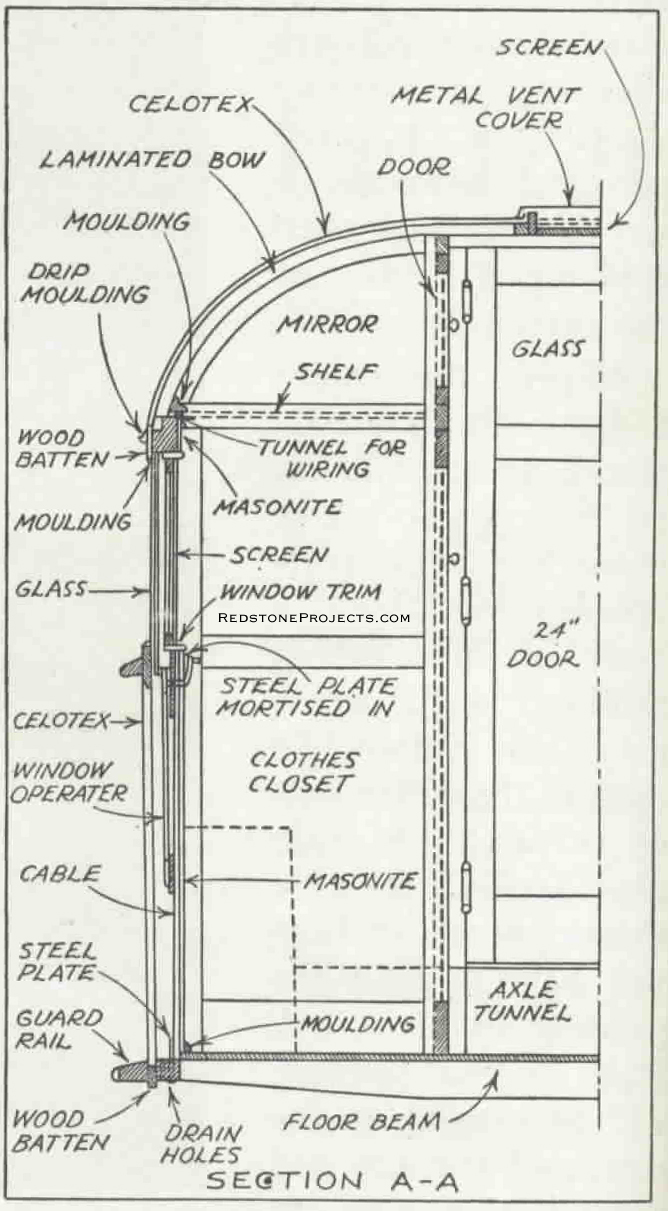
Assemble the base sill, setting in rear corners with half-lap joints, placing the wheel box at the proper location and setting the two curved pieces that connect this sill to the nose block. The nose block should be set up in place and temporarily fastened to 2" x 4" stock. Lay out and mark where the studs will come and start setting in the floor beams. The floor beams are 1 1/2" thick and are tapered from three inches at the center to two inches at the ends and should be spaced approximately on sixteen inch centers. This will vary a little as no floor beam should coincide with a stud, and is much better if placed two inches from the stud. This is because the floor beams are fastened with U shaped 1/8" x 1 1/2" band irons which go completely around the base sills. Countersink the holes on the top of this U iron and use flat headed stove bolts. This will save a lot of trouble when you lay the flooring. Mark where the slots come for the iron braces to which the cables fasten and saw these. The slots that come where a window lowers into the frame will have to be set off-center, about 3/4" from the inside of sill, so as not to interfere with window operators. The balance will be in the center of the sill. A keyhole saw with a heavy set in the teeth is ideal for this work. The first three floor beams on each side of the wheel box should be straight 2" x 2" pieces. These may be spaced a little closer together, as your springs fasten here, and these beams will carry all the weight on the car. The skid boards, 1/2" x 8" x 8' long, should be fastened to the under side of the floor beams. P u t clamps across the frame to draw the sill and floor beams as tight as possible before bolting. Use plenty of glue on all joints. At this point it is advisable to line up the frame with a chalk line drawn through center marks on the nose block and the floor beams. Setting the Studs We are now ready to set our studs. These may be slotted on the circular saw before setting, remembering that some slots are in the center and some 3/4" from the side. Cut perfectly square ends so that there will be a good butt joint. Be sure the floor is level and then plumb the studs and brace thoroughly. Set the 2" x 3" header on the studs and mark for slots. There are no slots to be cut at top of some studs. Note the side elevation of the trailer. The header can then be taken down to saw the slots and then replaced. Allow the header to extend across the side floor, as this can be sawn out later, when the curved piece for the door opening has been fitted. Set in rear corners and curved pieces from the header to the nose block, using half-lap joints and plenty of glue.
Place all other pieces in the frame as indicated in the drawings. We are then ready to make and set the roof bows. These are made by gluing four 1/4" x 1 1/2" spruce strips together on a form. The roof bows are mortised into the header. When all are set they should be faired up. It will probably be necessary to plane some of the bows down a little. Make and set the ventilator frames and set in flush three small pieces 3/4" x 1" between each roof bow at the sharp turn of the roof, so that the celotex will not sag. The roof bows in the nose will have to be made individually in each case.
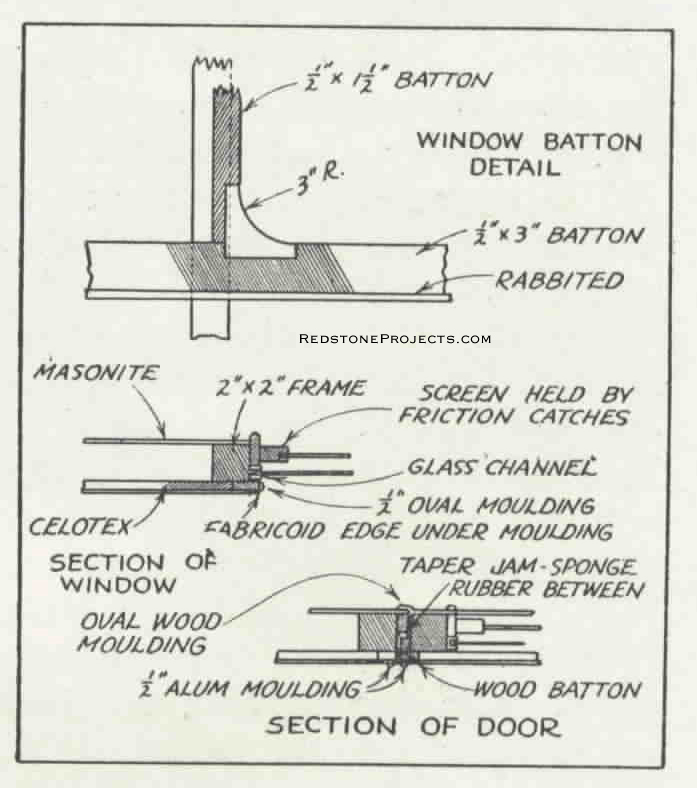
Fasten a 1/2" x 6" batten down the full length of the center of the roof. Rabbet this batten to take the celotex. Use the ends or curved parts of three roof bows and set three pieces in each rear corner. Divide the 90 degrees equally. Fit the curved piece over the side door and construct the doors, allowing for the tapered and offset door jamb which may now be applied. Lay the flooring next, using either 1/2" cypress ceiling smooth side up, or 3/8" plywood. Tempered Masonite flooring may also be used.
"PULLMAN" Trailer J. C. SPOONER This is the second and concluding article on the making of a real "home on wheels." This trailer may be made by any craftsman adept with tools and who possesses patience and a little leisure time.
Naturally, the workman may modify the suggestions to suit his convenience, needs, and his pocketbook. We now proceed to a description of construction where we left off in the preceding issue ; drill several drain holes under windows that let down, inserting a short piece of copper tubing 3/8" in diameter flush with top of sill and extend 1/4" below bottom of sill. Paint frame thoroughly with a wood preservative or a good white lead paint. Red lead all metal plates and parts. Install partitions for bathroom and closets, using Presdwood panels. Use a light weight wood for partition frames, such as white pine, cypress or mahogany. Wiring and Plumbing Install wiring and plumbing to suit individual needs, or, as shown on the drawings. The water system consists of an eighteen gallon range boiler with a 1" filler pipe extended through the side of the trailer at the rear. A cross bar handle is welded to a pipe cap and a regular tire valve inserted into this cap, by means of which the tank is pumped up after filling. Around fifty pounds of air are usually carried. A pressure gauge is in-stalled on top of tank as well as an air valve. A 3/8" pipe is used from the bottom of tank to the sink and shower bath. The battery is carried on the floor along side the left wheel box, beneath the chest of drawers. It is charged from the generator in the towing car, which can be wired up with a double pole switch so that either battery may be charged. Consult a good auto electrician for this job. It would be advisable to make a sheet lead tray to set the battery in to prevent any acid from reaching the woodwork. Use No. 10 or No. 12 stranded wire for charge line and No. 12 or No. 14 stranded wire for the rest of the wiring. Be particularly careful with the radio line, as I found it necessary to connect this line to an eight volt battery because of the drop in voltage. An extra cell added to any ordinary six volt battery, making it eight volts, gives a much better light and takes care of the voltage drop in the radio line so that the radio will work properly. All wires are run on top of the header and are covered with molding. Taper the bathroom floor, using wood shingles. Have a tinsmith make a metal floor to fit this room with sides about two inches high and a drain in the center. Put a wood batten, 1/2" x 1 1/2", around all windows, allowing it to extend over the frame Y2" to cover the window channels. A 1/2" x 1" batten is large enough for the doors and door openings. Saw out and fit round corners for the windows into these battens. Also put a wood batten on the frame wherever there will be a metal molding applied in trimming the outside of the car. The batten to form the outer window sill should be about 3" wide and rabbeted to take the top edge of the Celotex. Place aerial on roof bows. Tighten cables, being careful not to draw frame out of shape, as these turnbuckles exert an enormous pressure. These cables are the backbone of this type of construction, and you will find very little, if any, rattles and squeaks in this trailer, even after the severe usage. The Covering We are now ready to cover the trailer with Celotex. Put this on in as large sheets as possible. Some of the Celotex will have to be rabbeted where it is to fasten to the rabbeted battens. One width of Celotex will reach from the batten in the center sf the roof to the center of the header. Use one long piece under the windows rabbeted at the top edge, using plenty of glue to prevent water from entering. Be sure there is wood behind each butt joint in the Celotex. The two rear corners in the roof and the roof of the nose are applied in triangular pieces and then the sharp corners are rasped down. Galvanized roofing nails are excellent for fastening the Celotex. It is not necessary to steam or wet this material when applying it to any of the curves. Inspect the trailer and smooth all uneven places, as any uneven joint will show through t h e outside upholstering. Apply a layer of blue cotton padding, such as is used in automobile tops, to the entire outer surface. A little glue applied to the Celotex here and there will help to hold the padding in place. A little extra padding will be needed on the rear roof corners and around the nose to help absorb any un-evenness. Dupont's Fabricoid or whatever material you decide to use will come next. For economy, canvas may be used, which is afterwards filled and painted. If sheet metal is used, it is advisable to use it only from the window sill down, bringing the top material down to the metal. If metal is used, the Celotex may be replaced by several wood battens about six inches apart, which are covered with the cotton padding as previously described. Start on the sides and stretch the material tight and tack securely. Try to get the material in one long piece so there will be no seams. If it is necessary to have a seam, put it on the left side of the car. The doors will naturally divide the material into two pieces. It is tacked on the face of the battens around the doors and on the edge of the battens around the windows. These tacks are later covered with aluminum moldings. The top material is put on with one seam down the center of the roof. Cut for the ventilators and allow the material to come up on the sides of the ventilator frame. Cement all seams. A short seam will be necessary on each of the rear corners. Do not drive the tacks all the way in when applying the top material, as it may be necessary to pull some of them and restretch to remove wrinkles.
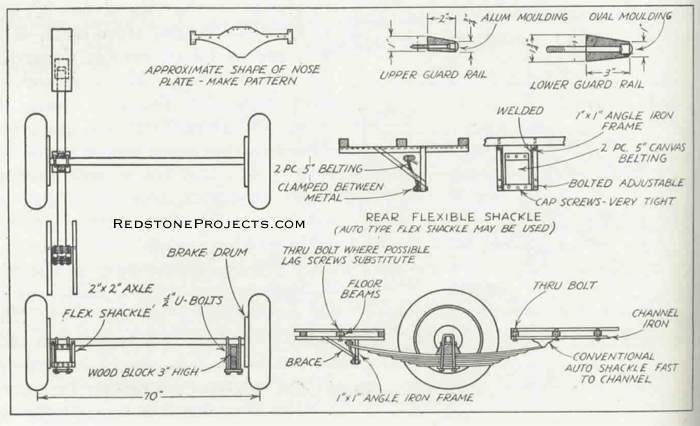
It is a real job, but it can be done with a little patience. A 3/4" aluminum molding runs the full length of the roof, covering the seam in the top material. Another goes completely around the car just above the windows and will cover the seam between the top material and the sides. The part of this molding that is over the windows and doors should be a drip molding. Another molding is placed just below the windows, covering a guard rail that runs the full length of the car. Where the guard rail ends, it should be tapered off and the molding continued on around the car. Another molding is placed at the sill and covers another guard rail here. Set all moldings in top cement. The rest of the molding is 1/2" and one piece is placed around the door frame and one around the door. Another piece should be placed around each window on the edge of the batten. Aluminum molding with a black filler strip is the nicest, but a little expensive. Solid molding costs less and will serve just as well. A big help in forming the molding to the curved corners of the windows is to turn a block of hard wood on a lathe, with the same radius as the curve in the window. Saw this block into several pieces and use these to hammer on. Have a tinsmith make a metal frame to go around the ventilator opening, to cover the edge of the top material, with a flange to fit tightly to the roof. Also get a cover for the ventilator, with a piano hinge on one end. Set all this in top cement. Interior Finish The matter of interior finish is a subject that is hard to cover, as each individual trailer builder will have his own ideas on this subject. It is advisable, however, to upholster the ceiling with a light weight, light colored, washable material, such as one of the Dupont fabrics. The sides should be covered with Presdwood put on in panels and fastened with screws, the joints to be covered with wood moldings. This is advisable so that you can remove the panels to tighten the turnbuckles if found necessary. The cables on the writer's car have not been touched so far, and it has traveled fifteen thousand miles. Paint thoroughly the inside of Celotex and frame under all windows that roll down. The Presdwood may be painted, enameled or varnished. Another very nice finish may be obtained by covering the Presdwood with an imitation leather of selected color. A satisfactory effect may be secured by applying a layer of cotton padding between the Presdwood and the imitation leather. The kitchen and bath should be enameled. If mahogany or walnut lumber can be secured at a reasonable price, use them for window trim, screen frames, doors and all moldings for the main compartment. However, a less expensive wood will serve just as well and it can be stained and varnished to suit. Line and paint the bathroom well, as the shower water must not be allowed to get to the frame or Celotex. A shower curtain is useful, hung across the center of the compartment. A drip molding fastened on the inside and at the bottom of the bath door will keep any water from running under the door into the kitchen. If a chemical toilet is used, vent it out the rear of the trailer. Your tinsmith can make a suitable trim for the opening, with a piece of screen wire soldered to it. The kitchen arrangement is clearly shown on the drawings, but of course, may be changed somewhat. The drain board may be covered with stainless steel, although my wooden board is very satisfactory. The stove compartment is lined with chromium plated zinc with 1/8" asbestos between it and the wood. All cupboard doors should have substantial catches, and all drawers a turn button to prevent them from sliding out. It is advisable to purchase a refrigerator. By shopping around, one of correct size may be found. The light fixtures, secured from a marine supply house, are of the wall bracket type and take a standard sized bulb. Six volt lamps are mainly used in the fixtures, but we carry a few 110 volt lamps and a long extension cord which connects to a marine waterproof fitting in the side of the trailer. This fitting is wired to the switchboard, and by throwing the double pole switch and changing lamps, we are all set for 110 volt lighting. Davenport Bed The davenport bed is constructed with a drawer that pulls out, on which is fastened a flat spring.
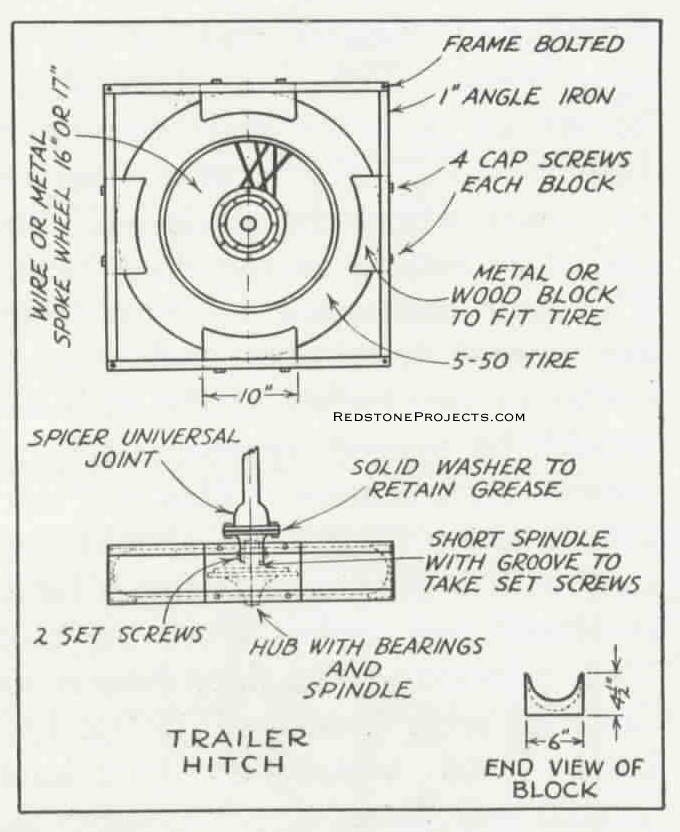
This spring is hinged at the back so that it may he raised to get at the contents of the drawer. Two small foot bolts should be used on this drawer to hold it in place when both closed and open. Roller skate wheels on the bottom will help in opening it. The mattress is then unfolded or opened out onto this drawer to form a double bed. This arrangement is similar to studio couches found on the market. The chair beds may be purchased from a furniture dealer. This arrangement of beds was chosen because the writer does not fancy sleeping in upper berths. The two windows in the nose should be hinged at the top and made to swing out. These should be set in a metal frame which a sheet metal worker can make for you. It will be less expensive to have the windows that hinge at the top, made with square corners, although they can be made with round corners and will look better as they will match the other windows, as shown on the drawings. The two side windows in the kitchen may be made to slide forward into the frame or they may be hinged at the top. The bath window should be hinged at the top. After bolting the running gear through the floor timbers and flooring lay linoleum on the floor with a sheet of felt under it and cement to the floor with a waterproof cement. Be sure to have a little slope in the thresholds of the two outside doors so that water will not run under the door into the car. It is advisable to cover this threshold with sheet aluminum or other metal as it gets a lot of wear. Axle Assembly If you are not very familiar with auto mechanics it will be best for you to let out. the contract for your axle and spring assembly. This should cost around $150.00, exclusive of the tires, providing you are willing to use some secondhand parts. I found it necessary to use such parts, as the cost of the new was prohibitive. Use a 2" square axle of the best axle stock you can secure. The tread is seventy inches. I used parts from an Imperial Chrysler car which had wood wheels 18" in diameter and internal brake shoes. It is advisable to use a good wood or metal spoke wheel. Secure parts from as large a car as possible in order to have large bearings and brake drums.
The springs will vary somewhat according to the weight, but should be about 60" long by 272" wide and approximately fifteen leaves. This will also vary somewhat depending on the thickness of the spring material. Any good spring repair plant can tell how much of a spring you will need if you know the weight. The idea is to secure just the right amount of spring so as to have an easy riding car. They should have a slight curve of three to four inches when loaded. It will be necessary to make a hard wood block to fit between the spring and the axle so that the axle will be in line with the floor of the car. This block will vary in height depending on the strength of the springs but is approximately 3" high. This under slung spring is necessary in order that the trailer may be about 14" to 15" from the ground. The springs can be fastened to the trailer in the conventional manner using a piece of 1" x 6" channel iron long enough to fasten to three floor beams. The spring shackle fastens to this channel iron. If desired, the flexible mounting on the rear end of spring may be made of 1 1/2" angle iron with a couple pieces of 5" canvas belting to take the flex of the spring. See sketch in previous issue. Line wheels up accurately with the trailer and have axle checked for any sag after the load is applied. The channel iron is fastened with carriage bolts where possible, with heads countersunk in the flooring. In some places lag screws will have to be used. It is advisable to place a snubber over each wheel fastened to the wheel box. The 3/4" plywood back should be reinforced with a large piece of band iron where the snubbers fasten. The Brakes Connect the brakes with 1/4" copper tubing. It will be necessary to have three flexible hose connections on the axle. These should be placed so that they will not rub on the frame.
Run the copper tubing to the locker in the nose of the trailer, where it connects to a master brake cylinder. This cylinder is mechanically connected to a vacuum cylinder of five or six inch diameter. It is then connected to a vacuum valve on the towing car with 1/2" copper tubing and a hose connection between trailer and car. It is advisable to put a shut-off valve in this line at the rear of the coupe so that it may be closed when it is desired to run the coupe without the trailer. The vacuum valve is connected to the service brake pedal of the car, with a very strong spring, and also to the intake manifold. This type of brake is very satisfactory and in some ways superior to an air brake. There are several companies making vacuum brake equipment. For economy, purchase a valve and cylinder only and necessary copper tubing and hose from a hardware, and install them yourself. Synchronize the action of the brakes on the trailer with those of the car. Once this is done, there should be no further trouble with the brakes except occasional adjustment for brake shoe wear. It is possible to adjust the brakes on the trailer so that they will take hold just a fraction ahead of the brakes on the towing car.
The universal joint on the nose of the trailer may be fastened to a vertical shaft fitted in the rear end of the coupe or roadster. A better hitch may be made by supporting a small auto wire or metal spoke wheel and tire in a horizontal position in the back of the coupe. A hub, short spindle and bearings are fitted to this wheel to which the universal joint is to fasten. This wheel is suspended by four blocks 10" long that fit the tire, which are in turn held in a frame of light weight 1" x 1' angle iron. This gives an air cushion to the front end of the trailer, which adds to the comfort of riding. These blocks may be made of hardwood hollowed out to fit the tire or a pattern may be made and the four blocks cast of aluminum. A solid washer should be placed between the two halves of the universal joint to hold the grease. Several pieces of 2" x 6" wood are placed under this whole assembly to level the wheel, as the usual car floor is not level and some have a step. These timbers are also used to regulate the height of the trailer from the ground. A groove should be turned in the stub of the spindle of this hitch, in which two set screws placed in the universal joint will fasten. It is then only necessary to loosen these two set screws and jack up the front end of the trailer in order to disconnect the trailer from the car. A used Ford hub and bearing is perfectly satisfactory here, as there is very little strain or motion. The short spindle will have to be turned. A used tire is also satisfactory as there is no wear and the air pressure is only 15 to 20 pounds. The hitch should preferably be placed over the center of the axle of the coupe. The rear end of the coupe may be finished in two ways. A hole may be cut in the rear door of the coupe and properly finished off, through which the stem of the trailer will pass, or the door of the coupe may be taken entirely off and a curtain of DuPont Fabricoid made to fit this opening, with a hole in it for the stem of the trailer. This curtain is fastened with Lift a Dot fasteners. The latter method is preferred, as you may want to dispose of the coupe in favor of a new car in a few years, in which case the rear door is simply replaced. It is very hard to cover every detail in a description of construction, and some small details are, therefore, naturally left to the good judgment of the craftsman. The more important points have been covered in the two articles, and you should have no trouble in construction. Some of you may even find a better method of handling these details than I. However, I am sure you will enjoy building this trailer as well as you will enjoy the many thousands of miles you will travel in it. Finish for the House Trailer The subject of finish for the house trailer which appeared in the two previous issues of POPULAR HOMECRAFT was suggested only. To go into greater detail, we suggest that the exterior be finished completely in enamelized paint. This will require one and one-half gallons for the entire job, roof included. Touch Up Screw Heads The operation would be to first touch up around all screw heads that had been used in assembly, with a very thin coat of the paint. The diagram says that "all screw heads are counter-sunk." After this coating is allowed to dry, fill such places with ordinary window putty. Allow this to dry overnight, then apply one coat of enamelized paint reduced with one pint of high grade thinner per gallon. Apply this with a three-inch enamel brush. Allow this coat to dry overnight, and then apply a second coat, using the paint as it is received. Have Right Temperature The temperature should not be less than 72 degrees Fahrenheit at the time of application and drying. Before the paint operation is started, the job should be thoroughly gone over with a clean dust brush for the removal of all dust and lint. Such places as might be rough as a result of construction, should be sanded smooth before starting the painting operation. The Color Scheme For color scheme, we suggest ivory for the lower part and for the top, cutting in the window section or the upper portion of the body proper with brown. We also suggest two coats of brown for wheels and all under part, including chassis. Another suggestion for exterior would be the use of pearl gray in place of the ivory, and medium green in place of brown. Exterior Work For the exterior work we recommend cream edged in light green, applying first one coat of flat white. Follow the usual recommendation for sanding and cleaning, then apply two coats of enamel over the entire interior; cabinets, tables and interior trim, using cream, and edge this with light green as the construction permits. Jobs done in stain and varnish are ordinarily not at all attractive. The two-tone enamel recommendation makes these very attractive and pleasant to live in. The recommendation for finishing as outlined is not complicated and should appeal to the builder. It is not practical to issue a recommendation such as would be used by the automobile builder, as all of this work will be done by individuals, and the fewer coats used to produce a good result the better.
|